background image

20

DAB Display Modes

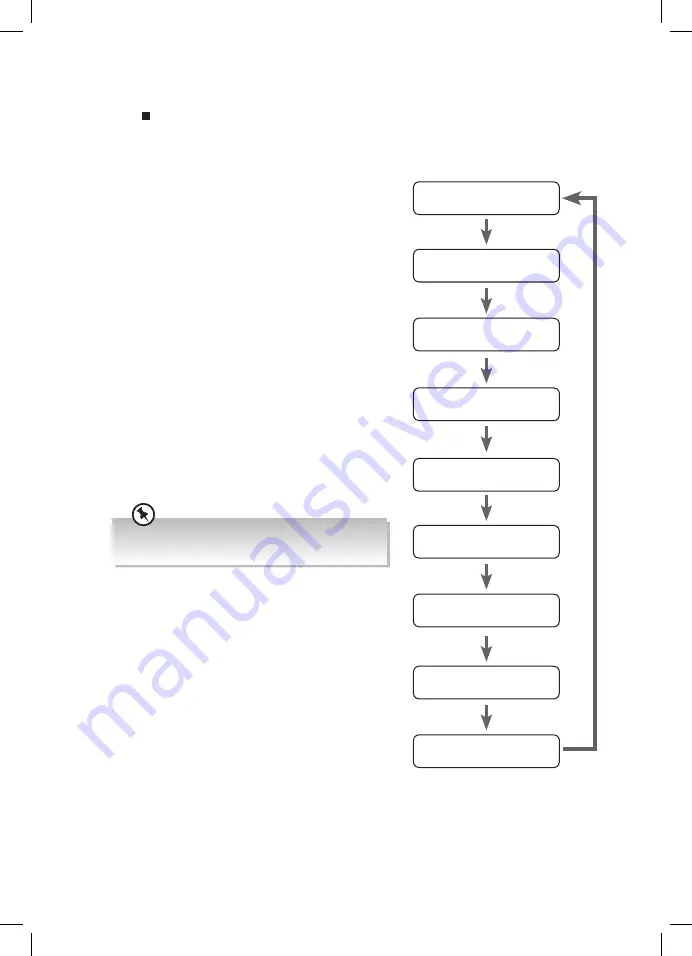
Press   on the unit or SHUFFLE/INFO on the remote control, the display will switch 

through the following display modes.
The information of each display mode is displayed on the lower segment of the display.

DLS (Dynamic Label Segment)
Dynamic label segment is a scrolling message that 

the broadcaster may include with their transmissions. 

The message usually includes information, such as 

programme details etc.
Signal Strength
This shows a slide bar to indicate the signal strength, 

the stronger the signal, the longer the bar will be from 

left to right.
Programme Type
This describes the “style” or “genre” of the programme 

that is being broadcast.
Ensemble
This displays the name of the multiplex that contains 

the station you are listening to. A multiplex is a 

collection of radio stations that are bundled and 

transmitted on one frequency. There are national and 

local multiplexes. Local ones contain stations that are 

specific to that area.

DAB – unlike normal radio, groups together several radio 

stations and transmits them on one frequency.

Channel
This displays the chanel of the present station, such as 

“5A“.
Frequency
This displays the frequency of the present station, such 

as “220.352” (MHz).
Signal Error
This displays a number showing the error rate. If the 

number is 0, it means the signal received is error free 

and the signal strength is strong. If the error rate is high, 

it is recommended to re-orient the aerial or re-position 

the unit.
Audio Bit Rate
The display will show the digital audio bit rate being received.
Time
This displays the current time provided automatically by the broadcaster.
Date
This displays the current date provided automatically by the broadcaster.

DLS

Signal Strength

Ensemble

Frequency

Programme Type

Signal Error

Time

Audio Bit Rate

Date

UX-D327B_IB_Final200407V5.indd   20

08/04/2020   16:24

Summary of Contents for UX-D327B

Page 1: ...Instruction Manual Wireless micro DAB Hi Fi UX D327B UX D327B_IB_Final200407V5 indd 1 08 04 2020 16 24 ...

Page 2: ...UX D327B_IB_Final200407V5 indd 2 08 04 2020 16 24 ...

Page 3: ... 15 System Reset 15 Software Version 15 Clock Operation 16 Manually Setting the Clock 16 Time Display 16 Setting the Sleep Timer 16 DAB Operation 17 Selecting DAB mode 17 First Time Auto Scan 17 Full Scan 17 To Select and Listen to the Found Stations 17 Manual Tuning 17 Secondary Services 18 DRC Dynamic Range Compression 18 Pruning Radio Stations 18 Presetting Stations 18 Recalling Preset Stations...

Page 4: ... Play 24 Using the USB 25 AUDIO IN AUX IN Operation 25 Bluetooth Operation 26 Maintenance 27 Cleaning the Unit 27 Handling Discs 27 Cleaning Discs 27 Storing Discs 27 Hints and Tips 28 Product Fiche and Specifications 30 Useful Information and Licences 31 UX D327B_IB_Final200407V5 indd 4 08 04 2020 16 24 ...

Page 5: ...ry holder tray is secure in the remote control Seek medical advice if you believe a cell has been swallowed Please dispose of batteries correctly by following the guidance in this manual Read all the instructions carefully before using the unit and keep them for future reference Retain the manual If you pass the unit onto a third party make sure to include this manual Check that the voltage marked...

Page 6: ... within the unit s enclosure that may be of sufficient magnitude to constitute a risk of electric shock The exclamation point within an equilateral triangle is intended to alert the user to the presence of important operating and maintenance servicing instructions in the manual accompanying the unit Service To reduce the risk of electric shock do not remove screws The unit does not contain any use...

Page 7: ...ore use and keep this instruction manual for future reference Speakers x 2 Main Unit Instruction Manual FM Aerial Quick Start Guide Remote Control AAA Battery x2 AUTO 1 4 7 0 SLEEP 2 5 8 3 6 9 SHUFFLE REPEAT MENU INFO INTRO PROG PRESET OK ALBUM TUNE VOL VOL EQ CD USB DAB FM UNPAIR LINE IN BT CLOCK ALBUM TUNE Quick Start Guide If items are missing or damaged please contact Partmaster UK only Tel 03...

Page 8: ... AUX IN Socket 5 USB Socket 6 Play Pause Button 7 Stop Menu Button Press to Stop playback Press and hold to enter the Menu 8 Button 9 Button 10 Button 11 Open Close Button 12 SPEAKER OUT 6Ω L R Sockets 13 FM ANTENNA Socket 1 2 3 4 5 6 7 8 9 10 11 12 13 UX D327B_IB_Final200407V5 indd 8 08 04 2020 16 24 ...

Page 9: ...n 15 OK Button 16 VOL Button 17 TUNE Button 18 Mute Button 19 Button 20 BT UNPAIR Button 21 DAB FM Button 22 SLEEP CLOCK Button 23 SHUFFLE INFO Button 24 REPEAT MENU Button AUTO 1 4 7 0 SLEEP 2 5 8 3 6 9 SHUFFLE REPEAT MENU INFO INTRO PROG PRESET OK ALBUM TUNE VOL VOL EQ CD USB DAB FM UNPAIR LINE IN BT CLOCK ALBUM TUNE 1 2 3 12 19 18 21 20 22 23 24 14 17 16 15 4 5 6 7 8 9 13 10 11 UX D327B_IB_Fina...

Page 10: ... in this manual Do not dispose of the used battery as domestic waste Dispose of it in accordance with local regulations Handling the Remote Control Be aware of your fingernails when removing the battery cover and the battery Do not drop the remote control Do not allow anything to impact the remote control Do not spill water or any liquid on the remote control Do not place the remote control on a w...

Page 11: ... between the infrared remote sensor of the unit and remote control If you install the unit on rack etc the remote controllable range may decrease depending on the thickness or colour of glass door of rack Do not expose the infrared remote sensor to direct sunlight or other strong light such as inverter fluorescent light 30 30 Max 6 m AUTO 1 4 7 0 SLEEP 2 5 8 3 6 9 SHUFFLE REPEAT MENU INFO INTRO PR...

Page 12: ...s at the back of the speakers to the SPEAKER OUT 6Ω L R sockets at the rear of the unit Do not overtighten this could damage the aerial To avoid noise keep aerial away from the unit the connecting cables and the mains cable Rear View of the Main Unit Rear View of the Main Unit Rear View of the Right Speaker Rear View of the Left Speaker UX D327B_IB_Final200407V5 indd 12 08 04 2020 16 24 ...

Page 13: ...re all audio connections of the unit are connected before connecting to the mains power socket Make sure the mains plug is firmly inserted into the mains socket To switch the unit off completely remove the mains plug from the mains socket Please turn the unit off completely to save energy when not in use Use the mains cable as the disconnect device The disconnect device shall remain readily operab...

Page 14: ...g from the mains socket Please turn the unit off completely to save energy when not in use ECO Power Mode The unit features an ECO Power Standby mode It automatically turns to Standby mode after 15 minutes if the unit is idle in LINE IN BT Bluetooth DISC or USB mode or the external unit is disconnected switched off or the volume is too close to mute Selecting Modes Press the button on the unit or ...

Page 15: ...mote control and then press or on the unit or TUNE TUNE on the remote control to select SYSTEM Press on the unit or OK on the remote control to confirm 2 Press or on the unit or TUNE TUNE on the remote control to select RESET Press on the unit or OK on the remote control to confirm 3 Press or on the unit or TUNE TUNE on the remote control to select Y and then press on the unit or OK on the remote ...

Page 16: ...unit is in ON mode press and hold SLEEP CLOCK button to display the clock Setting the Sleep Timer Use the sleep timer to turn the system o after a certain number of minutes in play mode By setting the sleep timer you can fall asleep to music and know that your system will turn o by itself rather than play all night 1 While the unit is in ON mode press SLEEP CLOCK on the remote control repeatedly t...

Page 17: ...vate auto scan The display will show a progressing slide bar Or 1 Press REPEAT MENU button The display will show FULL SCAN Press OK button the remote control to start auto scan Using the unit 1 Press and hold button The display will show FULL SCAN Press button to start auto scan The display will show a progressing slide bar 2 All the stations that have been found will be stored automatically To Se...

Page 18: ...the unit or OK button on the remote control to confirm Pruning Radio Stations You may remove all unavailable stations from the list 1 Press on the unit or REPEAT MENU on the remote control and then press or or TUNE TUNE on the remote control to select PRUNE Press on the unit or OK on the remote control to confirm 2 Press or or TUNE TUNE on the remote control to select PRUNE Y Press on the unit or ...

Page 19: ...enu 2 Press TUNE or TUNE to select your desired preset station number 3 Press OK button to confirm Using the Main Unit Press PROG PRESET on the remote control to enter the preset menu 1 Press or to select your desired preset station number 2 Press to confirm The stored stations will be saved into the memory and power off will not erase it Storing a new station into a preset location will erase the...

Page 20: ...dled and transmitted on one frequency There are national and local multiplexes Local ones contain stations that are specific to that area DAB unlike normal radio groups together several radio stations and transmits them on one frequency Channel This displays the chanel of the present station such as 5A Frequency This displays the frequency of the present station such as 220 352 MHz Signal Error Th...

Page 21: ... by pressing TUNE or TUNE button repeatedly Each press will adjust the frequency by 0 05MHz If reception is still poor adjust the position of the aerial or try moving the radio to another location Scan Settings By default FM scans stop at any available station This may result in a poor signal to noise ratio hiss from weak stations 1 Press and hold on the unit or REPEAT MENU on the remote control a...

Page 22: ...Press to confirm 3 The station will be stored and the screen will then show STORED Recalling Preset Stations To recall a preset you must first have stored preset stations in the unit Using the Remote Control Press or to select your desired preset station OR Simply recall the preset station by pressing 0 9 on the remote control OR 1 Press PROG PRESET to enter the preset menu 2 Press TUNE or TUNE to...

Page 23: ...n on the unit or remote control to close the tray 3 After closing the disc tray the unit will read the disc and play it automatically If there is no disc or the disc can t be read NO DISC will show on the display If in stop mode please press the button to start playing the disc 4 Press to pause the playback the time elapsed indicator will flash To resume playback press again 5 Press AUTO to stop t...

Page 24: ...lay Press the SHUFFLE INFO button The display will show RANDOM and then start random play Press the SHUFFLE INFO button twice The display will show OFF and cancel random play Programme Play You can program up to 20 tracks to play in any desired order 1 Make sure the disc is inserted and in STOP mode 2 Press PROG PRESET button to enter the programme mode The display will show 01 PR 01 for CD or 001...

Page 25: ... file format of MP3 only If your USB device is loaded with MP3 files but the display keeps showing NO SONG on the display the format of your USB device might not be compatible with the unit The unit can support USB devices with up to 32 GB of memory The unit may not be compatible with all USB devices this is not an indication of a problem with the unit AUDIO IN AUX IN Operation 1 While in ON mode ...

Page 26: ...rts A2DP play music via your device If your Bluetooth device supports AVRCP use supplied remote control to control play To pause resume playback press To skip to a track press or Turn the VOL VOL dial on the unit or press the VOL VOL buttons on the remote control to increase or decrease the volume The operational range between the unit and the device is approximately 10 metres Before connecting a ...

Page 27: ... from the centre outwards with a soft cloth Always keep the disc clean If you cannot wipe off the dust with a soft cloth wipe the disc lightly with a slightly moistened soft cloth and finish with a dry cloth Do not use any type of solvent such as thinner benzine commercially available cleaners or antistatic spray They may damage the disc Storing Discs Do not store discs in places subjected to dire...

Page 28: ...sure that the unit is not muted Press the or the VOL VOL on the remote control or turn the VOL VOL dial on the unit to resume normal listening Press on the unit or on the remote control to switch the unit to standby mode Then press the button again to switch the unit on Unplug the unit from the mains socket then plug them again Switch on the unit The unit does not respond when pressing any buttons...

Page 29: ...ion not found Weak signal Search manually Bluetooth Problem Solution I cannot find UX D327B on my Bluetooth device Ensure the Bluetooth function is activated on your Bluetooth device Ensure you have paired your unit with the Bluetooth device If any functional abnormality is encountered unplug the unit from the mains socket and reconnect it again UX D327B_IB_Final200407V5 indd 29 08 04 2020 16 24 ...

Page 30: ...y bands 2 4 GHz 2 480 GHz Unit Dimension W D H 180 mm 245 mm 120 mm Speakers Section Impedance 6 Ω Output RMS Power 2 x 5 W Speaker Box Dimension W D H 128 mm 225 mm 125 mm Compact Disc Section Optical Pickup 3 Beam Laser Frequency Response 100 Hz 10 kHz Radio Section Frequency Range DAB 174 928 239 200 MHz Band III FM 87 5 108 MHz USB Section USB Memory Stick Memory Size Up to 32 GB Features and ...

Page 31: ... the environment For more information about where you can drop off your waste for recycling please contact your local authority or where you purchased your product Notes for Battery Disposal The batteries used with this product contain chemicals that are harmful to the environment To preserve our environment dispose of used batteries according to your local laws or regulations Do not dispose of ba...

Page 32: ...Ltd declares that this product is in compliance with Directive 2014 53 EU The full text of the EU declaration of conformity is available at the following internet address teamknowhow com Click on SEARCH and enter the model number DSG Retail Ltd co no 504877 1 Portal Way London W3 6RS UK EU Representative DSG Retail Ireland Ltd 259460 3rd Floor Office Suite Omni Park SC Santry Dublin 9 Republic of ...

Reviews: