background image

5

ENGLISH

7

BLUE CHECK button

Displays only the blue signals.

• The button lights while this function is activated.
• Pressing the button again restores the normal screen.

By using this function with the standard color-bar
currently used, you can check if CHROMA (picture
color density) or PHASE (picture hue) is adjusted
properly.
Also you can check if “COMPO. LEVEL” (the
adjustment level of the component signal) is
adjusted properly for the component signal or the
SDI signal.

NOTE:

This function is not available to the RGB signal.

1 Display the standard color-bar currently used

on the screen.

2 Press the BLUE CHECK button.

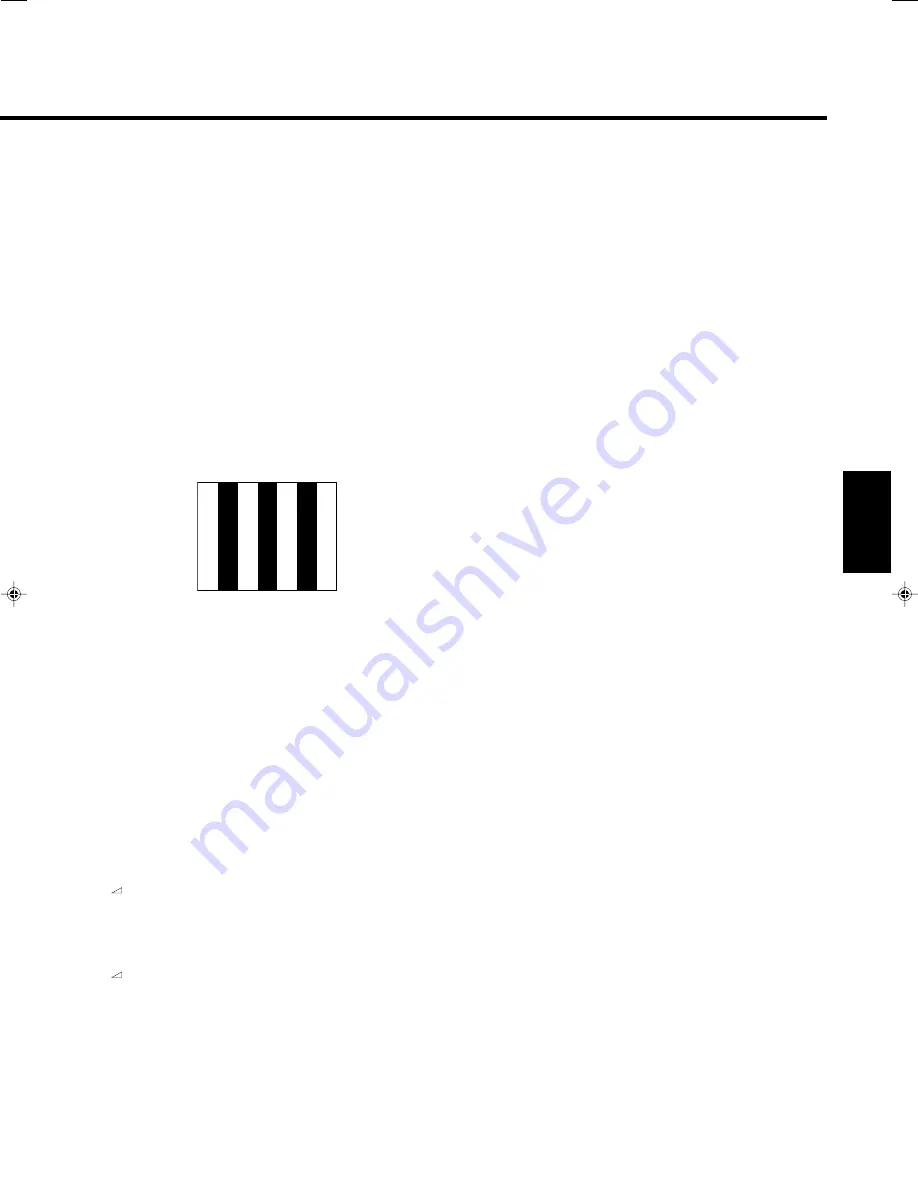
The following display appears on the screen.

3 If the brightness of the blue bars on the left

and right sides are the same, CHROMA
(picture color density) is adjusted properly.

• For the component signal or the SDI signal, if the

brightness of the blue bars on the left and right sides
are the same, “COMPO. LEVEL” is adjusted properly.

4 If the brightness of two blue bars in the

middle are the same, PHASE (picture hue) is
adjusted properly.

• PHASE should be checked only when the NTSC

signal is being input.

If the brightness of each blue bar is different, make the
following adjustment in the blue checking state:

When the composite signal or the Y/C (S-video) signal is being
input:

By using the CHROMA/PHASE button and the VOLUME/SELECT
(–

+) buttons, adjust CHROMA or PHASE so that brightness of the

blue bars on the left and right sides are the same.

When the component signal or SDI signal is being input:

Press the MENU button to display MENU, select “COMPO. LEVEL” by
pressing the 

%

/

 buttons.

Then, adjust “COMPO. LEVEL” by pressing the VOLUME/SELECT
(–

+) buttons so that brightness of two blue bars in the middle are

the same.

• Be sure to adjust CHROMA for the composite signal or the Y/C

(S-video) signal before adjusting “COMPO. LEVEL.”
If you change the CHROMA adjustment for other signal formats
than the component signal after “COMPO. LEVEL” has been
adjusted, you need to adjust “COMPO. LEVEL” again.

8

ASPECT button

Changes the aspect ratio from 4:3 to 16:9.

• The button lights while the aspect ratio is 16:9.
• Pressing the button again returns the aspect ratio to 4:3.

9

INPUT SELECT buttons

Select an input to display.

A:

Select the video signal input to the VIDEO A terminal
and the audio signal input to the AUDIO A terminal.

B:

Select the video signal input to the VIDEO B terminal
and the audio signal input to the AUDIO B terminal.

\

When both an Y/C (S-video) signal and a composite signal
are input to the VIDEO B terminal,  the Y/C signal has
priority over the composite signal.

C/D (SLOT):

Select the signal input to the input card installed in the
input card slot on the rear panel.

\

For details about how to select the input signal through the
input card, see pages 7 and 8.

• The corresponding button of the input currently selected

lights up.

p

Power lamp

Unlit:

The main power is off.

Orange:

The main power is on and the monitor is in stand-
by mode.

Green:

The monitor is on.

q

Stand-by button

Turns on and off the monitor when the main power
is on.

NOTE:

You can set the delay time between when the stand-by button is
pressed and when the monitor actually turns on. See “RUSH
DELAY” on page 12.

w

Speaker

A built-in speaker is on the side panel.

Blue

Blue

Blue

Blue

[04-09]_TM-H150CG.p65

04.1.17, 4:05 PM

5

Summary of Contents for TM-H150CG

Page 1: ...MONITOR ESPAÑOL ITALIANO FRANÇAIS DEUTSCH ENGLISH LCT1564 001A H For Customer Use Enter below the Serial No which is located on the rear of the cabinet Retain this information for future reference Pour l usage du client Enter ci dessous le numéro de série qui est situé sur l arrière du coffret Conserver cette information pour une référence ultérieure Model No Numéro de modèle Serial No Numéro de s...

Page 2: ... INSTRUCTIONS COLOR VIDEO MONITOR TM H150CG Thank you for purchasing this JVC color video monitor Before using it read and follow all instructions carefully to take full advantage of the monitor s capabilities ...

Page 3: ...completion of any servicing or repair work to this unit please ask the service personnel to perform the safety check described in the manufacturer s service literature When this unit reaches the end of its useful life improper disposal could result in a picture tube implosion Ask qualified service personnel to dispose of this unit This monitor is equipped with a 3 blade grounding type plug to sati...

Page 4: ...cted by surrounding magnetic fields which can generate irregular color on the screen When it is difficult to eradicate degauss from outside using a degausser etc Fuse POWER CONNECTION The power supply voltage rating of this product is AC 120 V For U S A and Canada only and AC 220 240 V For European countries or United Kingdom the power cord attached conforms to the following power supply voltage a...

Page 5: ...if no operation has been done for about 10 seconds The adjustment level bar also disappears if you press MENU button NO EFFECT will appear for about 3 seconds if the function you select has no effect 3 VOLUME SELECT buttons Adjusts the volume These buttons are also used to select the items on the menu screen while the menu screen is displayed Pressing or button displays the VOLUME level bar on the...

Page 6: ...NU button to display MENU select COMPO LEVEL by pressing the fi buttons Then adjust COMPO LEVEL by pressing the VOLUME SELECT buttons so that brightness of two blue bars in the middle are the same Be sure to adjust CHROMA for the composite signal or the Y C S video signal before adjusting COMPO LEVEL If you change the CHROMA adjustment for other signal formats than the component signal after COMPO ...

Page 7: ...he VIDEO B terminal the Y C signal has priority over the composite signal y AUDIO A terminal Input IN and output OUT terminals for analog audio signals The IN and OUT terminals are bridge connected auto termination NOTE Use the VIDEO A terminals for the corresponding video signals u AUDIO B terminal Input IN and output OUT terminals for analog audio signals The IN and OUT terminals are bridge conn...

Page 8: ... signal input output terminals for both SDI 1 and SDI 2 Input IN and output OUT terminals for the analog audio signals The IN and OUT terminals are bridge connected 7 SDI Input Card IF C01SDG 7 Acceptable signal formats when installed on this monitor 525 60i 625 50i B PB B Y G Y OUT IN OUT IN R PR R Y OUT IN VD OUT IN HD CS OUT IN OUT IN AUDIO OUT IN 1 2 3 4 AUDIO2 AUDIO1 OUT IN SWITCHED OUT SDI 1...

Page 9: ...cted IN1 or IN2 is re clocked and output from this terminal NOTES No signal is output from the SWITCHED OUT terminal when the main power is turned off Even when the input signal is switched from the SDI Input Card the SWITCHED OUT terminal still outputs the IN1 or IN2 re clocked signal which is selected last time The re clocked signal from IN1 is output from the SWITCHED OUT terminal when the moni...

Page 10: ...r panel of the monitor 5 Secure the Input Card by using the screws removed in step 2 NOTES The input card or the monitor may be damaged if you do not turn off the main power of the monitor before installing the input card Do not touch the terminals or the patterns on the circuit board of the input card Attach the slot cover when the input card slot is not in use Slot cover Fit the board to the gui...

Page 11: ... set at the factory You can adjust the standard value as your initial setting CONTRAST Adjusts contrast BRIGHT Adjusts brightness CHROMA2 Adjusts color density PHASE2 Adjusts hue H POSITION Adjusts the horizontal position of the screen V POSITION Adjusts the vertical position of the screen WHITE BALANCE Adjusts the white balance R CUTOFF Adjusts the cut off point of the red signal G CUTOFF Adjusts...

Page 12: ...COLOR SYSTEM COMPO LEVEL RUSH DELAY EXIT 7 Initializing the Settings You can initialize the following settings of the monitor MENU SET UP MENU picture adjustment volume level 1 Press the stand by button to turn off the monitor on stand by 2 While holding down both the MENU button and the fi button press the stand by button to turn on the monitor NOTE Keep pressing both the MENU button and the fi but...

Page 13: ...y used For details see page 5 RUSH DELAY Sets the delay time between when the stand by button is pressed and when the monitor actually turns on STD Power turns on about 1 second after the stand by button is pressed SLOW Power turns on about 3 seconds after the stand by button is pressed NOTE It is recommended to apply SLOW to some of the monitors if you need to turn on multiple monitors at the sam...

Page 14: ...to SET UP MENU H POSITION Adjusts the horizontal position of the screen NOTE You can adjust H POSITION separately for each video input Select the video input you want to adjust beforehand 05 00 05 Moves the screen to the left Moves the screen to the right V POSITION Adjusts the vertical position of the screen NOTE You can adjust V POSITION separately for each video input Select the video input you...

Page 15: ...the monitor and adjusting volume The menu operations are also prohibited ON Activates this function OFF Deactivates this function NOTES When CONTROL LOCK is set to ON CONTROL LOCK ON appears on the screen if you try to operate the monitor You can deactivate this function on SET UP MENU when CONTROL LOCK is set to ON STATUS DISPLAY If COLOR SYSTEM is set to AUTO you can display the color system NTS...

Page 16: ...terminal works to change the input between INPUT A opening and INPUT B short circuiting when INPUT REMOTE in SET UP MENU is set to A B 2 These pin terminals are not in use when INPUT REMOTE in SET UP MENU is set to A B Do not connect these pin terminals in such a case 3 The 14th pin terminal External control should be controlled by the make contact system even when selecting TRG the trigger system...

Page 17: ...on the power of the connected component and set it correctly Select the correct input with the INPUT SELECT buttons Check if the input signal format is acceptable to the monitor or the input card Connect the audio cable firmly Set the connected component correctly Adjust the volume with the VOLUME SELECT buttons Set each picture adjustment to the standard level 00 Or set each item in PICTURE SUB A...

Page 18: ...to OFF Change the setting of the external control so that the monitor can be operated by the buttons on the front panel The following are not malfunctions When a bright still image such as a white cloth is displayed for a long period it may appear to be colored This is due to the structure of the cathode ray tube and will disappear when another image is displayed You may sometimes experience a mil...

Page 19: ... 1 line monaural RCA pin x 2 0 5 V rms high impedance bridge connection possible Point of contact connection 1 line D sub connector 15 pin 3 line 1 W 8 cm round x 1 impedance of 8 Ω Operation temperature 5 C 40 C 41 F 104 F Operation humidity 20 80 non condensing 120 V 220 240 V AC 50 Hz 60 Hz 1 2 A 120 V AC 0 8 A 220 240 V AC Width 360 mm 14 1 4 Height 310 mm 12 1 4 Depth 418 mm 16 1 2 16 kg 35 2...

Page 20: ...nt Side 7 Acceptable Signal Formats Acceptable Not acceptable Input Signals NTSC 3 58 MHz PAL Black and White 50 Hz 60 Hz 480 60i 525i 576 50i 625i EMBEDDED AUDIO Analog audio When an input card not supplied is installed Terminals on the IF C01COMG IF C01SDG IF C21SDG IF C51SDG rear of the monitor 7 Y C Mini DIN 4 pin terminals 2 1 2 1 4 3 4 3 Pin No Signal 1 GND Y 2 GND C 3 Y 4 C For details abou...

Page 21: ...VICTOR COMPANY OF JAPAN LIMITED Printed in Thailand 0204MKH MW MT 2004 VICTOR COMPANY OF JAPAN LIMITED TM H150CG COLOR VIDEO MONITOR ...

Reviews: