


35
34
*
*
*
*
*
*
*
*
*
*
*
*
*
*
*
*
*
*
*
*
*
*
*
4
*
*
*
*
*
*
*
*
*
*
*
F
*
C
O
V
S
A
B
P
H
H
O
I
*
L
N
I
R
L
U
R
O
O
T
N
*
O
S
D
I
A
Z
O
L
U
H
*
C
C
E
/
R
Z
G
I
R
E
*
K
R
O
E
M
E
R
D
R
*
*
E
/
X
/
R
A
A
M
*
*
[
S
E
V
T
S
/
M
Y
E
M
M
E
N
T
*
E
I
*
*
T
*
E
E
T
/
R
M
N
N
T
S
E
*
N
N
*
F
*
O
S
*
I
E
R
*
U
U
*
.
M
D
O
O
M
T
*
*
*
]
*
D
O
E
R
U
E
*
*
*
*
*
*
I
D
*
*
T
R
*
*
*
*
*
*
S
E
*
M
*
*
*
*
*
*
P
*
*
O
*
*
*
*
*
*
*
*
*
*
*
D
*
*
*
*
*
*
*
*
M
*
*
E
*
*
*
*
*
*
*
*
O
*
*
*
*
*
*
*
*
*
*
*
D
*
*
*
*
*
*
*
*
*
*
*
E
*
*
O
O
*
*
O
O
*
*
*
*
*
*
N
N
*
*
N
N
*
*
*
*
*
*
*
*
*
1
1
1
*
*
*
*
1
3
5
7
9
1
3
5
*
*
*
*
:
:
:
:
:
:
:
:
*
*
*
0
0
0
–
–
–
–
–
*
*
*
S
–
–
–
–
–
–
–
–
–
T
[
T
–
–
–
–
–
–
–
–
–
U
H
A
:
–
–
–
–
–
–
–
–
E
O
R
–
–
–
–
–
–
–
–
–
*
L
T
–
–
–
–
–
–
–
–
–
W
I
*
:
:
:
:
:
:
:
:
*
E
D
S
–
–
–
–
–
–
–
–
–
D
A
T
–
–
–
–
–
–
–
–
–
*
Y
O
:
:
:
:
:
1
1
1
1
T
*
P
–
2
4
6
8
0
2
4
6
H
S
*
–
:
:
:
:
:
:
:
:
U
E
*
*
*
*
*
*
*
*
*
*
*
T
S
–
–
–
–
–
–
–
–
–
F
]
P
–
–
–
–
–
–
–
–
–
R
*
D
–
–
–
–
–
–
–
–
–
I
*
*
–
–
–
–
–
–
–
–
–
*
*
*
1
–
–
–
–
–
–
–
–
S
*
P
–
–
–
–
–
–
–
–
–
A
*
G
–
–
–
–
–
–
–
–
–
T
*
M
–
–
–
–
–
–
–
–
–
*
*
*
*
*
*
*
*
*
1
1
1
*
*
*
*
1
3
5
7
9
1
3
5
*
*
*
*
:
:
:
:
:
:
:
:
*
*
*
0
0
0
–
–
–
–
–
*
*
*
S
0
1
1
2
2
0
0
0
1
T
[
T
0
5
1
1
9
1
3
5
5
U
H
A
:
–
–
–
–
–
–
–
–
E
O
R
0
*
L
T
0
5
2
3
4
5
5
5
8
W
I
*
T
:
:
:
:
:
:
:
*
E
D
S
0
–
–
–
–
–
–
–
–
D
A
T
0
–
–
–
–
–
–
–
–
*
Y
O
:
:
:
:
:
1
1
1
1
T
*
P
0
2
4
6
8
0
2
4
6
H
S
*
0
:
:
:
:
:
:
:
:
U
E
*
*
*
*
*
*
*
*
*
*
*
T
S
2
1
2
1
0
2
2
–
–
F
]
P
4
5
3
0
3
3
3
–
–
R
*
D
0
–
–
–
–
–
–
–
–
I
*
*
–
1
1
1
1
–
–
*
*
*
1
9
9
0
1
1
2
–
–
S
*
P
–
–
–
–
–
–
–
–
–
A
*
G
O
–
–
–
–
–
–
–
–
T
*
M
N
–
–
–
–
–
–
–
–
*
*
*
D
M
T
W
T
F
S
D
*
*
*
*
A
O
U
E
H
R
A
A
D
*
*
*
Y
N
E
D
U
I
T
Y
A
*
*
*
0
0
0
–
–
–
–
–
I
*
[
S
1
–
–
–
–
–
–
–
L
–
P
T
0
–
–
–
–
–
–
–
Y
–
R
A
:
:
:
:
:
:
:
:
*
–
O
R
0
–
–
–
–
–
–
–
S
*
G
T
0
–
–
–
–
–
–
–
E
W
R
*
:
:
:
:
:
:
:
:
T
E
A
S
1
–
–
–
–
–
–
–
*
D
M
T
7
–
–
–
–
–
–
–
*
*
*
O
:
:
:
:
:
:
:
:
*
–
T
P
0
–
–
–
–
–
–
–
*
–
I
*
0
–
–
–
–
–
–
–
*
–
M
*
*
*
*
*
*
*
*
*
*
*
E
S
–
–
–
–
–
–
–
–
S
–
R
P
–
–
–
–
–
–
–
–
U
–
]
D
4
–
–
–
–
–
–
–
N
–
*
*
8
–
–
–
–
–
–
–
*
*
*
*
1
6
5
–
–
–
–
–
M
S
*
P
–
–
–
–
–
–
–
–
O
A
*
G
O
–
–
–
–
–
–
–
N
T
*
M
N
–
–
–
–
–
–
–
*
*
*
*
S
M
T
W
T
F
S
D
*
*
*
*
U
O
U
E
H
R
A
A
D
*
*
*
N
N
E
D
U
I
T
Y
A
*
*
*
0
0
0
–
–
–
–
–
I
*
[
S
–
–
–
–
–
–
–
–
L
T
P
T
–
–
–
–
–
–
–
–
Y
U
R
A
:
:
:
:
:
:
:
:
*
E
O
R
–
–
–
–
–
–
–
–
S
*
G
T
–
–
–
–
–
–
–
–
E
W
R
*
:
:
:
:
:
:
:
:
T
E
A
S
–
–
–
–
–
–
–
–
*
D
M
T
–
–
–
–
–
–
–
–
*
*
*
O
:
:
:
:
:
:
:
:
*
T
T
P
–
–
–
–
–
–
–
–
*
H
I
*
–
–
–
–
–
–
–
–
*
U
M
*
*
*
*
*
*
*
*
*
*
*
E
S
–
–
–
–
–
–
–
–
S
F
R
P
–
–
–
–
–
–
–
–
U
R
]
D
–
–
–
–
–
–
–
–
N
I
*
*
–
–
–
–
–
–
–
–
*
*
*
*
1
6
5
–
–
–
–
–
M
S
*
P
–
–
–
–
–
–
–
–
O
A
*
G
–
–
–
–
–
–
–
–
N
T
*
M
–
–
–
–
–
–
–
–
*
*
*
*
D
M
T
W
T
F
S
D
*
*
*
*
A
O
U
E
H
R
A
A
D
*
*
*
Y
N
E
D
U
I
T
Y
A
*
*
*
0
0
0
–
–
–
–
–
I
*
[
S
1
–
–
–
–
–
–
–
L
T
P
T
0
–
–
–
–
–
–
–
Y
U
R
A
:
:
:
:
:
:
:
:
*
E
O
R
0
–
–
–
–
–
–
–
S
*
G
T
0
–
–
–
–
–
–
–
E
W
R
*
:
:
:
:
:
:
:
:
T
E
A
S
1
–
–
–
–
–
–
–
*
D
M
T
7
–
–
–
–
–
–
–
*
*
*
O
:
:
:
:
:
:
:
:
*
T
T
P
0
–
–
–
–
–
–
–
*
H
I
*
0
–
–
–
–
–
–
–
*
U
M
*
*
*
*
*
*
*
*
*
*
*
E
S
–
–
–
–
–
–
–
–
S
F
R
P
–
–
–
–
–
–
–
–
U
R
]
D
4
–
–
–
–
–
–
–
N
I
*
*
8
–
–
–
–
–
–
–
*
*
*
*
1
6
5
–
–
–
–
–
M
S
*
P
*
–
–
–
–
–
–
–
O
A
*
G
O
–
–
–
–
–
–
–
N
T
*
M
N
–
–
–
–
–
–
–
*
*
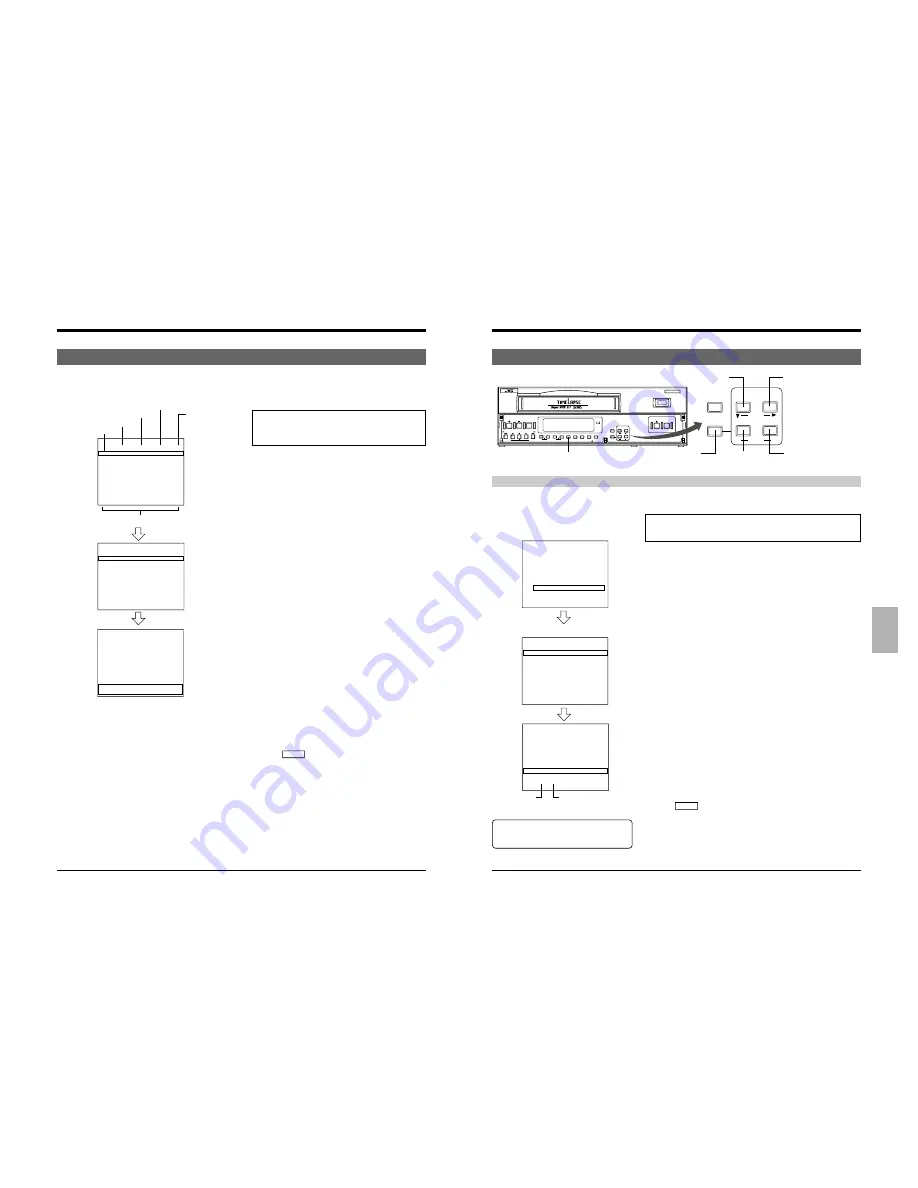
SR-S990E
VIDEO CASSETTE RECORCER
REC
REC
STOP
REC
CHECK
EJECT
OPERATE
REVERSE
FIELD REV
FIELD ADV
REW
PLAY
TRACKING
TIMER SEARCH
RESET/
CANCEL
DISPLAY LOCK CNT RESET
MENU
TIME MODE
SHIFT
ON SCREEN
OPERATE
V. LOCK
PAUSE
FF
–
+
–
+
S E T
–
+
RESET/
CANCEL
MENU
TIME MODE
SHIFT
ON SCREEN
S E T
–
+
VHS
PAL
625
6-3 Timer Recording
6-3 Timer Recording
5
Programming timer recording for more than one day
(every day)
This programming is to timer-record at the same time on
specified days of the week.
(Example)
Recording is performed in the 48-hour timelapse mode
from 10:00 a.m. to 5:00 p.m. on Monday, Wednesday and
Saturday.
1
Repeat steps 1 to 3 in “Timer Recording Program
Setting” on page 31.
2
Set the day of the week on <PROGRAM TIMER> to
“DAY” with the [SET +/–] button.
3
Press the [SHIFT
f
] button so that the “hour” for the
start time blinks and set “hour” to “10” with the [SET +/–]
button.
4
Press the [SHIFT
f
] button so that the “minute” for the
start time blinks and set “minute” to “00” with the [SET +/
–] button.
5
Press the [SHIFT
f
] button and [SET +/–] button to set
the hour of the stop time to “17”, the minute of the stop
time to “00”, the recording speed to “48” and “PGM” to
“ON”.
6
Set the days of the week when timer recording is to be
executed (Monday, Wednesday, Saturday).
Set the days with “DAILY SET” at the lower section of
the screen.
• Press the [SHIFT
7
] button so that “SUN” in the
second line from the bottom blinks.
7
Press the [SET +/–] button to set “SUN” to “– –”.
8
Press the [SHIFT
f
] button to select the day of the
week and set the operating day of the week with the
[SET +/–] button.
Set the items for “Tuesday”, “Thursday” and “Friday” to
“– –”.
• Timer recording will take place on the days of the week
shown on the display. Timer recording will not take
place on days of the week indicated by “– –”.
9
End timer program setting.
Press the [MENU] button twice.
[
The normal screen is restored.
0
Press the [TIMER] button.
[
The TIMER indication and active timer program
numbers light on the display and the operating mode
is automatically turned off to engage the Timer-
Recording Standby mode.
6 RECORDING
[SHIFT
7
] button
6 RECORDING
[SHIFT
f
] button
[MENU] button
[SET +] button
[SET –] button
[TIMER] button
PROGRAM TIMER screen
Day of the week
Start time
Stop time
Recording speed
ON: Enabled
OFF: Disabled
DAILY SET
PROGRAM
NO.
1
2
3
4
5
6
7
8
Holiday Timer Recording Setting
This lets you preset the VCR to record on specified dates (such as holidays) at any time over a period of a year. Up to 16
dates can be set. When holiday settings and program settings overlap, holiday setting is given priority
Main menu screen
(Example)
Recording is performed in the 240-hour timelapse mode from
00:00 a.m. to 0:00 a.m. the next day.
1
Press the [MENU] button to show the main menu on the monitor.
2
Call the <HOLIDAY SET> screen.
• Press the [SHIFT
7
] button to select <HOLIDAY SET> in the main
menu and press the [SET +/–] button.
3
Press the [SET +/–] button to set the hour of the start time to “0” and
press the [SHIFT
f
] button.
[
“Minute” for the start time blinks.
4
Press the [SET +/–] button to set the minute of the start time to “00” and
press the [SHIFT
f
] button.
[
“Hour” for the stop time blinks.
5
Press the [SET +/–] button to set the hour of the start time to “00” and
press the [SHIFT
f
] button.
“T” is shown at the beginning of the stop time.
* When the stop time is earlier than the start time or the same as the
start time, the stop time is assumed to be the next day and “T” is
added to the beginning of the stop time.
6
Press the [SHIFT
f
] button and [SET +/–] button to set the minute of
the stop time to “00”, the recording speed to “240” and “PGM” to “ON”.
7
Set the date.
• Press the [SHIFT
f
] button or [SHIFT
7
] button to select the line
and enter the day for timer recording with the [SET +/–] button.
• Press the [SHIFT
f
] button so that the month item on the selected
line blinks and enter the month for timer recording with the [SET +/–]
button.
8
End holiday timer recording setting.
Press the [MENU] button twice.
[
The normal screen is restored.
9
Press the [TIMER] button.
[
The TIMER indication lights on the display and the operating mode
is automatically turned off to engage the Timer-Recording Standby
mode.
* The timer program numbers are not shown on the display.Recording
Standby mode.
HOLIDAY SET screen
• When “PGM” is set to “OFF”, the setting is
disabled and holiday timer recording is not
executed.
Day
Month


