background image

Filename [VS30U_1a-EN.fm]

Masterpage:Left

38


EN

Page 38

January 31, 2002 3:35 pm

PLAYBACK/RECORDING ON DV DECK (cont.)

Playback Features

(DV deck)

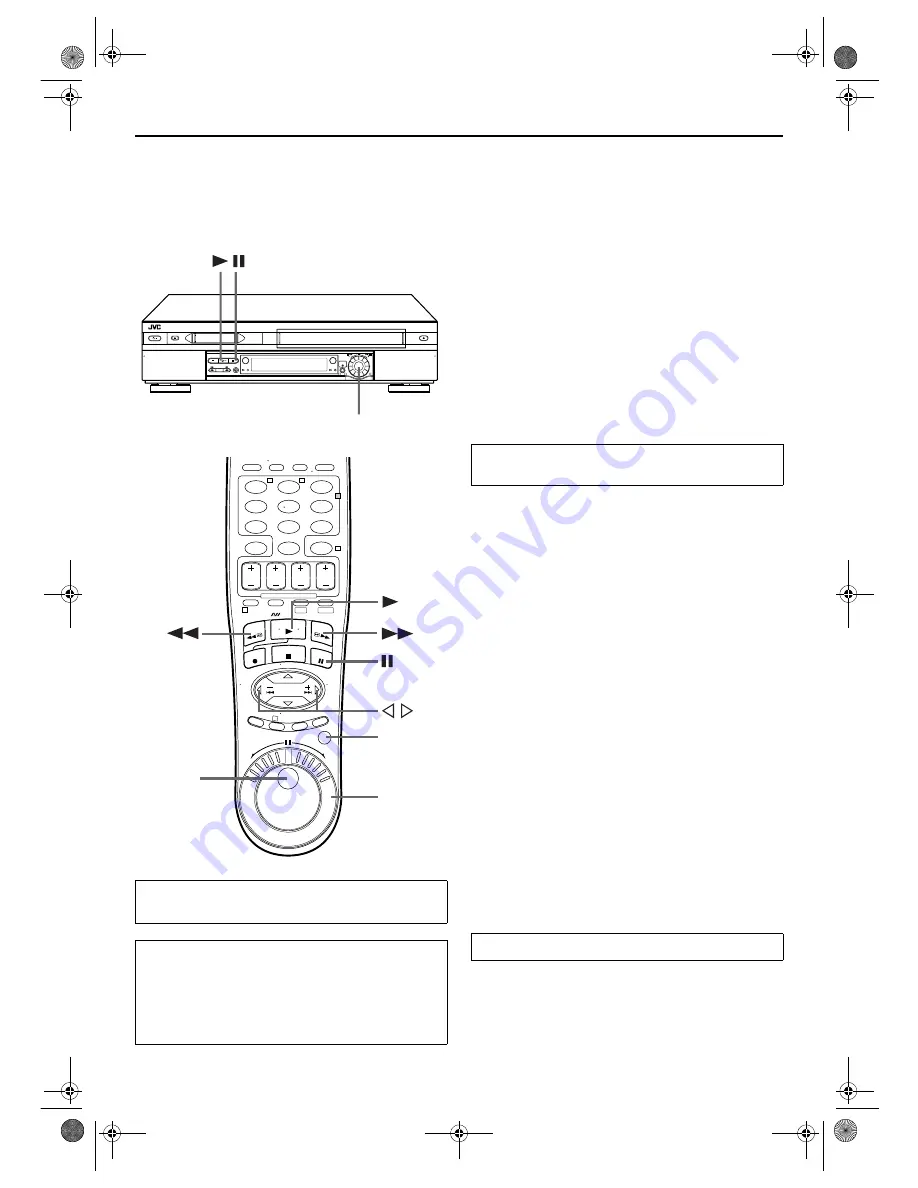
Still Picture/Frame-By-Frame 
Playback (On the VCR)

1

Pause during playback.

Push the 

ADVANCED JOG

 dial.

OR

Press 

PAUSE

(

9

).

2

Activate frame-by-frame playback.

Turn the 

ADVANCED JOG

 dial to the right for forward 

frame-by-frame playback, or to the left for reverse frame-
by-frame playback.

OR

Press 

PAUSE

(

9

) to advance a still picture.

NOTE:

Still picture playback stops automatically after 3 minutes to 
protect the heads.

Slow Motion (On the VCR)

During playback, turn the 

ADVANCED JOG

 dial one 

click to the left for forward slow motion. To play in 
reverse slow motion, continue to turn the 

ADVANCED 

JOG

 dial to the left.

OR

During still picture, press and hold 

PAUSE

(

9

) for more 

than 2 seconds, then release. Press 

PAUSE

(

9

) and 

release again to return to still picture.

NOTE:

Forward slow motion playback stops automatically after 1 
minute, reverse slow motion playback after 30 seconds to 
protect the heads.

High-Speed (Turbo) Search 
(On the VCR)

During playback, turn the 

ADVANCED JOG

 dial quickly 

to the left or right.

Variable Speed Search (On the VCR)

During playback, turn the 

ADVANCED JOG

 dial to the 

right for forward variable-speed search, or to the left for 
reverse variable-speed search.

ATTENTION

Picture may appear distorted during variable speed search.

Clean the video heads using a dry cleaning 
cassette — M-DV12CL — when:

No picture during playback.

Blocks of noise appear during playback.

“USE CLEANING CASSETTE” appears on the screen (only 
with “SUPERIMPOSE” set to “ON” (

pg. 71)).

1

3

2

ADVANCED JOG 
dial

1

2

3

4

5

6

7

8

9

0

2

4

1

3

T

W

DV

S-VHS

JOG/
SHUTTLE 
button

SHUTTLE 
ring

JOG dial

To resume normal playback, press 

PLAY

(

4

) or push 

the 

ADVANCED JOG

 dial.

To resume normal playback, press 

PLAY

(

4

).

VS30U_1a-EN.fm  Page 38  Thursday, January 31, 2002  3:35 PM

Summary of Contents for SR-VS30U

Page 1: ...L Ð MENU OK JOG SHUTTLE T I D E A R T U O N I T R A T S S VHS REC DUB DV DV S VHS CH PUSH TURN 24HR QUICK PROGRAM PULL OPEN PULL OPEN REW FF PAUSE PLAY STOP EJECT POWER EJECT Filename VS30U_Cov1 EN fm Mini DV S VHS VIDEO CASSETTE RECORDER For Customer Use Enter below the Model No and Serial No which are located on the rear of cabinet Retain this information for future reference Model No Serial No ...

Page 2: ...orporates copyright protection technology that is protected by method claimes of certain U S patents and other intellectual property rights owned by Macrovision Corporation and other rights owners Use of this copyright protection technology must be authorized by Macrovision Corporation and is intended for home and other limited viewing users only unless otherwise authorized by Macrovision Corporat...

Page 3: ...ire or electric shock 4 Power Cord Protection Power supply cords should be routed so that they are not likely to be walked on or pinched by items placed upon or against them paying particular attention to cords at plugs convenience receptacles and the point where they exit from the product 5 Ventilation Slots and openings in the cabinet are provided for ventilation To ensure reliable operation of ...

Page 4: ...rvicing to qualified service personnel 2 Damage Requiring Service Unplug this product from the wall outlet and refer servicing to qualified service personnel under the following conditions a When the power supply cord or plug is damaged b If liquid has been spilled or objects have fallen into the product c If the product has been exposed to rain or water d If the product does not operate normally ...

Page 5: ...g 37 Playback Features 38 Still Picture Frame By Frame Playback On the VCR 38 Slow Motion On the VCR 38 High Speed Turbo Search On the VCR 38 Variable Speed Search On the VCR 38 Still Picture Frame By Frame Playback On the Remote 39 Slow Motion On the Remote 39 High Speed Turbo Search On the Remote 39 Variable Speed Search On the Remote 39 Next Function Memory 40 Soundtrack Selection 40 Recording ...

Page 6: ...pg 26 27 N DV IN OUT connector i Link 墌 pg 56 i Link refers to the IEEE1394 1995 industry specification and extensions thereof The logo is used for products compliant with the i Link standard O Dubbing Direction DV S VHS Indicators 墌 pg 52 53 P Dubbing DUB Button 墌 pg 52 53 Dubbing Direction Buttons 墌 pg 52 53 Q REC 7 Button 墌 pg 27 37 R DV mode Indicators 墌 pg 36 37 S Remote Sensor T Front Displa...

Page 7: ... VIDEO AUDIO IN Connectors 墌 pg 56 58 D S VIDEO OUT Connectors 墌 pg 13 58 E VIDEO AUDIO OUT Connectors 墌 pg 58 F AC Power Cord 墌 pg 12 G ANTENNA OUT Connector 墌 pg 12 H CABLE BOX Connector 墌 pg 20 23 I Cooling fan This prevents the temperature from rising inside the VCR Do not remove it Install the VCR so as not to block the area around the fan The fan may be activated even if the VCR is turned of...

Page 8: ... 48 E Tape Remaining Time Indicator VHS deck only 墌 pg 33 F S VHS Indicator VHS deck only 墌 pg 72 G Cassette Loaded Mark H Counter Remain Display VHS deck only 墌 pg 33 Time Code Display DV deck only 墌 pg 41 Channel Mode Display L 1 or F 1 墌 pg 14 Clock Display 墌 pg 14 PLAY FF REW VARIABLE SEARCH STILL SLOW RECORD RECORD PAUSE AUDIO DUBBING AUDIO DUBBING PAUSE INSERT INSERT PAUSE AV INSERT AV INSER...

Page 9: ... 墌 pg 26 36 f PAUSE 9 Button 墌 pg 27 37 g w e Button 墌 pg 29 39 TV Volume VOL Button 墌 pg 67 h Random Assemble Edit R A EDIT Button 墌 pg 64 i Random Assemble Edit IN OUT Button 墌 pg 64 j JOG SHUTTLE Button 墌 pg 29 39 k SHUTTLE Ring 墌 pg 29 39 Buttons with a small dot on the left side of the name can also be used to operate your TV with the VCR TV CABLE DBS switch set to TV 墌 pg 67 How To Use Befor...

Page 10: ...an Index Search 墌 pg 30 The position of q in relation to B beginning or E end shows you where you are on the tape NOTE Depending on the type of tape being used the tape position indicator may not appear correctly E Index number 墌 pg 30 F Tape Remaining Time Indicator G Counter Display 墌 pg 33 H Audio Mode Display 墌 pg 31 I VHS Indicator J SAP Indicator 墌 pg 34 K Stereo program Indicator 墌 pg 34 L ...

Page 11: ...dicator ERROR indicator appears when you start dubbing a tape with a copy protection signals or when Audio Dubbing or Insert Editing is not possible depending on the condition E Time Code Display 墌 pg 41 76 F Audio Mode Display 墌 pg 40 G DV Indicator H SAP Indicator 墌 pg 41 I Stereo program Indicator 墌 pg 41 J Day Clock Display K Channel Position Number Auxiliary Input Indicator L 1 or F 1 Dubbing...

Page 12: ... TV s mode refer to the instruction manual of your television To obtain high quality S VHS pictures you can also use the S VIDEO connection described on page 13 D Connect the VCR to power source Plug the end of the AC power cord into an AC outlet The clock and tuner channels will automatically be set when the antenna is connected and when the AC power cord is first connected to an AC outlet 墌 pg 1...

Page 13: ...ront display panel before the VCR is powered on the clock and tuner channels are being set automatically Wait for the time to be displayed on the front display panel before powering on the VCR NOTES You can obtain high quality S VHS pictures To operate the VCR with your TV using the S VIDEO connection set your TV to its AV mode You can also use the TV VCR button on the VCR s Remote to set your TV ...

Page 14: ... data from the PBS channel If this function is taking a considerable amount of time it may be necessary to perform the Semiauto or Manual Clock Set procedure 1 3 2 INFORMATION If AUTO CLOCK is set to ON 墌 pg 17 the clock will be adjusted automatically by the host channel every hour except 11 00 PM midnight 1 00 AM and 2 00 AM using the incoming PBS channel clock setting data This automatic clock a...

Page 15: ...ccess the Main Menu screen Press MENU C Access the Initial Set screen D Select the language E Return to the normal screen Press MENU Turn on the TV and select the AV mode 1 2 3 4 5 6 7 8 9 0 2 4 1 3 T W DV S VHS Press rt to move the highlight bar arrow to INITIAL SET then press OK or e Press rt to move the highlight bar arrow to LANGUAGE then press OK or e repeatedly until the desired language is ...

Page 16: ... Main Menu screen Press MENU C Access the Initial Set screen Press rt to move the highlight bar arrow to INITIAL SET then press OK or e D Access the Clock Set screen Press rt to move the highlight bar arrow to CLOCK SET then press OK or e CABLE BOX USERS SET CLOCK MANUALLY appears on the screen for about 5 seconds then the Clock Set screen appears Turn on the TV and select the AV mode 1 2 3 4 5 6 ...

Page 17: ...e clock setting data of a PBS channel from an adjacent time zone or from an incorrect PBS channel from a cable TV system If you selected AUTO for the host channel in step 2 be sure to select the correct time zone manually E Complete the Semiauto Clock Set Press MENU to return to normal screen Manual Clock Set First follow steps 1 to 4 in Preparations 墌 pg 16 then go to the following steps A Set ti...

Page 18: ...hannels in your area in the order of their frequencies When Auto Channel Set is complete SCAN COMPLETED appears on the TV screen If the scan was unsuccessful SCAN COMPLETED NO SIGNAL appears on screen Check the connections and start again E Return to the normal screen Press MENU Turn on the TV and select the AV mode INFORMATION The VCR selects the correct band TV or CATV automatically during Auto ...

Page 19: ...the number keys to input a channel number you want to add B Press OK or e to set to ADD C Repeat A to B to add other channels To skip channels A Press rt or the number keys to select a channel number you want to skip B Press OK or e to set to SKIP C Repeat A and B to skip other channels F Return to the normal screen Press MENU 1 2 3 4 5 6 7 8 9 0 2 4 1 3 T W DV S VHS Press rt to move the highlight...

Page 20: ...p attached on the back of the Controller C Make connections If your cable box does not have audio video output connectors Connect the RF output connector on the cable box to the ANTENNA IN connector on the rear of your VCR If your cable box has audio video output connectors Connect an audio video cable between the AUDIO VIDEO IN connectors on the rear of the VCR and the audio video output connecto...

Page 21: ...able box is connected to your VCR If the cable box is connected to your VCR s ANTENNA IN connector on the rear panel press rt until the channel number representing the cable box s output CH2 CH9 appears on the screen If the cable box is connected to your VCR s AUDIO VIDEO IN connectors on the rear panel press rt until ON L 1 REAR appears on the screen If you do not use a cable box press rt until O...

Page 22: ...mer recording Contact your cable company about the possibility of exchanging your current cable box with the one compatible with your VCR The VCR can only change the cable box channel through the Controller during timer recording If your cable box cannot be operated with a Remote because it has no remote sensor you cannot use the Controller to change its channels Make sure to leave the cable box t...

Page 23: ... the Controller so that the path between its transmitter and the DBS receiver s remote sensor is unobstructed B Attach the Controller Fix securely using the adhesive strip attached on the back of the Controller C Make connections If your DBS receiver does not have audio video output connectors Connect the RF output terminal on the DBS receiver to the ANTENNA IN connector on the rear of your VCR If...

Page 24: ...he DBS receiver is connected to your VCR If the DBS receiver is connected to your VCR s ANTENNA IN connector on the rear panel press rt until the channel number representing the DBS receiver s output CH3 or CH4 appears on the screen If the DBS receiver is connected to your VCR s AUDIO VIDEO IN connectors on the rear panel press rt until ON L 1 REAR appears on the screen If you do not use a DBS rec...

Page 25: ... work with all types of DBS receiver If your DBS receiver does not respond to the code you cannot use the Controller to change satellite channels In this case make sure to leave the DBS receiver turned on and tuned to the proper channel before the scheduled start time of timer recording The VCR can only change the satellite channel through the Controller during timer recording If your DBS receiver...

Page 26: ... press EJECT to remove the cassette The VHS playback indicator turns off NOTE It is impossible to play back a tape on the VHS deck while the recording is in progress on the DV deck When you start recording on the DV deck during playback on the VHS deck playback stops on the VHS deck and recording continues on the DV deck Turn on the TV and select the AV mode 1 3 2 1 2 3 4 5 6 7 8 9 0 2 4 1 3 T W D...

Page 27: ...ess PLAY 4 on the Remote or press REC 7 on the VCR The VHS recording indicator lights on the VCR F Pause Resume recording Press PAUSE 9 Press PLAY 4 to resume recording You can select channel during the Record Pause mode G Stop recording Press STOP 8 Then press EJECT to remove the cassette The VHS recording indicator turns off NOTE It is not possible to record a TV program on both the VHS deck and...

Page 28: ...turn to still picture NOTES During slow motion some noise may appear on the TV screen Press CH on the Remote to eliminate the noise However the VCR will return to the default setting once a power failure occurs Slow motion playback stops automatically after 5 minutes to protect the heads High Speed Turbo Search On the VCR During playback turn the ADVANCED JOG dial quickly to the left or right Vari...

Page 29: ...ally after 5 minutes to protect the heads High Speed Turbo Search On the Remote Press JOG SHUTTLE so that the button lights up During playback or still turn the SHUTTLE ring all the way to the right for forward high speed search or to the left for reverse high speed search Releasing SHUTTLE ring resumes still picture playback OR During playback or still press FF 5 for forward high speed search or ...

Page 30: ...on To access index codes 2 through 9 press w or e repeatedly until the correct index number is displayed Example To locate the beginning of B from the current position press w twice To locate the beginning of D from the current position press e once When the specified index code is located playback begins automatically Next Function Memory The Next Function Memory tells the VCR what to do after re...

Page 31: ...ring Playback Pressing A MONITOR changes the soundtrack as follows You can also select the soundtrack on the VHS MODE SET screen 墌 pg 75 AUDIO MONITOR NOTES HI FI should normally be selected In this mode Hi Fi stereo tapes are played back in stereo and the normal audio track is played back automatically for tapes with only normal audio SUPERIMPOSE must be set to ON or the on screen displays will n...

Page 32: ...the front display panel 3 Set the recording duration If you want to record for more than 30 minutes press REC 7 to extend the time Each press extends recording time by 30 minutes NOTES You can only perform ITR using the REC 7 button on the VCR s front panel You can play back a tape on DV deck while using the VHS deck for Instant Timer Recording However remember that the VCR will turn itself off wh...

Page 33: ...panel The front display panel shows the tape remaining time with z displayed By pressing the DISPLAY OSD button you can change the display to show the counter reading tape remaining time channel position or clock time Channel position is not displayed during playback NOTES When you press DISPLAY OSD the on screen display appears 墌 pg 10 on the TV screen for 5 seconds then the displays other than t...

Page 34: ...io Recording This VCR s built in MTS decoder enables reception of Multichannel TV Sound broadcast To record a SAP program received set 2ND AUDIO RECORD to ON 墌 pg 71 NOTES When the channel is changed on the VCR The STEREO indicator appears on the screen for about 5 seconds if the program is a stereo broadcast The SAP indicator appears on the screen for about 5 seconds if the program is a SAP broad...

Page 35: ...he VCR assesses the quality of the tape once you initiate recording The VCR spends approximately 7 seconds assessing the condition of the tape then begins recording NOTES The Video Calibration works for both SP and EP modes only after a tape has been inserted and the Record mode is first initiated It does not work during recording In the case of timer recordings the Video Calibration works before ...

Page 36: ...t point If the tape is advanced past the start point press REW 3 or turn the ADVANCED JOG dial to the left To go forward press FF 5 or turn the ADVANCED JOG dial to the right D Start playback Press PLAY 4 The DV playback indicator lights on the VCR E Stop playback Press STOP 8 Then press EJECT to remove the cassette The DV playback indicator turns off NOTE When you record a tape on the DV deck wit...

Page 37: ...VCR The DV recording indicator lights on the VCR F Pause Resume recording Press PAUSE 9 Press PLAY 4 to resume recording You can select channel during the Record Pause mode G Stop recording Press STOP 8 Then press EJECT to remove the cassette The DV recording indicator turns off NOTES It is not possible to record a TV program on both the VHS deck and the DV deck simultaneously However it is possib...

Page 38: ...ress PAUSE 9 and release again to return to still picture NOTE Forward slow motion playback stops automatically after 1 minute reverse slow motion playback after 30 seconds to protect the heads High Speed Turbo Search On the VCR During playback turn the ADVANCED JOG dial quickly to the left or right Variable Speed Search On the VCR During playback turn the ADVANCED JOG dial to the right for forwar...

Page 39: ...o Search On the Remote Press JOG SHUTTLE so that the button lights up During playback or still turn the SHUTTLE ring all the way to the right for forward high speed search or to the left for reverse high speed search Releasing SHUTTLE ring resumes still picture playback OR During playback or still press FF 5 for forward high speed search or REW 3 for reverse high speed search NOTE For short search...

Page 40: ... ON 墌 pg 71 and if any timer programing has been made If AUTO TIMER is set to ON the VCR directly goes into the Timer Standby mode at the same time when the POWER is pressed for the Automatic Power Off Soundtrack Selection Your VCR is capable of recording two soundtracks L and R and will play back the one you select During Playback Pressing A MONITOR changes the soundtrack as follows NOTE SUPERIMP...

Page 41: ...rform Random Assemble Editing 墌 pg 64 time code is necessary Press DISPLAY OSD until the time code on the tape appears on the front display panel By pressing the DISPLAY OSD button you can change the display to show the time code channel position clock time Channel position is not displayed during playback If TIME CODE is set to ON 墌 pg 76 the time code always appears on the TV screen while the DV...

Page 42: ...en appears see ATTENTION on page 43 Before performing the VCR Plus Timer Programing Make sure that the VCR s built in clock is set properly Turn on the TV and select the AV mode 1 2 3 4 5 6 7 8 9 0 2 4 1 3 T W DV S VHS Press PROG The clock must be set to access the PlusCode No screen If you have not set the clock the Main Menu screen appears after an error message is displayed Refer to Plug Play S...

Page 43: ...ecord the same program on both the VHS deck and the DV deck simultaneously During timer recording it is not possible to change the recording deck VHS or DV If the times that are programed for recording on the DV deck and on the VHS deck overlap the earlier start time takes precedence If the start times are the same the VHS deck takes precedence Cable Box or DBS Receiver Users To timer record a cab...

Page 44: ...our TV listing or contact your cable supplier for details Many TV stations can be viewed on cable Check your TV listing or contact your cable supplier for details Guide Channel Number Set A Turn on the VCR Press POWER B Access the Main Menu screen Press MENU C Access the Initial Set screen Press rt to move the highlight bar arrow to INITIAL SET then press OK or e D Access the Guide Channel Set scr...

Page 45: ... channel s broadcasts are received then press OK or e Repeat steps 5 and 6 as necessary Example If WNJU ind is received on channel position 47 Guide Channel Number Guide Channel GUIDE CH number refers to the assigned TV station numbers according to broadcast area for the VCR Plus timer recording The Guide Channel numbers can be found in most TV listings GUIDE CHANNEL SET GUIDE CH 6 VCR CH 47 PRESS...

Page 46: ... Program screen F Enter the program start time G Enter the program stop time Press STOP to enter the time you want recording to stop Press and hold STOP to move in 30 minute increments or press and release repeatedly to move 1 minute at a time Before performing Express Timer Programing Make sure that the VCR s built in clock is set properly Turn on the TV and select the AV mode 1 2 3 4 5 6 7 8 9 0...

Page 47: ...minutes Programs that start after midnight must have the next day s date You can program the timer while a regular recording is in progress the on screen menu will not be recorded It is not possible to timer record the same program on both the VHS deck and the DV deck simultaneously During timer recording it is not possible to change the recording deck VHS or DV If the times that are programed for...

Page 48: ...he left or right to set the time you want recording to stop Push the ADVANCED JOG dial Turn the ADVANCED JOG dial to the left or right to select the channel you wish to record You can cancel the setting at any time by pressing and holding the ADVANCED JOG dial for more than 3 seconds or pressing CANCEL on the Remote Repeat the step 2 C Engage the VCR s timer mode Press 24HR QUICK PROGRAM The VCR t...

Page 49: ...Quick Programing function the program overlap warning display does not appear even if some programs overlap each other The program with the lower program number will be recorded and the other one will not be recorded correctly It is not possible to timer record the same program on both the VHS deck and the DV deck simultaneously During timer recording it is not possible to change the recording dec...

Page 50: ...program settings press the appropriate button START STOP DATE CH and or SP EP p E Return to the normal screen Press PROG CHECK as many times as necessary If there are still some programs remaining go to step 6 F Return to the timer mode Press TIMER 1 2 3 4 5 6 7 8 9 0 2 4 1 3 T W DV S VHS Press PROG CHECK The Program Check screen appears for the deck VHS or DV being selected Press PROG CHECK again...

Page 51: ...e button START STOP DATE CH and or SP EP p when the Program screen on which you want to make changes is shown then press OK PROGRAM COMPLETED appears on the TV screen for about 5 seconds then the normal screen appears NOTE If the overlap is not yet solved or another overlap occurs with the timer program setting after making the last correction on a program the conflicting programs will be shown on...

Page 52: ...ubbing Press DUB for more than 2 seconds DV playback indicator and VHS recording indicator light If the tapes have not been rewound both decks rewind automatically The VHS deck goes into Record Pause mode and the DV deck goes into Pause mode When both decks have finished rewinding dubbing begins automatically After dubbing is completed the decks rewind both tapes automatically and eject them The V...

Page 53: ...r more than 2 seconds VHS playback indicator and DV recording indicator light If the tapes have not been rewound both decks rewind automatically The DV deck goes into Record Pause mode and the VHS deck goes into Pause mode When both decks have finished rewinding dubbing begins automatically After dubbing is completed the decks rewind both tapes automatically and eject them The VCR then shuts off N...

Page 54: ... with the record safety tab intact or cover the hole using adhesive tape For the DV deck Insert a Mini DV cassette with the erase protection switch set to SAVE B Select the dubbing direction Press The dubbing direction indicator DV lights C Set the tape speed Press S VHS then press SP EP p DV VHS appears on the TV screen if SUPERIMPOSE is set to ON 墌 pg 71 D Locate the start point on the DV deck A...

Page 55: ...ty tab removed For the DV deck Insert a Mini DV cassette with the erase protection switch set to REC B Select the dubbing direction Press The dubbing direction indicator S VHS lights C Set the tape speed Press DV then press SP LP p VHS DV appears on the TV screen if SUPERIMPOSE is set to ON 墌 pg 71 D Locate the start point on the VHS deck A Press S VHS B Press PLAY 4 to start playback C Press PAUS...

Page 56: ...ng a monaural camcorder connect its AUDIO OUT connector to the AUDIO L input connector on your VCR When a Master Edit Control equipped JVC camcorder is used the camcorder is capable of controlling the VCR Refer to the camcorder s instruction manual for operating procedure B Set the VCR s input mode Press AUX number key 0 and or CH to select F 1 F 1 when connecting the camcorder to the audio video ...

Page 57: ...corder To AUDIO VIDEO OUT connector A If the camcorder has no S VIDEO output connector EDIT C If the camcorder has a DV IN OUT connector Camcorder Player Mini plug cable not supplied JVC camcorder only PAUSE connector Recorder EDIT DV IN OUT DV cable VC VDV204 not supplied DV IN OUT NOTES About DV IN OUT connector To output digital signal when dubbing from the VHS deck to other device through the ...

Page 58: ...editing B Set the input mode of recording deck If using your VCR as a recording deck press AUX number key 0 and or CH to select L 1 L 1 when connecting the VCR to the audio video input connectors on the rear panel When using S VIDEO connector set REAR AUX INPUT to S VIDEO 墌 pg 71 When using VIDEO connector set REAR AUX INPUT to VIDEO 墌 pg 71 C Select the recording deck Press S VHS or DV D Set the ...

Page 59: ...from VHS to S VHS S VHS to VHS or from S VHS to S VHS From VHS to S VHS Record VHS playback signals in the S VHS mode Although the picture quality is inherently limited by that of the original the edited tape has better picture quality than those made by VHS to VHS editing From S VHS to VHS Because the picture quality of the source material is very high the edited tape has better picture quality t...

Page 60: ...without erasing the original audio on a DV tape that was recorded with SOUND MODE set to 12BIT 墌 pg 76 ATTENTION You cannot perform Audio Dubbing on a tape that was recorded with SOUND MODE set to 16BIT 墌 pg 76 on a tape that was recorded at the LP speed or on a blank tape Normal audio track Video Hi Fi audio track Pre recorded tape Audio dubbed tape 1 3 2 Your VCR CD player etc 1 2 3 4 5 6 7 8 9 ...

Page 61: ...begins at this point o blinks and u is displayed on the front display panel To stop dubbing temporarily press PAUSE 9 Press PLAY 4 to resume dubbing H End Audio Dubbing Press STOP 8 to stop the tape in your VCR and engage the audio component s Stop mode NOTES Once the Audio Dubbing starts you can not use the other deck When monitoring the audio dubbed sound on the DV deck set 12BIT MODE to SOUND2 ...

Page 62: ... your VCR as the recording deck DV Insert Editing SP mode only The picture is replaced with new one while the audio soundtrack remains unchanged For Insert Editing use your VCR as the recording deck ATTENTION Insert Editing is not possible with a Mini DV cassette recorded in LP mode or on a blank tape Source tape Recording tape Before Insert Editing Normal audio track After Insert Editing Video Hi...

Page 63: ...hat is to be inserted When you reach the start of the section of the source tape that you wish to insert press PLAY 4 to start the tape in your VCR Insert Editing begins at this point o and u are displayed on the front display panel H End Insert Editing For the VHS deck At counter 0 00 00 Insert Editing will stop automatically while the tape continues running in the Play mode If you wish to stop I...

Page 64: ...e For the DV deck Insert a Mini DV cassette with the erase protection switch set to SAVE B Select the DV deck Press DV C Access the R A Edit screen Press R A EDIT The R A Edit screen appears D Select the program E Locate the start point 1 2 3 4 5 6 7 8 9 0 2 4 1 3 T W DV S VHS 1 3 2 Press rt to move the arrow to select one program you want to edit then press OK or e To remove a program from the R ...

Page 65: ...nd want to reset the first set you have to press CANCEL until all points after the first set have been erased Reenter them after you have repaired the first set of points NOTES When Random Assemble Editing does not work press then perform Random Assemble Editing again To cancel the registered scene press CANCEL Each time CANCEL is pressed the latest registered scene is erased When the source tape ...

Page 66: ...Press STOP 8 and release A B The Remote now can transmit B code control signals B Check the remote control code for VCR Press and hold PLAY 4 on the VCR for more than 5 seconds while the VCR is turned off The code currently set appears on the display panel C Change the code for VCR Press any key on the Remote The VCR now responds to B code control signals To set the Remote and the VCR back to A co...

Page 67: ...d turn off If it does try other operation 墌 step 2 Once you have set the Remote to operate the TV you do not have to repeat this step until you replace your Remote s batteries Some brands of TV have more than one code If the TV does not function with one code try entering another B Operate the TV Press the corresponding button POWER TV VCR TV CH TV VOL TV Muting number keys For some brands of TV y...

Page 68: ...f If it does try other operations 墌 step 2 Once you have set the Remote to operate the cable box you do not have to repeat this step until you replace your Remote s batteries Some brands of cable box have more than one code If the cable box does not function with one code try entering another B Operate the Cable Box Press the corresponding button POWER TV CH number keys For some brands of cable bo...

Page 69: ...ot have to repeat this step until you replace your Remote s batteries Some brands of DBS receiver have more than one code If the DBS receiver does not function with one code try entering another B Operate the DBS receiver Press the corresponding button POWER TV CH number keys For some brands of DBS receiver you must press ENTER after having pressed the number keys To return the Remote to VCR contr...

Page 70: ...ple A Turn on the VCR Press POWER B Access the Main Menu screen Press MENU C Access the Mode Set screen D Select the mode E Select the mode setting Press OK or e F Return to the normal screen Press MENU Turn on the TV and select the AV mode 1 2 3 4 5 6 7 8 9 0 2 4 1 3 T W DV S VHS MODE SET 墌 pg 71 VHS MODE SET 墌 pg 72 DV MODE SET 墌 pg 76 Press rt to move the highlight bar arrow to MODE SET then pr...

Page 71: ...s on the screen for about 5 seconds if the program is a stereo broadcast The SAP indicator appears on the screen for about 5 seconds if the program is a SAP broadcast Both indicators appear when a stereo program is accompanied by SAP sound 8 AUTO TIMER ON OFF When this function is set to ON the timer is automatically engaged when the VCR power is turned off and automatically disengaged when the VC...

Page 72: ...VHS VCRs and of VHS VCRs equipped with SQPB S VHS QUASI PLAYBACK function Notice some VCRs are not compatible with the S VHS ET function While playing back a tape recorded using the S VHS ET function on some VCRs noise may appear If playback picture becomes blurred or interrupted use a cleaning cassette In the high speed search still slow motion or frame by frame playback modes 墌 pg 28 noise may a...

Page 73: ...ION Picture System EDIT Minimizes picture degradation during editing recording and playback SOFT Reduces image coarseness when viewing overplayed tapes containing a lot of noise SHARP Clearer sharper edged picture when viewing images with lots of flat same coloured surfaces such as cartoons NOTES When you select EDIT SOFT or SHARP the selected mode will not change until you select another mode Whe...

Page 74: ...rding and the feature will not work properly on the following tapes T ST 30 T ST 60 T ST 90 and T ST 120 8 BLUE BACK ON OFF When this function is set to ON the TV screen becomes all blue when receiving a channel not in use NOTE When you want to receive an unstable channel with poor signals set this function to OFF 8 DIGITAL TBC NR ON OFF Your VCR is equipped with the Digital TBC Time Base Correcto...

Page 75: ...ormally it is recommended to keep DIGITAL R3 set to ON Depending on the type of tape being used picture quality may be better with DIGITAL R3 set to OFF If you use the VCR as the source player for editing be sure to set DIGITAL R3 to OFF before starting 8 AUDIO MONITOR HI FI HI FI L HI FI R NORM MIX This VCR can record two sound tracks simultaneously normal and Hi Fi on a Hi Fi stereo tape You can...

Page 76: ...iate mode when playing back an audio dubbed Mini DV tape SOUND1 Original recorded sound SOUND2 Audio dubbed sound FULL Original recorded sound and Audio dubbed sound NOTES When 12BIT MODE is set to FULL both the main and sub audio will be audible To select only the main audio or only the sub audio of bilingual tapes set 12BIT MODE to SOUND1 8 TIME CODE ON OFF When this function is set to ON the ti...

Page 77: ... displayed on the front display panel Press PLAY 4 to turn the i indicator off 2 The tape will not rewind or fast forward The tape is already fully rewound or fast forwarded Check the cassette SYMPTOM POSSIBLE CAUSE CORRECTIVE ACTION 1 The playback picture does not appear while the tape is running The TV receiver is not set to the AV mode Set the TV to its AV mode 2 Noise appears during visual sea...

Page 78: ... to L 1 or F 1 4 Camcorder recording is not possible The camcorder has not been properly connected Confirm that the camcorder is properly connected 墌 pg 56 The input mode is not correct Set the input mode to L 1 or F 1 5 on the front display panel won t stop blinking The end of the tape was reached during recording The program may not have been recorded in its entirety Next time make sure you have...

Page 79: ...tape was reached during timer recording The program may not have been recorded in its entirety Next time make sure you have enough time on the tape to record the entire program VHS deck The loaded cassette has had its record safety tab removed Remove the cassette and cover the hole with adhesive tape or insert a cassette with the record safety tab intact DV deck The loaded cassette has had its era...

Page 80: ...Whistling or howling is heard from the TV during camcorder recording The camcorder s microphone is too close to the TV Position the camcorder so its microphone is away from the TV The TV s volume is too high Turn the TV s volume down 2 When scanning channels some of them are skipped over Those channels have been designated to be skipped If you need the skipped channels restore them 墌 pg 19 3 The c...

Page 81: ... together RECORDING Q When I pause and then resume a recording the end of the recording before the pause is overlapped by the beginning of the continuation of recording Why does this happen A This is normal It reduces distortion at the pause and resume points Q Can the VCR indefinitely remain in the Record Pause mode A No The VCR goes to its Stop mode automatically after 5 minutes to protect the h...

Page 82: ...nnels 2 13 UHF Channels 14 69 CATV 113 Channels TIMER Clock reference Quartz Program capacity 1 year programmable timer 6 programs each on the VHS and DV deck Memory backup time Approx 10 min ACCESSORIES Provided accessories RF cable F type BNC RCA adapter x 2 Audio Video cable S Video cable 4 pin Controller Infrared remote control unit AA battery x 2 Specifications shown are for SP mode unless ot...

Page 83: ...al Dubbing from VHS to DV 55 O ON SCREEN DISPLAY for DV deck 11 ON SCREEN DISPLAY for VHS deck 10 P PICTURE CONTROL 73 PLAYBACK RECORDING ON DV DECK 36 PLAYBACK RECORDING ON VHS DECK 26 Plug Play Set 14 R Random Assemble Editing 64 REAR AUX INPUT 71 Record One Program While Watching Another 32 41 Recording Resume Function 32 41 Remote A B Code Switching 66 Repeat Playback 30 Retake 34 S Second Aud...

Page 84: ... VCR TV CA CANCEL START C RESE DBS PROG REW REC TV VOL Ð MEN Filename VS30U_Cov4 EN fm EN Page 84 February 23 2002 6 06 pm Printed in Japan 0302MNV ID VP VS30U_Cov4 EN fm Page 84 Saturday February 23 2002 6 06 PM ...

Reviews: