background image

— 8 —

Page 8

December 26, 2003 4:19 pm

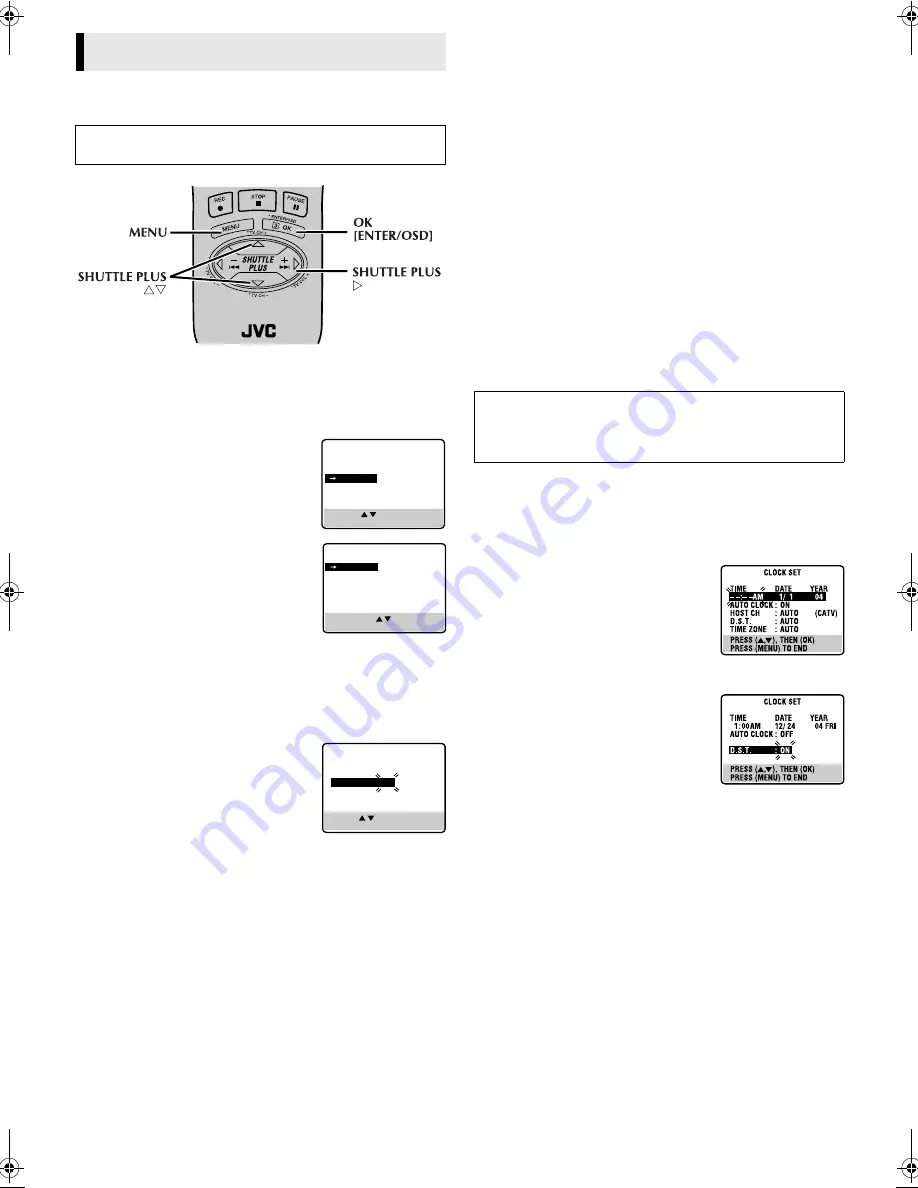
Clock Setting

Perform clock setting only if the clock has not been set correctly 
by the Plug&Play setting.

Preparations

A

Access Main Menu screen, then Initial 
Set screen

Press 

MENU

 on the Remote. Press 

SHUTTLE PLUS 

rt

 to move the 

highlight bar (arrow) to “INITIAL SET”,
then press 

OK

 or 

SHUTTLE PLUS 

e

.

B

Access Clock Set screen

Press 

SHUTTLE PLUS 

rt

 to move the 

highlight bar (arrow) to “CLOCK SET”,
then press 

OK

 or 

SHUTTLE PLUS 

e

.

Setting clock semiautomatically
— Semiauto Clock Set

You can change the host channel/D.S.T. (Daylight Saving Time)/
time zone setting manually. First follow steps 

1

 to 

2

 in 

“Preparations” above, then go to the following steps.

C

Set Auto Clock to ON

Press 

OK

 or 

SHUTTLE PLUS 

e

 on the 

Remote repeatedly to move the highlight 
bar to “AUTO CLOCK”, then press 

SHUTTLE PLUS 

rt

 so that “ON” is 

selected.

The time set previously will be erased 
when “AUTO CLOCK”, “HOST CH”, “D.S.T.” or “TIME ZONE”
setting is changed.

D

Select host channel

You can either select “AUTO” or enter a PBS channel number.
Press 

OK

 or 

SHUTTLE PLUS 

e

 to move the highlight bar to 

“HOST CH”, then press 

SHUTTLE PLUS 

rt

 repeatedly until 

“AUTO” or the desired PBS channel number is selected.

Some PBS channels do not transmit clock setting data.

E

Select D.S.T. mode

Press 

OK

 or 

SHUTTLE PLUS 

e

 to move the highlight bar to 

“D.S.T.”, then press 

SHUTTLE PLUS 

rt

 repeatedly until the 

desired setting is selected.

AUTO

: Select if you want to adjust your VCR’s clock 

automatically by the incoming signal from the host 
channel. (Auto Daylight Saving Time enables automatic 
adjustment of the VCR’s clock at the start and end of 
Daylight Saving Time.) Be sure to select the correct time 
zone manually in step 

6

.

ON

:

Adjustment will be made by the built-in clock itself.

OFF

:

Select when Daylight Saving Time does not apply to you.

F

Select time zone

Press 

OK

 or 

SHUTTLE PLUS 

e

 to move the highlight bar to 

“TIME ZONE”, then press 

SHUTTLE PLUS 

rt

 repeatedly until 

“AUTO” or the desired time zone is selected. Each time you press 
the button, the time zone changes as follows:

{

 AUTO 

{

 ATLANTIC 

{

 EASTERN

{

 CENTRAL

{

 MOUNTAIN 

{

 PACIFIC

{

 ALASKA 

{

 HAWAII

{

 (back to the beginning)

G

Complete Semiauto Clock Set

Press 

MENU

 to return to normal screen. 

Setting clock manually
— Manual Clock Set

First follow steps 

1

 to 

2

 in “Preparations” previously described, 

then go to the following steps.

C

Set time, date and year

Press 

SHUTTLE PLUS 

rt

 until the 

desired time appears, then press 

OK

 or 

SHUTTLE PLUS 

e

. Set the date and year 

in the same way.

Holding 

SHUTTLE PLUS 

rt

 changes 

the time in 30-minute intervals, or 
changes the date in 15-day intervals.

D

Select D.S.T. mode

Press 

OK

 or 

SHUTTLE PLUS 

e

 to move 

the highlight bar to “D.S.T.”, then press 

SHUTTLE PLUS 

rt

 to select the desired 

setting.

ON

: Adjustment will be made by the 

built-in clock itself.

OFF

: Select when Daylight Saving Time does not apply to you.

E

Start clock

Press 

MENU

 and normal screen appears.

To make corrections any time during the process

Press 

OK

 or 

SHUTTLE PLUS 

e

 repeatedly until the item you 

want to change blinks, then press 

SHUTTLE PLUS 

rt

.

Initial Settings

Turn on the VCR and TV, and select the VCR channel (or AV 
mode).

MAIN MENU

FUNCTION SET
TUNER SET

INITIAL SET 

PRESS (   ,   ), THEN (OK)
PRESS (MENU) TO END

SELECT WITH (   ,   ) AND (OK)
PRESS (MENU) TO END

INITIAL SET

CLOCK SET

GUIDE CHANNEL SET

PRESS (   ,   ), THEN (OK)
PRESS (MENU) TO END

CLOCK SET

TIME

DATE YEAR

– –:– – AM   1/ 1 04

AUTO CLOCK : ON

HOST CH

: AUTO

(CATV)

D.S.T.

: AUTO

TIME ZONE

: AUTO

IMPORTANT

Turn off the VCR. “Auto” will appear on the display panel while 
the clock is being set. The current clock time will appear 
automatically when the clock setting is complete.

SR-V101US.fm  Page 8  Friday, December 26, 2003  4:20 PM

Summary of Contents for SR-V101US - S-vhs Videocassette Recorder

Page 1: ...nce WARNING TO PREVENT FIRE OR SHOCK HAZARD DO NOT EXPOSE THIS UNIT TO RAIN OR MOISTURE CAUTION This video cassette recorder should be used with AC 120Vd 60Hz only To prevent electric shocks and fire hazards DO NOT use any other power source CAUTION TO PREVENT ELECTRIC SHOCK MATCH WIDE BLADE OF PLUG TO WIDE SLOT FULLY INSERT ATTENTION POUR ÉVITER LES CHOCS ÉLECTRIQUES INTRODUIRE LA LAME LA PLUS LA...

Page 2: ...n cords or integral convenience receptacles as this can result in a risk of fire or electric shock 4 Power Cord Protection Power supply cords should be routed so that they are not likely to be walked on or pinched by items placed upon or against them paying particular attention to cords at plugs convenience receptacles and the point where they exit from the product 5 Ventilation Slots and openings...

Page 3: ...ot operate normally by following the operating instructions Adjust only those controls that are covered by the operating instructions as an improper adjustment of other controls may result in damage and will often require extensive work by a qualified technician to restore the product to its normal operation e If the product has been dropped or damaged in any way f When the product exhibits a dist...

Page 4: ...g 16 Express Timer Programing 16 24HR Quick Programing 16 Checking Canceling or Changing Program Settings 17 Program Overlap Warning Display 17 Other Functions 17 Timer warning display 17 Checking tape position 17 Changing display information 17 Function settings 17 Satellite Auto Recording 20 Child Lock 20 Multi Brand Remote Control 21 TV Brand Setting 21 Cable Box or DBS Receiver Brand Setting 2...

Page 5: ...s Display panel VCR mode indicator Play indicator Record indicator Timer mode indicator Channel and auxiliary input Clock time Remote sensor Advanced JOG dial S VIDEO input connector S VHS indicator Counter Remain display REC LINK indicator Start Time Mode Lock indicator Stop Time Mode Lock indicator TBC indicator REMOTE OUT REMOTE IN AC power cord CONTINUED ON NEXT PAGE ...

Page 6: ...tons with a small dot on the left side of the name can also be used to operate your TV while holding down TV on the Remote Number keys To recall an indication A Press OSD OK All indications corresponding to the current status are displayed for 5 seconds After that the counter information and RECORD PAUSE if in the Record Pause mode remain on the TV screen B Press OSD OK again to clear the display ...

Page 7: ...ual Clock Set 墌 pg 8 E Set VCR channel Press POWER 1 to turn off the VCR then press STOP EJECT 0 on the VCR for more than 5 seconds 3CH appears on the display panel Press CH on the Remote to select 3CH 4CH or CH OFF then press OK The VCR channel is preset to 3CH Set to 4CH if 3CH is used for broadcasting in your area F Final preparation for use Turn on the VCR and the TV and select the VCR channel...

Page 8: ... be made by the built in clock itself OFF Select when Daylight Saving Time does not apply to you F Select time zone Press OK or SHUTTLE PLUS e to move the highlight bar to TIME ZONE then press SHUTTLE PLUS rt repeatedly until AUTO or the desired time zone is selected Each time you press the button the time zone changes as follows AUTO ATLANTIC EASTERN CENTRAL MOUNTAIN PACIFIC ALASKA HAWAII back to...

Page 9: ... screen Setting channels manually Manual Channel Set You can add the channels you want or delete the channels you do not want manually A Access Main Menu screen then Tuner Set screen Press MENU on the Remote Press SHUTTLE PLUS rt to move the highlight bar arrow to TUNER SET then press OK or SHUTTLE PLUS e B Access Manual Channel Set screen Press SHUTTLE PLUS rt to move the highlight bar arrow to M...

Page 10: ...he left or right Press PLAY 4 to resume normal playback Each time you press SHUTTLE PLUS 2 or 6 or each time JOG dial passes a click position the playback speed changes To decrease the speed during picture search press the opposite direction button repeatedly or turn the dial in the opposite direction During still picture press and hold SHUTTLE PLUS 6 to start forward or SHUTTLE PLUS 2 to start re...

Page 11: ...he Remote or STOP EJECT 0 on the VCR To select the returning point recording end or tape end see REC END RETURN on 墌 page 19 Locating beginning of recordings Index Search Index codes are placed on the tape at the beginning of each recording when recording on this VCR A While the tape is not running press SHUTTLE PLUS 2 or 6 on the Remote to start search B To access a recording of 2 to 9 index code...

Page 12: ... blinking slowly To stop recording press STOP 8 on the Remote or STOP EJECT 0 on the front panel Watching one program while recording another During recording If you connect the TV and the VCR only using the RF connection 墌 pg 7 to view pictures from the VCR press TV VCR on the Remote so that VCR mode indicator goes off from the display panel The TV broadcast being recorded disappears If you are u...

Page 13: ... ET the S VHS indicator lights up on the display panel regardless of the S VHS ET 墌 pg 19 or S VHS MODE 墌 pg 19 setting Series Playback NOTE Series Playback is also possible using the front AUDIO VIDEO connectors Using two sets or more of SR V101US you can play back two or more cassettes alternately as many times as you want You can select the returning point for Series Playback 墌 pg 19 Series Pla...

Page 14: ...CR No setting is required for this function Series Recording NOTE Select the correct input mode L 1 for the rear connector F 1 for the front connector 墌step 3 Using two sets or more of SR V101US a long recording will be possible such as camcorder recording another VCR playback or TV broadcast To prohibit operations during Series Playback Mode Lock Press and hold OK on the Remote for more than 5 se...

Page 15: ...timer recording while a regular recording is in progress the menu screens will not be recorded In case of a power failure after programming the VCR s memory backup keeps your selections if the lithium battery is not exhausted If the tape reaches its end during timer recording the recording stops and 䡬 and on the display panel blink Press TIMER to disengage timer then press STOP EJECT 0 on the VCR ...

Page 16: ...e VCR turns off automatically and is displayed on the display panel 24HR Quick Programing You can program a timer recording that starts within 24 hours using the JOG dial on the VCR Load a cassette with the record safety tab intact or set REC SAFETY to OFF 墌 pg 19 The VCR turns on and the counter is reset automatically A Press 24HR QUICK PROGRAM on the VCR The start time indicator starts blinking ...

Page 17: ...hange the VCR operation mode from the stop mode to fast forward or rewind mode or when you perform an Index Search 墌 pg 11 or Instant Review 墌 pg 11 the tape position indicator appears The position of q in relation to B Beginning or E End shows you where you are on the tape Set ON SCREEN REC and ON SCREEN PLAY to ON 墌 pg 18 Changing display information When you press DISPLAY the display panel show...

Page 18: ...n is set to OFF You have to press TIMER to engage or disengage the timer recording standby mode 䡵 ON SCREEN REC ON OFF When this function is set to ON if you press OSD OK 墌 pg 6 various VCR status information on screen display appears on the screen during recording NOTE The setting you have made is kept in memory Even if the VCR is unplugged or the power failure occurs it will resume every time yo...

Page 19: ... this function is set to ON you can record on VHS cassettes with S VHS picture quality Tapes recorded using this function can be played back on most S VHS VCRs or VHS VCRs equipped with the S VHS ET function or VHS VCR equipped with the SQPB S VHS QUASI PLAYBACK function When this function is set to ON the S VHS indicator lights up on the display panel NOTES Before recording set VIDEO CALIBRATION ...

Page 20: ...therwise the VCR will start recording when the DBS receiver is turned on To disengage the Satellite Auto Recording standby mode press REC LINK and go off Depending on the type of satellite receiver Satellite Auto Recording may not be compatible Child Lock You can disable the VCR operations While the VCR is turned on press and hold POWER 1 on the Remote for more than 10 seconds The VCR turns off CL...

Page 21: ...e A Press and hold CABLE DBS B Press MBR SET C Press the Number keys to enter your cable box s or DBS receiver s brand code D Press OK and release CABLE DBS C Operate cable box or DBS receiver While holding down CABLE DBS press one of the following buttons POWER 1 TV CH and the Number keys For some brands you must press ENTER after having pressed the Number keys to enter a channel number To change...

Page 22: ...by switching the remote control code for the Remote between A and B 墌 step A keeping two VCRs to different control codes To change only the remote control code for the Remote DO NOT perform steps B and C Editing with Another VCR You can use your VCR as the playback or recording VCR You can use a camcorder as the playback VCR and your VCR as the recording VCR Refer also to the other components inst...

Page 23: ...t or right C Locate start point and engage Audio Dubbing mode Load a cassette and press PLAY 4 on the VCR Press PAUSE 9 at the point where you want to start dubbing then press A DUB The VCR enters the Audio Dubbing Pause mode 䡬 blinks and lights on the display panel D Start dubbing Engage the Play mode of the audio component then press PLAY 4 on the VCR Audio Dubbing begins at this point To pause ...

Page 24: ...to the VCR and press PLAY 4 B Press PAUSE 9 when you find the end of the scene for which you want to edit C Press C RESET so that the counter reading becomes 0 00 00 F Locate start point and engage Insert Editing mode Press REW 3 then press PAUSE 9 when you find the beginning of the scene for which you want to edit then press INSERT The VCR enters the Insert Editing Pause mode 䡬 and light on the d...

Page 25: ...l 525 lines 60 fields Recording Playback system DA 4 Double Azimuth head helical scan system Signal to noise ratio 45 dB Horizontal resolution VHS 230 lines S VHS 400 lines Frequency range Normal audio 70 Hz to 10 000 Hz Hi Fi audio 20 Hz to 20 000 Hz Input Output RCA connectors IN x 2 OUT x 1 S video connectors IN x 2 OUT x 1 TUNER Tuning system Frequency synthesized tuner Channel coverage VHF Ch...

Page 26: ... Review 11 M Manual Channel Set 9 Manual Clock Set 8 N Next Function Memory 11 O ON SCREEN PLAY 18 ON SCREEN REC 18 P PICTURE CONTROL 18 Playback Resume Function 11 R REAR AUX INPUT 19 REC END RETURN 19 REC SAFETY 19 Recording Resume Function 12 Repeat Play 11 Repeat Recording 12 RF Connection 7 S Second Audio Recording 12 Semiauto Clock Set 8 Skip Search 11 S VHS Super VHS S VHS ET or VHS Recordi...

Page 27: ...ACTION Recording will not start There is no cassette loaded Insert a cassette on which the record safety tab is intact REC SAFETY is set to ON and the loaded cassette has had its record safety tab removed Set REC SAFETY to OFF 墌 pg 19 SYMPTOM POSSIBLE CAUSE CORRECTIVE ACTION Timer recording will not work The clock and or the timer program have been set incorrectly Set the clock and or timer progra...

Page 28: ...SR V101US COPYRIGHT 2004 VICTOR COMPANY OF JAPAN LTD Printed in China 0104 ASR PR BJ ...

Reviews: