background image

27

English

Creating Realistic Sound Fields

Activating Surround Mode

When Auto Surround is set to “OFF” or 2-channel source other than
Dolby Surround software is played back, activate Surround mode
manually.

Make sure that you have set the speakers information correctly
(see page 20 or 51).
• If only front speakers are connected, you cannot activate any

Surround mode.

On the front panel:

Press SURROUND ON/OFF.

The SURROUND indicator lights up on the display
(when Auto Surround is set to “OFF”).
• Each time you press the button, Surround mode is

activated or deactivated alternately.

From the remote control:

1

Press SOUND.

Number buttons now work for sound adjustments.

2

Press SURR ON/OFF.

The SURROUND indicator lights up on the
display (when Auto Surround is set to “OFF”).
• Each time you press the button, Surround mode

is activated or deactivated alternately.

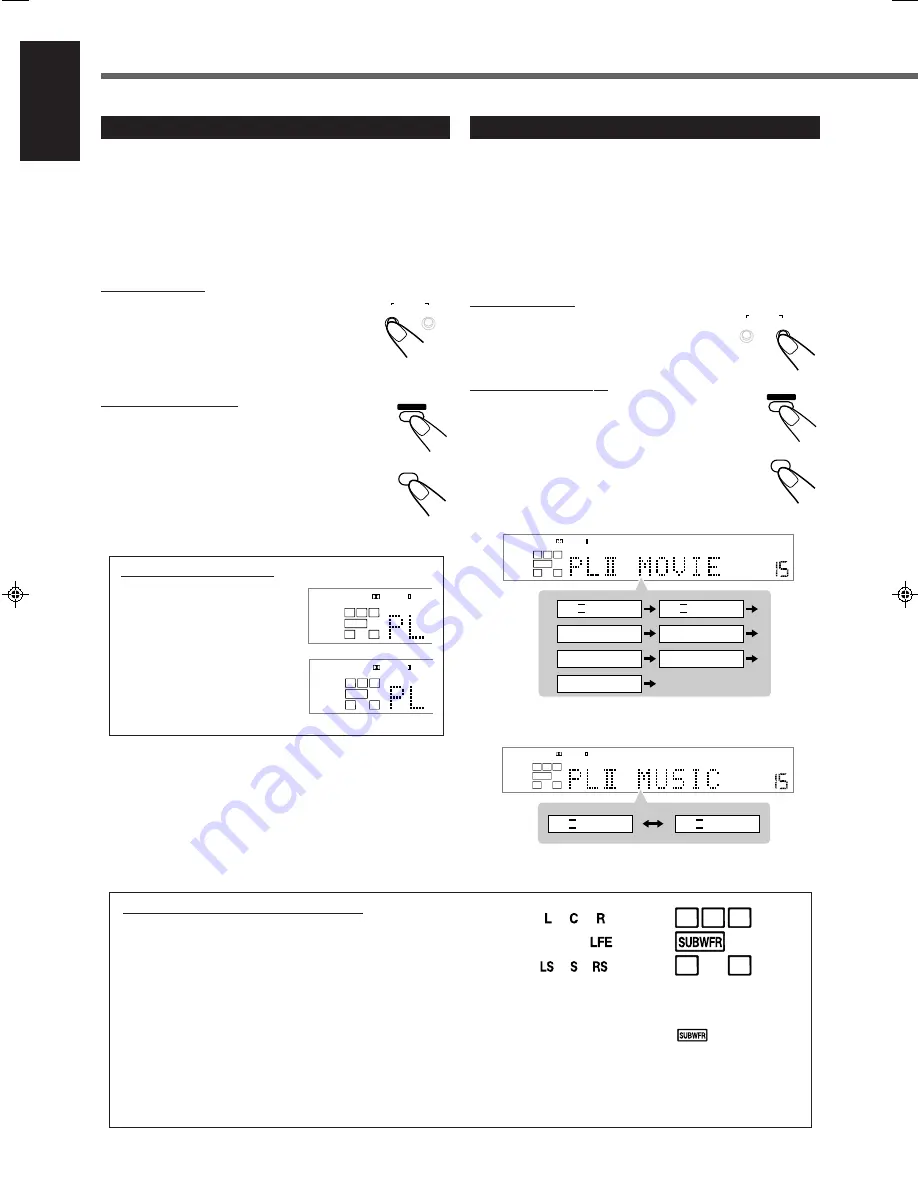
About SURROUND indicators

• When Auto Surround is set to

“ON,” the AUTO SURROUND
indicator always lights up on the
display.

• When you activate Surround

mode manually with Auto
Surround set to “OFF,” the
SURROUND indicator lights up
on the display.

Selecting Surround Modes

When 2-channel source is played back with Surround mode
activated, you can select another Surround mode.
Available Surround modes will vary depending on the number of the
connected speakers and the playback sound.

Make sure that you have set the speaker information correctly
(see page 20 or 51).
• If rear speakers are not connected, you cannot use DAP modes

and the All Channel Stereo.

On the front panel:

Press SURROUND MODE.

• Each time you press the button, Surround mode

is changed as illustrated below:

From the remote control:

1

Press SOUND.

Number buttons now work for sound adjustments.

2

Press SURR MODE.

• Each time you press the button, Surround mode is

changed as illustrated below:

When 5 or 4 (except center speaker) speakers are connected:

When 3 (except rear speakers) speakers are connected or
Dolby Digital including matrix source is played back:

Signal and speaker indicators on the display

The following signal indicators light up —:

L, R

: •

When digital input is selected:

 Light up when

the signals corresponding to each channel come
in.

When analog input is selected:

 Always light

up.

C, LS, RS :

Light up when the signals corresponding to each
channel come in.

S

:

Lights up when the monaural rear channel signal
or Dolby Surround encoded signal comes in.

LFE

:

Lights up when the LFE channel signal comes
in.

ON/OFF

SURROUND

MODE

REC MODE

DIGITAL AUTO

VOLUME

SURROUND

PRO LOGIC

L

R

SUBWFR

PL II MOVIE

PL II MUSIC

LIVE CLUB

HALL

PAVILION

ALL CH ST.

DANCE CLUB

(back to the beginning)

ON/OFF

SURROUND

MODE

REC MODE

SOUND

10/0

SURR MODE

SOUND

7

SURR ON/OFF

DIGITAL AUTO
AUTO SURROUND

PRO LOGIC

L

R

SUBWFR

DIGITAL AUTO

SURROUND

PRO LOGIC

L

R

SUBWFR

The speaker indicators light up as follows:

• The subwoofer speaker indicator (

) lights up when

“SUBWFR” is set to “YES” (see page 20) or “USE”  (see
page 51).

• The other speaker indicators light up only when the

corresponding speaker is activated, and also when required
for the current playback.

Signal indicators

Speaker indicators

DIGITAL AUTO

VOLUME

SURROUND

PRO LOGIC

L

R

SUBWFR

PL II MOVIE

PL II MUSIC

EN25-28RX-DV3SL[UG]2.pm5

02.8.8, 2:21 PM

27

Summary of Contents for RX-DV3SL

Page 1: ...O TAPE TV CDR FM AM FM MODE STROBE EFFECT TV DBS CH ANALOG DIGITAL TEST AUDIO INPUT SUBTITLE CHOICE ENTER ON SCREEN ANGLE ZOOM DIGEST TOP MENU MENU RETURN SURR ON OFF SURR MODE DIMMER MUTING TV VOL VOLUME SUBWOOFER HOME CINEMA DVD CD CONTROL CENTER SOUND STANDBY ON CENTER REAR L REAR R REMOTE CONTROL RM SRXDV3U PROGRESSIVE RX DV3SL INSTRUCTIONS HOME CINEMA DVD CD CONTROL CENTER DVD CD For Customer...

Page 2: ...d with liquids such as vases shall be placed on the apparatus Caution STANDBY ON button Disconnect the mains plug to shut the power off completely The STANDBY ON button in any position does not disconnect the mains line The power can be remote controlled CAUTION To reduce the risk of electrical shocks fire etc 1 Do not remove screws covers or cabinet 2 Do not expose this appliance to rain or moist...

Page 3: ...d Avoid direct exposure to beam 3 CAUTION Do not open the top cover There are no user serviceable parts inside the unit leave all servicing to qualified service personnel IMPORTANT FOR LASER PRODUCTS 1 CLASSIFICATION LABEL PLACED ON EXTERIOR SURFACE REPRODUCTION OF LABELS 2 WARNING LABEL PLACED INSIDE THE UNIT English ...

Page 4: ...ns 23 Operating Procedure 23 7 Front speaker output balance BAL 24 7 Tone BASS and TREBLE 24 7 Speaker output levels SUBWFR CENTER REAR L and REAR R 24 7 DAP effect level EFFECT 24 Creating Realistic Sound Fields 25 Activating Surround Mode 27 Selecting Surround Modes 27 Adjusting Surround Mode Using Remote Control 28 DVD Player Operations 29 Disc Information 29 Using the On screen Bar 31 Basic Op...

Page 5: ... HOME CINEMA DVD CD CONTROL CENTER ON OFF SURROUND MODE FM AM TAPE CDR SOURCE NAME TV VCR DBS DVD CONTROL STANDBY STANDBY ON 1 2 3 6 7 p w e r t y q REC MODE 8 9 4 5 AUTO SURROUND 1 2 3 4 5 ANALOGDIGITAL AUTO PRO LOGIC DSP PROGRAM REPEAT RANDOM 1A B PROGRESSIVE INPUT ATT LS RS S LFE L C R SUBWFR VOLUME RESUME SPK kHz MHz TUNED STEREO AUTO MUTING SLEEP 6 7 9 8 0 DIGITAL 1 Input mode indicators 13 A...

Page 6: ...ns For selecting preset channels 18 For adjusting sound 24 28 59 For operating audio video components 59 63 SURR surround ON OFF button 16 27 SURR surround MODE button 16 27 VFP button 40 TV RETURN button 60 61 PROGRESSIVE button 14 o TV VOL volume and buttons 60 61 VOLUME and buttons 11 16 a Menu operation buttons TOP MENU button 33 MENU button 33 RETURN button 33 ENTER button Cursor 5 3 2 button...

Page 7: ...good ventilation around the unit Poor ventilation could cause overheating and damage the unit Handling the unit DO NOT touch the power cord with wet hands DO NOT pull on the power cord to unplug it When unplugging the cord always grasp the plug so as not to damage the cord Keep the power cord away from the connecting cords and the antenna The power cord may cause noise or screen interference It is...

Page 8: ...lied Snap the tabs on the loop into the slots of the base to assemble the AM loop antenna Rear panel of the unit AM antenna connection Connect the AM loop antenna supplied to the AM LOOP terminals 1 Remove the insulation if the AM loop antenna wire is covered with vinyl 2 Press and hold the clamp of the terminal 1 then insert the wire 2 3 Release the clamp Turn the loop until you have the best rec...

Page 9: ...ver you like since bass sound is non directional Normally place it in front of you AM LOOP FM 75 COAXIAL AM EXT SUB WOOFER OUT VIDEO OUT SELECT DIGITAL 1 DBS DIGITAL 2 TV PCM STREAM FRONT SPEAKERS REAR SPEAKERS PAL NTSC CENTER SPEAKER DIGITAL IN DVD COMPONENT VIDEO OUT ANTENNA TV TAPE CDR DBS VCR AUDIO S VIDEO VIDEO Y PB PR DBS IN DBS IN MONITOR OUT MONITOR OUT CAUTION SPEAKER IMPEDANCE 8 16 RIGHT...

Page 10: ... components to this unit with the audio cords Use the cord supplied with the other components or purchase them at your dealer When the unit is shipped from the factory the DIGITAL IN terminals are set for use with the following components DIGITAL 1 coaxial For DBS tuner DIGITAL 2 optical For TV If you connect CDR change the digital input DIGITAL IN terminal setting see Digital input DIGITAL IN ter...

Page 11: ...R OUT REC IN PLAY VCR OUT REC IN PLAY RIGHT LEFT DIGITAL OPTICAL OUT B C DIGITAL 1 DBS DIGITAL 2 TV DIGITAL IN TV TAPE CDR DBS VCR AUDIO RIGHT LEFT IN IN OUT REC IN PLAY OUT REC IN PLAY LEFT RIGHT AUDIO OUT Audio connections Before connecting an optical digital cord unplug the protective plug AM LOOP FM 75 COAXIAL AM EXT SUB WOOFER OUT VIDEO OUT SELECT DIGITAL 1 DBS DIGITAL 2 TV PCM STREAM FRONT S...

Page 12: ... of the input output terminals are typical examples When you connect other components refer also to their manuals since the terminal names actually printed on their rear vary among the components AM LOOP FM 75 COAXIAL AM EXT SUB WOOFER OUT VIDEO OUT SELECT DIGITAL 1 DBS DIGITAL 2 TV PCM STREAM FRONT SPEAKERS REAR SPEAKERS PAL NTSC CENTER SPEAKER DIGITAL IN DVD COMPONENT VIDEO OUT ANTENNA TV TAPE C...

Page 13: ...th wet hands Do not pull on the power cord to unplug the cord When unplugging the cord always grasp the plug so as not to damage the cord Notes Keep the power cord away from the connecting cords and the antenna cables The power cord may cause noise or screen interference The preset settings such as preset channels and sound adjustment may be erased in a few days in the following cases When you unp...

Page 14: ...t the Volume On the front panel To increase the volume turn MASTER VOLUME clockwise To decrease the volume turn MASTER VOLUME counterclockwise From the remote control To increase the volume press and hold VOLUME To decrease the volume press and hold VOLUME CAUTION Always set the volume to the minimum before starting any sources If the volume is set at a high level the sudden blast of sound energy ...

Page 15: ...f the unit Changing the Display Brightness Press DIMMER to dim the display Each time you press the button the display and illumination lamp dim and brighten alternately Changing the Source Name When you connect an CD recorder to the TAPE CDR jacks on the rear panel change the source name which will be shown on the display Ex When changing the source name from TAPE to CDR 1 Press TAPE CDR SOURCE NA...

Page 16: ...yed back you can change the digital input mode Sound does not come out at the beginning of playback Noise comes out while searching for or skipping chapters or tracks Press CONTROL 3 or 2 to select DGTL D D or DGTL DTS while DGTL AUTO still remains on the display Each time you press the button the digital input mode changes as follows DGTL AUTO Normally select this The DIGITAL AUTO indicator light...

Page 17: ...cording with VCR You can record the picture on your video tape without the volume level indication when Recording mode is activated When you do not want to record the on screen guide icons see page 52 The choice menu and on screen bar are always recorded when they appear on the TV CAUTION When the front speakers are small the output sound may be distorted by Recording mode In this case decrease th...

Page 18: ...When audio CD is loaded Track number Elapsed playing time SPK DIGITAL AUTO VOLUME PRO LOGIC L R SUBWFR From the remote control ONLY 2 3 1 5 6 4 8 9 7 10 0 10 100 EFFECT TEST SURR ON OFF SURR MODE SUBWOOFER CENTER REAR L REAR R DIGITAL AUTO VOLUME DIGITAL AUTO SURROUND SPK LFE LS RS L C R SUBWFR Chapter number Elapsed playing time On the front panel From the remote control To change the color syste...

Page 19: ...k from the memorized point by pressing 3 Resume play About Resume play This unit can memorize the point when you operate the following procedures Pressing 7 during playback Pressing 3 starts Resume play Changing the source Pressing DVD or 3 starts Resume play Turning off the unit including Sleep Timer Pressing 3 starts Resume play Once you start Resume play the RESUME indicator goes off the unit c...

Page 20: ...he preset stations Before you start remember There is a time limit in doing the following steps If the setting is canceled before you finish start from step 2 again On the front panel ONLY 1 Tune into the station you want to preset see Tuning into Stations Manually If you want to store the FM reception mode for this station select the FM reception mode you want See Selecting the FM Reception Mode ...

Page 21: ...Each time you press the button the FM reception mode alternates between AUTO MUTING and MONO ANALOG VOLUME SPK MHz TUNED STEREO AUTO MUTING L R AUTO MUTING MONO 4 Press MEMORY again while the selected channel number is flashing on the display The station is assigned to the selected channel number The selected channel number stops flashing and then the frequency starts flashing 5 Press CONTROL 3 or...

Page 22: ...s If the setting is canceled before you finish start from step 1 again 1 Press SETTING The CONTROL buttons now work for basic settings The setting item selected previously appears on the display 2 Press CONTROL or 5 repeatedly until DGT Digital with the current setting appears on the display 1DBS 2TV is the initial setting If you have already changed the setting another combination will be shown 3...

Page 23: ... SML small If you have selected SML small for the front speakers you cannot select LRG large for the center and rear speakers 7 Speaker distance FRNT D front distance CNTR D center distance and REAR D rear distance The distance from your listening point to the speakers is another important element to obtain the best possible surround sound of the Surround modes You need to set the distance from yo...

Page 24: ...when the bass sound is distorted Note 0dB is the initial setting If you have already changed the setting 10dB will be shown SPK DIGITAL AUTO VOLUME L R SPK DIGITAL AUTO VOLUME DIGITAL L R SUBWFR C LS RS 7 Dynamic range compression D COMP You can compress the dynamic range difference between maximum sound and minimum sound of the reproduced sound This is useful when enjoying surround sound at night...

Page 25: ... appropriately when DVD is selected as the source see AV COMPU LINK Remote Control System on pages 57 and 58 Set the output terminal appropriately VIDEO Select this when you connect your TV to VIDEO jack by using a composite video cord S Select this when you connect your TV to S VIDEO jack by using an S video cord COMPNT Select this when you connect your TV to DVD COMPONENT VIDEO OUT jacks by usin...

Page 26: ...n the display Each time you press the button the indication changes as illustrated below Adjust the selected item Operating Procedure Ex When setting the front speaker output balance Before you start remember There is a time limit in doing the following steps If the setting is canceled before you finish start from step 1 again 1 Press ADJUST The CONTROL buttons now work for sound adjustments The s...

Page 27: ...nge of 1 to 5 Note 3 is the initial setting If you have already changed the setting another setting will be shown Sound Adjustments The following can be stored for each source Analog digital input mode see page 13 Input attenuator mode see page 14 Front speaker output balance see above or page 50 Speaker output level see above or page 51 Tone adjustment see above or page 50 DAP effect level see ab...

Page 28: ...l center channel left rear channel right rear channel and LFE channel signals Since each channel is completely independent from the other channel signals to avoid interference you can obtain much better sound quality with much stereo and surround effects Note Dolby Digital or DTS software can be roughly grouped into two categories multichannel up to 5 1 channel and 2 channel software To enjoy surr...

Page 29: ...when the front and rear speakers are connected to this receiver without respect to the center speaker connection If the center speaker is connected and activated the same phases of the front left and right signals are mixed and output through the center speaker All Channel Stereo can be used while reproducing 2 channel stereo software either analog or Linear PCM digital signal When All Channel Ste...

Page 30: ...nd the All Channel Stereo On the front panel Press SURROUND MODE Each time you press the button Surround mode is changed as illustrated below From the remote control 1 Press SOUND Number buttons now work for sound adjustments 2 Press SURR MODE Each time you press the button Surround mode is changed as illustrated below When 5 or 4 except center speaker speakers are connected When 3 except rear spe...

Page 31: ...s on page 24 Notes You can adjust the speaker output levels for the activated speakers ONLY the speaker indicators are lit on the display You cannot adjust the output levels of center speaker when one of DAP modes is activated You can adjust the effect level only when one of DAP modes is activated Before operating the DVD player using remote control press DVD to change the remote control operation...

Page 32: ...r they may not be played back because of their disc characteristics recording conditions or damage or stain on them Especially the configuration and characteristics of an MP3 disc or a JPEG disc is determined by the writing encoding software and hardware used for recording Therefore due to the software and hardware used the following symptoms may occur Some discs may not be played back Some tracks...

Page 33: ...ndex function Example 1 DVD VIDEO Example 2 VCD SVCD CD 7 Playback Control function PBC The Playback Control function allows you to enjoy menu driven operation Menu driven playback A selection menu is displayed when you start playing VCD and SVCD with the Playback Control feature The selection menu shows a list of numbers for selection Some discs may show moving pictures or a divided screen You ca...

Page 34: ...le language See page 35 1 3 Select this to change the view angle See page 34 PROG Select this for the program play See page 41 RND Select this for the random play See page 41 Using the On screen Bar You can check the information of a disc while the disc is loaded and use some functions through the on screen bar Whenever a disc is loaded Press ON SCREEN Each time you press the button the on screen ...

Page 35: ...he on screen bar and the display window on the center unit During playback or while stopped 1 Press ON SCREEN twice The on screen bar appears on the TV 2 Press cursor 3 or 2 to move to TIME 3 Press ENTER Each time you press the button the time indication changes as follows TOTAL T total REM TIME REM back to the beginning TOTAL Elapsed time of the disc T REM Remaining time of the disc TIME Elapsed ...

Page 36: ...te the specific track by using the menu see also page 30 Before using the remote control press DVD to change the remote control operation mode When the menu appears on the TV during playback with PBC Press number buttons 1 10 10 to select the number of the desired item The unit starts playback from the selected item Ex To select 3 press 3 To select 11 press 10 then 1 Ex To return to the menu Press...

Page 37: ... of 3 view angles recorded 3 Press cursor or 5 repeatedly to select the desired view angle Each time you press the button the angle of the scene changes 4 Press ENTER The pop up window goes off To turn off the on screen bar Press ON SCREEN 7 Showing all view angles on the TV During playback 1 Press and hold ANGLE for a few seconds Up to 9 pictures of the different camera angles recorded on a disc ...

Page 38: ...NTER The pop up window goes off To turn off the on screen bar Press ON SCREEN Notes For DVD VIDEO Some subtitle languages are abbreviated in the pop up window See Language code list on page 50 For SVCD SVCD can contain up to four subtitles Pressing SUBTITLE changes the subtitles regardless of whether the subtitles are recorded or not Subtitles will not change if no subtitle is recorded If appears ...

Page 39: ...x ST 1 ST 2 L 1 R 1 L 2 R 2 back to the beginning ST 1 ST 2 To listen to normal stereo playback of ST 1 or ST 2 channel L 1 L 2 To listen to the L left 1 or 2 audio channel R 1 R 2 To listen to the R right 1 or 2 audio channel The pop up window goes off if no operation is done for about 5 seconds Using the on screen bar 1 Press ON SCREEN repeatedly until the on screen bar with pull down menu appea...

Page 40: ... from the beginning of the disc up to 99 59 for VCD SVCD CD Before using the remote control press DVD to change the remote control operation mode For DVD VIDEO During playback For VCD SVCD While stopped or during playback without PBC For CD While stopped or during playback 1 Press ON SCREEN repeatedly until the on screen bar with pull down menu appears on the TV 2 Press cursor 3 or 2 repeatedly to...

Page 41: ...function You can specify the time in hours minutes seconds for DVD VIDEO and in minutes seconds for VCD SVCD CD 7 Locating a desired scene DIGEST The unit can display the opening scenes of each title or chapter on DVD VIDEO or each track of VCD SVCD You can select a desired title chapter or track from the opening scenes shown on the TV screen For DVD VIDEO While stopped or during playback For VCD ...

Page 42: ... Notes If you press and hold STROBE 8 for a few seconds during playback 9 still pictures also appear but they advance in normal playback speed with a time delay The sound is muted You can also perform the above operation using 8 on the front panel 7 Playing back in slow motion Before using the remote control press DVD to change the remote control operation mode During playback 1 Press 8 STROBE at ...

Page 43: ... adjust Adjust gradually to show preferable appearance by confirming the picture GAMMA Controls the brightness of neutral tints while maintaining the brightness of dark and bright portions 4 to 4 BRIGHTNESS Controls the brightness of the screen 16 to 16 CONTRAST Controls the contrast of the screen 16 to 16 SATURATION Controls the color depth of the screen 16 to 16 TINT Controls the tint of the scr...

Page 44: ...played back the program screen appears again To edit your program repeat steps 3 and 4 To cancel the program playback mode Clear the program you made as follows 1 Press 7 to stop playback 2 Press ON SCREEN to turn on the on screen bar 3 Press 7 You can also clear the program by ejecting the disc or turning off the unit To turn off the on screen bar Press ON SCREEN Note When all the programed track...

Page 45: ...ING Notes If you select ALL during random playback the all tracks of the disc are played repeatedly in random order A B cannot be selected during the program and random playback or while a disc is not played back To turn off the on screen bar Press ON SCREEN To cancel the repeat playback Select OFF in step 3 then press ENTER CHOICE ON SCREEN DIGEST ENTER TOP MENU MENU RETURN 8 5Mbps DVD VIDEO TITL...

Page 46: ...ID3 Tag where its album name performer track title etc are recorded There are two versions ID3v1 ID3 Tag version 1 and ID3v2 ID3 Tag version 2 It is recommended that you make each MP3 file at sampling rate of 44 1 kHz and at bit rate of 128 kbps The unit cannot play back the files made at bit rate of under 64 kbps If both MP3 files and JPEG files are recorded on a disc set the MP3 JPEG setting in ...

Page 47: ...icator lights up on the display Each time you press the button the repeat mode changes as follows REPEAT TRACK REPEAT GROUP REPEAT ALL the indication goes off back to the beginning REPEAT TRACK Repeats the current track REPEAT GROUP Repeats the current group REPEAT ALL Repeats all the tracks on the disc To cancel repeat mode Press REPEAT repeatedly until the repeat indication goes off from the MP3...

Page 48: ...ine JPEG files Progressive JPEG files or lossless JPEG files cannot be played Baseline JPEG format Used for digital cameras web etc Progressive JPEG format Used for web Lossless JPEG format An old type and rarely used now Some JPEG discs may not be played back because of their disc characteristics or recording conditions Group 2 Group 1 Group 3 Group 4 Group 5 File 1 File 2 Up to 99 groups Up to 1...

Page 49: ...lack screen continuously appears in the slide show playback the file currently played may be non baseline JPEG file In this case select a playable file a baseline JPEG file again e g pressing 7 or MENU to open the JPEG CONTROL screen etc Note that it may take a long time to select another file Some files on a JPEG disc may be distored during playback Operations through the JPEG CONTROL Screen You ...

Page 50: ...ollowing menus LANGUAGE menu see page 49 You can select the initial language for the disc menu audio and subtitle You can also select the language used on the TV screen while operating this unit PICTURE menu see page 49 You can select the desired options concerning a picture or monitor screen AUDIO menu see page 50 You can adjust the sound settings of this unit through this menu SPK SETTING menu s...

Page 51: ...m appear on the TV You can set the items using cursor 5 and ENTER as explained in steps 5 and 6 above ENTER 4 3 LB PICTURE MONITOR TYPE PROGRESSIVE MODE SCREEN SAVER AUTO ON USE TO SELECT USE ENTER TO CONFIRM TO EXIT PRESS CHOICE ENTER SELECT MP3 JPEG MP3 AUTO FILM VIDEO Ex When FILM is selected ENTER 4 3 LB PICTURE MONITOR TYPE PROGRESSIVE MODE SCREEN SAVER FILM ON USE TO SELECT USE ENTER TO CONF...

Page 52: ...tically adjusts the screen width of the output signal correctly when playing back a picture whose aspect ratio is 4 3 16 9 AUTO 16 9 MULTI AUTO Wide television conversion Select this when the aspect ratio of your TV is 16 9 wide TV 4 3 LB 4 3 MULTI LB Letter Box conversion Select this when the aspect ratio of your TV is 4 3 conventional TV While viewing a wide screen picture the black bars appear ...

Page 53: ...see pages 19 to 24 L R BALANCE Adjust the output balance between the left front speaker and right front speaker within the range of R 21 to CENTER or CENTER to L 21 CENTER 0 0 AUDIO L R BALANCE BASS TREBLE LFE ATT D RANGE COMPRESSION 0 dB MID KM Cambodian KN Kannada KO Korean KOR KS Kashmiri KU Kurdish KY Kirghiz LA Latin LN Lingala LO Laothian LT Lithuanian LV Latvian Lettish MG Malagasy MI Maori...

Page 54: ...UB WOOFER Adjust the speaker output level within the range of 10 dB to 10 dB for each speaker in 1 step interval TEST TONE Select this to start or stop test tone RETURN Select this to return to SPK SETTING menu Notes When NONE is selected for the center speaker rear speakers and or subwoofer on the SIZE menu appears instead of the current setting In this case you cannot adjust the output level of ...

Page 55: ... subtitles For plural audio languages For playback status 1 8 x 5 etc The on screen guide icons appear on the TV at the beginning of the playback with this function turned on When recording the picture with VCR set OFF to avoid recording the indications above on your video tape The choice menu and on screen bar can be recorded even though this function is set to OFF Select one of the following set...

Page 56: ...indow for setting level appears 6 Press cursor or 5 repeatedly to select the level of restriction then press ENTER moves to PASSWORD The smaller the value of level is the more restrictive the Parental Lock level is Select NONE to cancel this function 7 Press the number buttons 0 9 to enter a four digit number as your password then press ENTER moves to EXIT 8 Press ENTER OTHERS menu resumes To retu...

Page 57: ...ore than three times moves to EXIT automatically and cursor or 5 does not work Press ENTER to exit from the PARENTAL LOCK submenu then start from step 1 again If you forget your password enter 8888 7 Releasing Parental Lock temporarily When you set a strict parental level some discs may not be played back at all When you load such a disc and try to play it the following display appears on the TV Y...

Page 58: ...KN Saint Kitts and Nevis KP Korea Democratic People s Republic of KR Korea Republic of KW Kuwait KY Cayman Islands KZ Kazakhstan LA Lao People s Democratic Republic LB Lebanon LC Saint Lucia LI Liechtenstein LK Sri Lanka LR Liberia LS Lesotho LT Lithuania LU Luxembourg LV Latvia LY Libyan Arab Jamahiriya MA Morocco MC Monaco MD Moldova Republic of MG Madagascar MH Marshall Islands ML Mali MM Myanm...

Page 59: ...ume as a regular CD can Multi angle By recording multiple scenes progressing at the same time in a single title the user can select view angles This feature is called the multi angle function Multichannel DVD VIDEO has been designed to have each soundtrack constitute one sound field Multichannel refers to a structure of sound tracks having three or more channels Multilanguage When a title is creat...

Page 60: ...utput mode of the built in DVD player to component connect this unit to the TV s Video Input 2 terminals component video input using component video cables To Video Input 1 TV RX DV3SL S video cable S video cable Source Equipment To Video Input 2 Composite video cable Composite video cable TV RX DV3SL Source Equipment To Video Input 2 Component video cable TV RX DV3SL Notes When connecting the uni...

Page 61: ... you insert a video cassette with its safety tab press the play 3 button on the VCR or on the remote control You can get the same result One Touch DVD Play Simply by starting playback on the built in DVD player you can enjoy the playback without setting other switches manually The TV automatically turns on and changes the input mode to the appropriate position so that you can view the playback pic...

Page 62: ...to the beginning of the current or previous track Skips to the beginning of the next track 7 Stops playing 8 Pauses playing To release it press 3 1 10 10 Selects a track number directly For track number 5 press 5 For track number 15 press 10 then 5 For track number 20 press 10 then 10 For track number 30 press 10 10 then 10 Note When you start recording on the CD recorder use the buttons on the CD...

Page 63: ...hen 3 For channel number 135 press 100 3 then 5 TV RETURN Alternates between the previously selected channel and the current channel 2 3 1 5 6 4 8 9 7 VFP 10 0 10 100 TV RETURN VCR DBS DVD TV VIDEO REW TUNING 9 FF REPEAT SLEEP VCR DBS TV AUDIO TAPE TV CDR FM AM FM MODE STROBE EFFECT TV DBS CH ANALOG DIGITAL TEST AUDIO INPUT SUBTITLE SURR ON OFF SURR MODE SUBWOOFER SOUND STANDBY ON CENTER REAR L RE...

Page 64: ...number23 press2 then3 For channel number 135 press 100 3 then 5 TV RETURN will function as the ENTER button if your equipment requires pressing ENTER after selecting a channel number Notes Refer also to the manual supplied with your TV All the functions listed on the left may not be assigned to the buttons for some TVs If you cannot change the channels of some TVs by pressing the number buttons pr...

Page 65: ...ner After pressing DBS you can perform the following operations on a DBS tuner TV DBS CH or Changes the channels 1 9 0 100 Selects the channels For channel number 5 press 5 For channel number 10 press 1 then 0 For channel number 23 press 2 then 3 For channel number 135 press 100 3 then 5 TV RETURN will function as the ENTER button if your equipment requires pressing ENTER after selecting a channel...

Page 66: ...ures codes for VCR Manufacturer Codes JVC 00 26 29 58 Aiwa 01 02 Bell Howell 03 Blaupunkt 04 05 CGM 06 07 Emerson 08 10 12 64 65 Fisher 03 14 17 Funai 01 GE 18 20 Goldstar 07 Goodmans 13 21 Grundig 06 22 Hitachi 18 23 25 66 Loewe 07 21 Magnavox 04 19 24 Mitsubishi 30 35 NEC 26 27 Nokia 03 36 Nordmende 38 Orion 09 Panasonic 19 24 39 40 Philips 04 19 21 24 41 42 Phonola 21 RCA PROSC 04 18 19 23 24 4...

Page 67: ...eep your discs and mechanism clean Cleaning Discs Wipe the disc with a soft cloth in a straight line from center to edge DO NOT use any solvent such as conventional record cleaner spray thinner or benzine to clean the disc Cleaning the Unit Stains on the unit Should be wiped off with a soft cloth If the unit is heavily stained wipe it with a cloth soaked in water diluted neutral detergent and wrun...

Page 68: ...DBY ON on the front panel to turn off the unit After unplugging the power cord consult your dealer Press SOUND see page 24 or a source selecting button first then press the buttons you want to use Come closer to the unit Operate the remote control within 7 m from the unit Remove the obstruction Aim the remote control at the remote sensor on each component you want to operate Insert the batteries c...

Page 69: ...roperly One touch DVD playback does not work though you have connected AV COMPU LINK cord correctly No subtitle appears on the TV screen though you have selected as your initial subtitle language Audio language is different from the one you have selected as your initial audio language SOLUTION Connect the cord correctly see page 8 Select the correct input on the TV Replace the disc see page 29 Cha...

Page 70: ...P3 files set the MP3 JPEG setting to MP3 see page 50 POSSIBLE CAUSE No MP3 files are recorded on the disc The disc is unplayable such as CD ROM MP3 files do not have the correct file extension mp3 Mp3 mP3 or MP3 in their file names MP3 files are made at bit rate under 64 kbps MP3 files are not recorded in the format compliant with ISO 9660 Level 1 or 2 The MP3 JPEG setting is set to JPEG PROBLEM A...

Page 71: ...z 48 kHz Signal to Noise Ratio 66 IHF 78 IHF TV TAPE CDR DBS VCR 87 dB 67 dB Frequency Response 8 Ω TV TAPE CDR DBS VCR 20 Hz to 20 kHz 1 dB Tone Control Bass 100 Hz 10 dB 2 dB Treble 10 kHz 10 dB 2 dB Video Mesured on AC 110V 127V 220V 240V Video Input Sensitivity Impedance 1 kHz Composite video DBS IN VCR IN 1 V p p 75 Ω S VIDEO DBS IN VCR IN Y luminance 1 V p p 75 Ω C chrominance 0 286 V p p 75...

Page 72: ...ÆÆÆÆÆÆÆÆÆÆÆÆÆÆÆÆÆÆÆÆÆÆÆÆÆÆÆÆÆÆÆÆÆÆÆÆÆÆÆÆÆÆÆÆÆÆÆÆÆÆÆ qOGA ÆÆÆÆÆÆÆÆÆÆÆÆÆÆÆÆÆÆÆÆÆÆÆÆÆÆÆÆÆÆÆÆÆÆÆÆÆÆÆÆÆÆÆÆÆÆÆÆÆÆÆÆÆÆÆÆÆÆÆÆÆÆÆÆÆÆ WOKLF dł ÆÆÆÆÆÆÆÆÆÆÆÆÆÆÆÆÆÆÆÆÆÆÆÆÆÆÆÆÆÆÆÆÆÆÆÆÆÆÆÆÆÆÆÆÆÆÆÆÆÆÆÆÆÆÆÆÆÆÆÆÆÆÆÆÆÆÆ 7 WO U ô WŽUL Ãdš œUFð BAL 7 U WLGM BASS qÐd Ë TREBLE 7 UŽUL Ãdš U u SUBWFR dH u WŽULÝ WOŽdH CENTER e d WŽULÝ REAR L WŽUL WOHK Èd O REAR R WOHK vMLO WŽUL ÆÆÆÆÆÆ 7 WO UF Èu DAP EFFECT ÆÆÆÆÆÆÆÆÆÆÆÆÆÆÆÆ...

Page 73: ...CD CD INPUT ATT INPUT ANALOG DIGITAL COMPACT SUPER VIDEO SETTING ADJUST MEMORY RX DV3 HOME CINEMA DVD CD CONTROL CENTER ON OFF SURROUND MODE FM AM TAPE CDR SOURCE NAME TV VCR DBS DVD CONTROL STANDBY STANDBY ON REC MODE AUTO SURROUND ANALOGDIGITALAUTO PRO LOGIC DSP PROGRAM REPEAT RANDOM 1A B PROGRESSIVE INPUT ATT LS RS S LFE L C R SUBWFR VOLUME RESUME SPK kHz MHz TUNED STEREO AUTO MUTING SLEEP DIGI...

Page 74: ...U ô o j C uM UO šô µπ uB q bF µπ u bOH Ø uB U U u L qOGA jO uB UI ØqOGAð ON OFF SURR jO uB l Ë SURR MODE uBK oO b Z UF VFP Êu eHK UM œU ð TV RETURN w b PROGRESSIVE Ë Êu eHK u u Èu TV VOL Ë uB u Èu VOLUME WLzUI qOGAð W uKF WLzUI TOP MENU WLzUI MENU Ÿułd RETURN ušb ENTER dýR 5 3 2 2 3 1 5 6 4 8 9 7 VFP 10 0 10 100 TV RETURN REMOTE CONTROL RM SRXDV3U VCR DBS DVD TV VIDEO REW TUNING 9 FF REPEAT SLEEP ...

Page 75: ...l WI d lDI œbŽ 5ÝuI 5Ð œułu r d s bFÐ sŽ rJ bŠË U UD Włu Í UÞ wz u AM Włu wz u FM V d u bO pKÝ WOzUÐdNJ W UD pKÝ fÐU T UN AC Æ u pKOLFÐ qBð UI K Ác s U hI W UŠ w WOD uH V M j ÆU Ëd p ÊU wK U qLŽ ULz œ öO u qLŽ q WOD uH V M WDÝ uÐ p IDM W O B WOD uH d š VOLTAGE SELECTOR pH ULF ÝUÐ UN WOHKš vKŽ œułu Æwž dÐ b dð w WIDM WOD u vKŽ WÞu C WOD uH W öŽ Ê s b Q K h ÆUNÐ UN ULF Ý bFÐ sŽ rJ bŠË qš œ U UD VO d...

Page 76: ...RIGHT LEFT IN IN OUT REC IN PLAY OUT REC IN PLAY DIGITAL OUT VCR OUT REC IN PLAY VCR OUT REC IN PLAY RIGHT LEFT 110V 127V 230 240V 220V FM 75 COAXIAL ANTENNA AM LOOP FM 75 COAXIAL AM EXT B FM 75 COAXIAL UN K WOHK WŠuK Włu wz u qO uð AM Włu Í UÞô wz uN q Ë AM qO u dÞ l UN l o d AM LOOP Æ Í UÞô wz uN pKÝ ÊU UF Ÿe AM ÆqOMOH œU0 vDG dD p A vKŽ jGC lÐUðË jG pK qšœ p bFÐË Æ Æp A dŠ Ëœ Ò Æ U I Ý qC vKŽ u...

Page 77: ...WŽULÝË WO U ô UŽUL qO uð bFÐ s W O uBÐ WŽUL j U uKF j WOŽdH dH u WŽULÝ dE q UH qł s ÆWMJL jO uB WO UF vKŽ uB qł Æ W H UNO Mð WŽUL WF U2 UŽULÝ qLF Ý SPEAKER IMPEDANCE WMO Æ ÂË UŽUL dÞ WDÝ uÐ uð ô Ò ÆWŽUL qO uð dÞ l bŠ Ë WŽULÝ s d q WOHK Ë e d WŽULÝË WO U ô UŽUL qO uð l WOHK WŠuK vKŽ œułu Ë dÞô q Ë WŽULÝ qJ Æw u vKŽ UŽUL vKŽ dýR Ë dÞô WŽULÝ pKÝ q W UN w œułu UF Ÿe Æ UN l o d dOž dD p A vKŽ jGC lÐUðË...

Page 78: ...HK qO u pK ULF Ý WDÝ uÐ B Ë C u œuł vKŽ uB pMJ1 VOðd UÐ qC A B C Æ n u s uB b UA DBS u bO XOÝU q Ë VCR vKŽ pK Ÿu fH ULF ÝUÐ UN c l Êu eHK q Ë p u eHKð n u qO u DBS u bO XOÝU q Ë VCR Æ GA s uB b UA Ò q DVD UN c l Êu eHK q Ë wKš b öÝô ULF ÝUÐ A B Ë ØË C Ý p bFÐË Ò u bOH Ãdš l Ë q r dE W O uBÐ u bOH Ãdš l Ë Æ W H vKŽ œułu l o u Êu eHKð q Ë w b u bOH uBÐ ŸU L Ýö pK ULF ÝUÐ w b u bOH qšœ C Ož p bF Ë Ò ...

Page 79: ...IN PLAY DIGITAL OUT VCR OUT REC IN PLAY VCR OUT REC IN PLAY RIGHT LEFT DIGITAL OPTICAL OUT B C DIGITAL 1 DBS DIGITAL 2 TV DIGITAL IN TV TAPE CDR DBS VCR AUDIO RIGHT LEFT IN IN OUT REC IN PLAY OUT REC IN PLAY LEFT RIGHT AUDIO OUT uB öO uð wL d pKÝ qO uð q fÐU Ÿe ÍdB ÆW UL AM LOOP FM 75 COAXIAL AM EXT SUB WOOFER OUT VIDEO OUT SELECT DIGITAL 1 DBS DIGITAL 2 TV PCM STREAM FRONT SPEAKERS REAR SPEAKERS ...

Page 80: ...FT RIGHT AUDIO OUT A AM LOOP FM 75 COAXIAL AM EXT SUB WOOFER OUT VIDEO OUT SELECT DIGITAL 1 DBS DIGITAL 2 TV PCM STREAM FRONT SPEAKERS REAR SPEAKERS PAL NTSC CENTER SPEAKER DIGITAL IN DVD COMPONENT VIDEO OUT ANTENNA TV TAPE CDR DBS VCR AUDIO S VIDEO VIDEO Y PB PR DBS IN DBS IN MONITOR OUT MONITOR OUT CAUTION SPEAKER IMPEDANCE 8 16 RIGHT LEFT AV COMPU LINK RIGHT LEFT IN IN OUT REC IN PLAY OUT REC I...

Page 81: ...jzU w œułu UNO Mð Æ U UÐ WKK p b ÊuJð U bMŽ WOzUÐdNJ W UD pKÝ fLKð ô WOzUÐdNJ W UD pKÝ Ÿe bMŽ ÆpK ŸeM WOzUÐdNJ W UD pKÝ V ð ô ÆpK dCð ÂbŽ qł s p Ë Ã U K t Ý Ë fÐUI p ULz œ UEŠö V Ê sJ1 Æwz uN öÝ Ë qO u öÝ sŽ WOzUÐdNJ W UD pKÝ bFÐ ÆWýUA vKŽ g uAð Ë ZO WOzUÐdNJ W UD pKÝ uB j Ë UI WÞu C uMI q UI WÞu C UÞu C WO U ôU w ÂU bŽ öš UN r Ê sJ1 UI uC ÆWOzUÐdNJ W UD pKÝ Ÿe bMŽ ÆWOzUÐdNJ W UD w qDŽ uBŠ bMŽ XOÝ...

Page 82: ...K v K u Š W ô U O W Ë e STANDBY ON AUDIO u ł u œ Ž K v Ë Š b J r Ž s Ð F b Æ O wH Ò qOGA K œ bF Ýô s STANDBY Æ U ô W wCðË Æ dF WýUý vKŽ w U bB rÝ ÊUOÐ dNE U Ê A G Ò q DVD b š K w u B b U w ð E N d ý U I d READING Ð O M L U J A n N U u Ÿ ô Ý D u W L K W E d H W π Æ b A G O q Ë ð u U ð O J O U Ž M b L O q Ð F i Ý D u U H O b u VIDEO DVD Æ ð E N d ý U Ž b Â Ë ł u œ Ý D u W NO DISC Ž K v ý U ý W F d w...

Page 83: ... ULF Ý UI ô dJÐ X Ë ÁbMŽ Íc l u ÂuI uÝ X u fHMÐ µ W H Æ UN qOGAð UI UÐ qOGA bFÐ sŽ rJ bŠË s jI MUTING SLEEP bFÐ sŽ rJ bŠË s jI DIGITAL AUTO SPK L R Basic Operation dF WýUý U ŸuDÝ dOOGð U ô bý X Uš jG DIMMER U XH Æ dF WýUý U ô W Ë dF WýUý U XHš r e UNÐ jGCð d q w Æ œU UÐ bB rÝ dOOGð q qO uð bMŽ CD fÐUI l TAPE CDR WŠuK vKŽ œułu Ož WOHK Ò Æ dF WýUý vKŽ dNE uÝ Íc bB rÝ d s bB rÝ dOOGð bMŽ U TAPE v CDR...

Page 84: ...WŠuK vKŽ CONTROL DIGITAL AUTO VOLUME DGTL AUTO DGTL D D DGTL DTS L R ANALOG DIGITAL INPUT wL d Ë dþUM qšb l Ë UO š wI dÞ s ö ULF ÝUÐ wL bB X U u L eNł qO uð r U bMŽ pMJ1 v U HB dE wL d qO u Ë dþUM qO u Æqšb l Ë UO š Ý wL d qšb l Ë UO š q Ò uBÐ wL d qšb dÞ j q r dE W O wL d qšb qO uð dÞ DIGITAL IN Æ W H vKŽ œułu bB UO š bŠ jG DBS TV Ë CDR Æt qšb l Ë dOOGð b dð Íc bFÐ sŽ rJ bŠË s WEŠö GA UO š bMŽ qš...

Page 85: ...ETTING q bF Ë ADJUST ÆWO U ô WŠuK vKŽ œułu jO uB UI ØqOGAð SURROUND ON OFF uB l Ë Ë jO SURROUND MODE ÆWO U ô WŠuK vKŽ œułu ÆbFÐ sŽ rJ bŠË vKŽ œułu uB q bF ÂU ô Basic Operations ON OFF SURROUND MODE REC MODE WO U ô WŠuK vKŽ jI qšb Uý nOH ð Ž M b U J u Ê u È œ š q B b M U þ d Ž U w ł b Ý u ð J u Ê ô u A u Ò Á Æ Š B q p U à H O n ý U b š q Ë p M l ð A u Ò Á ô u Æ qJ j C c qLŽ V dþUM bB Æ e vKŽ jGC lÐ...

Page 86: ...ð b W uDÝô WOMO oKGð e WDÝ uÐ W uDÝô WOMO öž UC sJ1 0 WŠuK vKŽ œułu ÆWO U ô TUNING WO U ô WŠuK vKŽ bFÐ sŽ rJ bŠË s lOłdð Ë bIðË X R UI ô pMJ1 WO U ô jG WDÝ uÐ Æ U Ë qBH Ê uMF W bÐ œU Ë qOGA W R uBÐ qOGA UI ô e jG 8 Æ e jG bMŽ 3 ÆWO UŁ d qOGA b Ê uŁ bI0 nK K qOGA ÊUJ lOłd u bO W uDÝô jI DVD VIDEO e jG 3 u bOH W uDÝ qOGAð UMŁ DVD VIDEO Æ w U ÊUJ q U dIð Ê uŁ bI0 nK K qOGA ÊUJ UN qIM ÆqOGA n Q p bFÐË...

Page 87: ...Ýô WOMO ÊuJð U bMŽ e XDG Æ UN qOGAð UI r p bFÐË UOJOðU uðË W uDÝô œ bF Ýô l Ë w v Š WOzUÐdNJ W UD s WKOK WOL öN Ý r qO uð pKÝ Ÿe UN sŽ UOK WOzUÐdNJ W UD qBH ÆqOGA K WOzUÐdNJ W UD AC ÆWOzUÐdNJ W UD W s FM MODE uB u Èu j r dE qO UH qł s WOÝUÝô qOGA UOKLŽ vKŽ œułu Æ W H µ wF u uB U jOAMð ÆwF u uB ôU qLF jO uB l Ë jOAMð pMJ1 œbF bB qOGAð bMŽ UOJOðU uðË jO uB l Ë jOAMð pMJ1 wL d jO uB ÂUE Ë wL d w Ëœ Â...

Page 88: ...L ANALOG VOLUME SPK MHz TUNED STEREO AUTO MUTING L R ANALOG VOLUME SPK AUTO MUTING L R CONTROL bFÐ sŽ rJ bŠË s Włu jG FM AM Æ nO u vKŽ jGC lÐUð Ë lÐU UÐ jG Ë TUNING 9 ÆÁb dð Íc œœd œU r v Š e vKŽ jGC WFÐU Ë jG TUNING 9 Æœœd b e e vKŽ jGC WFÐU Ë jG TUNING Æœœd qKI UEŠö e d Ë jGC lÐU ð U bMŽ CONTROL 3 e Ë TUNING 9 œułu e Ë bFÐ sŽ rJ bŠË vKŽ CONTROL 2 e Ë TUNING vKŽ nO u r v Š dOOG œœd lÐU bFÐ sŽ rJ ...

Page 89: ... YÐ U I Ý w w WÐuF UM ÊuJ U bMŽ FM pMJ1 u dO Włu U I Ý l Ë dOOGð FM Włu YÐ U I Ý UMŁ FM Æ Włu U I Ý l Ë Êeš pMJ1 FM Æo j WD qJ cð b q Ò ìd ÆWO U uD qLF œb X Ë błu uD s bÐ j C s UN ô q j C vG ÆWO UŁ d WO U ô WŠuK vKŽ WD v ŸUL Ýô UMŁ FM jG e CONTROL e Ë 5 Uýô dNEð v Š lÐU UÐ FM MODE Æ dF WýUý vKŽ Uýô UIÐ UMŁ FM MODE e jG dF WýUý vKŽ CONTROL 3 e Ë 2 UO šô ÍœUŠô uB l Ë MONO Æ l Ë œU ð r e UNÐ jGCð d q...

Page 90: ...j C U UOÐ dF Æ Æ dF WýUý vKŽ bMÐ UO šô OG e UNÐ jGCð d q w Ò UL ÊUO d ÆqHÝô w u u Æ U bM j C SUBWFR FRNT SP CNTR SP REAR SP FRNT D CNTR D REAR D CROSS LFE D COMP DGT AUTO SR VOUT WOKLF dł wL d qšb dÞ j bMŽ U DIGITAL IN Æ cð b q Ò ìd s UN ô q j C vG ÆWO U uD qLF œb X Ë błu uD s bÐ j C ÆWO UŁ d j C jG SETTING Æ j C Êô qG Að CONTROL UÞu CK WýUý vKŽ oÐU w U j C bMÐ dNE ÆWO Ozd Æ dF e jG CONTROL e Ë 5 ...

Page 91: ... ÊU UI d š rÝ LRG dO d š rÝ s q UI ÊU Ë UI SML dOG Æ UI d š SML dOG UO š pMJ1 ô WO U ô UŽUL K UI LRG dO ÆWOHK UŽUL Ë e d WŽUL Basic Settings DIGITAL AUTO VOLUME L R SPK 7 UŽUL W U FRNT D UŽUL W U WO U ô CNTR D e d WŽULÝ W U Ë REAR D WOHK UŽUL W U rN dBMŽ UC w UŽUL v ŸUL Ýô ÊUJ s W U ÆjO uB ŸU Ë s sJ2 jO u qC vKŽ uB K WDÝ uÐ Æ UŽUL v pŽUL Ý ÊUJ s W U j C ÃU dOšQð X Ë UN c j C WŽUL W U j v Ÿułd u ô ...

Page 92: ... H U O q E d r ð G O O d Ý r B b u ł u œ Ž K v H W Æ SPK DIGITAL AUTO VOLUME L R 7 w dH œœd CROSS w dH F qJAÐ UÐ u s uJð dOGB UŽUL lOD ð ô Ò w Æ U UOJOðU uðË UN c bOF l Ë ÍUÐ dOG WŽULÝ ULF Ý W UŠ UŽUL vKŽ dOGB WŽUL K WMOF U u d UMŽ l uð Æ dO J w dH œœd Èu j O qJAÐ WHOþu Ác ULF Ýô Æ UN l W u u dOGB WŽUL UI V Š l u d š LRG dO Ác qOFHð r ô UŽUL qJ ÆWHOþu WO U UÞu C bŠ d š 80Hz WOÞËd WŽUL UI ÊuJ U bMŽ...

Page 93: ...Ëœ bB UO š WDÝ uÐ WÞU Ð qJÐ jO uB l Ë jOAMð pMJ1 jO uB bB p c U wL d qšb ÊuJ U bMŽ ÆwzUIK WO U UÞu C bŠ d š ON O ULz œ wC Ò wzUIK jO uB s AUTO SURROUND Æ dF WýUý vKŽ r uÝ UMI œbF Uýô ušœ W UŠ w Ærzö jO uB l Ë vKŽ q u Ë UM wL d w Ëœ ÂUE Uý ušœ W UŠ w ÂUE Uý DTS uB Uý WMLC UM l Ë UO š r uÝ jO PL II MOVIE Æ Ë UM wL d w Ëœ ÂUE Uý ušœ W UŠ w ÂUE Uý DTS uB Uý ÊËbÐ UM l Ë UO š r uÝ jO STEREO Æ OG ô uÝ Èd...

Page 94: ...ROL 3 e Ë 2 ÆWO U ô WŽUL œUFð j C OG e UNÐ jGCð d q w Ò wK UL ÊUO d ADJUST CONTROL SPK DIGITAL AUTO VOLUME L R CONTROL SPK DIGITAL AUTO VOLUME L R CENTER R 21 L 21 qOGA WŠuK vKŽ œułu ô qLF Ý UN cN WO Ozd UÞu C qLF ÆWO U ô WýUý s ÊUO wH U dIð Ê uŁ µ b WOKLŽ dł ÂbŽ W UŠ w Æ dF UŽUL Ãdš œUFð UM ÝUÐ uB q bFð qLŽ UC pMJ1 ÆbFÐ sŽ rJ bŠË s WO U ô q bF jG ADJUST OG UC lÐU UÐ Ò ÆÊUO d dF WýUý vKŽ ÊUO qOJAð...

Page 95: ...PK DIGITAL AUTO VOLUME L R 7 UŽUL Ãdš U u WOŽdH dH u WŽULÝ SUBWFR e d WŽULÝ CENTER WOHK Èd O WŽUL REAR L Ë WOHK vMLO WŽUL REAR R WŽUL U uKF X U UŽUL Ãdš U u q bFð pMJ1 Æ O qJAÐ WÞu C jI WOHK WŽUL Ë ØË e d WŽUL Ãd Èu j pMJ1 Æ W H dE UDOA jO uB ŸU Ë bŠ ÊuJ U bMŽ Èb öš s WŽUL Ãdš Èu j v Æ uDš q uHÐ WEŠö 0 Ož Æw Ëô j C u Ò Ædš j dNE uÝ j C d 7 WO UF Èu DAP EFFECT ŸU Ë bŠ jOAMð UMŁ DAP O wC Ò s DSP dF ...

Page 96: ...qš b V Æd uBÐ jO u Ë u dO Ý u UO UF WEŠö Ë wL d w Ëœ Z dÐ lOL U dIð sJ1 DTS 5 ŽuL w W UG UMI œbF Z d 5 1 Z dÐË UM u UÐ ŸU L Ýö Æ UM wL d w Ëœ Z U dÐ qOGAð UMŁ jO uB Ë UM DTS pMJ1 pOłu ËdÐ w Ëœ ÂUE ULF Ý II Æ MB Ò WOJ d Ÿ d š dÐ ÆWOL d Õd WLE W ÝR s hOšd Ð l No 5 451 942 KF Ë WO UŽ Èdš Ÿ d š dÐ U UC l Ò ÆWI DTS Ë wL d jO uB ÂUE DTS WLE W ÝR WK W U U öŽ w WOL d Õd WLE W ÝR ÆWOL d Õd 1996 ÆWþuH uI lO...

Page 97: ... Uýô DIGITAL SURROUND MOVIE MUSIC CLUB CLUB ST wL d w Ëœ ÂUE 䡬 䡬 UMI œbF wL d w Ëœ ÂUE 䡬 䡬 䡬 UM E U  B u O j œ Ë w 䡬 䡬 䡬 U ð d f M U jO uB ÂUE wL d DTS 䡬 䡬 UMI œbF jO uB ÂUE wL d DTS 䡬 䡬 䡬 UM PCM wDš 䡬 䡬 䡬 䡬 䡬 䡬 䡬 䡬 dþUM 䡬 䡬 䡬 䡬 䡬 䡬 䡬 䡬 uMI q u dO Ý lÝË u dO Ý u U s uJð uMI q u dO Ý l Ë lOD Æ WDOAM Ë W u u UŽUL q ULF ÝUÐ UŽUL ÊuJð U bMŽ uMI q u dO Ý l Ë ULF Ý sJ1 qO uð sŽ dEM iGÐ UN l W u u WOHK ...

Page 98: ... bMŽ wC HA Uýô Ë uB Ò Æw Ëœ jO uB ÂUEMÐ d LFE iH M œœd WO UF UM Uý qšbð U bMŽ wC LFE Æ ON OFF SURROUND MODE REC MODE SOUND 7 SURR ON OFF jO uB ŸU Ë UO š bB qOGAð bMŽ UO š pMJ1 jO uB l Ë jOAMð l UM Ædš jO u l Ë W u u UŽUL œbŽ vKŽ œUL Ž jO uB ŸU Ë nK ð uÝ ÆqOGA u Ë W O uBÐ UŽUL U uKF j s b Qð Æ µ Ë W H dE ULF Ý pMJ1 ô W u u dOž WOHK UŽUL X U ŸU Ë DAP Æ uMI q u dO Ý l ËË WO U ô WŠuK vKŽ jO uB l Ë jG ...

Page 99: ...œułu TEST CENTER REAR L REAR R SUBWOOFER EFFECT wL d w Ëœ ÂUE 䡬 䡬 䡬 䡬 䡬 E U  B u O j d L w DTS 䡬 䡬 䡬 䡬 䡬 pOłu ËdÐ w Ëœ ÂUE II 䡬 䡬 䡬 䡬 䡬 wL d uB Z UF ŸU Ë DAP 䡬 䡬 䡬 䡬 䡬 uMI q u dO Ý 䡬 䡬 䡬 䡬 䡬 WEŠö Æ U jO uB l uÐ WKLF dOž UŽUL q bFð pMJ1 ô 䡬 sJ2 sJ2 dOž bM l u UEŠö WDOAM UŽUL K jI UŽUL Ãdš U u q bFð pMJ1 Æ dF WýUý vKŽ UŽUL UMO wCð ŸU Ë bŠ ÊuJ U bMŽ e d WŽUL Ãd U u q bFð pMJ1 ô DAP ÆUDOA ŸU Ë bŠ ÊuJ...

Page 100: ... U uDÝ qOGAð UN c lOD CD R U uDÝ Ë CD RW U uDÝô Ác qO ð wB ý dðuO L vKŽ WK u W uDÝ U uHÐ CD Æ U uDÝ qOGAð UN c lOD CD R U uDÝ Ë CD RW UHK qO ð MP3 UHK Ë JPEG Æ U uDÝô Ác vKŽ vKŽ œUL Ž p Ë U uDÝô Ác qG Að ô Ê sJ1 p l Ë U uDÝô Ác qO ð ôUŠ Ë U uDÝô Ác hzUBš r Uš qJAÐ Æ U uDÝô Ác vKŽ ŒUÝË lIÐ Ë d œułË W uDÝ hzUBšË qOJAð b b MP3 W uDÝ Ë JPEG WDÝ uÐ V Ð cN ÆqO K qLF UN Ë WÐU J dOHAð Z U dÐ dŽô iFÐ qB Ê ...

Page 101: ...Ë l o u dOž UN 7 qOGA j WHOþË PBC J9 Ò ÆWLzU qOGAð WOKLFÐ ŸU L Ýô s qOGA j WHOþË pM WLzUI qOGAð WDÝ uÐ dF u bOH W uDÝ qOGAð b ð U bMŽ UO šô WLzU dŽ r VCD Ë W uDÝ SVCD O ð ÆqOGA j eO l Ò ÂU Ëbł UO šô WLzU s Ë W d u U uDÝô iFÐ dFð Ê sJ1 Æ UO šô qł s ÆWL I WýUý Æ œU qOGAðË UO šô WLzUI dŽ ULF ÝUÐ WýUA l qŽUH pMJ1 E d U A d Ë Õ w ô Ý H q Š u O e ô Ý U Ý O W A G O q I U z L W s ł q H U O q Š u Ž L K O W...

Page 102: ...Ë dOOG c d š Æ W H dE ÆdEM PROG qOGA c d š Æ W H dE ÆZ U d RND qOGA K c d š W H dE Æwz uAF Æ 8 5Mbps DVD VIDEO TITLE 14 TOTAL1 25 58 CHAP 23 8 5Mbps DVD VIDEO TITLE 14 TOTAL1 25 58 CHAP 23 8 5Mbps TITLE 14 TOTAL1 25 58 CHAP 23 OFF 1 3 1 3 1 3 TIME CHAP DVD VIDEO u bO W uDÝ qOGAð bMŽ U DVD VIDEO qHÝö V WLzU l U uDÝô q WýUA vKŽ dF j dý ULF Ý ULF Ý pMJ1Ë W uDÝô qOL UMŁ W uDÝô U uKF h pMJ1 ÆWýUA vKŽ d...

Page 103: ...E CHAP 8 5Mbps DVD VIDEO TITLE 14 TOTAL1 25 58 CHAP 23 1 3 1 3 1 3 TIME CHAP OFF 8 5Mbps DVD VIDEO TITLE 14 TOTAL1 25 58 CHAP 23 1 3 1 3 1 3 TIME CHAP TITLE 8 5Mbps DVD VIDEO TITLE 14 TOTAL1 25 58 CHAP 23 TITLE 1 3 1 3 1 3 TIME CHAP CHOICE ENTER ON SCREEN DIGEST TOP MENU MENU RETURN X u ÊUOÐ dOOGð c U Ë WýUA vKŽ dF j dý qš œ X u U uKF dOOGð pMJ1 ÆWO Ozd bŠu vKŽ œułu dF UMŁ Ë qOGA öš UI ô WýUA vKŽ ...

Page 104: ...qOGAð UMŁ dF WýUý vKŽ ÊUO uŠ VCD SVCD W uDÝ qOGAð UMŁ VCD SVCD qOGA j WHOþË l WK PBC wK UL dF WýUý vKŽ qOGA U uKF dNEð W uDÝ qOGAð bMŽ U VCD WHOþË ULF ÝUÐ PBC W uDÝ qOGAð bMŽ U VCD WHOþË ULF Ý ÊËbÐ PBC 1 2 3 7 W uDÝ WLzU s VCD SVCD qOGA j WHOþË l PBC W uDÝ Íu VCD W uDÝ Ë SVCD j WHOþË l WK qOGA PBC qOL bFÐ Æ U Ëbł WLzU q UNÐ W Uš WLzU vKŽ e d dNE U uDÝô Ác q PBC pMJ1 Æ dF WýUý vKŽ Æ W H UC dE WLzUI...

Page 105: ...O š r ÆWK VFP 10 0 10 100 TV RETURN SUBTITLE ANGLE ZOOM SURR MODE DIMMER MUTING TV VOL VOLUME SUBWOOFER PROGRESSIVE 1 1 1 3 1 3 1 1 3 2 2 3 3 3 3 8 5Mbps DVD VIDEO TITLE 14 TOTAL1 25 58 CHAP 23 OFF 1 3 1 3 1 3 TIME CHAP 1 DVD Player Operatio dýR jG e Ë 5 UO šô lÐU UÐ ÆWÐuKD b UA W Ë OG ð e UNÐ jGCð d q w Ò ÆdEM W Ë d ušb jG ENTER Æ ÆeHI c U wH ð WýUA vKŽ dF j dý qOGAð UI ô WýUA vKŽ dF jG ON SCREEN...

Page 106: ...ITLE ANGLE SURR ON OFF SURR MODE DIMMER SUBWOOFER REAR R PROGRESSIVE ENGLISH ENGLISH 1 3 1 3 8 5Mbps DVD VIDEO TITLE 14 TOTAL1 25 58 CHAP 23 OFF 1 3 1 3 1 3 TIME CHAP ENGLISH ušb jG ENTER Æ ÆeHI c U wH ð WýUA vKŽ dF j dý qOGAð UI ô WýUA vKŽ dF jG ON SCREEN Æ UEŠö u bO W uDÝô DVD VIDEO qš œ dB WOŽdH s ËUMF UG iFÐ r dE ÆeHI c U WGK dHý Ëbł Ƶ W H vKŽ œułu W uDÝô SVCD W uDÝ Íu Ê sJ1 SVCD ÆWOŽd s ËUMŽ...

Page 107: ...R REAR L REAR R PROGRESSIVE ST ST ST ST DVD Player Operations uB jG AUDIO UM UO šô lÐU UÐ ÆWÐuKD uB OG ð e UNÐ jGCð d q w Ò Æ uB UM d W uDÝô VCD U R L ST W b v Ÿuł ST ÆÍœUŽ u dO Ý u qOGAð v ŸUL Ýö L uB UM v ŸUL Ýö L Æ Èd O R uB UM v ŸUL Ýö R Æ vMLO W uDÝô SVCD U R 2 L 2 R 1 L 1 ST 2 ST 1 W b v Ÿuł ST 1 ST 2 UMI ÍœUŽ u dO Ý u qOGAð v ŸUL Ýö u dO ST Æ Ë L 1 L 2 uB UM v ŸUL Ýö L Æ Ë Èd O R 1 R 2 uB U...

Page 108: ... VOL VOLUME SUBWOOFER SOUND CENTER REAR L REAR R PROGRESSIVE 8 5Mbps DVD VIDEO TITLE 14 TOTAL1 25 58 CHAP 23 OFF 1 3 1 3 1 3 TIME CHAP CHAPTER _ 7 uKD ÊUJ œU X u Y Ð s wCIM X u b b WDÝ uÐ uKD ÊUJ s qOGA bÐ pMJ1 W UG w U Ê uMF W bÐ 9 59 59 u bO W uDÝô DVD VIDEO Ë W UG W uDÝô W bÐ s 99 59 U uDÝô VCD SVCD CD Æ jG bFÐ sŽ rJ bŠË ULF Ý q DVD dOOG ÆbFÐ sŽ rJ bŠË qOGAð l Ë u bO W uDÝô DVD VIDEO qOGA öš W ...

Page 109: ...G DIGEST Æ Æb UA U bI π W UG dŽ r u bOH W uDÝ n uð UMŁ DVD VIDEO ÆÊu eHK WýUý vKŽ Ê uMŽ qJ b UA U bI dNEð u bOH W uDÝ qOGAð UMŁ DVD VIDEO WýUý vKŽ w U Ê uMF w qB qJ b UA U bI dNEð ÆÊu eHK W uDÝ ÊuJð U bMŽ VCD Ë SVCD qš œ WKL UN ÆÊu eHK WýUý vKŽ U qJ b UA U bI dNEð DVD Player Operation CHOICE ENTER ON SCREEN ZOOM DIGEST TOP MENU MENU RETURN MUTING TV VOL VOLUME dýR jG 5 3 2 rN p d Æ uKD dEM vKŽ dŽ ...

Page 110: ...Šö X R UI ô WFÐU W ÐU uB vKŽjGC XFÐUðËXDG STROBE 8 UMŁ Ê uŁ bF Æ uB r r ÆX ËdOšQðl ÍœUŽ dŽWŽd ÐÂbI ðsJ ËW ÐUŁ u πUC dNEð dF e ULF ÝUÐ vKŽô w u c WOKLF dł sJ1 8 ÆWO U ô WŠuK vKŽ œułu 7 W OD W d UÐ dF jG bFÐ sŽ rJ bŠË ULF Ý q DVD dOOG ÆbFÐ sŽ rJ bŠË qOGAð l Ë qOGA UMŁ X R UI ô jG 8 STROBE WDIM bMŽ ÆW OD W d UÐ dF U bMŽ b ð Ê b dð w ÆX R qJAÐ qOGA n u e vKŽ jGC lÐUðË jG e Ë 4 Æ e vKŽ jGC lÐUðË jG ÂU ...

Page 111: ...l u UO š bMŽ USER1 Ë USER2 Æ uB dNE q bFð pMJ1 uBK oO b Z UF jG VFP p bFÐË dýR jG 3 e Ë 2 UO šô lÐU UÐ l Ë USER1 Ë USER2 Æ dýR jG e Ë 5 UO šô lÐU UÐ ÆtK bFð b dð Íc d U Æ uB s b Q WDÝ uÐ qCH dNE ÊUO w bð qJAÐ j GAMMA UM uK U ô bý d U c j C ełô bý vKŽ WE U l WOFO D WHOH Æ v W UH Ë WL F BRIGHTNESS WýUA U bý d U c j C Æ v CONTRAST WýUA s U ð d U c j C Æ v SATURATION WýUA Êu oLŽ d U c j C Æ v TINT WýU...

Page 112: ...ogram Time 00 04 14 µ qOGA jG 3 Æ ÆZ d VOðd UÐ qOGA b Z U d qOGAð UI ô UI ô jG 7 Æ W uDÝ qOGAð bMŽ VCD Ë SVCD ÆÈdš d Z U d WýUý dNEð uD bŽ Z U d d d Ë Æ Z U d qOGAð l Ë UN Ë uD q UG ô wK UL t KLŽ Íc Z U d wG UI ô jG 7 ÆqOGA UI ô WýUA vKŽ dF jG ON SCREEN dF j dý qOGA ÆWýUA vKŽ UI ô jG 7 Æ qOGAð UI Ë W uDÝô Ã dš WDÝ uÐ Z U d UG UC pMJ1 Æ UN WýUA vKŽ dF j dý qOGAð UI ô WýUA vKŽ dF jG ON SCREEN Æ WEŠö...

Page 113: ... Ë d š ALL q qOGAð r uÝ wz uAF qOGA UMŁ Æwz uAŽ VOðd Ð dJ qJAÐ W uDÝô U r I UO š sJ1 ô A B UI UMŁ Ë wz uAF Ë Z U d qOGAð UMŁ ÆW uDÝô qOGAð WýUA vKŽ dF j dý qOGAð UI ô WýUA vKŽ dF jG ON SCREEN Æ qOGA dJð UG ô UI d š OFF uD w ušb jG p bFÐË ENTER Æ 7 uKD eł dJð WDIM W b b b WDÝ uÐ uKD r qOGAð dJð pMJ1 A W UNM Ë WDIM B Æ qOGA öš WýUA vKŽ dF jG ON SCREEN l WýUA vKŽ dF j dý dNE v Š lÐU UÐ ÆÊu eHK WýUý v...

Page 114: ... v ý U ý W F d Æ 1 J s Ê u È K n MP3 Ž K v F K u U K n Ë ð L v ID3 Tag Š O Y r ð O q Ý r ô u Â Ë G M w Ë Ž M u Ê U a Æ u ł b U Ê ID3v1 ID3 Tag W Ë ID3v2 ID3 Tag W Æ M B Ð O q q K n MP3 Ð M W Ž O M W O K u d ð e Ë W I q F K u U O K u Ð X Ð U U O W Æ ô D O l c N U ð A G O q K H U Ð M W I q F K u U q s O K u Ð X Ð U U O W Æ U X ö s K H U MP3 Ë K H U JPEG K W Ž K v ô Ý D u W j Ë l j MP3 JPEG œ š q U z...

Page 115: ... REAR L REAR R U r b b WDÝ uÐ qOGA b ÂU ô jG 10 1 10 Æ U r Ušœô U e jG r d UO šô 3 Æ jG r d UO šô 10 p bFÐË 4 Æ jG r d UO šô 10 10 p bFÐË 4 Æ ô š O U d r G j 10 Ž A d d Ë Ð F b p G j e 10 Æ U s qOGA b p bFÐË U r ÊUOÐ qš œ qšb r d dNE ÆtðœbŠ Íc dJ qOGA œułu U q Ë WO U WŽuL Ë U LK qOGA dJð pMJ1 ÆWKL W uDÝô vKŽ UMŁ Ë qOGA UMŁ UI ô bFÐ sŽ rJ bŠË s jI dJ jG REPEAT Æ O dNE Ò WýUý vKŽ dJ s MP3 CONTROL O ...

Page 116: ...K qOGAð sJ1 ô Æ JPEG UHK Ë w b JPEG ÆÊ bI ÊËbÐ U u JPEG ÍbŽUI j dO UJK U uH c qLF Æa X d ô U H WOL d U u JPEG w b U HB U uH c qLF ÆX d ô U u JPEG ÆqLF U œU Ë b u U uH c Ê bI ÊËbÐ U uDÝ iFÐ qG Að ô Ê sJ1 JPEG qO ð ôUŠ Ë hzUBš V Ð Æ U uDÝô Ác WŽuL ππ W UG nK µ W UG b ö dŽ qOGAð dŽ qOGAð UOJOðU uðË Èdšô bFÐ bŠ Ë W ÐU uB uB pMJ1 Æ b ö fH XJK WO U ô WŠuK vKŽ œułu ô ULF Ý UC pMJ1 ÆbFÐ sŽ rJ bŠË vKŽ w UL...

Page 117: ...łd ØWŽd Ð ÂU ö qOGA dJ qOGA wz uAF qOGA Æ UO šô rz u Ë WýUA vKŽ dF b ö dŽ qOGAð qš œ dL uBÐ œuÝ WýUý dNþ nK dOž UO UŠ qG A Íc nK ÊuJ Ê sJ1 JPEG Ác w ÆÍbŽU jš nK qOGA K qÐU nK d š W U JPEG ö ÆWO UŁ d ÍbŽU jš UI ô jG 7 WLzUI Ë MENU W uDÝUÐ rJ WýUý H JPEG CONTROL Æ a Ædš nK UO šô uÞ X Ë qL Ê sJ1 t kŠô W uDÝ vKŽ œułu UHK iFÐ qG Að Ê sJ1 JPEG ÆÁuA uBÐ W uDÝ j WýUý öš s öOGA JPEG CONTROL W uDÝUÐ rJ WýUý...

Page 118: ...DÝô WGK UO š UC pMJ1 ÆwŽdH UMŁ Êu eHK WýUý vKŽ WKLF Æ UN c qOGAð uB WLzU PICTURE π W H dE WÐuKD UO šô UO š pMJ1 ÆV d WýUý Ë uB V Š uB WLzU AUDIO dE µ W H cN uB UÞu q bFð pMJ1 ÆWLzUI Ác öš s UN U z L W j L U Ž W SETTING SPK E d H W µ ÆWŽUL UÞu q bFð pMJ1 Ãdš Èu q bFð UC pMJ1 Æ UŽUL Èdšô UÞu C WLzU OTHERS µ W H dE iF UÞu C dOOGð pMJ1 q ô qH WHOþË j C ÆnzUþu ÆWLzUI Ác qLF Ý ENGLISH ENGLISH ENGLISH EN...

Page 119: ... Ë j bMŽ U jG UO šô WLzU qOGAð q DVD v bB dOOG GA bB Ò q DVD Æ UO šô jG CHOICE Æ WGK WLzU dNEð LANGUAGE ÆÊu eHK vKŽ dýR UNÐ jGCð d q w 3 e Ë 2 OG ð Ò ÆWLzUI d dýR jG 3 e Ë 2 uB WLzU dF lÐU UÐ PICTURE Æ OG ð e UNÐ jGCð d q w Ò ÆWLzUI d dýR jG e Ë 5 rN p d lÐU UÐ vKŽ w b l Ë PROGRESSIVE MODE Æ ušb jG ENTER Æ WKÐUI UO šô UNO Ã b eHI WLzU dNEð Æ UO šö ENGLISH ENGLISH ENGLISH ENGLISH LANGUAGE MENU LANG...

Page 120: ... rK dF VÝUM l u c Æw bð wzUIKð AUTO vKŽ Íu W uDÝ dF l u c qLF dF Æu bO Ë rK bB œ u Ò Ÿu vKŽ UN WO U W uDÝö u bO bB Ë rK uB ÆW uDÝô U uKF V Š WýuA Ë W Ë dOž dF u X U dOOG ËUŠ WKLJ dOž uBK WKzU uD Ë ÆÈdšô ŸU Ëô vKŽ 7 WGK WLzU LANGUAGE WLzUI WG UO š pMJ1 MENU LANGUAGE uB WG Ë AUDIO LANGUAGE wŽdH Ê uMF Ë SUBTITLE q jI ÆqOGA WLzUI WG MENU LANGUAGE Æ œbF UG U uDÝô iFÐ pK 9 s WGK dHý Ë UGK ÈbŠ d š AA v Z...

Page 121: ...N BO BR CA CO CS CY DA DZ EL EO ET EU Ž H U W Ð U W d J U e W N d W Ž d Ð O W Ý U O e W 1 U W Ð O U O W Ð A J O d W Ð O ö Ë Ý O W Ð K G U W Ð N U W Ð ö O W Ð M G U O W Ð M G ö ð O W Ð d u O W U ô O W u Ý O J U O W ý O J O W Ë K e W œ U O W Ð u ð U O W u U O W Ý d O W Ý u O W Ð U Ý O J O W Ý u œ O W Ý u b W Ý u Š O K O W ð U O K O W ð O K u ž O W Þ U ł O J U O W ð U ö b W ð G d M O W ð d L U O W ð ...

Page 122: ...LzU vKŽ WOHK SIZE ÁcN h H WLG Ãd ð ô Æ UŽUL 3 0m DISTANCE FRONT SPEAKER RETURN CENTER SPEAKER REAR SPEAKER TEST TONE 3 0m 3 0m UO šô WLzU öOGAð 7 WŽUL j WLzU SPK SETTING WŽUL UI SIZE š d c u l ô œ š U I U z L W H d Ž O W I U SIZE L U Ž W Æ WO U ô WŽUL FRONT SPEAKER e d WŽULÝ CENTER SPEAKER WOHK WŽUL REAR SPEAKER WŽULÝ qJ WO U UÞu C bŠ d š dO UI LARGE LRG ÊuJ U bMŽ l u c d š ÆUO dO WŽUL UI dOG UI S...

Page 123: ... 8 x 5 a Æ w Êu eHK WýUý vKŽ WýUA vKŽ dF qO œ Uý dNEð ÆWýUA vKŽ dF qO œ WHOþË qOGAð UMŁ qOGA W bÐ u bO XOÝU q WDÝ uÐ uB qO ð bMŽ VCR j UI ô l Ë vKŽ WHOþu OFF M Ò j dý vKŽ UMO qO ð V Æu bOH v ŠË WýUA vKŽ dF j dýË UO šô WLzU qO ð sJ1 UI ô l Ë vKŽ WHOþu j bMŽ OFF Æ WO U UÞu C bŠ d š qOGAð ON ÆWHOþu Ác jOAM l u c d š UI OFF ÆWHOþu Ác jOAMð UI ô l u c d š Ëe U uKF Ë µ W H dE WOŽdH s ËUMF dNEð bMŽ v ŠË ...

Page 124: ...Ý qOGAð bOOIð pMJ1 DVD VIDEO dþUM vKŽ Íu w bŠ ô Æp KzUŽ œ d ô W ÝUM dOž dþUM vKŽ Íu w U uDÝô Ë VŽ ÆWHOþu Ác UG ô U uDÝô Ác q qOGAð lOD u bOH U uDÝô jI j C c qOFHð r DVD VIDEO Íu w Èu v bOOIð d ô Èu q ô qH Èu U uKF vKŽ Æ bOIð q ô ÆqOGA UI UMŁ jI q ô qH WHOþË j pMJ1 7 q ô qH j UO šô jG CHOICE jG p bFÐË dýR 3 e Ë 2 UÞu C WLzU dF Èdšô OTHERS Æ dýR jG e Ë 5 p d lÐU UÐ rN q ô qH WHOþË vKŽ PARENTAL LOCK ...

Page 125: ...šô jG CHOICE jG p bFÐË dýR 3 e Ë 2 UÞu C WLzU dF Èdšô OTHERS Æ dýR jG e Ë 5 p d lÐU UÐ rN q ô qH WHOþË vKŽ PARENTAL LOCK ušb jG p bFÐË ENTER Æ q ô qH WHOþu WOŽdH WLzUI dNEð PARENTAL LOCK vKŽ ÆÊu eHK WýUý rN p d pMJ1 d WLK l Ë vKŽ PASSWORD ÃËd l Ë vKŽ Ë EXIT Æd WLK Ušœ q jI ÂU ô jG 9 0 WLKJ ÂU WFÐ ô Ušœô ušb jG p bFÐË d ENTER Æ Èdš d ËUŠ QDš Uý dNEð W ÞUš dÝ WLK XKšœ WRONG RETRY PRESS 0 9 KEY WLzUI...

Page 126: ...1 U Ð u Í ł L N u W ô Ë b 1 I d Þ O W A F O W Æ M U Ê Ý U X u ý O U O A M 5 Ý d ö J U O O d U O u ð u O u O U u L u ô ð H O U L U d W F d Ð O W K O O W G d u U u u b O U ł L N u W u b O U b ž A I d ł e U ý U U w O U U M G u O U U U Ë ł e U U U A L U O W U ð O M O p u U O U u O d Ò U D U u A O u U b n U ô Ë Í J O p U O e U u O o U O O U O u U O b Ë O U M O d ł e d u u p O O d U O J U ž u u ô b M d ...

Page 127: ... dÐ qOGAð ÂbŽ Ë qOGAð d dI UN c w œułu eO u bOH DVD VIDEO dþUMLK UOI q ô qH Èu W UI WDÝ uÐ Z U d U bI u C Ë WOLOKFð dE WNłË s a UNO užd dOž Z U dÐ qH Èu ÊU ÆqLF WDÝ uÐ UN c vKŽ W uDÝô qOGAð r uÝ qLF j Èu s bOOIð q W uDÝô ÆW uDÝô W uDÝô WLzU N WýUA vKŽ dŽ Ò s ËUMF u ô uB UO š sJ1 v Š e u bOH W uDÝ vKŽ WK a œbF U Ëe WOŽdH DVD VIDEO Æ uB UI W W ÆÊu eHK WýUý vKŽ W ËdF uB dŽ v uÞ UI W w W œUO Žô U u eH...

Page 128: ... eHK vKŽ œułu V d W U GA u bOH qšœ l Ë j bMŽ Ò q DVD X U u L l Ë vKŽ wKš b component u bOH dÞ qšœ l UN c q Ë Æu bO X U u L öÝ ULF ÝUÐ Êu eHK vKŽ œułu X U u L u bO qšœ UEŠö qO u dDÐ Êu eHK l UN qO uð bMŽ AV COMPU LINK EX qšœ l u wJOðU uðËô UO šô ULF Ý pMJ1 ô X U u L u bO q ULF Ý WDÝ uÐ Æ µ W H dE Êu eHK u bO XOÝU q jI qO uð bMŽ VCR Æ uB W œUŠ wMO fÐ u l öÝ ULF ÝUÐ UN l dýU u bO XOÝU q q Ë UN c l u ...

Page 129: ... q VCR Æ OG Ë UOJOðU uðË Êu eHK qG A Ò YOŠ rzö l u v qšb l Ë d Æ dF u b UA pMJ1 jG qO W ULŠ WM tM ŸËeM dOž u bO XOÝU Ušœ bMŽ qOGA 3 u bOH XOÝU q vKŽ œułu VCR vKŽ œułu Ë ÆW O M fH vKŽ uB pMJ1 ÆbFÐ sŽ rJ bŠË W uDÝ qOGAð DVD bŠ Ë W LKÐ GA vKŽ qOGA bÐ bMŽ WÞU Ð Ò q DVD ŸU L Ýô pMJ1 wKš b UOJOðU uðË Êu eHK qG A ÆU Ëb Èdšô OðUH j ÊËœ qOGA UÐ OG Ë Ò Æ dF u b UA pMJ1 YOŠ rzö l u v qšb l Ë d Êu eHK qšœ l u...

Page 130: ...FM AM FM MODE STROBE EFFECT TV DBS CH ANALOG DIGITAL TEST AUDIO INPUT SUBTITLE SURR ON OFF SURR MODE SUBWOOFER SOUND CENTER REAR L REAR R 2 3 1 5 6 4 8 9 7 VFP 10 0 10 100 TV RETURN VCR DBS DVD TV VIDEO REW TUNING 9 FF REPEAT SLEEP TAPE TV CDR FM AM FM MODE STROBE EFFECT TV DBS CH ANALOG DIGITAL TEST AUDIO INPUT SUBTITLE SURR ON OFF SURR MODE SUBWOOFER SOUND CENTER REAR L REAR R PROGRESSIVE uB U U...

Page 131: ... bFÐË 5 Æ TV RETURN ÆWO U UMI l WIÐU UMI œU 2 3 1 5 6 4 8 9 7 VFP 10 0 10 100 TV RETURN VCR DBS DVD TV VIDEO REW TUNING 9 FF REPEAT SLEEP VCR DBS TV AUDIO TAPE TV CDR FM AM FM MODE STROBE EFFECT TV DBS CH ANALOG DIGITAL TEST AUDIO INPUT SUBTITLE ANGLE ZOOM SURR ON OFF SURR MODE DIMMER MUTING TV VOL VOLUME SUBWOOFER SOUND STANDBY ON CENTER REAR L REAR R PROGRESSIVE Operating JVC s Audio Video Compo...

Page 132: ...elefunken 40 42 69 Thomson 71 72 Toshiba 37 43 44 Zenith 45 46 Êu eHK K WF UB U dA dHý WEŠö W UŠ w Æo UFý ÊËbÐ dOOG K W dF WF UB U dA dHý Æ UN qOGAð Ác bFÐ sŽ rJ bŠË lOD ð ô dHA dOOGð 00 dHA w Ëô j C u JVC Æ UI WÞu C Uýô dHý dOOGð WŽUMB dšô U dA WŽUM eNł qOGA JVC ULF ÝUÐ bFÐ sŽ rJ bŠË łË Ò œułu bFÐ sŽ rJ U Š vKŽ dýU bFÐ sŽ rJ bŠË t Æ UNł q vKŽ bB UO š V bFÐ sŽ rJ bŠË WDÝ uÐ bB qOGA ÆbFÐ sŽ rJ bŠË ...

Page 133: ... jG n u qOGAð STANDBY ON DBS Æ Æ n u jG DBS Æ Æ WF UB W dA dHý qšœ ô ULF ÝUÐ 1 9 0 Æ Æ dHA œU ô Èd O WN vKŽ dE Æ n u qOGAð dŠ STANDBY ON DBS Æ n u UI Ë qOGAð pMJ1 DBS STANDBY ON DBS n u UI Ë qOGA DBS Æ Ð F b G j u n DBS 1 J M p ł d A G O ö U O W Ž K v u n DBS Ë TV DBS CH Æ uMI dOOG 1 9 0 100 Æ uMI UO šô jG µ UMI r UO šô 5 Æ jG UMI r UO šô 1 bFÐË jG p 0 Æ jG UMI r UO šô 2 bFÐË jG p 3 Æ jG µ UMI r U...

Page 134: ...STANDBY ON VCR Æ Æ u bO XOÝU q jG VCR Æ Æ WF UB W dA dHý qšœ ô ULF ÝUÐ 1 9 0 Æ Æ dHA œU ô Èd O WN vKŽ dE Æ u bO XOÝU q qOGAð dŠ STANDBY ON VCR Æ u bO XOÝU q UI Ë qOGAð pMJ1 VCR STANDBY ON VCR A G O q Ë I U q U Ý O X H O b u VCR Æ u bOH XOÝU q jG bFÐ VCR öOGA dł pMJ1 u bOH XOÝU q vKŽ WO U VCR 1 9 0 u bOH XOÝU q vKŽ Êu eHK uM UO šô VCR Æ jG µ UMI r UO šô 5 Æ jG UMI r UO šô 1 jG p bFÐË 0 Æ jG UMI r U...

Page 135: ...Ê sJ1 t U0 WO U u ö ÁU ô vłd tMŽ ÊuK Ë ÆWMAš UL WFDIÐ UN 9 ô Æ uIÐ UN 9 ô Æs eM Ë dM ULF Ý WDÝ uÐ UN 9 ô ÆW dA bO q d UD œ u Í UN vKŽ lCð ô ÆWK uÞ b UN K W ö WOJO ÝöÐ Ë WOÞUD œ u Í UI Ð L ð ô W UOB W UŽ UEŠö WE U WDÝ uÐ UN c s W œQð qC vKŽ qB uÝ ÂUŽ qJAÐ O Ë W b U uDÝô vKŽ Ò ÆnOE qJAÐ qOGA W sz eš w rN eš Ë UN WBB k u w W b U uDÝô l Æ dG cN WBB d vKŽ Ë W b U uDÝôUÐ W UMF vKŽ jGC UMŁ u s UNJ WDÝ uÐ...

Page 136: ... WOzUÐdNJ W UD pKÝ qB AC ÆWO UŁ d tKO uð bŽ p bFÐË WŽUL öÝ w f öð qDŽ œułË W UŠ w ÆpKOLFÐ qBð e jG STANDBY ON vKŽ œułu Ÿe bFÐË Æ UN qOGAð UI ô WO U ô WŠuK ÆpKOLŽ dA Ý WOzUÐdNJ W UD pKÝ dB jG SOUND W H dE jG p bFÐË ôË bB UO š Ë ÆUN ULF Ý b dð w ô Gý Æ UN s d Ò bFÐ sŽ rJ bŠË q Æ UN s U W U öš Æoz uF łË Ò rJ U Š ÁU UÐ bFÐ sŽ rJ bŠË t b dð X U u L UNł q vKŽ œułu bFÐ sŽ ÆtKOGAð Æ O qJAÐ U UD qšœ bÐ Ò Æ...

Page 137: ... w t uAð błu ÆÊu eHK WýUý uB ö9 ô W uDÝ qOGAð qLF ô DVD W LKÐ pKÝ XK Ë p l Ë bŠ Ë AV COMPU LINK ÆW O uBÐ Êu eHK WýUý vKŽ WOŽd s ËUMŽ dNEð ô ÆWO Ëô wŽdH Ê uMF WG d š p l Ë UNðd š w WGK sŽ WHK uB WG ÆWO Ë u WGK Õö ô Æ W H dE Æ O qJAÐ pK q Ë ÆÊu eHK vKŽ O B qšb d š bÐ Ò Æ π W H dE ÆW uDÝô Ož Ò pÐUA l Ë vKŽ l Ë d INTERLACE Æ W H dE Ož Ò Æ W H dE ÊuK ÂUE d bÐ Ò Æ π W H dE W uDÝô d r d qšœ Ò q ô qH Èu d...

Page 138: ...u ô JPEG vKŽ WK ÆW uDÝô qOGA K WKÐU dOž W uDÝô W uDÝ q CD ROM Æ UHK Íu ô JPEG nK lÝu vKŽ Æ UHK Ác ULÝ qš œ O B UHK JPEG U uHÐ W K JPEG jš ÆÍbŽU UHK JPEG o u U uHÐ W K dOž l ISO 9660 Æ Ë Èu j MP3 JPEG l Ë vKŽ u C MP3 Æ Õö ô Ož Ò Włu Í UÞô wz uN ÁU Ë ÊUJ d AM Æ Włu wz u œb FM Æl Ë qC vKŽ Włu wł Uš wz u q Ë FM Ë wł Uš ÆwK pKOLFÐ qBð Æ b bł WD d š wz uN pK 9 p s b Q K pKOLŽ l qBð Æ O B Æ öO u h Æ UO Ë...

Page 139: ...8 IHF TV TAPE CDR DBS VCR q œ Øq œ ÂË œœd WÐU Ý TV TAPE CDR DBS VCR eðd uKO v eðd q œ WLGM j eðd U q œ q œ qÐd eðd uKO q œ q œ u bOH Ô œœd UOð vKŽ UI AC X u ØX u ØX u ØX u eðd uKO vKŽ WF UL Øu bOH qšœ WOÝU Š V d u bO DBS IN VCR IN V p p ÂË µØ S VIDEO DBS IN VCR IN Y dý V p p ÂË µØ C w u l Að V p p ÂË µØ eðd uKO vKŽ WF UL Øu bOH qšœ Èu V d u bO VCR OUT MONITOR OUT V p p ÂË µØ S VIDEO VCR OUT MONITO...

Page 140: ...DBS IN MONITOR OUT MONITOR OUT CAUTION SPEAKER IMPEDANCE 8 16 RIGHT LEFT AV COMPU LINK RIGHT LEFT IN IN OUT REC IN PLAY OUT REC IN PLAY DIGITAL OUT VCR OUT REC IN PLAY VCR OUT REC IN PLAY RIGHT LEFT 110V 127V 230 240V 220V VOLTAGE SELECTOR 110V 127V 230 240V 220V CAUTION for mains AC line BEFORE PLUGGING IN do check that your mains AC line voltage corresponds with the position of the voltage selec...

Reviews: