background image

38

English

 Using the DVD MULTI Playback Mode

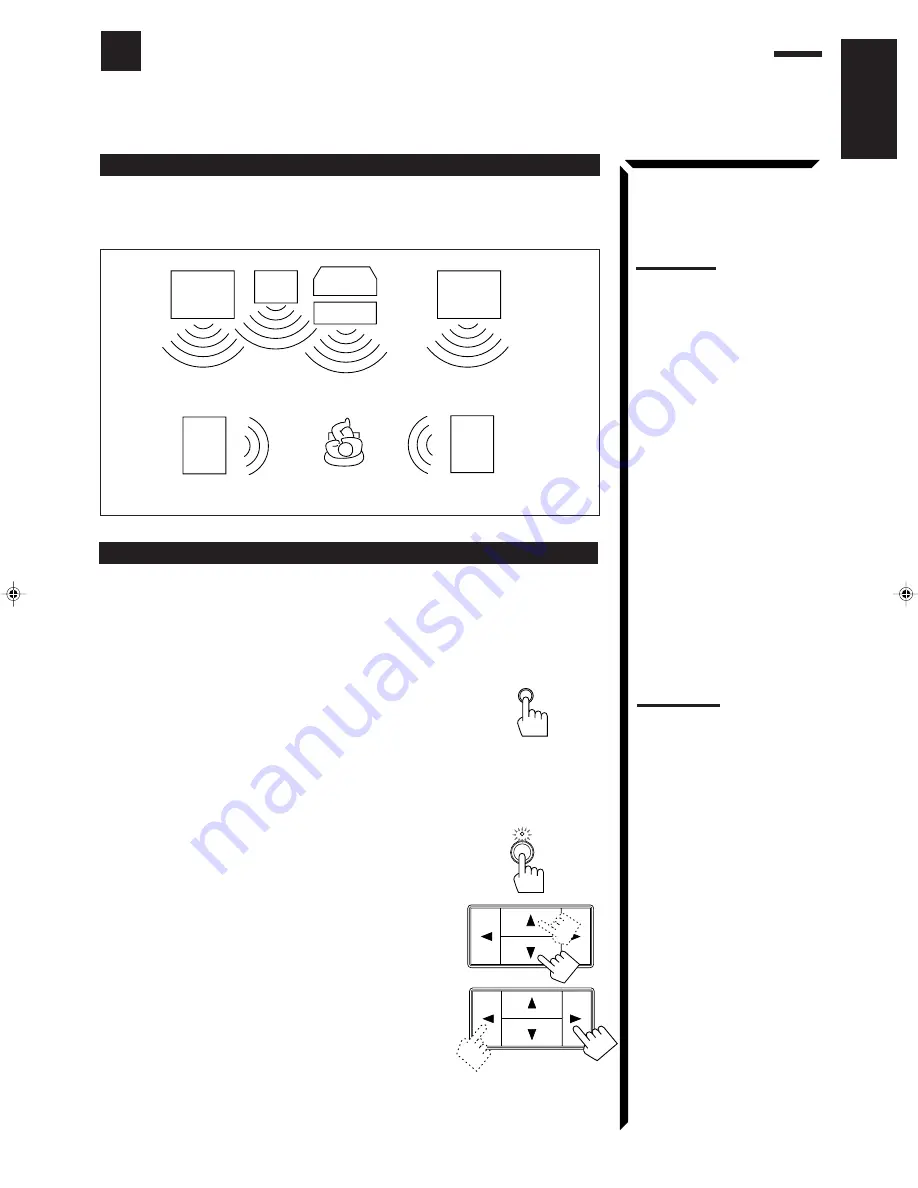
This receiver provides the DVD MULTI playback mode for reproducing the analog discrete output mode
(5.1 CH) of the DVD player.
Before playing back a DVD, refer also to the manual supplied with the DVD player.

Left front

speaker

Sub-

woofer

TV

Right front

speaker

Left

rear

speaker

Right

rear

speaker

Center

speaker

Note:

You can place the subwoofer
anywhere around you.

Activating the DVD MULTI playback

You can adjust the DVD MULTI playback mode while playing back a DVD using the
analog discrete output mode on the DVD player.
Once you made adjustments, the receiver memorizes the adjustments until you change
them. You also need to set the DVD player to the analog discrete output mode.

On the front panel:

1. Press DVD MULTI until “DVD MULTI” appears on

the display.

2. Select the analog discrete output mode on the DVD

player, and start playing a DVD.
Refer to the manual supplied with the DVD player.

If you want to make any adjustment, go to the following steps.

3. Press ADJUST so that the Control  

5

5

5

5

5

 / 

 / 

2

2

2

2

2

 / 

3

3

3

3

3

buttons work for adjusting the DVD MULTI
playback mode.
The lamp above the button lights up.

4. Press Control 

5

5

5

5

5

 / 

 until “–” appears on

the display.

5. Press Control 

2

2

2

2

2

 / 

3

3

3

3

3

 to adjust the center speaker

output level.

Pressing Control 

2

 decreases the output level up to

–10 dB.

Pressing Control 

3

 increases the output level up to

+10 dB.

ADJUST

Speaker arrangements for DVD MULTI playback

The following illustration show how to obtain the optimum sound environment for the
DVD MULTI playback mode. Try to find the speaker direction and location to create
the optimum sound field.

DVD MULTI

Note:

When you select “DVD MULTI” as
the source to play, the Surround
Processor modes are canceled
temporarily.

RX-665VBK(C)24-50

98.5.12, 11:30 AM

38

Summary of Contents for RX-665VBK

Page 1: ...TROL RECEIVER STANDBY POWER PHONES SPEAKERS MASTER VOLUME TUNER BAND PRESET SEA SOURCE SURROUND ADJUST ONE TOUCH OPERATION SETTING MEMORY 1 2 _ON OFF DVD MULTI ENHANCED COMPULINK CONTROL SYSTEM CATV SAT TV VIDEO TV CATV CONTROLCD DISC SOUND CONTROL VCR AUDIO CENTER REAR L 100 RETURN ENTER 3 2 1 6 5 4 9 8 10 7 P 10 0 CD VCR MUTING DVD MULTI TAPE DVD POWER TUNER BAND TV SOUND RM SR665U REMOTE CONTRO...

Page 2: ...tion Le courant peut être télécommandé CAUTION To reduce the risk of electrical shocks fire etc 1 Do not remove screws covers or cabinet 2 Do not expose this appliance to rain or moisture ATTENTION Afin d éviter tout risque d électrocution d incendie etc 1 Ne pas enlever les vis ni les panneaux et ne pas ouvrir le coffret de l appareil 2 Ne pas exposer l appareil à la pluie ni à l humidité For Can...

Page 3: ...és pour la pièce d écoute les noter dans le tableau ci dessous à titre de références futures même si l ampli tuner mémorise les réglages jusqu à ce qu ils soient changés Pour les procédures de réglage voir les pages 26 à 39 Mode de lecture DVD MULTI Niveau de l enceinte centrale Niveau de l enceinte arrière gauche Niveau de l enceinte arrière droite Mode Surround Dolby Pro Logic Dolby 3ch Logic Th...

Page 4: ...17 Using the Sleep Timer 17 Selecting the Center Speaker Size 19 One Touch Operation 20 About the One Touch Operation 20 Using the One Touch Operation 20 Receiving Radio Broadcasts 21 Tuning in Stations Manually 21 Using Preset Tuning 21 Selecting the FM Reception Mode 23 Using the Preset SEA Modes 24 Selecting Your Favorite SEA Mode 24 Using the Surround Processor 26 Using JVC 3D PHONIC Modes 27 ...

Page 5: ...D REAR R EFFECT DELAY TEST SEA MODE SEA PRESET MENU LIGHT _ When press the LIGHT button these buttons 10 key except key 0 CENTER REAR L L TV VOLUME CH and VOLUME buttons light up in red Note Be careful that frequent use of the LIGHT button causes the batteries to be exhausted quickly Remote Control POWER buttons CATV SAT TV VCR AUDIO 14 45 46 47 CATV CONTROL button 46 10 keys Sound control buttons...

Page 6: ...R IN ANTENNA IN OUT RX 664V AUDIO VIDEO CONTROL RECEIVER ENHANCED COMPULINK CONTROL SYSTEM Easy Set Up Operations If you are already familiar with audio components following four pages give you enough information to operate your RX 665VBK for enjoyment of surround sound in your listening room For Reproducing Surround Sound with your VCR Rear Speaker To audio video input If your TV does not have a ...

Page 7: ...ISC AUDIO RM SR665U REMOTE CONTROL CATV SAT TV VCR DAP MODE EFFECT SEA MODE 1 4 7 P 10 3D PHONIC SEA PRESET DELAY 2 5 8 0 SURROUND TEST MENU RETURN ENTER 3 6 9 10 CENTER REAR L TV VOLUME CH VOLUME MUTING PHONO DVD MULTI CD VCR TAPE TV SOUND TUNER BAND DVD ONE TOUCH OPERATION TV VIDEO REAR R POWER LIGHT ENHANCED COMPULINK CONTROL SYSTEM LIGHT 100 CATV CONTROL SOUND CONTROL CD DISC AUDIO CATV SAT TV...

Page 8: ...IGITAL OPTICAL COAXIAL AUDIO OUT CENTER SUBWOOFER NORMAL RIGHT LEFT REAR FRONT RIGHT LEFT RIGHT LEFT OFF ON ATTENUATOR 2CH VIDEO S VIDEO GAIN PLUS VIDEO OUT 1 RX 664V AUDIO VIDEO CONTROL RECEIVER ENHANCED COMPULINK CONTROL SYSTEM Easy Set Up Operations To video output For Reproducing DVD MULTI Playback with your DVD player TV To video input Center Speaker Front Speaker Rear Speaker DVD Player To s...

Page 9: ...AR L TV VOLUME CH VOLUME MUTING PHONO DVD MULTI CD VCR TAPE TV SOUND TUNER BAND DVD ONE TOUCH OPERATION TV VIDEO REAR R POWER LIGHT ENHANCED COMPULINK CONTROL SYSTEM RM SR665U REMOTE CONTR OL CENTER REAR L VOLUME MUTING PHONO DVD MULTI CD VCR TAPE TV SOUND TUNER BAND DVD ONE TOUCH OPERATION TV VIDEO VOLUME LIGHT LIGHT 100 CATV CONTROL SOUND CONTROL CD DISC AUDIO CATV SAT TV VCR DAP MODE EFFECT SEA...

Page 10: ...ween 23 and 95 F 5 and 35 C Make sure there is good ventilation around the receiver Poor ventilation could cause overheating and damage the receiver Handling the receiver Do not insert any metal object into the receiver Do not disassemble the receiver or remove screws covers or cabinet Do not expose the receiver to rain or moisture Checking the Supplied Accessories Check to be sure you have all of...

Page 11: ... mm AM Antenna Connections AM Loop Antenna Turn the loop until you have the best reception Snap the tabs on the loop into the slots of the base to assemble the AM loop Outdoor Single Vinyl covered Wire How to strip the 75 Ω coaxial cable and connect it to the FM terminals 1 Strip back the outside covering of the 75 Ω coaxial cable to expose the braided metallic mesh about 13 16 inches 20 mm 2 Pull...

Page 12: ...e other end to the speaker For connecting a subwoofer see page 10 1 Open each terminal 2 Insert the end of the speaker signal cable as shown be sure to remove the insulation at the end of each wire first 3 Close the terminals to clamp the speaker signal cables firmly in place 4 Connect the and terminals on the rear panel to the and terminals marked on the speakers Connecting the front speakers Con...

Page 13: ...ou can register the center speaker size after you finish its connection If you register it you do not have to set the center speaker mode while setting the surround mode If you do not use a center speaker register that information See page 19 Left rear speaker Center speaker Right rear speaker RIGHT LEFT REAR SPEAKERS CENTER SPEAKER Connecting the subwoofer Connect the input jack of a powered subw...

Page 14: ...t see note to the right To audio video output To audio output To audio video input VCR TV Video component connections TV and VCR connection If your audio components have a COMPU LINK 3 terminal The COMPU LINK remote control system allows you to control other JVC audio components from the receiver or vice versa For detailed information about the COMPU LINK 3 remote control system see page 40 To aud...

Page 15: ...an AV COMPU LINK terminal The AV COMPU LINK remote control system allows you to control other JVC video components from the receiver or vice versa For detailed information about the connection and the AV COMPU LINK remote control system see page 41 TAPE PHONO CD OUT REC IN PLAY VCR OUT REC IN PLAY OUT REC IN PLAY MONITOR OUT L R TV SOUND DVD LEFT RIGHT VIDEO LEFT RIGHT DVD FRONT CENTER SUBWOOFER L...

Page 16: ...y cause noise or screen interference We recommend that you use a coaxial cable to connect the antenna since it is well shielded against interference Putting Batteries in the Remote Control Before using the remote control put the two supplied batteries in first When using the remote control aim the remote control directly at the remote sensor on the receiver 1 On the back of the remote control remo...

Page 17: ...he band alternates between FM and AM CD Listen to the CD player TAPE Listen to the cassette deck TV SOUND Listen to TV sounds VCR View the playback picture from the VCR DVD Play back a stereo digital video disc PHONO Listen to a record DVD MULTI Play back a digital video disc using the analog discrete output mode 5 1 CH reproduction on the DVD player Current source name appears Current volume leve...

Page 18: ...To use both set of speakers press both SPEAKERS 1 and 2 to set them in the _ON position To use neither set of speakers press both SPEAKERS 1 and 2 to set them in the OFF position Muting the Sound From the remote control only Press MUTING to turn off the sound through all speakers and headphones connected MUTE appears on the display and the volume turns off To restore the sound press MUTING again T...

Page 19: ...nes can be connected to the PHONES jack on the front panel Be sure to turn down the volume before connecting or putting on headphones as high volume can damage both the headphones and your hearing To listen with only headphones Press both SPEAKERS 1 and 2 to set them in the OFF position Note The following sound modes cannot affect the recording Preset SEA modes see page 24 3D PHONIC modes see page...

Page 20: ...ss Control 5 5 5 5 5 until LOUDNESS appears on the display 3 Press Control 2 2 2 2 2 3 3 3 3 3 to set the Loudness function to ON or OFF Select ON to activate the Loudness function The LOUDNESS indicator lights up on the display Select OFF to cancel it The indicator goes off Using the Sleep Timer Using the Sleep Timer you can fall asleep to music and know the receiver will turn off by itself rathe...

Page 21: ... setting the Sleep Timer 2 Press Control 5 if necessary until SLEEP appears on the display 3 Press Control 2 3 The remaining time until the shut off time appears in minutes To change the shut off time press Control 2 3 repeatedly To cancel the Sleep Timer Press Control 2 3 repeatedly in step 3 above until 0 appears on the display The SLEEP indicator goes off Turning off the power also cancels the ...

Page 22: ...s the button the display changes to show the following SMALL Select this mode when the size of the center speaker is smaller than that of the front speakers LARGE Select this mode when the size of the center speaker is the same as that of the front speakers NO Select this mode when you do not use a center speaker Note This center speaker size setting is so related to the center mode setting for su...

Page 23: ...h Operation To store the sound settings 1 Press ONE TOUCH OPERATION The ONE TOUCH OPERATION lamp lights up then the previously memorized settings are recalled and appear on the display in turn 2 Adjust the sound using the functions listed above The newly adjusted settings are memorized To recall the sound settings With the ONE TOUCH OPERATION lamp lit the settings for the currently selected source...

Page 24: ...ns On the front panel only 1 Tune in the station you want to preset see above If you want to store the FM reception mode for this station select the FM reception mode you want See page 23 for details 2 Press MEMORY The channel number starts flashing on the display for about 5 seconds 3 Press Control 2 2 2 2 2 3 3 3 3 3 to select a channel number while the channel number position is flashing Pressi...

Page 25: ...ing order Pressing Control 3 changes preset channels in increasing order From the remote control 1 Press TUNER BAND Each time you press the button the band alternates between FM and AM 2 Press 10 keys to select a preset channel number For channel number 5 press 5 For channel number 15 press 10 then 5 For channel number 20 press 10 then 10 For channel number 30 press 10 10 then 10 TUNER BAND TUNER ...

Page 26: ...n the display 3 Press Control 2 2 2 2 2 3 3 3 3 3 to select either FM AUTO or FM MONO Normally select FM AUTO When an FM stereo broadcast is hard to receive or noisy select FM MONO FM AUTO When a program is broadcast in stereo you will hear stereo sound when in monaural you will hear monaural sounds This mode is also useful to suppress static noise between stations The MUTE AUTO indicator lights u...

Page 27: ...2 3 3 3 3 3 to select the effect level Each time you press the button the effect level changes as follows When Movie is selected When Sports is selected When Music is selected Movie Adds breadth to sounds so you feel like you are in a movie theater Sports Makes sounds exciting Music Select one of the modes below JAZZ Gives a feeling of a live atmosphere Good for acoustic music ROCK Gives a heavy s...

Page 28: ...u press the button the preset SEA modes change as follows 3 Press SEA PRESET to select the effect level Each time you press the button the effect level changes as follows When Music is selected When Sports is selected When Movie is selected To cancel the preset SEA mode Select OFF in step 2 above The SEA indicator goes off from the display SOUND CONTROL 7 P SEA MODE 8 SEA PRESET JAZZ 1 JAZZ 2 COUN...

Page 29: ...und Dolby Surround has been developed to reproduce the important elements of the acoustic surround at home To watch the soundtracks of video software bearing the mark DOLBY SURROUND which includes the same encoded surround information as found in Dolby Stereo films the receiver can provide you with 2 Dolby Surround modes Dolby Pro Logic and Dolby 3ch Logic Dolby Pro Logic Select this mode when opt...

Page 30: ...iously selected mode appears on the display 3 Press Control 2 2 2 2 2 3 3 3 3 3 until the 3D PHONIC mode you want appears on the display Each time you press the button the 3D PHONIC modes change as follows 3DACTION Best for action and war movies where the action is fast and explosive 3DTHEATR Reproduces the sound field of a large theater 3DDRAMA Best for dramas and romantic movies where the action...

Page 31: ... Each time you press the button the 3D PHONIC modes change as follows 3 Press EFFECT to select the effect level Each time you press the button the level changes as follows As the number increases the effect of the selected 3D PHONIC mode becomes stronger 4 Select and play a sound source which was processed with Dolby Surround and is labeled with DOLBY SURROUND mark To cancel the 3D PHONIC mode Sel...

Page 32: ...ously selected mode appears on the display 3 Press Control 2 2 2 2 2 3 3 3 3 3 until the DAP mode you want appears on the display Each time you press the button the DAP modes change as follows HEAD Phones Gives a spacious stereo effect when listening with headphones PAVILION Gives the spacious feeling of a pavilion with a high ceiling HALL Gives clear vocal and the feeling of a concert hall LIVE C...

Page 33: ... previously selected mode is recalled at first at its previous effect level and is shown on the display The DAP indicator also lights up on the display Each time you press the button the DAP modes change as follows When you select HEAD P or OFF you cannot go to the following steps No adjustments can be made for Headphones 3 Press REAR L to adjust the rear speaker output level Pressing REAR L decre...

Page 34: ...ct level Each time you press the button the effect level changes as follows To cancel the DAP mode Select OFF in step 2 The DAP indicator goes off from the display EFFECT 1 EFFECT 2 EFFECT 4 EFFECT 3 EFFECT 5 Using the Surround Processor 4 EFFECT ...

Page 35: ...have added rear speakers without a center speaker CASE 3 When you have added a center speaker without rear speakers Front speaker Front speaker Rear speaker Rear speaker TV Center speaker Front speaker Front speaker Rear speaker Rear speaker TV Front speaker Front speaker TV Center speaker In this case 1 Select 3CHLOGIC 2 Select NORMAL or WIDE for center mode See pages 33 to 36 for more details In...

Page 36: ...speakers and a center speaker This mode gives you the feeling of a movie theater 3CHLOGIC Select this mode when you use a center speaker without rear speakers OFF Select this to turn off the Surround Processor mode You cannot select the 3D PHONIC modes or the DAP modes in this step For the 3D PHONIC modes see pages 27 and 28 For the DAP modes see pages 29 and 31 3 Press ADJUST so that the Control ...

Page 37: ...LAY appears on the display 7 Press Control 2 2 2 2 2 3 3 3 3 3 to adjust the delay time of the rear speaker output Each time you press the button the delay time changes as follows DELAY 1 Select this when the distance from you to your rear speakers is greater than that to the front speakers DELAY 2 Select this when the distance from you to your rear speakers is almost equal to that to the front sp...

Page 38: ... button the effect level changes as follows As the number increases the effect of the Theater Surround becomes stronger From the remote control If you have already set the center speaker size following the procedure described on page 19 you can use the remote control for surround mode preparation 1 Press SOUND CONTROL so that 10 keys work for adjusting the sound 2 Press SURROUND until the Surround...

Page 39: ...ou press the button the effect level changes as follows As the number increases the effect of the Theater Surround mode becomes stronger Left front speaker Center speaker Rear speakers Right front speaker Notes The sound level of the left and right rear speakers will be the same You cannot set the sound level of the rear speakers when you have selected 3CHLOGIC You cannot set the sound level of th...

Page 40: ...h was processed with Dolby Surround and is labeled with DOLBY SURROUND mark To cancel Surround mode Select OFF in step 2 above From the remote control 1 Press SOUND CONTROL so that 10 keys work for adjusting the sound 2 Press SURROUND until the mode you want appears on the display The previous mode is recalled with its previous settings and is shown on the display The indicator for that mode also ...

Page 41: ...ears on the display 2 Select the analog discrete output mode on the DVD player and start playing a DVD Refer to the manual supplied with the DVD player If you want to make any adjustment go to the following steps 3 Press ADJUST so that the Control 5 5 5 5 5 2 2 2 2 2 3 3 3 3 3 buttons work for adjusting the DVD MULTI playback mode The lamp above the button lights up 4 Press Control 5 5 5 5 5 until...

Page 42: ... DVD MULTI appears on the display 2 Select the analog discrete output mode on the DVD player and start playing a DVD Refer to the manual supplied with the DVD player If you want to make any adjustment go to the following steps 3 Press CENTER to adjust the center speaker output level Pressing CENTER decreases the output level up to 10 dB Pressing CENTER increases the output level up to 10 dB 4 Pres...

Page 43: ...usly selected When you turn off the receiver both the CD player and cassette deck will turn off Synchronized Recording Synchronized recording means the cassette deck starts recording as soon as a CD or a record begins playing To use synchronized recording follow these steps 1 Put a tape in the cassette deck and a disc in the CD player or a record on the turntable 2 Press the record button and the ...

Page 44: ...ini plug not supplied 2 Connect the VCR DVD player and TV using the cables with RCA pin plug see pages 11 and 12 If you connect the VCR or DVD player to the TV directly using an S video cable leave the corresponding video input on this receiver unplugged VCR IN PLAY for the VCR or DVD for the DVD player 3 When turning on the TV for the first time after the AV COMPU LINK connection turn the TV volu...

Page 45: ...TI DVD playback mode is automatically selected when a disc played in stereo while DVD MULTI playback mode is automatically selected when a disc is played back using the analog discrete output mode on the DVD player or the audio output setting of the DVD player is mixed to two front channels The TV automatically turns on and changes the input mode to the position so that you can view the playback p...

Page 46: ...5 press 5 For track number 15 press 10 then 5 For track number 20 press 10 then 10 For track number 30 press 10 10 then 10 7 7 7 7 7 After pressing CD DISC you can perform the following operations on the CD changer 1 6 7 P Select the number of a disc installed in a CD changer Then continue to operate the CD player as described above For example To find a track number 11 of disc 4 1 Press CD DISC 2...

Page 47: ...nnels RETURN Alternates between the previously selected channel and the current channel You can always do the following on the TV TV VOLUME Adjust the volume TV VIDEO Sets the input mode either TV or VIDEO TV Turns on or off the TV in the POWER section 7 7 7 7 7 After pressing DVD or DVD MULTI you can perform the following operations on the DVD player 3 Starts playing 4 Returns to the beginning of...

Page 48: ...V or VIDEO After pressing TV SOUND you can perform the following operations on the TV CH Changes the channels 1 9 0 100 10 Selects the TV channels 100 10 button will function as the ENTER button if your TV requires pressing ENTER after selecting a channel number RETURN Alternates between the previously selected channel and the current channel 5 Try to operate your TV by pressing TV in the POWER se...

Page 49: ...l 5 Try to operate your CATV converter or satellite tuner by pressing CATV SAT in the POWER section When your CATV converter or satellite tuner turns on or off you have entered the correct code If there are more than one code listed for your brand of CATV converter or satellite tuner try each one until the correct one is entered Note Refer to the manual supplied with your CATV converter or satelli...

Page 50: ...e your VCR by pressing VCR POWER When your VCR turns on or off you have entered the correct code If there are more than one code listed for your brand of VCR try each one until the correct one is entered Manufacturer Codes Manufacturer Codes EMERSON 11 26 PHILIPS 09 FISHER 29 RCA 05 06 FUNAI 10 14 15 16 SAMSUNG 24 GOLD STAR 12 SANYO 21 22 23 HITACHI 04 SHARP 27 28 JVC 01 02 03 SONY 18 19 20 MITSUB...

Page 51: ...the antenna farther from automobile traffic Select DVDMULTI as the source on the receiver Check the sound setting of the DVD player Move speakers away from the turntable Remove the obstruction Replace batteries PROBLEM The display does not light up No sound from speakers OVERLOAD starts flashing on the display Sound from one speaker only Continuous hiss or buzzing during FM reception Occasional cr...

Page 52: ...hms at 1kHz with no more than 0 8 total harmonic distortion Total Harmonic Distortion 8 ohms 1 kHz 0 8 at 100 watts output Measured by JVC Audio Analysis System Frequency Response 8 ohms PHONO MM 20 Hz to 20 kHz 1 dB CD TAPE TV SOUND VCR DVD 20 Hz to 20 kHz 1 dB Audio Input Sensitivity Impedance 1 kHz PHONO 2 7 mV 47 k ohms CD TAPE TV SOUND VCR DVD 220 mV 47 k ohms Audio Output Level TAPE VCR 220 ...

Page 53: ...t 1 kHz Stereo Separation at REC OUT 40 dB at 1 kHz Capture Ratio 1 5 dB 10 mV Alternate Channel Selectivity 60 dB 400 kHz Frequency Response 30 Hz to 15 kHz 0 5 dB 3 dB AM tuner Tuning Range 530 kHz to 1 710 kHz Usable Sensitivity Loop antenna 300 µV m Signal to Noise Ratio 50 dB 100 mV m General Power Requirements AC 120 V 60 Hz Power Consumption 330 watts 440 VA 5 watts in standby mode Dimensio...

Page 54: ...VICTOR COMPANY OF JAPAN LIMITED J VC 0498OFMMDWJEM EN FR ...

Reviews: