background image

17

Notes:

When you hold down Control 

@

#

 in step 3, the frequency

keeps changing until you press
Control 

@

 / 

#

 again or a station

is tuned in.

When a station of sufficient
signal strength is tuned in, the
TUNED indicator lights up on
the display.
When an FM stereo program is
received, the STEREO indicator
also lights up.

Receiving Radio Broadcasts

You can browse through all the stations or use the preset function to go immediately to a particular
station.

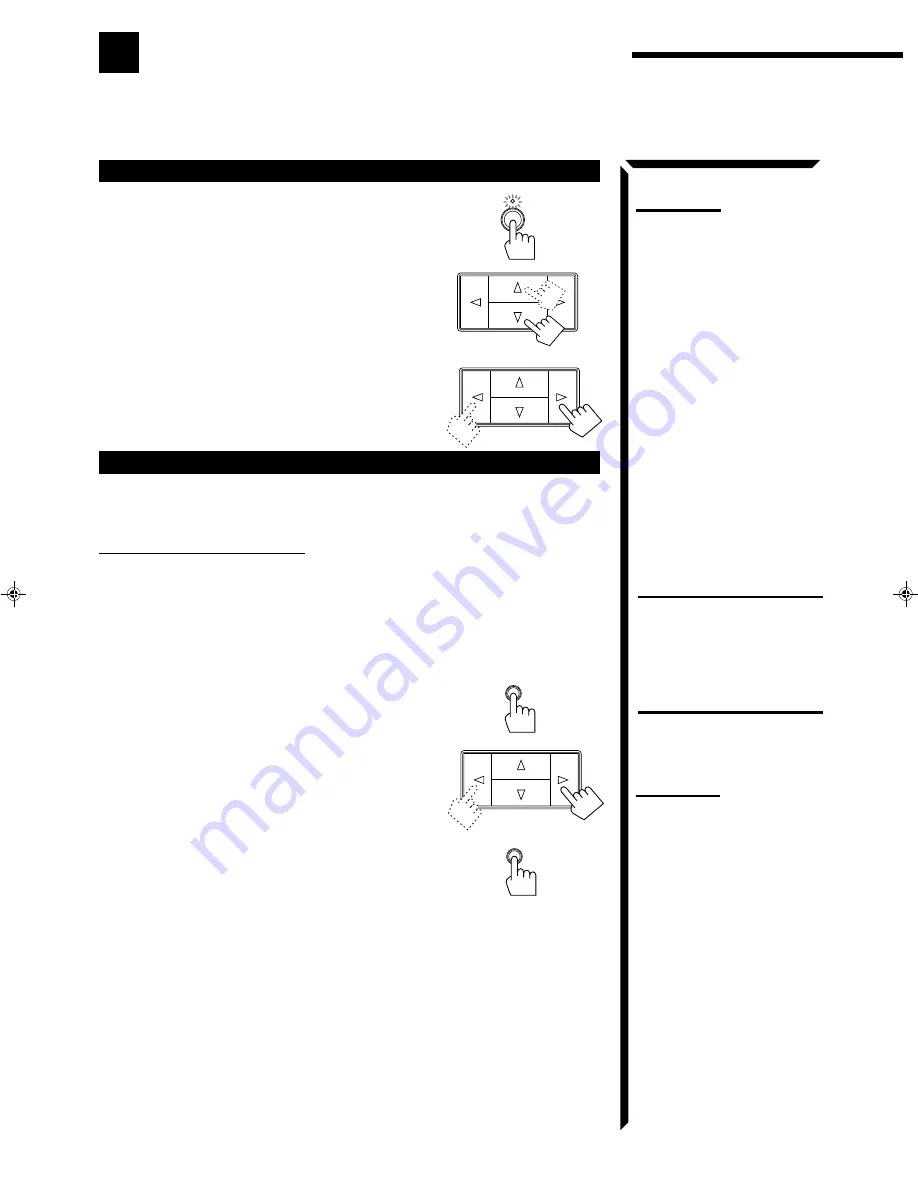
Tuning in Stations Manually

On the front panel 

only:

1. Press TUNER/BAND.

The indicator above the button lights up.
Each time you press the button, the band alternates
between FM and AM.

2. Press Control 

%

%

%

%

%

 / 

fi

fi

fi

fi

fi

 until “–” appears on

the display.

3. Press Control 

@

@

@

@

@

 / 

#

#

#

#

#

 until you find the frequency you

want.
• Pressing Control 

@

 decreases the frequency.

• Pressing Control 

#

 increases the frequency.

Using Preset Tuning

Once a station is assigned to a channel number, the station can be quickly tuned. You
can preset up to 40 stations at random.

To store the preset stations

On the front panel 

only:

1. Tune in the station you want to preset (see above).

If you want to store the FM reception mode for this
station, select the FM reception mode you want. See
page 19 for details.

2. Press MEMORY.

The channel number starts flashing on the display for
about 5 seconds.

3. Press Control 

@

@

@

@

@

 / 

#

#

#

#

#

 to select a channel number

while the channel number position is flashing.
• Pressing Control 

@

 decreases the number.

• Pressing Control 

#

 increases the number.

4. Press MEMORY again while the selected channel

number is flashing on the display.
The selected channel number stops flashing.
The station is assigned to the selected channel number.

CAUTION:

Preset stations may be erased in
a few days when power is cut off
to the receiver, as when it is
unplugged from the AC outlet or
a power failure occurs. If the
preset stations are lost, simply set
the stations again.

Note:

You can press 10 keys on the
remote control to select a channel
number in step 3, if you have
pressed TUNER/BAND on the
remote control prior to starting this
preset procedures.

For channel number 5, press 5.

For channel number 15, press
+10 then 5.

For channel number 20, press
+10 then 10.

For channel number 30, press
+10, +10, then 10.

TUNER/BAND

MEMORY

MEMORY

RX-554VBK(J)_0117-001B_En.01-19

98.1.6, 11:35 AM

17

Summary of Contents for RX-554VBK

Page 1: ...ECEIVER CD 4 5 6 1 2 3 TV VCR POWER AUDIO EFFECT DELAY 3D PHONIC SURROUND TEST TAPE 7 P 8 9 10 SEA PRESET 10 TUNER BAND VCR SOUND CONTROL CD DISC VIDEO RM SR554U REMOTE CONTROL PHONO TV VIDEO MUTING ONE TOUCH OPERATION VCR CH CENTER REAR TV CH TV VOL VOLUME DAP MODE SEA MODE RX 554V AUDIO VIDEO CONTROL RECEIVER STANDBY POWER PHONES SPEAKERS MASTER VOLUME TUNER BAND PRESET SEA SOURCE SURROUND ADJUS...

Page 2: ...triangle is intended to alert the user to the presence of uninsulated dangerous voltage within the product s enclosure that may be of sufficient magnitude to constitute a risk of electric shock to persons The exclamation point within an equilateral triangle is intended to alert the user to the presence of important operating and maintenance servicing instructions in the literature accompanying the...

Page 3: ...ting procedures see pages 22 to 32 DAP Mode Dance Club Live Club Hall Pavilion Headphones Rear Speaker Level Effect Level Surround Mode Dolby Pro Logic Dolby 3ch Logic Theater Surround Center Mode Delay Time Center Speaker Level Rear Speaker Level Effect Level 3D PHONIC Mode 3D Action 3D Drama 3D Theater Effect Level The left rear speaker level and right rear speaker level for DAP and the surround...

Page 4: ...3 Basic Settings 14 Adjusting the Front Speaker Output Balance 14 Listening at Low Volume Loudness 14 Using the Sleep Timer 14 Selecting the Center Speaker Size 15 One Touch Operation 16 About the One Touch Operation 16 Using the One Touch Operation 16 Receiving Radio Broadcasts 17 Tuning in Stations Manually 17 Using Preset Tuning 17 Selecting the FM Reception Mode 19 Using the Preset SEA Modes 2...

Page 5: ...12 13 Control fi buttons ONE TOUCH OPERATION button and lamp 16 Remote Control Source buttons CD TAPE TUNER BAND VCR VIDEO PHONO 11 34 35 SOUND CONTROL button 21 24 26 30 32 To use JVC VCR cassette deck and CD player after adjusting preset SEA or surround modes using SOUND CONTROL press the corresponding source button VCR TAPE or CD prior to using JVC audio video operating buttons TV CH Channel bu...

Page 6: ...SEA SOURCE SURROUND ADJUST ONE TOUCH OPERATION SETTING MEMORY 1 2 _ON OFF Easy Set Up Operations If you are already familiar with audio components these two pages just you opened give you enough information to operate your RX 554VBK for enjoyment of surround sound in your listening room Rear Speaker TV To video input TV VCR To RF output To TV antenna input Front Speaker To audio video output RX 55...

Page 7: ...PE RATION TAPE TUNER BAND VIDEO VCR PHONO DAP MODE 3D PHONIC SURROUND POWER AUDIO SEA MODE SEA PRESET CENTER TV CH TV VIDEO TV VOL VCR CH REAR DELAY 8 10 5 2 EFFECT 1 4 7 P TEST 3 6 9 10 TV SOUND CONTR OL VCR CD DISC AUDIO RM SR554U REMOTE CONTROL VOLUME MUTING CD ONE TO UCH OPE RATION TAPE TUNER BAND VIDEO VCR PHONO DAP MODE 3D PHONIC SURROUND POWER VCR SEA MODE SEA PRESET CENTER TV CH TV VIDEO T...

Page 8: ... 23 and 95 F 5 and 35 C Make sure there is good ventilation around the receiver Poor ventilation could cause overheating and damage the receiver Handling the receiver Do not insert any metal object into the receiver Do not disassemble the receiver or remove screws covers or cabinet Do not expose the receiver to rain or moisture Checking the Supplied Accessories Check to be sure you have all of the...

Page 9: ...enna Cable 13 16 in 20 mm AM Antenna Connections AM Loop Antenna Turn the loop until you have the best reception Snap the tabs on the loop into the slots of the base to assemble the AM loop Outdoor Single Vinyl covered Wire How to strip the 75 Ω coaxial cable and connect it to the FM terminals 1 Strip back the outside covering of the 75 Ω coaxial cable to expose the braided metallic mesh about 13 ...

Page 10: ...to the and terminals marked on the speakers Connecting the front speakers Connect the front speakers to the FRONT SPEAKERS terminals CAUTION When connecting speakers use speakers with the SAME IMPEDANCE indicated by the speaker terminals Getting Started 1 2 1 2 RIGHT LEFT FRONTSPEAKERS Left speaker Right speaker SPEAKERS 1 SPEAKERS 2 Connecting the rear and center speakers Connect the rear speaker...

Page 11: ...T TAPE PHONO CD OUT REC IN PLAY VIDEO LEFT RIGHT Turntable Cassette deck To audio output To audio input To audio output To audio output CD player If a ground cable is provided for your turntable connect the cable to the GND terminal of theAM LOOP terminals on the rear panel CAUTION If you connect a sound enhancing device such as a graphic equalizer between the source components and this receiver t...

Page 12: ...s from the receiver or vice versa For detailed information about the COMPU LINK 3 remote control system see page 33 TV To video input VCR OUT REC IN PLAY OUT REC IN PLAY AUDIO VIDEO MONITOR OUT TAPE PHONO CD OUT REC IN PLAY VHS VIDEO LEFT RIGHT Video disc player VCR To audio video output To audio video input To audio video output Video component connections ...

Page 13: ...nce We recommend that you use a coaxial cable to connect the antenna since it is well shielded against interference Putting Batteries in the Remote Control Before using the remote control put the two supplied batteries in first When using the remote control aim the remote control directly at the remote sensor on the receiver 1 On the back of the remote control press down on the battery cover and s...

Page 14: ...tons work for selecting the source The lamp above the button lights up 2 Press Control fi fi fi fi fi until the source name you want appears on the display From the remote control Press one of the source buttons directly CD Listen to the CD player TAPE Listen to the cassette deck TUNER BAND Listen to the radio Each time you press the button the band alternates between FM and AM VCR View the playba...

Page 15: ...OFF position To use both set of speakers press both SPEAKERS 1 and 2 to set them in the _ON position To use neither set of speakers press both SPEAKERS 1 and 2 to set them in the OFF position Muting the Sound From the remote control only Press MUTING to turn off the sound through all speakers and headphones connected MUTE appears on the display and the volume turns off To restore the sound press M...

Page 16: ...hones A standard pair of headphones can be connected to the PHONES jack on the front panel Be sure to turn down the volume before connecting or putting on headphones as high volume can damage both the headphones and your hearing To listen with only headphones Press both SPEAKERS 1 and 2 to set them in the OFF position Note The output volume level preset SEA DAP 3D PHONIC and surround modes cannot ...

Page 17: ...l fi fi fi fi fi until LOUDNESS appears on the display 3 Press Control to set the Loudness function to ON or OFF Select ON to activate the Loudness function The LOUDNESS indicator lights up on the display Select OFF to cancel it The indicator goes off Using the Sleep Timer Using the Sleep Timer you can fall asleep to music and know the receiver will turn off by itself rather than play all night On...

Page 18: ...l fi fi fi fi fi buttons work for selecting the center speaker size The lamp above the button lights up 2 Press Control fi fi fi fi fi until CNTR SPK Center Speaker appears on the display 3 Press Control to select the appropriate item about your center speaker Each time you press the button the display changes to show the following SMALL Select this mode when the size of the center speaker is smal...

Page 19: ...ration To store the sound settings 1 Press ONE TOUCH OPERATION The ONE TOUCH OPERATION lamp lights up then the previously memorized settings are recalled and appear on the display in turn 2 Adjust the sound using the functions listed above The newly adjusted settings are memorized To recall the sound settings With the ONE TOUCH OPERATION lamp lit the settings for the currently selected source is r...

Page 20: ...On the front panel only 1 Tune in the station you want to preset see above If you want to store the FM reception mode for this station select the FM reception mode you want See page 19 for details 2 Press MEMORY The channel number starts flashing on the display for about 5 seconds 3 Press Control to select a channel number while the channel number position is flashing Pressing Control decreases th...

Page 21: ...rder Pressing Control changes preset channels in increasing order From the remote control 1 Press TUNER BAND Each time you press the button the band alternates between FM and AM 2 Press 10 keys to select a preset channel number For channel number 5 press 5 For channel number 15 press 10 then 5 For channel number 20 press 10 then 10 For channel number 30 press 10 10 then 10 TUNER BAND TUNER BAND 4 ...

Page 22: ...on the display 3 Press Control to select either FM AUTO or FM MONO Normally select FM AUTO When an FM stereo broadcast is hard to receive or noisy select FM MONO FM AUTO When a program is broadcast in stereo you will hear stereo sound when in monaural you will hear monaural sounds This mode is also useful to suppress static noise between stations The MUTE AUTO indicator lights up on the display FM...

Page 23: ...o select the effect level Each time you press the button the effect level changes as follows When Movie is selected When Sports is selected When Music is selected Movie Adds breadth to sounds so you feel like you are in a movie theater Sports Makes sounds exciting Music Select one of the modes below JAZZ Gives a feeling of a live atmosphere Good for acoustic music ROCK Gives a heavy sound Both hig...

Page 24: ...ss the button the preset SEA modes change as follows 3 Press SEA PRESET to select the effect level Each time you press the button the effect level changes as follows When Music is selected When Sports is selected When Movie is selected To cancel the preset SEA mode Selecting OFF in step 2 above The SEA indicator goes off from the display 7 P SEA MODE SPORTS1 SPORTS2 SPORTS3 SEA PRESET SOUND CONTRO...

Page 25: ...ect sounds are the most important elements of the acoustic surround effects The DAP mode can create these important elements and gives you a real being there feeling by using the front speakers and rear speakers On surround modes With this receiver you can use two types of the surround mode Dolby Surround Dolby Surround has been developed to reproduce the important elements of the acoustic surroun...

Page 26: ...y Each time you press the button surround DAP 3D PHONIC modes change as follows As for the DAP modes see page 25 and the 3D PHONIC modes one of the previously selected mode appears on the display 3 Press Control until the 3D PHONIC mode you want appears on the display Each time you press the button the 3D PHONIC modes change as follows 3DACTION Best for action and war movies where the action is fa...

Page 27: ...revious effect level and is shown on the display The 3D PHONIC indicator also lights up on the display Each time you press the button the 3D PHONIC modes change as follows 3 Press EFFECT to select the effect level Each time you press the button the level changes as follows As the number increases the effect of the selected 3D PHONIC mode becomes stronger 4 Select and play a sound source which was ...

Page 28: ...ars on the display 3 Press Control until the DAP mode you want appears on the display Each time you press the button the DAP modes change as follows HEAD Phones Gives a spacious stereo effect when listening with headphones PAVILION Gives the spacious feeling of a pavilion with a high ceiling HALL Gives clear vocal and the feeling of a concert hall LIVE Club Gives the feeling of a live music club w...

Page 29: ...lso lights up on the display Each time you press the button the DAP modes change as follows When you select HEAD P or OFF you cannot go to the following steps No adjustments can be made for Headphones 3 Press REAR to adjust the rear speaker output level Pressing REAR decreases the output level up to 10 dB Pressing REAR increases the output level up to 10 dB 4 Press EFFECT to select the effect leve...

Page 30: ...w to obtain the optimum sound environment for various surround modes settings Try to find the speaker direction and location to create the optimum sound field CASE 1 When you have added a center speaker and rear speakers CASE 2 When you have added rear speakers without a center speaker CASE 3 When you have added a center speaker without rear speakers Front speaker Front speaker Rear speaker Rear s...

Page 31: ...rs and a center speaker This mode gives you the feeling of a movie theater 3CHLOGIC Select this mode when you use a center speaker without rear speakers OFF Select this to turn off the surround DAP 3D PHONIC modes You cannot select the 3D PHONIC modes or the DAP modes in this step For the 3D PHONIC modes see pages 23 and 24 For the DAP modes see pages 25 and 26 3 Press ADJUST so that the Control f...

Page 32: ...ess Control fi fi fi fi fi until DELAY appears on the display 7 Press Control to adjust the delay time of the rear speaker output Each time you press the button the delay time changes as follows DELAY 1 Select this when the distance from you to your rear speakers is greater than that to the front speakers DELAY 2 Select this when the distance from you to your rear speakers is almost equal to that ...

Page 33: ...ach time you press the button the effect level changes as follows As the number increases the effect of the Theater Surround mode becomes stronger From the remote control If you have already set the center speaker size following the procedure described on page 15 you can use the remote control for surround mode preparation 1 Press SOUND CONTROL so that 10 keys work for adjusting the sound 2 Press ...

Page 34: ...ffect level changes as follows As the number increases the effect of the Theater Surround mode becomes stronger Activating the Surround Sounds 6 TEST Notes No test tone comes out of the rear speakers when you have selected 3CHLOGIC No test tone comes out of the center speaker when you select PHANTOM for the center mode Left front speaker Center speaker Rear speakers Right front speaker Notes The s...

Page 35: ...sed with Dolby Surround and is labeled with DOLBY SURROUND mark To cancel surround mode Select OFF in step 2 above From the remote control 1 Press SOUND CONTROL so that 10 keys work for adjusting the sound 2 Press SURROUND until the mode you want appears on the display The previous mode is recalled at first with its previous settings and is shown on the display The indicator for that mode also lig...

Page 36: ... selected When you turn off the receiver both the CD player and cassette deck will turn off Synchronized Recording Synchronized recording means the cassette deck starts recording as soon as a CD or a record begins playing To use synchronized recording follow these steps 1 Put a tape in the cassette deck and a disc in the CD player or a record on the turntable 2 Press the record button and the paus...

Page 37: ...s 10 then 10 For track number 30 press 10 10 then 10 7 7 7 7 7 After pressing CD DISC you can perform the following operations on the CD changer 1 6 7 P Select the number of a disc installed in a CD changer Then continue to operate the CD player as described above For example To find a track number 11 of disc 4 1 Press CD DISC 2 Press 4 3 Press CD 4 Press 10 then 1 7 7 7 7 7 After pressing TAPE yo...

Page 38: ...the TV volume using the TV VOL button Change the channels on the TV using the TV CH button Turn on and off the TV by pressing TV in the POWER section Note If you choose a source on the front panel the remote control will not operate that source Operating Other Components CD 4 5 6 1 2 3 TV VCR POWER AUDIO EFFECT DELAY 3D PHONIC SURROUND TEST TAPE 7 P 8 9 10 SEA PRESET 10 TUNER BAND VCR SOUND CONTRO...

Page 39: ...oo close to speakers There is an obstruction in front of the remote sensor on the receiver Batteries are weak SOLUTION Plug the power cord into an AC outlet Check speaker wiring and reconnect if necessary Press SPEAKERS 1 and 2 to set it in the _ ON position Select the correct source Rotate the MASTER VOLUME control counterclockwise three or four times then press POWER on the front panel If OVERLO...

Page 40: ...ms at 1kHz with no more than 0 8 total harmonic distortion Total Harmonic Distortion 8 ohms 1 kHz 0 8 at 100 watts output Measured by JVC Audio Analysis System Frequency Response 8 ohms PHONO MM 20 Hz to 20 kHz 1 dB CD TAPE VIDEO VCR 20 Hz to 20 kHz 1 dB Audio Input Sensitivity Impedance 1 kHz PHONO 2 7 mV 47 k ohms CD TAPE VIDEO VCR 220 mV 47 k ohms Audio Output Level TAPE VCR 220 mV Signal to No...

Page 41: ...eparation at REC OUT 40 dB at 1 kHz Capture Ratio 1 5 dB 10 mV Alternate Channel Selectivity 60 dB 400 kHz Frequency Response 30 Hz to 15 kHz 0 5 dB 3 dB AM tuner Tuning Range 530 kHz to 1 710 kHz Usable Sensitivity Loop antenna 300 µV m External antenna 30 µV Signal to Noise Ratio 50 dB 100 mV m General Power Requirements AC 120 V 60 Hz Power Consumption 270 watts 360 VA 5 watts in standby mode D...

Page 42: ...ORIES To purchase accessories for your JVC product you may contact your local JVC Dealer Or from the 48 Continental United States call toll free 800 882 2345 QUALITY SERVICE HOW TO LOCATE YOUR JVC SERVICE CENTER TOLL FREE 1 800 537 5722 Dear customer In order to receive the most satisfaction from your purchase read the instruction booklet before operating the unit In the event that repairisnecessa...

Page 43: ...rvice or if affixed to any attachment not provided with the products or if the model or serial number has been altered tampered with defaced or removed 2 Initial installation and installation and removal for repair 3 Operational adjustments covered in the Owner s Manual normal maintenance video and audio head cleaning 4 Damage that occurs in shipment due to act of God and cosmetic damage 5 Signal ...

Page 44: ...VICTOR COMPANY OF JAPAN LIMITED J VC 1297OFMMDWJEM EN ...

Reviews: