background image

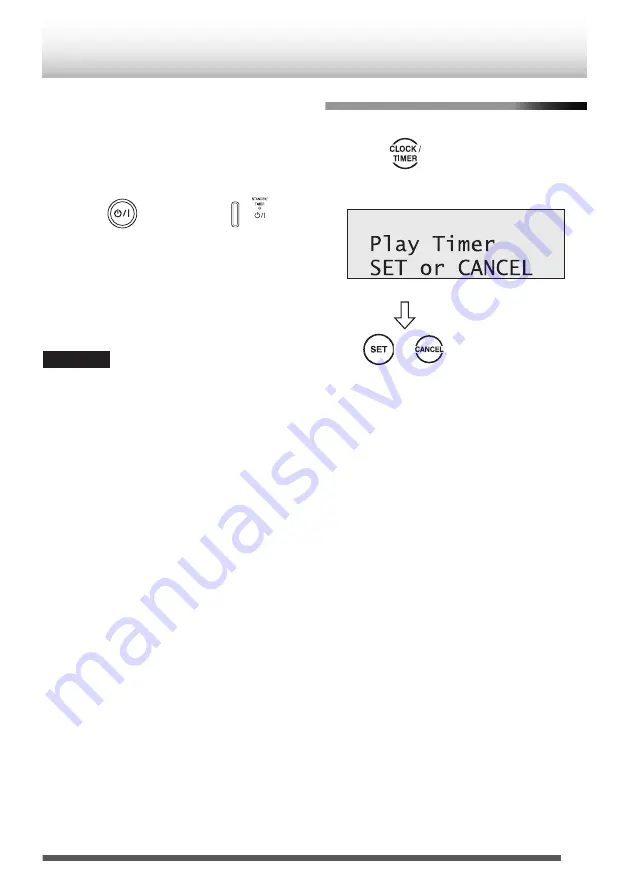
Once you have set the volume, “Play Timer Set”

will be displayed and the setting contents will be

displayed in order.

3

Turn off the System.

.

Main unit

Remote control

The STANDBY/TIMER LED lights up in umber.

0

While the daily timer is working, the daily timer

indicator (

A

) blinks.

0

Once set, the daily timer works every day.

To correct a misentry during the process, press

[CANCEL]. You can return to the previous step.

CAUTION

0

The daily timer works only when the System is on

standby.

0

Auto power save (A.P.S.) is effective even while the

daily timer is working.

To activate/deactivate the daily timer

.

(Press repeatedly)

Remote control

.

.

 / 

To set the daily timer again without changing the

contents, press [SET]. “Timer On” and the setting

contents appear.
To deactivate the daily timer, press [CANCEL]. “Timer

Off” appears.

41

Summary of Contents for RV-S5B

Page 1: ... POWERED WOOFER SYSTEM RV S5B INSTRUCTIONS ENGLISH LVT2395 002A E ...

Page 2: ...tructions and open spacing 2 Sides Top Back Noobstructionsshouldbe placed in the areas indicated by the dimensions in the illustration 3 Bottom Place on a level surface Front view 15 cm 15 cm 15 cm Side view 15 cm Rear of the System Notes on installation 0 Select a place which is level dry and neither too hot nor too cold between 5 C and 35 C Adjustable range for the Wi Fi antenna CAUTION 0 Do not...

Page 3: ...ch iPhone iPad connected to the System Login Sharing 20 Adding AirPlay DLNA Devices to the Same Wi Fi Network as the Main Unit 21 Navigating on AirPlay DLNA Devices 22 Setting the Network Standby 23 AirPlay DLNA Auto Switch 23 Setting the menu 24 Listening to BLUETOOTH device 26 Registering a BLUETOOTH device 26 Navigating the BLUETOOTH Device 27 Listening to iPod 28 Connecting iPod 28 Compatible ...

Page 4: ...control decreases replace the battery To replace the battery in the remote control Insert the battery into the remote control by matching the polarities and correctly Lithium coin battery CR2025 NOTE 0 The included battery is for checking system operation Replace it with a new one as soon as possible CAUTION 0 Danger of explosion if the battery is incorrectly replaced 0 Replace only with the same ...

Page 5: ...ndle batteries properly 0 When you do not use the System remove the batteries from the battery compartment 0 Dispose of batteries in the proper manner according to federal state and local regulations 0 Do not mix with batteries of different types or with new and old ones 0 Do not attempt to charge any batteries other than rechargeable ones 0 Discard leaky batteries immediately Battery leakage can ...

Page 6: ... point at this part F SOURCE button Switches the source G SUPER WOOFER knob Changes the level of the super woofer H MENU button Displays network setting by pressing and holding the button NETWORK Selects upper folder NETWORK in DMP mode Switches the standby mode Displays menu of iPod iPod Shows file browser display Returns to upper directory in file browser mode USB SD I K J button Puts the clock ...

Page 7: ... turned off except AirPlay Put iPod in sleep mode by pressing and holding the button iPod L o button Stops playback BLUETOOTH USB SD Displays the clock while the system is turned off Starts PTY search TUNER FM M S T button Selects next previous file track Activates fast forward reverse by pressing and holding the button NETWORK AirPlay BLUETOOTH iPod USB SD Selects upper lower frequency Scans uppe...

Page 8: ...ment Looking for a better reception state stick a wire antenna on the wall or a pole C SD card slot Insert a SD card for playback D AC IN jack Connect the supplied AC power cord Side A Carrying handle Hold both handles when you carry the System B FM telescopic antenna Adjust length angle and direction to obtain the best reception C Wi Fi antenna Turn the antenna upright before operation D AUDIO IN...

Page 9: ...andom All tracks are played once in a random order iPod USB SD Repeat Random All tracks are played repeatedly in a random order iPod USB SD Indicates the range of the repeat random playback is within the current folder iPod USB SD iPod Appears when connecting iPod to the USB connector USB MP3 Indicates that the file type of the current track is MP3 USB SD WMA Indicates that the file type of the cu...

Page 10: ...y NETWORK p 22 BLUETOOTH p 27 iPod p 30 USB SD p 33 Switches the source between tuner and audio in TUNER FM p 38 AUDIO IN p 37 D CLOCK TIMER Sets the clock and daily timer p 13 p 40 E SLEEP Sets the sleep timer p 40 F APS Switches APS Auto Power Save function on and off p 15 G CANCEL Cancels the previous operation Deletes the file track from the Favorite list USB SD p 36 H REPEAT FM MODE Switches ...

Page 11: ...TWORK p 17 Selects upper folder NETWORK in DMP mode Switches the standby mode p 23 Displays menu of iPod iPod p 31 Shows file browser display returns upper directory in file browser mode USB SD p 34 Shows BROWSE FOLDER selection display pressing and holding Q SET Selects the item Clock Timer setting NETWORK iPod USB SD Changes the audio input level from the external device AUDIO IN p 37 R S T Sele...

Page 12: ...e AC power cord AC outlet AC power cord supplied CAUTION 0 Only use the AC power cord provided for this System to avoid malfunction or damage to the System 0 Remove all the batteries when using the AC power cord 0 Be sure to unplug the AC power cord from the outlet when going out or when the System is not in use for an extended period of time NOTE 0 The power can also be supplied through the batte...

Page 13: ...a misentry during the process press CANCEL You can return to the previous step NOTE 0 The clock may gain or lose 1 to 2 minutes per month You may need to readjust the clock periodically 0 About several hours after you disconnect the AC power cord and no batteries are installed the set time will be reset To display the clock while being turned off Main unit Remote control 0 The clock is displayed f...

Page 14: ... Press repeatedly to change the setting Canceled NOTE The sound mode setting also affects the sound through the headphones Changing the display information Main unit Remote control Eachtimeyoupressthebutton thedisplayinformation changes from the clock to other information 0 The information shown on the display differs depending on the source 0 Tag information can be shown on the display while an M...

Page 15: ...s performed for 15 minutes in the following situations the System turns off automatically The volume level is set to Min or muting is activated iPod USB or SD is selected as the source and no device is connected BLUETOOTH or NETWORK is selected as the source and no wireless connecion with the System USB or SD is selected as the source and playback is stopped AUDIO IN is selected as the source and ...

Page 16: ...chnology you can stream your music from your Mac Windows iPod touch iPhone iPad to external speakers AirPlay usage requires 0 iTunes version 10 2 2 or later Mac Windows PC 0 Following devices with the latest iOS update iPod touch 5th 4th and 3rd generation iPhone 5 iPhone 4S iPhone 4 iPhone 3GS iPhone 3G does not support AirPlay iPad 4th and 3rd generation iPad 2 iPad About DLNA With DLNA technolo...

Page 17: ...ork setup 0 Refer to the instruction manual of your device for further details 5 Select RV S5 xxxxxx from the network list RV S5 xxxxxx Wi Fi RV S5 0 You can confirm the System name displayed on your device p 25 0 xxxxxx is a model specific number 6 On iPod touch iPhone iPad start a Music application to display the Now Playing screen 0 On a PC start iTunes or Windows Media Player 12 Start a DLNA c...

Page 18: ...e to NETWORK Remote control Main unit 2 Display the screen to select the desired connection method Hold Hold Main unit Remote control 3 Select SSID Set Press repeatedly Press repeatedly Main unit Remote control 0 Wait until the display shows SSID Ready which takes about 40 seconds 4 On your device set Wi Fi to ON 0 On iPod touch iPhone iPad select Wi Fi from Settings 0 On an Android device select ...

Page 19: ... Set ID SSID pull down list select the SSID of your router RV S5 10 Enter your network password if required 0 Depending on the router it may be necessary to put a check mark on DHCP in the Advance Setting menu 11 Tap or click Apply at the bottom of the page to apply your settings RV S5 RV S5 12 Tap or click OK to confirm your settings 0 Please wait B Successfully connected to network name will be ...

Page 20: ... again from the beginning if connection cannot be established Connection via iPod touch iPhone iPad connected to the System Login Sharing If you use an Apple product you can also choose this connection method 1 Switch the source to NETWORK Remote control Main unit 2 On iPod touch iPhone iPad select Wi Fi from Settings and then set to ON to connect the wireless LAN router 3 Connect the iPod touch i...

Page 21: ...ls on checking the MAC ID refer to p 25 0 Try again from the beginning if connection cannot be established Adding AirPlay DLNA Devices to the Same Wi Fi Network as the Main Unit You can add other AirPlay DLNA devices to join the same Wi Fi network as the unit 1 On the iPod touch iPhone iPad select Wi Fi from Settings and then set to ON 0 On an Android device select Wireless networks in Settings an...

Page 22: ...a Mac PC 1 On the menu bar click iTunes and select Preferences 2 Under Devices tab check the Allow iTunes audio control from remote speakers box Setting iTunes on a Windows PC 1 On the menu bar click Edit and select Settings 2 Under Devices tab check the Allow iTunes audio control from remote speakers box Playing via Windows Media Player 12 1 Start Windows Media Player 12 2 Select the files for pl...

Page 23: ...y between the System and your AirPlay DLNA device p 17 0 Press the SET button on the remote control when Press SET key is displayed 0 To cancel the network standby mode press the NETWORK SETUP button remote control during the normal standby mode The System will switch to the low power consumption mode AirPlay DLNA Auto Switch For sources other than NETWORK if RV S5 is selected by an AirPlay DLNA d...

Page 24: ... Information Device Name Edit 0 To return to the previous menu press MENU Network Setting Connecting this System and your device to search or input the necessary information 1 Select Network Setting Press repeatedly Press repeatedly Main unit Remote control 2 Set the items by pressing the UP DOWN SET button Search AP The System searches for the access point automatically After searching is finishe...

Page 25: ... name IP Adress Subnet Mask Gateway Primary DNS Secondary DNS SSID Mac Adress Firmware version Device Name Edit Changing the Network name of this System 1 Select Device Name Edit Press repeatedly Press repeatedly Main unit Remote control 2 Set the Network name by pressing the UP DOWN SET button 0 Each time you press the UP DOWN button the alphabet displayed on the screen changes in order 25 ...

Page 26: ...e System automatically 0 Connected will be displayed on the System 0 When the target device requests the passkey during pairing operation enter 0000 4 On iPod touch iPhone iPad start a Music application to display the Now Playing screen 0 On a PC start iTunes or Windows Media Player 12 Start the BLUETOOTH compatible application on other BLUETOOTH compatible devices 0 Refer to the instruction manua...

Page 27: ...egister the new device to the System Refer to Registering a BLUETOOTH device p 26 Navigating the BLUETOOTH Device Various functions can be controlled from the remote control or your BLUETOOTH device Function Front Remote control BLUETOOTH device Volume up down Turn Controlled Play pause Fast Forward Fast Rewind Hold Hold Next previous track Mute Stop 27 ...

Page 28: ...is connected to the USB connector and USB is selected as the source CAUTION 0 You cannot send any data to iPod from the System 0 Connect iPod firmly 0 Do not carry the System with iPod connected Doing so might cause damage to the dock or you might drop iPod To connect iPod to the dock for iPod Front door CAUTION 0 Remove the protecting case of iPod before connecting 0 Keep iPod in a straight posit...

Page 29: ...y to USB connector 0 If iPod does not play correctly update the software of iPod to the latest version For details about updating iPod check on the Apple web site http www apple com Viewing video picture from iPod You can view video picture from iPod connected to the dock for iPod on an external monitor 0 Before connecting a monitor turn off the power of this System 1 Connect a monitor Monitor not...

Page 30: ...ext information icon Indicates the category of the displayed text information You can change the category by pressing DISPLAY Title Album Artist To pause Main unit Remote control To cancel pause press the button again To select a track Press repeatedly Press repeatedly Main unit Remote control To fast forward reverse 0 During playback Hold Hold Main unit Remote control Shuffle playback Main unit R...

Page 31: ...Depending on the type of iPod iPod may operate differently 0 Depending on the type of iPod shuffle and repeat indicator may not work properly 0 Depending on the type of iPod you can operate the menu only on the screen of iPod 0 Operate iPhone or iPod touch itself in the following cases When operating the home button When selecting application icons on the home screen When dragging the slider 0 For...

Page 32: ...omputer to the USB terminals of the System 0 Electrostatic shock at connecting a USB device may cause abnormal playback of the device In this case disconnect the USB device then disconnect AC power cord from an outlet and connect it and then connect the USB device Inserting an SD card 0 When removing the SD card push it in and then pull it out CAUTION 0 DO NOT insert any object other than an SD ca...

Page 33: ...formation Album Tag information Artist Tag information NOTE 0 If there is no tag information Unknown is displayed To stop Main unit Remote control 0 If you start playback again after stopping the track which was being played is played from the beginning Resume Play Press o again while stopped to cancel Resume Play 0 Resume playback is canceled when another source is selected To pause Main unit Rem...

Page 34: ...at playback Main unit Remote control Each time you press the button the setting changes as follows Repeat 1 Repeats the current track Repeat All Repeats all tracks Repeat Group Repeats all tracks in the current group Repeat Off Cancels repeat playback 0 Repeat playback is canceled in the following cases When the System is turned off When the source is changed When a USB device or a SD card is disc...

Page 35: ... To return to the upper directory press MENU To return to the normal display press and hold SET Using the Favorite folder You can register up to 30 tracks to the Favorite folder to make an original playlist To add a track to the Favorite folder 0 While the track which you want to register is playing Main unit Remote control 0 Favorite Set is displayed when the track is registered 0 If 30 tracks ha...

Page 36: ...ncel the Favorite folder display press and hold MENU Display information 1 2 A Category of the current item Favorite B File name To delete tracks from the Favorite folder 0 While the Favorite folder is displayed Select the track to delete Main unit Remote control To delete all the tracks in the Favorite folder press and hold the CANCEL button NOTE The registered playlist is erased in the following...

Page 37: ...atedly Press repeatedly Main unit Remote control 2 Start playback of the external device 3 Adjust the volume To adjust the audio input level If the sound from the device connected to the AUDIO IN jack is too quiet you can change the audio input level through the AUDIO IN jack without changing the volume level Main unit Remote control Each time you press the button the setting changes Level 1 Ordin...

Page 38: ...hange the information by pressing DISPLAY Clock Frequency To search for a station with good reception Hold Hold Main unit Remote control The search stops automatically when a station with good reception is found To stop the search manually press one of the buttons To improve the FM reception If an FM stereo broadcast is hard to listen to you can improve the reception by switching to monaural mode ...

Page 39: ...ting press CANCEL To tune in to a preset station Press repeatedly Press repeatedly Main unit Remote control PTY search You can using the PTY search for the stored preset stations 1 Enter the PTY code setting mode Main unit Remote control 2 Select a PTY code Press repeatedly Press repeatedly Main unit Remote control or or 0 To cancel the searching press CANCEL 0 The first one found is tuned in To c...

Page 40: ...ou can wake up with your favorite music 0 Connect a USB device iPod to the System and make sure that the source works properly beforehand 0 Preset the desired FM station before setting the daily timer 1 Select Play Timer Press repeatedly Main unit Remote control 2 Set the timer contents Press repeatedly Press repeatedly Main unit Remote control You can set the following items 0 Hour and minute for...

Page 41: ...mer works every day To correct a misentry during the process press CANCEL You can return to the previous step CAUTION 0 The daily timer works only when the System is on standby 0 Auto power save A P S is effective even while the daily timer is working To activate deactivate the daily timer Press repeatedly Remote control To set the daily timer again without changing the contents press SET Timer On...

Page 42: ...n 1 and version 2 on an MP3 or WMA file can be displayed About DLNA Devices 0 About the Digital Media Server DMS Files stored in the Network Attached Storage NAS or PC can be played back by the Digital Media Renderer DMR being connected to the network 0 About the Digital Media Player DMP It is used to search and play back contents stored on the server DMS via network client 0 About the Digital Med...

Page 43: ...eless performance 0 iPhone iPod iPod classic iPod nano and iPod touch are trademarks of Apple Inc registered in the U S and other countries 0 SDHC Logo is a trademark of SD 3C LLC 0 AirPlay AirPlay logo iPhone iPod iPod classic iPod nano iPod touch are registered trademarks of Apple Inc in the United States and or other countries iPad is a registered trademark of Apple Inc 0 DLNA DLNA logo and DLN...

Page 44: ...to turn off other devices that are connected to the router Breaking of music streaming B Restart your AirPlay DLNA device or this System B Enable the Auto Channel Scan Option on the Wi Fi router if available B Enable the Wireless Intelligent Stream Handling WISH option on the Wi Fi router if available B Enable the Quality of Service QoS option on the Wi Fi router if available B Other home routers ...

Page 45: ...connected properly MP3 WMA groups and tracks are not played back as you expect B Playing order was determined when the groups and tracks are recorded It depends on the writing application Tuner operations Hard to listen to broadcasts because of noise B The FM antenna is not properly extended and positioned Timer operations The daily timer does not work B The System is turned on when the on time co...

Page 46: ... USB 2 0 Full Speed Compatible devices Mass storage class Compatible file systems FAT16 FAT32 Playable files MP3 WMA SD card Compatible devices SD SDHC Compatible file systems FAT16 FAT32 Playable files MP3 WMA AUDIO IN Stereo mini o 3 5 mm x 1 Input Sensitivity Impedance 1 kHz LEVEL 1 500 mV 47 kΩ LEVEL 2 250 mV 47 kΩ LEVEL 3 125 mV 47 kΩ PHONES Stereo mini o 3 5 mm x 1 20 mW Ch output into 32 Ω ...

Page 47: ...e Control Profile General Power supply AC AC 230 V 50 Hz DC DC 15 V R14 SUM 2 C 14D size batteries x 10 Power consumption When using an AC outlet 35 W at operation 0 50 W or less on standby Dimensions approx W x H x D 615 mm x 196 mm x 277 mm Mass approx 6 3 kg without batteries inserted in the battery compartment This power consumption value is obtained when NETWORK STANDBY is cancelled in the po...

Page 48: ... V EN 2013 JVC KENWOOD Corporation 0413KMYSANANA ...

Reviews: