background image

18

DAB Full Scan

The Full Scan will search for the entire DAB Band III channels. After the scan has finished, 

the first alphanumerically found station will be automatically selected.

Full scan will not replace the DAB stations in memory. If you want to remove all 

the previous scanned stations, Factory Reset is required.

1.  Press MENU button, and then turn the VOLUME/SELECT dial or press     button to 

select Full Scan. Press the VOLUME/SELECT dial to confirm.

2.  The display will show Scanning ... Stations: ## and a progressing slide bar.
3.  Press     button to select a scanned DAB station in the Station List, and then press 

VOLUME/SELECT to confirm.

Secondary Services

You may see a   symbol after the name of the station, this indicates that there are 

secondary services available to that station. These secondary services contain extra 

services that are related to the primary station. e.g. a sports station may want to add extra 

commentaries. The secondary services are inserted directly after the primary station in the 

station list.
To select the secondary station, turn VOLUME/SELECT dial on the unit until you find the 

secondary service you want, then press VOLUME/SELECT dial on the unit to select it.
When the secondary service ends, the unit will automatically switch back to the primary 

station.

Manually Tuning In DAB Radio Stations

As well as the auto scan function, you can manually tune them in. You will need to know 

which multiplex the station you are looking for is in.
1.  Press MENU button, and then turn the VOLUME/SELECT 

dial or press     button to select Manual Tune. Press 

the VOLUME/SELECT dial to confirm.

2.  Turn the VOLUME/SELECT dial or press     button to 

select a multiplex. You will now see the Strength of the 

signal for your chosen multiplex. You won’t hear anything 

at the moment.

3.  Now view the Station List and you will find any new 

radio stations that have been manually tuned in.

Manual Tune

10:45

5A 174.928MHz

5B 176.640MHz
5C 178.352MHz
5D 180.064MHz
6A 181.936MHz
6B 183.648MHz
6C 185.360MHz

>

>
>
>
>
>
>

Manual Tune

10:45

5A 174.928MHz

Strength

RA-D77M_IB_170608_will.indd   18

13/6/2017   4:32 PM

Summary of Contents for RA-D77M

Page 1: ...Instruction Manual Wooden Wireless DAB Radio RA D77M RA D77M_IB_170608_will indd 1 13 6 2017 4 32 PM ...

Page 2: ...RA D77M_IB_170608_will indd 2 13 6 2017 4 32 PM ...

Page 3: ...aliser 14 Setting the Time and Date 15 Backlight 15 Language 15 Factory Reset 16 Software version 16 DAB Operation 17 DAB Full Scan 18 Secondary Services 18 Manually Tuning In DAB Radio Stations 18 DRC Setting 19 Saving Preset Stations 19 Recalling a Preset Station 19 DAB Display Modes 20 FM Operation 21 Auto Scan 21 Manual Tune 21 Scan Setting 21 Audio Setting 22 Saving Preset Stations 23 Recalli...

Page 4: ...Hints and Tips 27 Product Fiche and Specifications 28 Useful Information and Licences 29 RA D77M_IB_170608_will indd 4 13 6 2017 4 32 PM ...

Page 5: ...terference If you do it may adversely affect the operating performance of the unit and cause a distorted picture or sound Read all the instructions carefully before using the unit and keep them for future reference Retain the manual If you pass the unit onto a third party make sure to include this manual Check that the voltage marked on the rating label matches your mains voltage Damage Please ins...

Page 6: ...quilateral triangle is intended to alert the user to the presence of important operating and maintenance servicing instructions in the manual accompanying the unit Service To reduce the risk of electric shock do not remove screws The unit does not contain any user serviceable parts Please leave all maintenance work to qualified personnel Do not open any fixed covers as this may expose dangerous vo...

Page 7: ...ffers You will also find some hints and tips to help you resolve any issues Read all the safety instructions carefully before use and keep this instruction manual for future reference Main Unit Instruction Manual Mains Adapter Instruction Manual If items are missing or damaged please contact Partmaster UK only Tel 0344 800 3456 for assistance If you require additional assistance For UK please call...

Page 8: ...erview Front View 1 Speaker 2 TFT Display 1 DAB FM Aerial 2 Socket 3 AUX IN Socket 4 DC IN 12V 2A Socket 5 UPDATE PORT Socket 1 1 1 2 Rear View UPDATE PORT 2 3 4 5 1 RA D77M_IB_170608_will indd 8 13 6 2017 4 32 PM ...

Page 9: ...me playback in Bluetooth mode 5 MENU Button Press to enter or exit the menu Top View VOLUME SELECT 2 3 4 5 1 7 6 8 6 Preset 1 2 3 Button Press and hold to directly save preset station 1 2 or 3 Press to directly recall preset station 1 2 or 3 7 Preset 4 Button Press and hold to save preset station among 1 10 Press to recall preset station among 1 10 8 Button Press to move upwards downwards in the m...

Page 10: ...earphones Slowly raise the volume with the earphones on until you reach your desired volume When earphones are connected the speaker is automatically muted Rear of the Unit UPDATE PORT Auxiliary Equipment 3 5 mm to 3 5 mm stereo audio cable Not included Rear of the Unit UPDATE PORT Long term exposure to loud music may cause hearing damage It is best to avoid extreme volume when using earphones esp...

Page 11: ...ocket To the mains socket Rear View of the Main Unit Extend the aerial before switching to DAB mode for the first time This will ensure that the initial scan captures all stations in your area Remove the mains plug from the mains socket if you want to switch the unit off completely UPDATE PORT Ensure all audio connections of the unit are connected before connecting to the mains power socket Make s...

Page 12: ... unit will automatically go to STANDBY mode after 10 minutes if it has no audio playback Press STANDBY to resume Adjusting the Volume Turn VOLUME SELECT dial on the unit to increase decrease the volume Automatically Setting the Clock The clock can be set and updated automatically if the unit receives DAB FM signals in your location In order for the clock to synchronise to the current local time yo...

Page 13: ...d Alarm 2 This is handy so you can set one alarm for workdays and one for weekends You set both alarms in the same way 1 Press MENU button and then turn the VOLUME SELECT dial or press button to select System settings Press the VOLUME SELECT dial to confirm 2 Turn the VOLUME SELECT dial or press button to select Alarm Press the VOLUME SELECT dial to confirm 3 Turn VOLUME SELECT dial or press butto...

Page 14: ...ou can save as your own personal Eq Profile 1 Press MENU button and then turn the VOLUME SELECT dial or press button to select System settings Press the VOLUME SELECT dial to confirm 2 Turn the VOLUME SELECT dial or press button to select Equaliser Press the VOLUME SELECT dial to confirm 3 Turn the VOLUME SELECT dial or press button to select a profile through Normal Flat Classic Jazz Pop Rock Spe...

Page 15: ...MENU button and then turn the VOLUME SELECT dial or press button to select System settings Press the VOLUME SELECT dial to confirm 2 Turn the VOLUME SELECT dial or press button to select Backlight Press the VOLUME SELECT dial to confirm 3 Turn VOLUME SELECT dial or press button to select options and then press VOLUME SELECT dial to confirm the setting Timeout On 10 sec 20 sec 30 sec 45 sec 60 sec ...

Page 16: ...e VOLUME SELECT dial or press button to select Yes Press the VOLUME SELECT dial to confirm After factory reset all tuned stations preset stations and alarm settings will be erased then your radio will switch back on Software version This information may be requested when dealing with technical support issues 1 Press MENU button and then turn the VOLUME SELECT dial or press button to select System ...

Page 17: ...ation Press button to select a scanned DAB station and then press VOLUME SELECT to confirm In DAB mode press MENU to display the Digital Radio menu The menu items are as follows Station list Show the list of all radio stations Full Scan Select Full Scan in the menu and then press VOLUME SELECT dial to scan for DAB radio stations Manual tune Select Manual Tune to manually tune in radio stations tha...

Page 18: ...vices are inserted directly after the primary station in the station list To select the secondary station turn VOLUME SELECT dial on the unit until you find the secondary service you want then press VOLUME SELECT dial on the unit to select it When the secondary service ends the unit will automatically switch back to the primary station Manually Tuning In DAB Radio Stations As well as the auto scan...

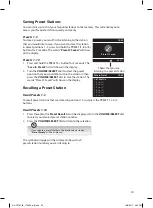
Page 19: ...osition that you would like to store the station in then press the VOLUME SELECT dial to save the station The words Preset Saved will show on the display Recalling a Preset Station Recall Presets 1 3 To recall preset stations that are stored in positions 1 3 just press the PRESET 1 2 or 3 buttons Recall Presets 1 10 1 Press 4 button the Preset Recall list will be displayed Turn the VOLUME SELECT o...

Page 20: ...cy Signal Error Signal Strength The error is shown as a number If the number is 0 it means the signal received is error free and the signal strength is strong If the error rate is high it is recommended to reposition the radio aerial or reposition the unit The display will show a slide bar to indicate the signal strength the stronger the signal the longer the bar will be from left to right Bit Rat...

Page 21: ... 05MHz If reception is still poor adjust the position of the DAB FM aerial or try moving the radio to another location Scan Setting In the Scan Settings menu you can choose if you want your radio to tune to Strong Stations Only or select All Stations and it will try to tune to all stations however some may be very weak 1 In FM mode press MENU to display the FM menu 2 Turn VOLUME SELECT dial to sel...

Page 22: ...r up some of the static 1 In FM mode press MENU to display the FM menu 2 Turn VOLUME SELECT dial to select Audio setting and then press VOLUME SELECT dial to confirm You ll now be asked if you want to listen in MONO only or not 3 Turn VOLUME SELECT dial to select Stereo Allowed or Forced Mono then press VOLUME SELECT dial to confirm RA D77M_IB_170608_will indd 22 13 6 2017 4 32 PM ...

Page 23: ...n then press the VOLUME SELECT dial to save the station The words Preset Saved will show on the display Recalling a Preset Station Recall Presets 1 3 To recall preset stations that are stored in positions 1 3 just press the PRESET 1 2 or 3 buttons Recall Presets 1 10 1 Press Preset 4 the Preset Recall list will be displayed Turn the VOLUME SELECT dial to select your desired preset station number 2...

Page 24: ...s information about the current programme Programme Type This describes the Style or Genre of music that is being broadcast Station Name Frequency When an RDS station is received the name of that station will be displayed or if not the frequency will be displayed Date This displays the current date provided automatically by the broadcaster Radio Text Programme Type Station Name Frequency Date RA D...

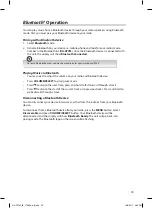
Page 25: ...just the volume on your radio and Bluetooth device Press VOLUME SELECT to play pause music Press to skip to the next track press and hold to fast forward through a track Press to skip to the start of the current track or to previous tracks Press and hold to go backward through a track Disconnecting a Bluetooth Device You can disconnect your device in two ways either from the radio or from your Blu...

Page 26: ...switch the unit on 3 Select Auxiliary Input mode 4 In Aux in mode you may operate your audio device directly for playback features 5 Turn VOLUME SELECT dial on the unit to increase decrease the volume 6 When you have finished listening turn off the power of the connected external audio device Press MODE on the unit to return to DAB or FM mode especially if wake up alarms are programmed Maintenance...

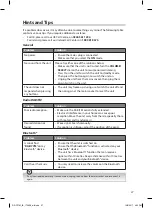
Page 27: ...eeze up during use Switch the unit off and then on again at the mains socket to reset the unit Radio DAB FM Problem Solution Poor radio reception Make sure the DAB FM aerial is fully extended Electrical interference in your home can cause poor reception Move the unit away from them especially those with motors and transformers Desired station not found Weak signal Search manually If reception is s...

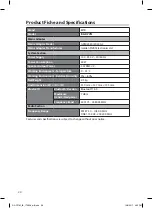
Page 28: ...er 5 W RMS 2 Working Environment Temperature 0 35 C Working Environment Relative Humidity 5 80 Net Weight 2 3 kg Unit Dimension W D H 330 mm 147 mm 135 mm Bluetooth Bluetooth Version Bluetooth 4 0 Maximum transmitted power 7 dBm Frequency Band 2401 75 2480 25 MHz Radio Section Frequency Range FM 87 50 108 00 MHz DAB 174 928 239 200 MHz Features and specifications are subject to change without prio...

Page 29: ...ion point for the recycling of waste electrical and electronic equipment The separate collection and recycling of your waste equipment at the time of disposal will help conserve natural resources and ensure that it is recycled in a manner that protects human health and the environment For more information about where you can drop off your waste for recycling please contact your local authority or ...

Page 30: ...RA D77M_IB_170608_will indd 30 13 6 2017 4 32 PM ...

Page 31: ...RA D77M_IB_170608_will indd 31 13 6 2017 4 32 PM ...

Page 32: ...entative of the manufacturer is DSG Retail Ltd co no 504877 1 Portal Way London W3 6RS UK For Help and Support Call UK 0344 561 1234 Ireland 1890 818 575 The product is distributed and warranted exclusive by DSG Retail Ltd JVC is the trademark of JVC KENWOOD Corporation used by DSG Retail Ltd under license RA D77M_IB_170608_will indd 32 13 6 2017 4 32 PM ...

Reviews: