background image

18

Quick Setup                                     Connections

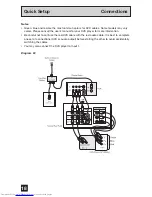
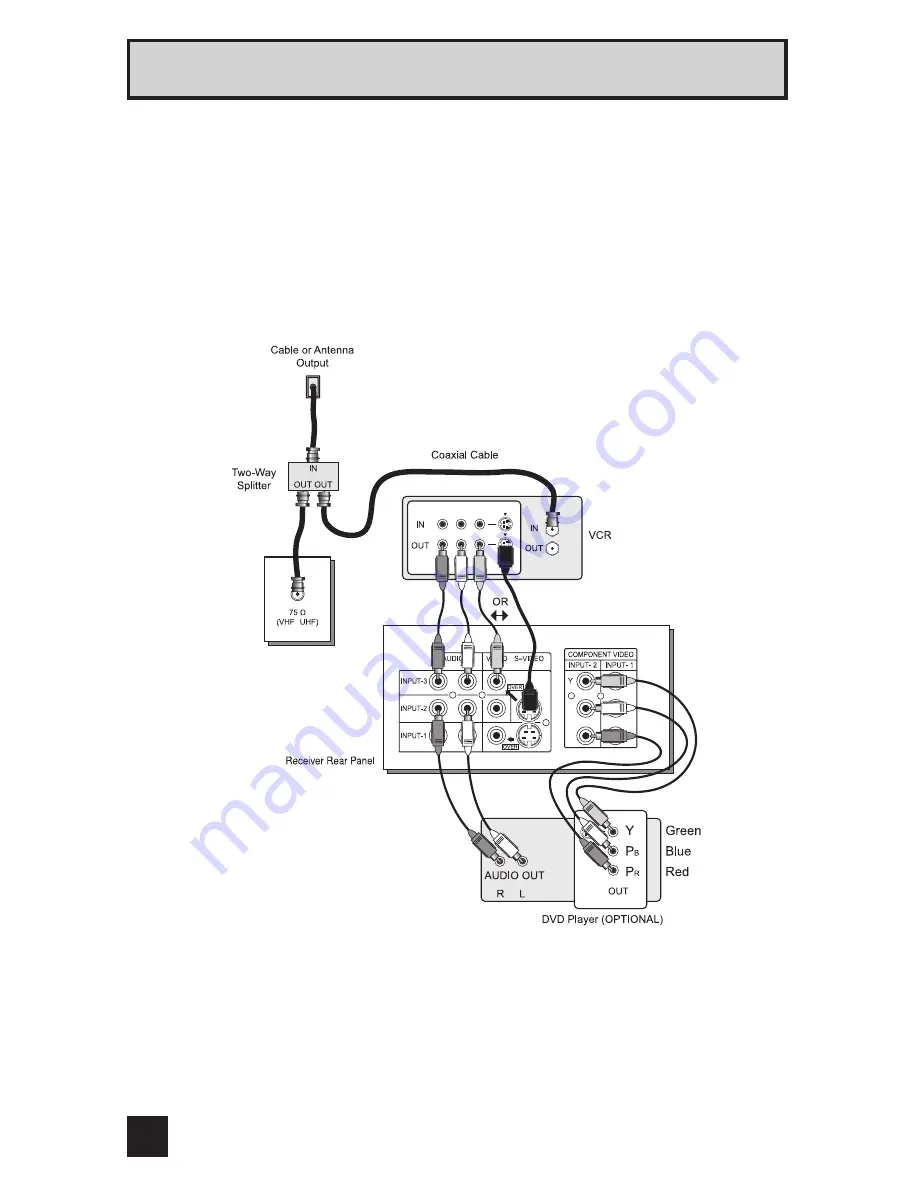
Notes:

•   Green, blue and red are the most common colors for DVD cables. Some models may vary 

colors. Please consult the user’s manual for your DVD player for more information.

•   Be careful not to confuse the red DVD cable with the red audio cable. It is best to complete 

one set of connections (DVD or audio output) before starting the other to avoid accidentally 
switching the cables.

•   You may also connect the DVD player to Input 1.

P

b

P

r

P

b

P

r

Diagram #3

Summary of Contents for PD-42WV74

Page 1: ...e use LCT1517 001B 0903 KT CR VP Model Number Serial Number Illustration of PD 42WV74 and RM C13G For Model PD 42WV74 Plasma Display Users Guide INPUT 1 INDEX ASPECT FREEZE SWAP SELECT RETURN INPUT 2 INPUT 3 INPUT 4 DIGITAL IN THEATER PRO NATURAL CINEMA VIDEO STATUS SLEEP TIMER DISPLAY SOUND LIGHT TV CATV VCR DVD MUTING MENU BACK C C RM C13G REW VCR CHANNEL PREV NEXT VCR DVD POWER TV VCR FF PLAY R...

Page 2: ...e sure to disconnect both the power plug from the AC outlet and antenna for your safety To prevent electric shock do not use this polarized plug with an extension cord receptacle or other outlet unless the blades can be fully inserted to prevent blade exposure CAUTION To reduce the risk of electric shock Do not remove cover or back No user serviceable parts inside Refer servicing to qualified serv...

Page 3: ...e receptacles and the point where they exit from the apparatus 11 Only use attachments accessories specified by the manufacturer 12 Use only with a cart stand tripod bracket or table specified by the manufacturer or sold with the apparatus When a cart is used use caution when moving the cart apparatus combination to avoid injury from tip over 13 Unplug this apparatus during lightning storms or whe...

Page 4: ...tance guidelines shown for safe operation 8 inch 200 mm 4 inch 100 mm 4 inch 100 mm 4 inch 100 mm 4 inch 100 mm 2 inch 50 mm 6 inch 150 mm 6 inch 150 mm 2 inch 50 mm 17 Cautions for installation Do not tilt the TV towards the left or right or towards the back Install the TV in a corner on the floor so as to keep cords out of the way The TV will generate a slight amount of heat during operation Ens...

Page 5: ...ly bright room it is recommended to change the VIDEO STATUS setting to standard theater or game Doing so will reduce the chance of PDP burn in and extend the life of the PDP Refer to page 56 Do not display static images or characters for long periods of time While an image is displayed With power OFF Burn in example Reduce PICTURE and BRIGHT on the PICTURE ADJUST menu page 47 when viewing Do not v...

Page 6: ...ight all the time Do not install the TV near electronic equipment that is susceptible to electromagnetic waves It may cause interference in images sound etc In particular keep video equipment away from this product Effect on infrared devices There may be interference while using infrared devices such as infrared cordless headphones The phenomenon described below is not a malfunction If the televis...

Page 7: ...Panel Lock 45 V1 Smart Input 45 Auto Shut Off 46 XDS ID 46 Picture Adjust 47 Picture Settings 47 Adjust Picture Settings 47 Color Temperature 47 Digital Noise Clear 48 Color Management 48 Burn in Image Reducer 48 Reset 48 Table of Contents Sound Adjust 49 Sound Settings 49 Adjust Sound Settings 49 MTS Multi Channel Television Sound 49 Clock Timers 50 Set Clock 50 On Off Timer 51 Button Functions 5...

Page 8: ...on Before you begin setting up your new television please check to make sure you have all of the following items TV Receiver Remote control AA R06 size batteries used to check operation System cable Power cord Screw A 2 Screw B 6 Stand 1 Cover 2 Ferrite core 1 Cable clamp 1 Screw C 4 ...

Page 9: ...rews A to the back of the TV 2 Attach the TV to the stand Insert the heads of the screws A into the top of the stand bar and temporarily secure the TV to the stand 3 Secure the TV to the stand with the screws B 4 Insert the cover to the stand and fix with the screws C 5 Remove the paper from the bottom of the cable clamp and attach the cable clamp to the stand Clamp the system cable and power cord...

Page 10: ...Refer to the pages in parentheses for details 1 Remote control sensor 2 Power lamp page 15 3 MENU button pages 32 4 INPUT button page 54 5 VOL Volume buttons 6 CH buttons page 14 7 POWER button R POWER INPUT 4 L MONO VIDEO OVER AUDIO S VIDEO Refer to the pages in parentheses for details 1 INPUT 4 terminal pages 20 2 POWER button page 15 3 Power lamp page 15 How to open the cover ...

Page 11: ... DISPLAY SOUND LIGHT TV CATV VCR DVD MUTING MENU BACK C C RM C13G REW VCR CHANNEL PREV NEXT VCR DVD POWER TV VCR FF PLAY REC PAUSE OPEN CLOSE STILL PAUSE STOP CH CH VOL VOL OK MULTI SCREEN SPLIT V1 V2 V3 V4 D IN 1 2 3 4 5 6 7 8 9 0 100 TV C C Quick Setup TV Remote Control RM C13G For information on remote control buttons see pages 52 60 ...

Page 12: ... Getting Started STEP 1 Set Up Your TV Caution Turn off all equipment including the TV before connecting anything Connection Diagram DISPLAY OUT SYSTEM CABLE R AUDIO L VIDEO DIGITAL IN SUB WOOFER OUT AUDIO OUT AV COMPULINK Pb Pr Pb Pr DISPLAY INPUT CONNECTTO SYSTEM CABLE AC 120V TV back Receiver back Supplied system cable Cable supplied with TV Refer to page 13 for connection details Refer to page...

Page 13: ...e socket Release connector 2 by removing it from the socket while pressing the release bottoms on either side Connecting the power cord to the AC outlet Insert the AC plugs on the power cords from the TV and receiver into AC outlets Caution Operate only from the power source specified AC 120V 60 Hz on the unit Failure to use the supplied power cord or to insert it into a correctly grounded outlet ...

Page 14: ...le box satellite receiver may have to be reset See pages 26 29 Quick Setup Getting Started Step 2 The Remote Control Key Feature Buttons The four key feature buttons at the center of the remote can be used for basic operation of the television The top and bottom buttons will scan forward and back through the available channels To move rapidly through the channels using JVC s Hyperscan feature pres...

Page 15: ...x Slide the VCR DVD selector switch to VCR to control a VCR Slide to DVD to control a DVD player Please see pages 26 to 29 for instructions on programming your remote control to operate a cable box VCR or DVD player Quick Setup Getting Started Display front Receiver front When the TV is off the TV and TUNER power lamps do not light When the TV is on the TV and TUNER power lamps light However when ...

Page 16: ...vision system please refer to the satellite TV manual Diagram 2 Do you use a Cable TV Box Do you have a VCR Do you have a VCR Diagram 1 Diagram 3 Diagram 1 Yes No Yes No Yes No Quick Setup Connections Used to connect an external antenna or cable TV system to your receiver Used to make video connections with S Video VCRs Camcorders and DVD players Coaxial Cables S Video Cable Used to connect audio ...

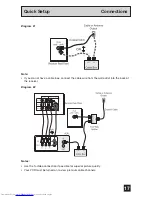
Page 17: ...Video connection if possible for superior picture quality Your VCR must be turned on to view premium cable channels Diagram 2 Note If you do not have a cable box connect the cable wire from the wall outlet into the back of the receiver Diagram 1 ...

Page 18: ...ult the user s manual for your DVD player for more information Be careful not to confuse the red DVD cable with the red audio cable It is best to complete one set of connections DVD or audio output before starting the other to avoid accidentally switching the cables You may also connect the DVD player to Input 1 Pb Pr Pb Pr Diagram 3 ...

Page 19: ...ved from the VHS tape If the tab is in place automatic switching will occur when you push the VCR s PLAY button If your JVC brand VCR has A code B code remote control switching see your VCR s instruction book using VCR A code will switch the TV to input 1 Refer to your DVD instruction book for detailed connection information To connect a JVC HiFi receiver or amplifier for a completely automated ho...

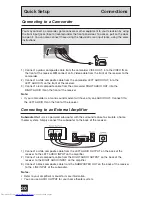
Page 20: ...nnections 1 Connect a yellow composite cable from the camcorder VIDEO OUT into the VIDEO IN on the front of the receiver OR connect an S Video cable from the front of the receiver to the camcorder 2 Connect a white composite cable from the camcorder LEFT AUDIO OUT into the LEFT AUDIO IN on the front of the receiver 3 Connect a red composite cable from the camcorder RIGHT AUDIO OUT into the RIGHT A...

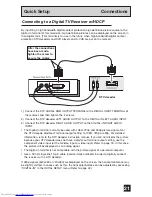
Page 21: ...t terminal output setting to 1080i 720p or 480p For detailed information refer to the DTV decoder instruction manual If you can not display the picture because your DTV decoder does not have a digital out terminal output setting use the component video input or the S Video input or video input Refer to page 18 In this case the picture will be displayed as an analog signal The digital in terminal i...

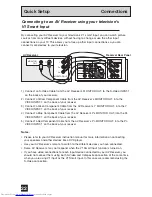
Page 22: ...Receiver s PB MONITOR OUT into the PB VIDEO INPUT 1 on the back of your receiver 5 Connect a Red Component Cable from the AV Receiver s PR MONITOR OUT into the PR VIDEO INPUT 1 on the back of your receiver Notes Please refer to your AV Receiver instruction manual for more information on connecting your speakers and other devices like a DVD player Use your AV Receiver s remote to switch to the dife...

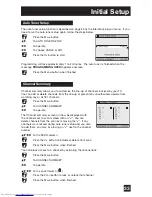
Page 23: ...or MANUAL for setting the clock The auto tuner setup of which channels you wish to receive We recommend you complete the interactive plug in items before you start using your television Step 4 The Interactive Plug In Menu Quick Setup Plug In Menu After the JVC INTERACTIVE PLUG IN MENU has been displayed the TV automatically switches to the LANGUAGE settings You can choose to view your onscreen men...

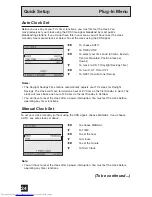
Page 24: ...ns If you do not have this in your area you will have to set the clock manually See manual clock set below To set the clock using the XDS signal To choose AUTO To TIME ZONE To select your time zone Atlantic Eastern Central Mountain Pacific Alaska or Hawaii To move to D S T Daylight Savings Time To turn D S T ON or OFF To NEXT To Auto Tuner Setup Notes The Daylight Savings Time feature automaticall...

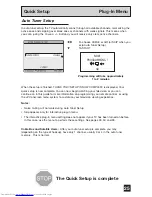
Page 25: ...PLETE is displayed Your quick setup is now complete You can now begin watching your television or you can continue on in this guide for more information on programming your remote control or using the JVC onscreen menu system to customize your television viewing experience Notes Noise muting will not work during Auto Tuner Setup Skip appears only for interactive plug in menu The interactive plug i...

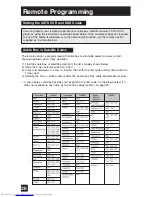
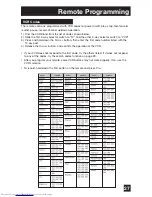
Page 26: ...l up down and 10 key operation 1 Find the cable box or satellite brand from the list of codes shown below 2 Slide the 2 way selector switch to CATV 3 Press and hold down the DISPLAY button then enter the first code number listed with the 10 key pad 4 Release the DISPLAY button and confirm the operation of the cable box satellite receiver If your cable or satellite box does not respond to the first...

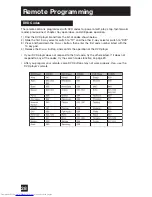
Page 27: ...hold down the DISPLAY button then enter the first code number listed with the 10 key pad 4 Release the DISPLAY button and confirm the operation of the VCR If your VCR does not respond to the first code try the others listed If it does not respond to any of the codes try the search codes function on page 29 After you program your remote some VCR buttons may not work properly If so use the VCR s rem...

Page 28: ...y selector switch to DVD 3 Press and hold down the DISPLAY button then enter the first code number listed with the 10 key pad 4 Release the DISPLAY button and confirm the operation of the DVD player If your DVD player does not respond to the first code try the others listed If it does not respond to any of the codes try the search codes function on page 29 After you program your remote some DVD bu...

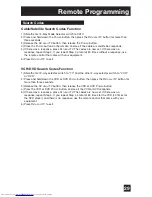
Page 29: ...ntrol that came with your equipment 6 Press RETURN TV to exit VCR DVD Search Codes Function 1 Slide the first 2 way selector switch to TV and the other 2 way selector switch to VCR or DVD 2 Press and hold down the VCR or DVD POWER button then press the RETURN TV button for more than three seconds 3 Release the RETURN TV button then release the VCR or DVD POWER button 4 Press the VCR or DVD POWER b...

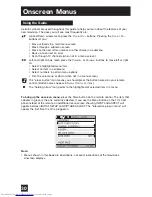
Page 30: ...he ones you will see most frequently are Up and Down arrows mean press the CH or CH buttons Pressing the CH or CH buttons let you Move vertically in a main menu screen Move through a submenu screen Move to the next letter number or other choice in a submenu Back up to correct an error Scan through TV channels when not in a menu screen Left and right arrows mean press the VOLUME or VOLUME buttons t...

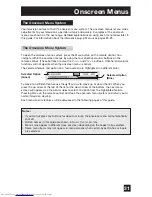
Page 31: ...on on a menu screen are highlighted in a different color To move to a different feature use the arrows to move up or down the list When you press the up arrow at the top of the list or the down arrow at the bottom the next menu screen will appear Use the arrows to select an option from the highlighted feature Pressing MENU on the remote control will close the onscreen menu system and return you to...

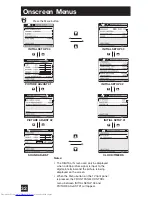
Page 32: ... INITIAL SETUP 02 Notes The DIGITAL IN menu can only be displayed when a 480p picture signal is input to the digital in terminal and the picture is being displayed on the screen When the Menu button on the TV front panel is pressed the FRONT PANEL CONTROL menu between INITIAL SETUP 03 and PICTURE ADJUST 01 will appear INITIAL SETUP 01 ...

Page 33: ...dd or delete channels from the line up or prevent any unauthorized viewers from watching any or all 181 channels Press the MENU button To CHANNEL SUMMARY To operate The Channel summary screen will now be displayed with the channels set to scan marked with an You can delete channels from the scan by removing the If any channels were missed during auto tuner setup and you wish to add them you may by...

Page 34: ...Chip Canada V Chip Movie ratings Descriptions for setting each of the three V Chip formats appear in the next six pages along with descriptions of the rating categories To access the rating categories Press the MENU button To V CHIP To operate Lock icon will appear Press ZERO to access the V Chip menu To turn V Chip ON or OFF V Chip must be turned ON for rating settings to operate To move to SET U...

Page 35: ...g refers to any programming which does not contain a rating signal Programming on television stations which do not broadcast rating signals will be placed in the Unrated Programming category Examples of Unrated programs Emergency Bulletins Locally Originated Programming News Political Programs Public Service Announcements Religious Programs Sports Weather Some Commercials Note TV programs or movie...

Page 36: ...but not much strong language limited violence and some suggestive sexual dialog or situations It is recommended that parents watch these programs first or with their children TV 14 Parents Strongly Cautioned Programs contain some material that may be unsuitable for children under the age of 14 including possible intense violence sexual situations strong coarse language or intensely suggestive dial...

Page 37: ...icon Once you ve put a lock on the top row everything in that column is automatically locked To the TV 14 Column Press the OK button to lock Press the MENU button when finished Note If you want to change the setup move the cursor to the top column and change the lock icon to by pressing OK again You may then select individual categories to block Directions to set US V Chip Ratings Press the MENU b...

Page 38: ...ned Parents with children under 13 are cautioned that the content of movies with this rating may include more explicit sexual language and violence content than movies rated PG R Restricted These films contain material that is explicit in nature and is not recommended for unsupervised children under the age of 17 NC 17 No One Under 17 These movies contain content which most parents would feel is t...

Page 39: ...pictions of aggressive behavior will be infrequent and limited to portrayals that are clearly imaginary comedic or unrealistic in nature C8 Programming Intended for Children 8 and Over Violence Guidelines Any realistic depictions of violence will be infrequent discreet of low intensity and will show the consequences of the acts There will be no offensive language nudity or sexual content G General...

Page 40: ...w these directions for all four numbers Press the OK button to finish your lock code is now set Press the Menu button when finished After a power interruption you must reset the lock code Write your lock code number down and keep it hidden from potential viewers If you forget the lock code a new code may be set using the steps listed above Notes When a viewer attempts to watch a blocked channel th...

Page 41: ...OR To adjust POWER INDICATOR LOW HIGH or OFF Position adjustment allows you to adjust the position of the picture on the screen vertically when the aspect is set to panorama cinema or full Press the MENU button To POSITION ADJUSTMENT To enter To adjust the position Press the MENU button to finish Notes To reset the adjustment to the center press the OK button When the arrow disappears while you ar...

Page 42: ... MENU button to finish Note The DIGITAL IN menu can only be displayed when a 480p picture signal is input to the Digital In terminal and the picture is being displayed on the screen Digital In Initial Setup If your TV is connected to a stereo system you can turn off the TV speakers and listen to the audio through your stereo Press the MENU button To TV SPEAKER To turn the TV s speakers ON or OFF P...

Page 43: ...nu If you need to choose the language again follow the steps below Press the Menu button To LANGUAGE To choose a language ENG English FRAN French or ESP Spanish Press the MENU button when finished Language If your television is connected to an external speaker source audio out gives you the option of controlling the volume level with your TV s remote control Press the MENU button To AUDIO OUT To V...

Page 44: ...nnel CC1 Some programs may include additional text information which is usually found on text channel T1 The other channels are available for future use Closed captioning may not work correctly if the signal being received is weak or if you are playing a video tape Most broadcasts containing closed captioning will display a notice at the start of the program To select the mode press the C C button...

Page 45: ... will appear Note To turn ON OFF the TV press the power button for more than 3 seconds This feature will remain ON V1 Smart Input This feature is used if you have connected an AV Receiver to your television By turning this feature on your television can automatically detect the signal source from your components that are connected to your AV Receiver Refer to page 22 for how to connect an AV recei...

Page 46: ... ID This function automatically shuts off your TV when there is no signal from the channel the TV is on Press the MENU button To AUTO SHUT OFF To turn ON or OFF Press the MENU button when finished If the channel that you have on does not receive a signal for more than one minute the blinking text NOT RECEIVING A SIGNAL appears on the screen and starts the countdown If no signal is being received w...

Page 47: ...cture appear either more vivid or subtle PICTURE Picture allows you to adjust the levels of black and white on the TV screen giving you a darker or brighter picture overall BRIGHT You can adjust the overall brightness of the TV picture with the Bright control DETAIL The Detail feature adjusts the level of fine detail displayed in the picture Picture Adjust Picture Settings Adjust the Picture Setti...

Page 48: ...the default setting for all the picture adjustments Press the MENU button when finished Burn in Image Reducer When burn in is minimal burn in and residual images may be softened with the BURN IN IMAGE REDUCER function Press the MENU button To BURN IN IMAGE REDUCER To enter Burn in will be reduced by displaying snow on the screen for approximately 55 seconds and white for approximately 5 seconds in...

Page 49: ... MTS unavailable if your television s input source is in input 1 2 3 or 4 mode as described on page 54 These settings allow you to change and adjust the way the picture appears on your television BASS You can increase or decrease the level of low frequency sound in the TV s audio with the bass adjustment TREBLE Use treble to adjust the level of high frequency sound in your TV s audio BALANCE Adjus...

Page 50: ...ET CLOCK To operate When you set the clock automatically choose AUTO by pressing the or arrows To TIME ZONE To select your time zone To D S T daylight savings time To turn D S T ON or OFF Press OK to finish Press the MENU button when finished When you set the clock manually choose MANUAL by pressing the or arrows To move to the hour To set the hour To move to minutes To set the minutes Press OK to...

Page 51: ...TIME the time the TV will turn off Set the OFF TIME the same way as ON TIME To accept OFF TIME and move to CHANNEL To select channel To ON VOLUME To set the volume level To move to MODE Choose ONCE or EVERYDAY To ON OFF TIMER Choose YES to accept the timer setting choose NO if you don t wish to accept Press the OK button to finish Press the MENU button to exit the menu Notes The on off time cannot...

Page 52: ...ot work with locked channels or channels blocked by V Chip ratings limits A grey screen will display instead With split screen the picture from the component terminal and HDCP terminal will not be displayed The aspect of MAIN CHANNEL PICTURE becomes 16 9 when you input the picture of 480p 720p and 1080i from the component terminal and HDCP terminal After you press the Select button and select SPLI...

Page 53: ...Note It will only work in SPLIT mode Freeze Swap With SELECT you can select the picture channel while viewing SPLIT screen When you press SELECT button the channel number on the top will be highlighted Each press of SELECT will shift the channel Select Note When the screen is in freeze mode if you do not operate it within 15 minutes this function will cancel out Pressing the FREEZE button causes t...

Page 54: ... channel 99 For example to move to channel 124 press 100 2 Two 4 Four 100 Button Selects the signal input source for the television Input 1 2 3 or 4 for video devices like VCR s DVD players or camcorders INPUT 1 2 3 4 Note When you return to TV mode press the RETURN TV button or direct 10 key pad Input Digital In Use this button to directly select the digital in input Press the DIGITAL IN button D...

Page 55: ...uttons Pressing any number key will cancel return RETURN CHANNEL PROGRAMMED Button Functions Return TV By pressing the sound button you can change the A H S Advanced Hyper Surround mode BBE and A H B Active Hyper Bass mode A H S Adds a more spacious surround sound Music gives basic effect and movie for more effect BBE BBE high definition audio adds natural clear and extraordinary sound quality to ...

Page 56: ...ht room it is recommended to change the VIDEO STATUS setting to standard theater or game Doing so will reduce the chance of PDP burn in and extend the life of the PDP Video Status Button Functions Natural cinema corrects the problem of blurred edges which may occur when viewing a program originally shot on film such as motion pictures or animation If you notice blurring at the edges of these progr...

Page 57: ...nputs and XDS ID Press the DISPLAY button The screen to the right shows the following information The current channel or AV input Channel 05 The current time 12 20 pm Sleep timer status minutes remaining The Sleep Timer is off On off timer status Set to turn on everyday at 7 00 PM off at 10 00 PM Each Press of the DISPLAY button changes the display mode Display Full screen shown above Time Shows t...

Page 58: ...des The 4 3 picture will be centered within the boundaries of the 16 9 screen Button Functions Aspect Aspect Ratios PANORAMA With this ratio a normal 4 3 aspect picture is stretched to fit the dimensions of the 16 9 aspect screen CINEMA This ratio zooms in on the center part of a 4 3 aspect picture blowing it up to fill the 16 9 screen FULL This is the ratio to use when watching 16 9 High Definiti...

Page 59: ...ption text mode This button allows you to go back in the menu to change a selection or correct a mistake This button confirms your selection when you are in one of the onscreen menus When you change the aspect ratios it is different from their broadcast or recorded program Aspect Ratios Continued Press the ASPECT button By pressing the ASPECT button you can change the size NTSC 480i 480p HDCP 480p...

Page 60: ...lso use this remote control to operate the basic functions of your DVD player These functions include play rewind fast forward stop still pause previous next tray open close power on and power off Move the selector switch to DVD to operate The remote is preset with the code 000 to control JVC brand DVD players For any other manufacturer s brand DVD player please see the code chart and instructions...

Page 61: ...urns off by itself Make sure the set did not become unplugged Perhaps the ON OFF TIMER is set See page 51 Check to see if the Sleep Timer was set See page 57 It does not operate correctly This television is operated by a microprocessor It is possible that external noise or interference is causing the problem If the television does not function correctly remove the power plugs of the TV and Receive...

Page 62: ...l and could occur with any television using PDP It is not a malfunction PROBLEMS CHECK There are double picures ghosts A building or passing airplane can reflec the original signal and produce a second slightly delayed one Adjust your antenna position Picture is snowy image noise Your antenna may be damaged disconnected or turned Check the antenna connection page 17 in Quick setup If the antenna i...

Page 63: ...spots of oily dirt DO NOT allow liquid to enter the TV through the ventilation slots DO NOT use strong or abrasive cleaners on the TV DO NOT spray liquids or cleaners directly on the TV s surface DO NOT rub or scrub the TV harshly Wipe the set gently with a soft cloth Caring for the Screen When it gets dirty wipe it gently with a soft cloth Do not apply alcohol organic solvents like acetone acidic...

Page 64: ...sion by the service technician WHAT IS NOT COVERED This limited warranty provided by JVC does not cover 1 Products which have been subject to abuse accident alteration modification tampering negligence misuse faulty installation lack of reasonable care or if repaired or serviced by anyone other than a service facility authorized by JVC to render such service or if affixed to any attachment not pro...

Page 65: ... do not allow the exclusion of incidental or consequential damages or limitations on how long the warranty lasts so these exclusions or limitations may not apply to you This warranty gives you specific legal rights and you may also have other rights which vary state to state JVC COMPANY OF AMERICA 1700 Valley Road DIVISION OF JVC AMERICAS CORP Wayne New Jersey 07470 http www jvc com REFURBISHED PR...

Page 66: ...ustomer Relations Department at 1 800 537 5722 or visit our website at www JVC com Remember to retain your Bill of Sale for Warranty Service Don t service the television yourself Caution To prevent electrical shock do not open the cabinet There are no user serviceable parts inside Please refer to qualified service personnel for repairs Accessories To purchase accessories for your JVC product pleas...

Page 67: ...sitive 75 ohms negative sync provided C 0 286 Vp p burst signal 75 ohms Component Input Jacks Y 1Vp p positive 75 ohms negative sync provided Pb Pr 0 7 Vp p 75 ohms Audio Output Jacks VARI FIX VARI More than 0 to 1000mVrms 2 2 dBs FIX 500mVrms 4dBs Low impedance 400 Hz when modulated 100 Subwoofer Output Jack More than 0 to 1000mVrms 2 2 dBs Low impedance 100 Hz when modulated 100 AV Compu Link II...

Page 68: ...JVC COMPANY OF AMERICA Division of JVC Americas Corp 1700 Valley Road Wayne New Jersey 07470 JVC CANADA INC 21 Finchdene Square Scarborough Ontario Canada M1X 1A7 ...

Reviews: