background image

12

•  Do not place anything on top of the main unit. Doing so 

may cause the main unit to fall down, and cause injury to 
the persons around.

•  Do not climb onto the main unit or hang from it. Doing 

so may damage the main unit and/or cause injury to the 
person.

  Take care specially when there are small children at the 

home.

•  Avoid sandwiching the cords between the main unit and 

wall. This may upset the balance of the main unit and 
cause the main unit to fall down.

•  Make sure that the connected cords will not interfere 

with daily activities and that the users will not be caught 
in the cords.

•  Do not pull the connected cords with excessive force.
•  Check regularly that none of the screws are loose.
•  In the event that the main unit has fallen, turn off the 

power, disconnect the power cord from the AC outlet. 
Then, contact your dealer for an inspection and repairs. 
Using the main unit in this state may cause a fire or 
electrical shock.

•  Do not place valuables (breakables) underneath the 

location where the main unit is installed. They will be 
damaged if the main unit should fall.

JVC bears no responsibility for any accidents or damage 
resulting from inadequate assembly or mounting, 
insufficient strength of attachment, misuse or abuse, or 
natural disasters.

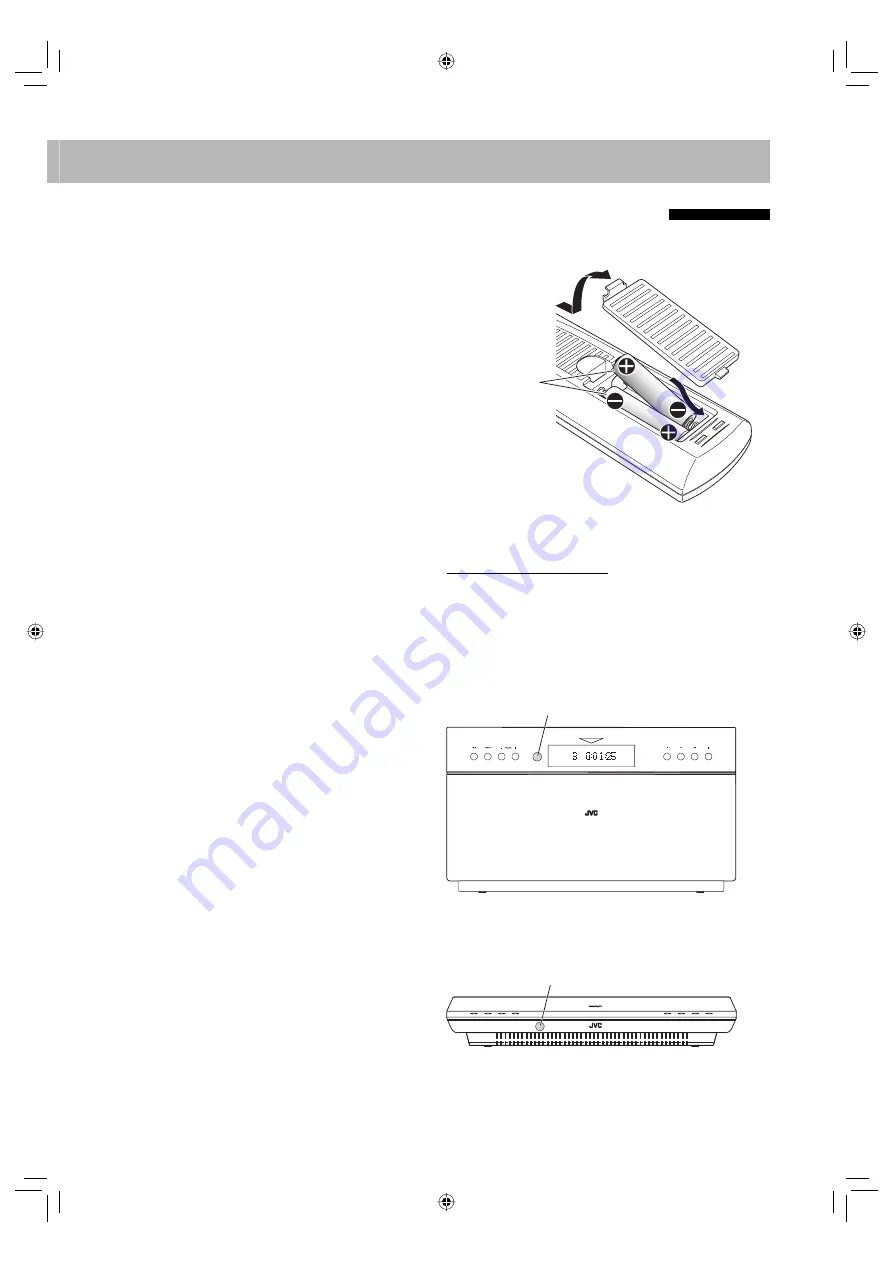
Preparing the Remote Control 

Insert the battery into the remote control by matching the 
polarity (+ and –) correctly.

•  If the range or effectiveness of the remote control 

decreases, replace both batteries.

When using the remote control

Point the top of the remote control towards the remote 
sensor as directly as possible. If you operate it from a 
diagonal position, the operating range (approx. 5 m) may 
be shorter.

When placing the main unit vertically (with the DISPLAY MODE 
switch set to “V”)

When placing the main unit horizontally (with the DISPLAY 
MODE switch set to “H”)

R03/LR03/AAA

Remote sensor

Remote sensor

EN_NX-T5[B].indb   12

EN_NX-T5[B].indb   12

10.3.19   5:26:03 PM

10.3.19   5:26:03 PM

Summary of Contents for NX-T5

Page 1: ...COMPACT COMPONENT SYSTEM NX T5 Consists of CA NXT5 SP NXT5F and SP NXT5W INSTRUCTIONS LVT2145 001A B EN_NX T5 B indb 1 EN_NX T5 B indb 1 10 3 19 5 25 55 PM 10 3 19 5 25 55 PM ...

Page 2: ...If nonetheless the mains plug is cut off ensure to remove the fuse and dispose of the plug immediately to avoid a possible shock hazard by inadvertent connection to the mains supply If this product is not supplied fitted with a mains plug then follow the instructions given below IMPORTANT DO NOT make any connection to the terminal which is marked with the letter E or by the safety earth symbol or ...

Page 3: ...cal municipal office your household waste disposal service or the shop where you purchased the product Penalties may be applicable for incorrect disposal of this waste in accordance with national legislation Business users If you wish to dispose of this product please visit our web page http www jvc eu to obtain information about the take back of the product Other Countries outside the European Un...

Page 4: ...either too hot nor too cold between 5 C and 35 C Leave sufficient distance between the System and the TV Keep the speakers away from the TV to avoid interference with the TV Power sources When unplugging the System from the wall outlet always pull on the plug not the power cord DO NOT handle the power cord with wet hands Moisture condensation Moisture may condense on the lens inside the System in ...

Page 5: ...tomatically 21 Advanced Radio Operations 22 Receiving FM Stations with Radio Data System 22 Searching for a Program by PTY Codes 22 Unique Video Disc File Operations 23 Selecting the Audio Track 23 Selecting the Subtitle Language 24 Selecting the View Angle 24 Special Effect Playback 25 Advanced Disc File Playback Operations 26 Programming the Playing Order Program Play 26 Playing at Random Random...

Page 6: ...aded DVD Logo is a trademark of DVD Format Logo Licensing Corporation This System can play back Everio files see page 37 recorded on DVD CD and USB mass storage class device Only when the maximum bit rate is less than 2 Mbps About color system This System can play back discs recorded in both PAL and NTSC video format When you play back an NTSC disc the NTSC video signal is converted into the PAL v...

Page 7: ...Vertically or Horizontally You can place the main unit either vertically or horizontally Set the DISPLAY MODE switch according to the way the main unit is placed The position of the remote sensor also changes according to the setting of the DISPLAY MODE switch see page 12 This manual explains operations using the illustrations of the main unit placed vertically as examples Buttons and operations w...

Page 8: ...f a TV monitor See page 6 When placing the main unit horizontally FM ANT From the FM antenna See page 6 AUDIO IN From the output of an analog audio device See page 7 How to detach the connector cover Cords Cords When placing the main unit vertically Ÿ DIGITAL IN OPTICAL From the output of a Blu ray device or a Digital Set Top Box See page 6 Use the same hole as illustrated above when installing th...

Page 9: ...le HDMI cable not supplied Use an HDMI cable of less than 2 m Connect the HDMI cable straight not to cause damage to the HDMI terminal Composite video cord supplied Ÿ Blu ray device or Digital Set Top Box When connecting a Blu ray device or a Digital Set Top Box When connecting the digital audio output of the device to the DIGITAL IN OPTICAL terminal set the digital audio output setting of the dev...

Page 10: ...m Do not connect the supplied speakers to any devices other than the subwoofer of the System SP NXT5W Doing so may damage the speakers Do not connect external speakers together with the supplied speakers The change in impedance may damage the System IMPORTANT Improper speaker cable connection reduces the sound quality The supplied speakers and subwoofer are not magnetically shielded so do not plac...

Page 11: ...cable Connect the system cable with the arrow side facing up How to attach the core filter Attach the provided core filter to the system cable then the core filter reduces interference 1 Release the stopper of the core filter 2 Run the system cable through the core filter and place the core filter at the root of the connector connected to the subwoofer 3 Close the core filter until it clicks shut ...

Page 12: ...evice When connecting with a USB cable use the USB 2 0 cable whose length is less than 1 m You can connect a USB mass storage class device such as a USB flash memory device hard disk drive multimedia card reader etc to this System You cannot connect a computer or JVC Everio camcorder to the USB MEMORY PLAY terminal of the System Electrostatic shock at connecting a USB device may cause abnormal pla...

Page 13: ...he screws must be secured tightly in all three locations Failure in installing the main unit to the wall using all three holes on the back of the main unit makes for an unstable installation and it constitutes a safety hazard as the main unit may fall down Example of attachment The procedure below is an example of how to attach the main unit to a wall It does not make any guarantee for safety whil...

Page 14: ...than 4 mm and their length must be 3 times longer than the thickness of the board mounted on the wall also take the thickness of the wall into account 4 Mount three screws not supplied to the board which has been attached on the wall Attach the screws to the board as illustrated below D Screws not supplied F F E D 240 mm E 78 mm F 120 mm Board G J K G Keep the space of 6 to 7 mm H 10 5 to 12 mm I ...

Page 15: ...he main unit in this state may cause a fire or electrical shock Do not place valuables breakables underneath the location where the main unit is installed They will be damaged if the main unit should fall JVC bears no responsibility for any accidents or damage resulting from inadequate assembly or mounting insufficient strength of attachment misuse or abuse or natural disasters Preparing the Remot...

Page 16: ...th a composite video cord 1 Select DVD CD as the source 2 Enter the scanning mode setting Finish the following process while the setting item is flashing Remote ONLY AUTO 576P 720P 1080P 1080I 3 Select the scanning mode AUTO Normally select this 576P 720P 1080I 1080P Select a scanning mode when it is needed Available settings vary according to the available resolutions of the connected TV 4 Store ...

Page 17: ...ghts while an FM stereo station with sufficient signal strength is tuned in MONO monaural lights while receiving an FM station in monaural 2 Digital audio signal format indicators 3 HDMI indicator Lights when an HDMI video signal is output 4 FM indicator Lights when FM is selected as the source 5 CHAP chapter indicator Lights to indicate the chapter number 6 TRK track indicator Lights to indicate ...

Page 18: ...N repeatedly to select DGTL IN or AUDIO IN See page 19 On the main unit Pressing SOURCE repeatedly changes the source as follows You can change the display information by pressing DISPLAY For details see page 21 3 Adjust the volume You can adjust the volume level from VOL MIN level 0 to VOL MAX level 50 To turn off standby the System The lamp on the main unit lights red The POWER ON STANDBY lamp o...

Page 19: ...LY The MONO monaural indicator lights on the display Reception will improve though stereo effect is lost Monaural reception To restore the stereo effect press the button again The ST stereo indicator lights on the display when an FM stereo broadcast with sufficient signal strength is received To preset the stations Remote ONLY You can preset 30 FM stations 1 Tune in to a station you want to preset...

Page 20: ...ture files it appears while playback is stopped For details see page 31 1 Control screen appears on the TV 1 Audio 2 Still picture 3 Moving picture 2 Select a file type When the sound of DVD Video or DVD VR is not loud enough DVD sound is sometimes recorded at a lower level than other discs and sources You can set the increase level for the currently loaded DVD without changing the volume level To...

Page 21: ... moving picture To return to normal playback press 3 You can also select the position to play by using the on screen bar For details see page 30 To locate an item directly Remote ONLY You can select a title chapter track file directly and start playback For DVD Video you can select a title before starting playback while you can select a chapter after starting playback To select a number see How to...

Page 22: ...laying a disc with PBC PBC appears on the on screen bar see page 29 To select a number see How to select a number on page 16 To move to the next or previous page of the current menu To show the menu during playback To cancel PBC select a track to play by using the on screen bar For details about the on screen bar operation see page 30 To activate PBC again press MENU to show the menu To rotate a J...

Page 23: ...ives the impression that the speakers are farther apart than they really are It is recommended to select this mode when you cannot place the speakers as illustrated on page 8 BYPASS No effect applies For a 5 1 channel digital audio signal The audio signal will be down mixed into 2 channels For information of Dolby Virtual Speaker see page 8 For FM AUDIO IN This function is not available Subwoofer ...

Page 24: ...ication on the display and on screen bar For details see page 29 3 For CD SVCD VCD Track number For MP3 JPEG MPEG 1 MPEG 2 DivX files Group and file number For DVD Video DVD VR Title and chapter number Turning Off the Power Automatically Remote ONLY Auto Standby While DVD CD or USB is selected The System turns off standby automatically if no operation is done for about 30 minutes after playback is...

Page 25: ...lected and tunes in to that station If no program is found NOT FOUND appears on the display To stop searching any time during search press any button To continue searching after it stops on an unwanted station While the indications on the display are flashing press PTY SEARCH again Frequency Non Radio Data System signal Receiving FM Stations with Radio Data System Remote ONLY Radio Data System all...

Page 26: ... playing a DVD VR or SVCD VCD STEREO To listen to normal stereo 2 channel playback MONO L To listen to the left audio channel MONO R To listen to the right audio channel MIX MONO To listen to monaural sound the left and right sounds are mixed SVCD can have 4 audio channels SVCD usually uses these 4 channels to record two 2 channel recordings STEREO 3 JAPANESE 1 ENGLISH D 5 1CH 2 FRENCH D 5 1CH 3 J...

Page 27: ...ontaining subtitles in different languages you can select the subtitle language to display on the TV For DVD VR While playing you can turn the subtitles on or off For SVCD While playing you can select the subtitles even if no subtitles are recorded on the disc While playing a DVD Video Ex While playing a DVD VR While playing an SVCD 3 JAPANESE 1 ENGLISH 2 FRENCH 3 JAPANESE OFF 1 2 3 4 1 3 2 3 3 3 ...

Page 28: ...SB 1 5 SB 1 7 SB 1 8 SB 1 6 SF 1 2 SF 1 3 SF 1 4 SF 1 5 SF 1 7 SF 1 6 Forward slow motion starts Reverse slow motion starts Returns to normal playback Returns to normal playback To replay the previous scenes One Touch Replay This function is only used while playing DVD Video DVD VR While playing The playback position moves back about 10 seconds before the current position only within the same titl...

Page 29: ...er To select a number input a number directly with the number buttons see page 16 To erase the entire program select CLEAR on the program menu screen then press ENTER 3 Repeat step 2 until you complete your program 4 Start playback Playback starts in the order you have programmed You can also start playback by selecting PLAY on the program menu screen and then pressing ENTER To skip To pause To st...

Page 30: ...NFO Remote ONLY For DVD Video While playing For CD SVCD VCD While playing without PBC for SVCD VCD For DVD VR While playing an Original Program While playing a Play List For MP3 JPEG MPEG 1 MPEG 2 DivX files While playing CHAPTER Repeats the current chapter TITLE Repeats the current title REP 1 Repeats the current track file REP GROUP Repeats the current folder group REP PG Repeats the current Ori...

Page 31: ...the button To cancel A B Repeat press REPEAT A B again A B Repeat will also be canceled when you stop playback or skip the chapter or track Prohibiting Disc Ejection Child Lock Main Unit ONLY You can lock the disc ejection so that the loaded disc cannot be ejected While the System is turned on and the disc player panel is closed To cancel the prohibition repeat the same procedure UNLOCKED appears ...

Page 32: ... bar differs depending on the type of disc file The following information is displayed on the on screen bar Items displayed depend on the types of disc or file TT Title CH Chapter TRK Track Time indication Audio language Subtitle language Angle D DTS LPCM Audio format Repeat mode PBC Playing back a disc with PBC On Screen Operations Remote control Number buttons 1 2 3 4 TT DVD CH 003 006 00 00 4 1...

Page 33: ...ed items through the control screen for DVD VR and MP3 JPEG MPEG 1 MPEG 2 DivX files Control screen for DVD VR The control screen is superimposed onto the TV screen when you call up Original Program PG or Play List PL To select playback type To display the Original Programs To display the Play Lists To remove the list press the same button again Ex When Original Program is selected Ex When Play Li...

Page 34: ...in mp3 01 Cloudy 02 Ra in 03 F a ir 01 Summe r 02 Spring 03 F a ll 04 Winte r 05 __________ __________ 06 04 F og 05 Ha il 06 indian summer 07 Showe r 08 Snow 09 Thunde r ALBUM SONG Summer Rain ARTIST 1 3 3 2 2 4 5 6 To move the highlight bar between group list and file list To select an item in the list Move the highlight bar to the desired item To start playback For JPEG The selected file still ...

Page 35: ...corded for wide screen televisions 4 3 PS Pan Scan conversion For a conventional 4 3 TV The picture is zoomed in to fill the screen vertically and the left and right sides of the picture are cut off 4 3 LB Letter Box conversion For a conventional 4 3 TV Displays a wide screen picture to fit the width of the TV screen keeping the aspect ratio 16 9 Wide screen television Select this when the aspect ...

Page 36: ... the TV connected to the HDMI OUT terminal PCM Select this if no sound is reproduced on the TV with the AUTO setting The System converts the audio signal into PCM and emits the signal from the HDMI OUT terminal BRIGHTNESS You can adjust the brightness 0 to 12 CONTRAST You can adjust the contrast 0 to 12 HUE You can adjust the hue 6 to 6 SATURATION You can adjust the color depth 0 to 12 SHARPNESS Y...

Page 37: ...MI CEC functions operate the same as when ON 1 is selected OFF Deactivates the HDMI CEC function DVICOLOR You can select the settings for the picture appearance image quality color intensity and black fading on the TV connected to the HDMI OUT terminal STANDARD Normally select this ENHANCE The System automatically adjusts the picture appearance DVDLEVEL DVD sound is sometimes recorded at a lower l...

Page 38: ...e other functions on the System Note This function is available only when the source is set to DVD CD or USB This function is available when ON 1 or ON 2 is selected for the HDMI CEC setting see page 34 For details about the CEC function refer to the operation manuals of the connected CEC devices Not all HDMI devices are compatible with CEC If the System is connected to non CEC compatible devices ...

Page 39: ... storage class device refer also to its manual Connect one USB mass storage class device to the System at a time Do not use a USB hub You cannot charge any USB mass storage class device through the USB MEMORY PLAY terminal While playing back a file in a USB mass storage class device do not disconnect the device It may cause malfunction on both the System and the device This System is compatible wi...

Page 40: ... fps Audio stream should conform to Dolby Digital MPEG 1 Audio Layer 2 or MPEG Audio Layer 3 MP3 This System can play back DivX files with the extension code divx div avi regardless of the letter case upper lower The System does not support GMC Global Motion Compression The file encoded in the interlaced scanning mode may not be played back correctly Advanced Radio Operations see page 22 If you wa...

Page 41: ... procedure again Operations are disabled The built in microprocessor may malfunction due to external electrical interference Unplug the power cord and then plug it back in Unable to operate the System from the remote control The path between the remote control and the remote sensor on the System is blocked The batteries are exhausted No sound is heard Speaker connections are incorrect or loose No ...

Page 42: ...ced upside down Place the disc with the label side facing front or facing up ID3 Tag on an MP3 file cannot be shown There are two types of ID3 Tag Version 1 and Version 2 This System can only show ID3 Tag Version 1 Groups and tracks are not played back as you expect The playing order is determined when the groups and tracks were recorded It depends on the writing application MP3 JPEG MPEG 1 MPEG 2...

Page 43: ...CD VCD MP3 JPEG MPEG 1 MPEG 2 DivX format DVD R RW DVD Video DVD VR MP3 JPEG MPEG 1 MPEG 2 DivX format R RW DVD Video MP3 JPEG MPEG 1 MPEG 2 DivX format Dynamic range 80 dB Horizontal resolution 500 lines Wow and flutter Immeasurable USB Playable files MP3 JPEG MPEG 1 MPEG 2 DivX format USB specification Compatible with USB 2 0 Full Speed Compatible device Mass storage class Compatible system FAT1...

Page 44: ... 2 3 kg Dimensions approx Placed vertically 1 240 mm 2 420 mm 3 64 mm 4 70 mm 5 134 mm Placed horizontally 6 420 mm 7 70 mm 8 240 mm 7 6 8 1 2 3 4 5 EN_NX T5 B indb 41 EN_NX T5 B indb 41 10 3 19 5 26 17 PM 10 3 19 5 26 17 PM ...

Page 45: ...ure level 77 dB W m Power requirements AC 230 V 50 Hz Power consumption 40 W at operation of the System 1 00 W or less on standby Mass approx 9 2 kg Dimensions approx 231 mm 393 mm 370 5 mm W H D Speakers SP NXT5F Speaker 1 way bass reflex type 8 cm cone x 1 Impedance 6 Ω Power handling capacity 50 W Frequency range 75 Hz 20 kHz Sound pressure level 82 dB W m Mass approx 0 83 kg each Dimensions ap...

Page 46: ...DivX Certified to play DivX video including premium content This product incorporates copyright protection technology that is protected by U S patents and other intellectual property rights Use of this copyright protection technology must be authorized by Macrovision and is intended for home and other limited viewing uses only unless otherwise authorized by Macrovision Reverse engineering or disas...

Page 47: ... MODE h 16 MENU PL f 18 19 30 MUTING k 20 Number buttons 2 16 18 19 30 32 PLAY MODE c 26 27 PRESET d 16 PTY SELECT 9 m 22 PTY SEARCH 22 REPEAT u 27 REPEAT A B i 28 SCAN MODE y 13 SET UP x 32 34 SLEEP 7 21 SLOW 9 g 25 SUBTITLE n 24 VS t 20 TIME SEARCH b 27 30 TOP MENU PG 3 18 30 TUNING 9 8 16 USB w 15 VOLUME s 15 Main unit Name Page 1 15 3 7 15 17 8 8 17 25 7 6 17 28 0 9 15 17 28 Display 5 14 DISPL...

Page 48: ...is designed for unattended operation or has a standby mode Switch off using the switch on the equipment and make sure that your family know how to do this Special arrangements may need to be made for infirm or handicapped people DON T use equipment such as personal stereos or radios so that you are distracted from the requirements of traffic safety It is illegal to watch television whilst driving ...

Reviews: