background image

13

Playing Back from iPod

This system is equipped with an iPod terminal on the rear panel. You can connect your iPod to this 
terminal and enjoy the sound from your iPod.

 Compatible iPod types:

If the iPod does not play correctly, please update your iPod software to the latest version.
• For details about updating your iPod, check on the Apple web site <http://www.apple.com>. 

To Connect iPod

Connect the iPod to the System using the supplied cable.
Make sure the System is turned off when you connect it.

Connect the arrow of iPod terminal and the arrow of the connector facing each other.

iPod nano 1G/2G/4G 

iPod mini 

iPod (4th Generation) 20G/40G 

iPod photo (4th Generation) 20G/30G/40G/60G 

iPod video (5th Generation) 30G/60G 

iPod is a trademark of Apple Computer, Inc., 
registered in the U.S. and other countries.

USB

AUDIO

i Pod

DC IN

SPEAKERS

RIGHT LEFT

WOOFER

8-16

23V 2.5A

1

2

You can place the iPod on 
the supplied iPod stand.

NX-PS1[B].BOOK  Page 13  Monday, October 30, 2006  9:26 AM

Summary of Contents for NX-PS1

Page 1: ...COMPACT COMPONENT SYSTEM NX PS1 Consists of CA NXPS1 SP NXPS1F and SP NXPS1W STANDBY COMPACT COMPONENT SYSTEM NX PS1 VOLUME FUNCTION CA NXPS1 SP NXPS1F SP NXPS1W SP NXPS1F INSTRUCTIONS LVT1633 003A B ...

Page 2: ... If this product is not supplied fitted with a mains plug then follow the instructions given below IMPORTANT DO NOT make any connection to the terminal which is marked with the letter E or by the safety earth symbol or coloured green or green and yellow The wires in the mains lead on this product are coloured in accordance with the following code Blue Neutral Brown Live As these colours may not co...

Page 3: ...y Do not expose this apparatus to rain moisture dripping or splashing and that no objects filled with liquids such as vases shall be placed on the apparatus Caution Proper Ventilation To avoid risk of electric shock and fire and to prevent damage locate the apparatus as follows 1 Front No obstructions and open spacing 2 Sides Top Back No obstructions should be placed in the areas shown by the dime...

Page 4: ...nt DON T continue to operate the equipment if you are in any doubt about it working normally or if it is damaged in any way switch off withdraw the mains plug and consult your dealer DON T remove any fixed cover as this may expose dangerous voltages DON T leave equipment switched on when it is unattended unless it is specifically stated that it is designed for unattended operation or has a standby...

Page 5: ...ldren push anything into holes slots or any other opening in the case this could result in a fatal electrical shock NEVER guess or take chances with electrical equipment of any kind it is better to be safe than sorry Dear Customer This apparatus is in conformance with the valid European directives and standards regarding electromagnetic compatibility and electrical safety European representative o...

Page 6: ... Timer 11 Playing Back from iPod 13 To Connect iPod 13 Basic Operations 14 Playing Back from USB mass storage class device 15 To connect the USB mass storage class device 15 Basic Operations 15 Playing Back from the PC 17 How to install the USB drivers 17 To playback sounds on the PC 18 Playing Back from Other Equipment 19 To connect other equipment 19 Troubleshooting 20 Specifications 21 ...

Page 7: ...ernal heat Others Should any metallic object or liquid fall into the System unplug the AC adaptor and consult your dealer before operating any further If you are not going to operate the System for an extended period of time unplug the AC adaptor from the wall outlet If anything goes wrong unplug the AC adaptor and consult your dealer DO NOT install the System in a location near heat sources or in...

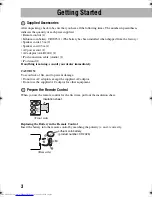
Page 8: ...Pod connection cable Audio 1 iPod stand 1 If anything is missing consult your dealer immediately CAUTION To avoid risk of fire and to prevent damage Do not use AC adaptors except the supplied AC adaptor Do not use the supplied AC adaptor for other equipment Prepare the Remote Control When you use the remote control for the first time pull out the insulation sheet Replacing the Battery in the Remot...

Page 9: ...lic materials Doing this may cause the battery to give off heat crack or start a fire When throwing away or saving the battery wrap it in tape and insulate otherwise the battery may start to give off heat crack or start a fire Do not poke the battery with tweezers or similar tools Doing this may cause the battery to give off heat crack or start a fire Dispose of battery in the proper manner accord...

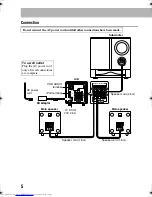
Page 10: ... WOOFER 6 16Ω 8 16Ω 23V 2 5A INPUT SPEAKERS RIGHT LEFT WOOFER 6 16Ω 8 16Ω Subwoofer Unit To a wall outlet Plug the AC power cord only after all connections are complete AC adaptor USB AUDIO terminal iPod terminal DC IN 23V 2 5A Main speaker Speaker cord 1 5m Speaker cord 1 5m AC adaptor AC power cord Main speaker Speaker cord 2 5m ...

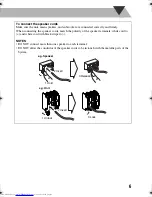
Page 11: ...aker cords match the polarity of the speaker terminals white cord to and white cord with black stripe to NOTES DO NOT connect more than one speaker to each terminal DO NOT allow the conductor of the speaker cords to be in touch with the metallic parts of the System e g Speaker 2 Insert 1 Hold 3 Release e g Unit 1 Unlock 2 Insert 3 Lock ...

Page 12: ...Pod P 13 See Playing Back from USB mass storage class device P 15 STANDBY COMPACT COMPONENT SYSTEM NX PS1 VOLUME FUNCTION AUX PHONES USB MEMORY 4 3 2 1 Display STANDBY lamp Remote control sensor Operation buttons Adjust the volume Select a source STANDBY ON button AUX jack PHONES jack USB MEMORY terminal Opening the front panel cover STANDBY FUNCTION AUX PHONES USB MEMORY Using Headphones Be sure ...

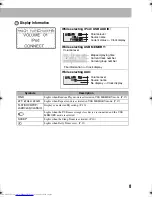
Page 13: ... Volume level Source name No display Clock display Symbols Description RND Lights when Random Play mode is activated in USB MEMORY mode P 17 1 ALL GR Lights when Repeat mode is activated in USB MEMORY mode P 17 FLAT ROCK POP JAZZ CLAS CLASSIC Displays an selected EQ setting P 10 Lights when the USB mass storage class device is connected and the USB MEMORY mode is selected SLEEP Lights when the Sle...

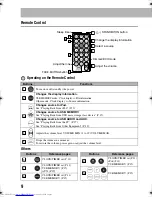
Page 14: ... iPod See Playing Back from iPod P 13 Changes source to USB MEMORY See Playing Back from USB mass storage class device P 15 Changes source to USB AUDIO and AUX See Playing Back from the PC P 17 See Playing Back from Other Equipment P 19 Adjusts the volume level VOLUME MIN 1 to 29 VOLUME MAX Drops the volume in a moment To restore the volume press again or adjust the volume level 1 2 3 4 5 Buttons ...

Page 15: ...ears Press While the System is turned off ECO ON appears and then nothing is displayed 1 Press repeatedly to specify the time in minutes as follows 2 Wait until the set time goes off 1 Selects an item as follows 2 Adjust the bass and treble level with VOLUME from 5 to 5 Select a EQ setting as follows with VOLUME When the bass or treble level is adjusted EQ is not effective and EQ symbol disappears...

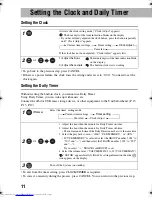
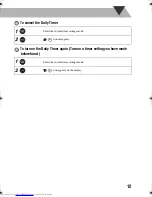
Page 16: ...repeatedly until Clock Adjust appears If the clock has not been adjusted Clock Adjust appears first 2 1 Adjust the hour The minute digits of the time indication blink on the display 2 Adjust the minute The built in clock starts working 1 Select the timer setting mode 2 1 Adjust the hour then the minute for Daily Timer on time 2 Adjust the hour then the minute for Daily Timer off time The on time a...

Page 17: ...ily Timer To turn on the Daily Timer again Turn on a timer setting you have made beforehand 1 Select the current timer settings mode 2 icon disappears 1 Select the current timer settings mode 2 icon appears on the display ...

Page 18: ... apple com To Connect iPod Connect the iPod to the System using the supplied cable Make sure the System is turned off when you connect it Connect the arrow of iPod terminal and the arrow of the connector facing each other iPod nano 1G 2G 4G iPod mini iPod 4th Generation 20G 40G iPod photo 4th Generation 20G 30G 40G 60G iPod video 5th Generation 30G 60G iPod is a trademark of Apple Computer Inc reg...

Page 19: ... that might result from the use of this product When you connect your iPod to the cable make sure it connects all the way in Do not carry the System with iPod connected You might drop it down or it might cause damages to the connector part Do not touch or hit the iPod terminal pins or the connector pins directly It might cause damages to the connector part Remove the iPod from the cable when you d...

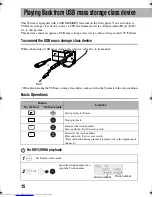
Page 20: ...torage class device refer also to its manual When disconnecting the USB mass storage class device make sure that the System is in the stop condition Basic Operations For MP3 WMA playback Button Function On the Unit On the remote Starts playback Pauses Stops playback Increases the track numbers Press and hold Fast forward search Decreases the track numbers Press and hold Fast reverse search Press t...

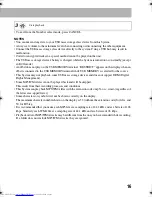
Page 21: ...urce This System may not playback some USB mass storage devices and does not support DRM Digital Rights Management Some MP3 WMA files cannot be played back and will be skipped This result from their recording processes and conditions This System can play back MP3 WMA files with the extension code mp3 or wma regardless of the letter case upper lower Some characters or symbols will not be shown corr...

Page 22: ... track ALL Repeats all tracks GR Repeats all tracks in the current group Cancel 2 Start playback 1 RND appears on the display before you start playback To cancel press again 2 Playback starts in random order Random Play ends when all tracks are played To repeat random play press REPEAT 1 Turn on your PC and start running Windows 98SE Windows Me Windows 2000 or Windows XP If the PC has been turned ...

Page 23: ...or several seconds while your PC is recognizing the receiver Use a full speed USB cable version 1 1 Recommended cord length is shorter than approximately 2 m If your PC does not recognize the unit disconnect the USB cable and connect it again If it does not work yet restart Windows The installed drivers can be recognized only when the USB cable is connected between the unit and your PC The sound m...

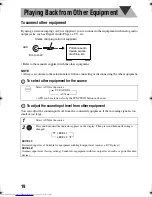
Page 24: ... adjust the sound input level from the connected equipment if the incoming signal is too small or too large Select AUX for the source AUX can be selected also by the FUNCTION button on the unit 1 Select AUX for the source 2 Press and hold until the indicator appears on the display Then press and hold until setting is changed LEVEL 1 Decreased input level Suitable for equipment with high output lev...

Page 25: ...ot reach the remote sensor More closer to the System The batteries are exhausted No sound is heard from the speakers Speaker connections are incorrect or loose P 5 Headphones are connected P 7 Sound from PC connected with a USB cable has some noise P 17 PC is subjected to excessive load due to using other applications Close the applications you do not use PC is connected via USB Hub Connect the PC...

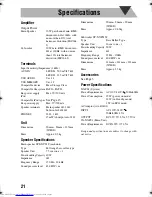
Page 26: ...m W H D Mass Approx 0 5kg Speaker Specifications Main speaker SP NXPS1F each unit Type Full range bass reflex type Speaker Unit 7 5 cm cone 1 Power handling Capacity 10 W Impedance 6Ω Frequency Range 150 Hz 20 kHz Sound pressure level 83 dB W m Dimensions 90mm 96mm 90mm W H D Mass Approx 0 63kg Subwoofer SP NXPS1W Type Bass Reflex Type Speaker Unit 16 cm cone 1 Power handling Capacity 30 W Impedan...

Page 27: ...NX PS1 COMPACT COMPONENT SYSTEM EN 2006 Victor Company of Japan Limited 0906NSMCREBET ...

Reviews: