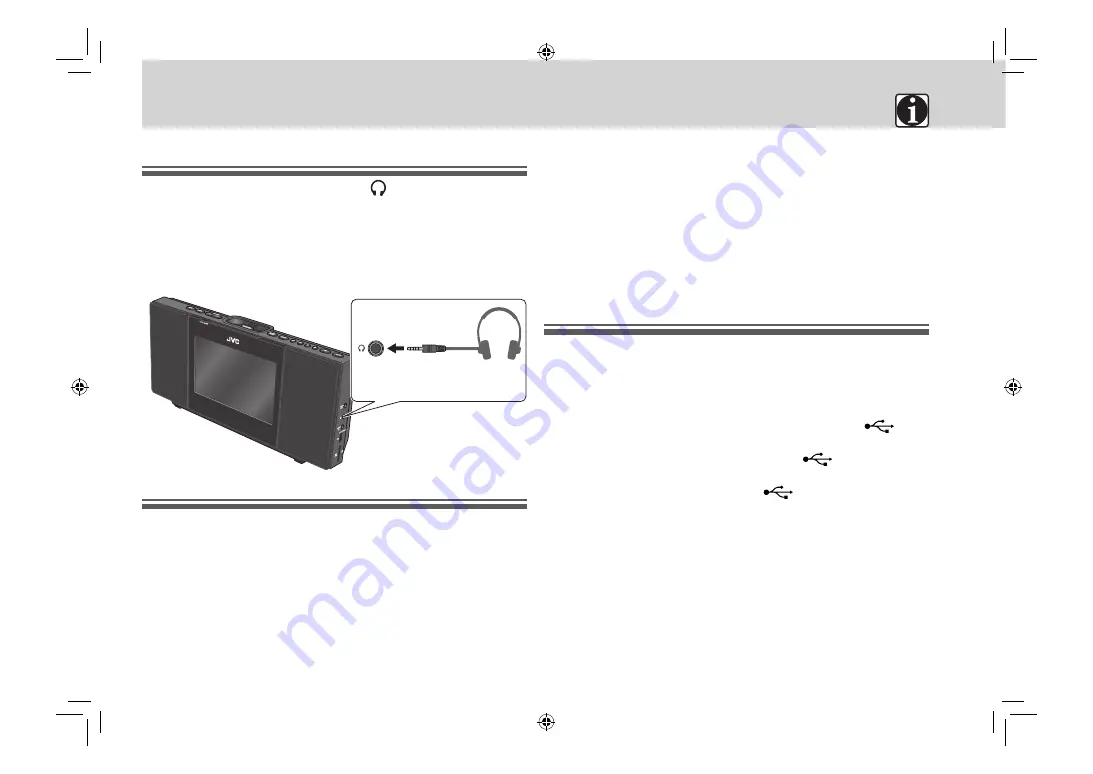
background image

24

Using headphones

Connect headphones (not supplied) to the 

 jack.

•  When headphones are connected to the unit, no sound is output from 

the speakers.

Caution for using the headphone

Be sure to turn down the volume before connecting or putting on the 
headphones.

Notes on using iPod

•  Do not connect or disconnect the iPod when the unit is turned on.
•  Do not carry the unit with iPod connected. It might cause damage to 

the dock or you might drop the iPod.

•  Do not touch or hit the iPod terminal pins or connector pins in the 

dock for iPod directly. Doing so might cause damage to the connector 
pins.

•  Keep iPod in a straight position while connecting/disconnecting it.
•  iPod is charged through the dock when the unit is turned on.

•  The information displayed on the screen of the main unit differs 

depending on the type of the iPod.

•  Depending on the type of the iPod, the iPod may operate differently.
•  If iPod does not play correctly, update iPod software to the latest 

version.
–  For details about updating iPod, check on the Apple web 

site<http://www.apple.com/>.

Notes on using USB mass storage class 
device/SD card

•  Disconnect the USB mass storage class device after stopping playback.
•  Do not use a USB hub.
•  When connecting with a USB cable, use a USB 2.0 cable whose length 

is less than 1 m.

•  Deactivate the security function of the USB mass storage class device.
•  The USB mass storage class device is charged through the 


terminal when “USB” is selected as the source. (Some USB mass storage 
class devices may not be charged through the 

 terminal even if 

“USB” is selected as the source.)

•  You cannot connect a computer to the 

 terminal of the unit.

•  Electrostatic shock at connecting a USB mass storage class device may 

cause abnormal playback of the device. In this case, disconnect the 
USB mass storage class device then reset this unit and the USB mass 
storage class device.

•  While playing back a file on a USB mass storage class device, do not 

disconnect the device. Doing so may cause malfunction on both the 
unit and the device.

•  This unit may not recognize some USB mass storage class devices.

References

References

Headphones 
(not supplied)

Stereo mini 
plug cord

EN_NX-PB15V[USUXA].indb   24

EN_NX-PB15V[USUXA].indb   24

11.8.30   11:29:27 AM

11.8.30   11:29:27 AM

Summary of Contents for NX-PB15V

Page 1: ...DVD PORTABLE SYSTEM NX PB15V SUPER VIDEO LVT2191 002A US UX A INSTRUCTIONS EN_NX PB15V USUXA indb 1 EN_NX PB15V USUXA indb 1 11 8 30 11 29 11 AM 11 8 30 11 29 11 AM ...

Page 2: ... sure to remove iPod disc USB mass storage class device and SD card then disconnect the power cord There are no user serviceable parts inside If anything goes wrong unplug the power cord and consult your dealer In this manual The remote control buttons are used for explaining the operations unless mentioned otherwise However if the unit has the same or similar button names they can also be used fo...

Page 3: ...9 Setting the clock 9 Switching the time display format 24 hour 12 hour 9 Playing iPod 10 Connecting an iPod device 10 Compatible iPod models 10 Playback operations 10 Menu operations 11 Playing DVD CD USB SD 12 Placing a disc 12 Connecting a USB mass storage class device 12 Inserting an SD card 12 Playback operations 13 Resume play 13 Displaying the on screen bar 13 Various playback for DVD CD US...

Page 4: ...o keep the antenna away from metallic parts of the unit connecting cords and the AC power cord Otherwise it could cause poor reception Connecting a TV only when viewing the picture video on the TV You can view the picture video played back by this unit except the still pictures of iPod on the TV or monitor connected to the unit Connect the video input jack of the TV to the VIDEO OUT jack of the un...

Page 5: ...t To replace the battery in the remote control Caution Danger of explosion if battery is incorrectly replaced Replace only with the same or equivalent type Store the battery in a place where children cannot reach If a child accidentally swallows the battery consult a doctor immediately To prevent the battery from overheating cracking or starting a fire Do not recharge short disassemble or heat the...

Page 6: ...lternates between FM and AUDIO IN Main unit Press SOURCE repeatedly until the source you want is selected then press ENTER For details refer to Selecting a source on page 8 You can also select the source by pressing 2 3 on the main unit then ENTER 3 Adjust the volume Adjusts the volume within the range of 0 to 32 To turn off the power press The STANDBY lamp is turned on When using the remote contr...

Page 7: ...store the volume press again Remote sensor STANDBY lamp 2 2 DO NOT turn off the unit with the volume set to an extremely high level EN_NX PB15V USUXA indb 7 EN_NX PB15V USUXA indb 7 11 8 30 11 29 15 AM 11 8 30 11 29 15 AM ...

Page 8: ...in unit 1 Press SOURCE repeatedly to select the source you want Each time you press the button tab selection moves to right 2 Press 6 to enter the source screen Playback starts To return to the source selecting screen home screen press SOURCE on the main unit iPod DVD CD USB SD FM AUDIO IN iPod Music Video Play Mode Shuffle Songs Now Playing LCD Set Clock Timer System 16 9 Brightness Contrast Colo...

Page 9: ...Select Time Format in step 2 of Setting the clock on the left column 2 Select the time format Press 2 3 to select 24H or 12H 3 Confirm the entry Press ENTER To return to the playback screen press LCD SET or one of the source buttons on the remote control To return to the home screen press SOURCE on the main unit Setting the clock 1 Display the clock setting screen 2 Select Time Set 3 Select AM or ...

Page 10: ...arts and menu of the iPod appears To pause Press iPod 6 during playback To select the track Press or 4 To fast forward a track Press and hold To fast reverse a track Press and hold 4 iPod Music Video Play Mode Shuffle Songs Now Playing Playing iPod Playing iPod iPod You cannot send any data to the iPod from the unit It is not necessary to use the dock adaptor for some iPod models iPod nano 6th gen...

Page 11: ...o item a desired file then press ENTER The items displayed on the screen differ depending on iPod models Selecting play modes The currently selected play mode is shown below Play Mode on the menu screen Ex Shuffle songs Shuffle play Select Play Mode SHUFFLE one of the following then press ENTER ALBUM Plays back all tracks in the current album at random SONG Plays back all tracks in the iPod at ran...

Page 12: ...ut connecting a USB mass storage class device Inserting an SD card Side view of the main unit When removing the SD card push it in and then pull it out Refer to page 25 for more about inserting an SD card Playing DVD CD USB SD Playing DVD CD USB SD Caution for the monitor of the main unit When opening or closing the display panel open it slowly not to damage the monitor by hitting it to the table ...

Page 13: ...ress 6 for the target source DVD USB SD Resume play This unit stores the stopped point When you start playback again it starts from the stopped point During playback Press 7 once To clear the stored track or chapter press 7 while RESUME is displayed Displaying the on screen bar You can check the source information and playback status using the on screen bar Title 1 7 Chapter 1 06 current total num...

Page 14: ... When playback of JPEG MPEG 1 MPEG 2 DivX files is stopped Various playback for DVD CD USB SD Various playback for DVD CD USB SD Using the disc menu For DVD Video 1 Display the menu 2 Select the menu To go back to the previous menu press MENU For VCD SVCD with Play Back Control PBC You can play VCD SVCD from its menu using the Play Back Control PBC While the disc menu is displayed Press the number...

Page 15: ... used during playback of PBC VCD SVCD REP DIR cannot be used during program playback Canceled 1Current playing file 2 Folder list 3 File list 4Track information 5 File type Press 5 2 3 repeatedly to select a file then press ENTER If different types of playable files audio still picture moving picture are contained select a file type to play See below Selecting the file type Press 2 3 repeatedly to...

Page 16: ...till pictures and DVD Video 1 Select a source and stop playback 2 Display the program setting screen 3 Select the program number you want to store the track into 4 Select a track number For DVD Video select a title number and chapter number 5 Repeat steps 3 and 4 You can select up to 16 tracks To erase the entire program press 5 2 3 to select CLEAR and press ENTER 6 Start program playback Playback...

Page 17: ...otates to right by 90 degrees Press ENTER to return to the normal display The slide show playback starts again Editing the program While playback is stopped 1 Select the program number of the track you want to replace Press PRGM to display the program setting screen and press 5 2 3 To add a track at the end of the program move the cursor to the last program number 2 Perform step 4 in the left colu...

Page 18: ...ts searching for stations automatically and stores them into the preset numbers Searching stops automatically when the unit has finished searching for all receivable stations or 20 stations have been stored Storing stations manually in the unit Manual Preset 1 Display the preset number while listening to the target station 2 Select a preset number Radio Stereo FM 87 50 MHz Searching Listening to t...

Page 19: ... turn off Mono External device Connecting an external device Connect an external device using a stereo mini plug cord not supplied Be sure to turn down the volume before connecting the unit and external device Side view of the main unit Playing an external device Press FM AUDIO IN repeatedly to select AUDIO IN as the source then start playback of the connected external device Refer to the instruct...

Page 20: ...nit changes automatically to match the color system of the picture 4 3 PS 4 3 AUTO PS Pan Scan conversion For a conventional 4 3 TV The picture is zoomed in to fill the screen vertically and the left and right sides of the picture are cut off 4 3 LB 4 3 AUTO LB Letter Box conversion For a conventional 4 3 TV Displays a wide screen picture to fit the width of the TV screen keeping the aspect ratio ...

Page 21: ...t the outcoming sound when playing a multi channel DVD disc LT RT Surround signals are downmixed to the front channel signals STEREO Only front channel sounds come out Menu Item Contents NIGHT MODE You can set the sound to reduces the intensity of loud sounds and raises the level of very soft sounds ON or OFF DYNAMIC RANGE You can select the Dynamic Range Compression DRC for night time listening O...

Page 22: ...il the unit is turned off press SLEEP once while the sleep timer is on Adjusting the sound Hyper Bass Sound HBS You can reinforce the bass sound Sound mode You can select the sound mode suitable for your favorite music Canceled Canceled Sleep 10 Adjusting the sound Setting the Timer Adjusting the sound Setting the Timer HBS ON HBS ON HBS OFF Canceled CLASS Classical music EN_NX PB15V USUXA indb 22...

Page 23: ... unit The STANDBY lamp starts blinking Daily Timer does not work while the unit is turned on Daily Timer By using Daily Timer you can wake up with your favorite music Set the clock beforehand refer to page 9 Prepare the playback source beforehand 1 Display the Daily Timer setting screen The setting items are displayed 2 Set the timer contents You can set the following each items Timer On Hour and ...

Page 24: ...le web site http www apple com Notes on using USB mass storage class device SD card Disconnect the USB mass storage class device after stopping playback Do not use a USB hub When connecting with a USB cable use a USB 2 0 cable whose length is less than 1 m Deactivate the security function of the USB mass storage class device The USB mass storage class device is charged through the terminal when US...

Page 25: ...n or the sound may be degraded Use a blower available at a camera store etc to blow dust off the lens DO NOT insert any object other than an SD card into the insertion slot DO NOT use a cracked or deformed SD card Make sure that SD card playback has stopped before removing the SD card Otherwise the data may be damaged Never insert an SD card upside down Otherwise it will not be able to be removed ...

Page 26: ...eo format only discs The DVD indicator lights up when a R disc is loaded Some discs may not be played back because of their characteristics recording conditions or damage or stains on them For similar reasons some file names may not be displayed properly DVD Logo is a trademark of DVD Format Logo Licensing Corporation The non DVD side of a DualDisc does not comply with the Compact Disc Digital Aud...

Page 27: ...esign rule for Camera File System standard if you use the auto turning function for the files on the digital camera the files may be not based on the DCF standard and may not be displayed Files created edited or saved again using computer software may not be displayed This unit cannot play movies such as MOTION JPEG or still pictures such as files other than JPEG TIFF etc or pictures with audio si...

Page 28: ...arge the iPod battery Disc USB SD The disc USB mass storage class device SD card does not play Select the correct source DVD CD USB or SD There is moisture condensation Turn the unit on and wait for a few hours before use The disc is placed incorrectly Place the disc with the label side facing forward The disc is recorded using packet writing UDF file system It cannot be played The disc is not be ...

Page 29: ...operly recorded onto the USB mass storage class device or SD card In this case disconnect and connect the USB mass storage class device or remove and insert the SD card again after turning off the unit If the unit is used at an extremely high volume the sound may skip due to vibration Turn down a volume No picture is displayed on the TV screen or monitor Connect the video cord correctly Refer to p...

Page 30: ...ted logos are trademarks of Rovi Corporation or its subsidiaries and are used under license ABOUT DIVX VIDEO DivX is a digital video format created by DivX LLC a subsidiary of Rovi Corporation This is an official DivX Certified device that plays DivX video Visit divx com for more information and software tools to convert your files into DivX videos ABOUT DIVX VIDEO ON DEMAND This DivX Certified de...

Page 31: ...Display 7 0 inches wide LCD display 800 x 480 pixel Speaker type Bass Reflex type Speaker unit 8 cm 2 Speaker impedance 4 Ω Power requirements For Australia AC 240 V 50 Hz For other countries AC 110 V 127 V AC 220 V 240 V adjustable with the voltage selector 50 Hz 60 Hz Power consumption 28 W at operation 0 50 W or less on standby Color system PAL NTSC Dimensions approx 364 mm 170 mm 105 mm W H D ...

Page 32: ...FORE PLUGGING IN do check that your mains AC line voltage corresponds with the position of the voltage selector switch provided on the outside of this equipment and if different reset the voltage selector switch to prevent from a damage or risk of fire electric shock Main unit rear EN_NX PB15V USUXA indb 32 EN_NX PB15V USUXA indb 32 11 8 30 11 29 31 AM 11 8 30 11 29 31 AM ...

Reviews: