background image

– 26 –

Selecting the Picture Brightness
—Theater Position

You can select picture brightness from among three options
according to the source program, lighting condition of the
room and/or personal preference.

On the unit:
Press THEATER POSITION
during play.
On the remote control:
Press THEATER POSITION
while holding down SHIFT
during play.

The theater position indication
appears on the TV screen.
• Each time you press THEATER POSITION, the theater

position changes as follows. The picture brightness
becomes darker as the number increases.

To cancel the function, select “THEATER OFF.”

THEATER 1

THEATER 2

THEATER 3

THEATER OFF

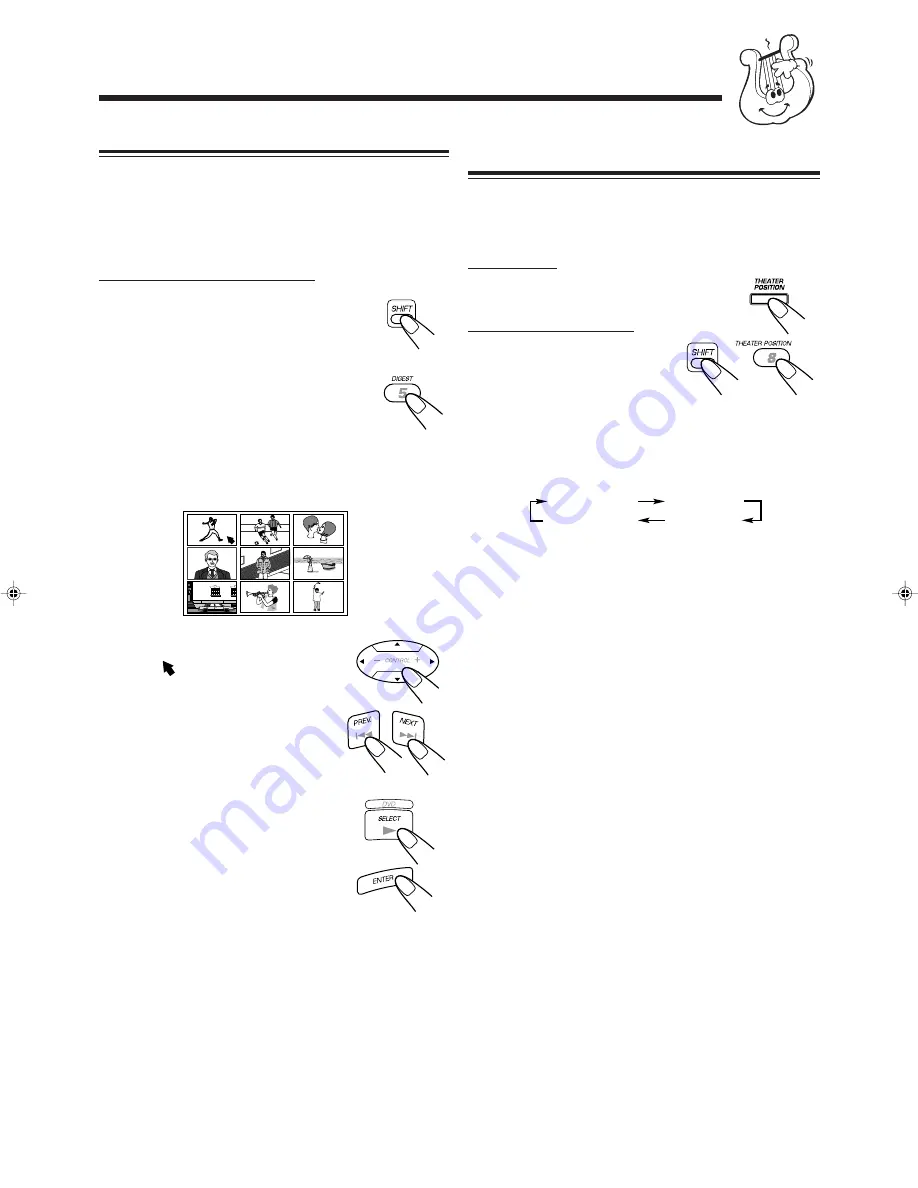
Viewing the Desired Chapters/Tracks—Digest

You can view 9 opening scenes of chapters or tracks at a time
and select desired scene from those displayed on the TV
screen directly.
• You can not use this function on VCD with the PBC

function.

On the remote control ONLY:

1

Press DIGEST while holding down
SHIFT when stopped playing or
during playback.

The opening scene appears in sequence (up to
9 pictures at a time) on the TV screen.
• When DVD is a source disc and stopped,

the opening scene of each title appears.

• When DVD is a source disc and played

back, the opening scene of each chapter in
the current title appears.

• When VCD without the PBC function is loaded, the

opening scene of each track appears.

2

Press Cursor (

5

 / 

 / 

3

 / 

2

) to

move   to a scene you want to
start playback.

• If there are more than 9 scenes, you

can see next 9 scenes. To go to the
next screen press NEXT, and to go
back to the previous screen press
PREV..

3

Press SELECT or ENTER.

Playback starts from the selected scene.

+

or

+

EN25-28.MX-DVA9[J,C]_f

01.7.3, 3:11 PM

26

Summary of Contents for MX-DVA9

Page 1: ...r future reference Model No Serial No GVT0057 001A J C MX DVA9 Consists of CA MXDVA9 SP MXG79 and SP DS99TN SP DSC99TN and SP DSS99TN Composé du CA MXDVA9 SP MXG79 et SP DS99TN SP DSC99TN et SP DSS99TN SP MXG79 SP MXG79 CA MXDVA9 SP DSC99TN SP DSS99TN SP DS99TN COMPACT COMPONENT SYSTEM SYSTEME DE COMPOSANTS COMPACT INSTRUCTIONS MANUEL D INSTRUCTIONS ...

Page 2: ...ce with the instructions may cause harmful interference to radio communications However there is no guarantee that interference will not occur in a particular installation If this equipment does cause harmful interference to radio or television reception which can be determined by turning the equipment off and on the user is encouraged to try to correct the interference by one or more of the follo...

Page 3: ...rements for the grounding electrode Example of antenna grounding is illustrated in here IMPORTANT PRODUCTS SAFETY INSTRUCTION Statement in accordance with the UL standards GROUND CLAMP ELECTRIC SERVICE EQUIPMENT NEC NATIONAL ELECTRICAL CODE POWER SERVICE GROUNDING ELECTRODE SYSTEM NEC ART 250 PART H GROUND CLAMPS GROUNDING CONDUCTORS NEC SECTION 810 21 ANTENNA DISCHARGE UNIT NEC SECTION 810 20 ANT...

Page 4: ...it Leave sufficient distance between the unit and the TV Keep the speakers away from the TV to avoid interference with TV DO NOT install the unit in a location near heat sources or in a place subject to direct sunlight excessive dust or vibration We would like to thank you for purchasing one of our JVC products Before operating this unit read this manual carefully and thoroughly to obtain the best...

Page 5: ... 21 Playing at Random Random Play 23 Repeating Playback 23 Repeat Play 23 A B Repeat 24 DVD VCD Special Effect Playback 25 Still Picture Frame by Frame Playback 25 Viewing Continuous Still Pictures Strobe 25 Slow Motion Playback Slow 25 Zoom in the Picture Zoom 25 Viewing the Desired Chapters Tracks Digest 26 Selecting the Picture Brightness Theater Position 26 Playing Back Tapes 27 Playing Back a...

Page 6: ... 3 Location of the Buttons and Controls Become familiar with the buttons and controls on your unit Front Panel Front Panel 1 4 5 7 8 9 q w e r t y 3 h s u i o a z c x k l j g f d 2 6 p ...

Page 7: ...ray open close buttons DVD1 DVD2 and DVD3 16 19 Pressing one of these buttons also turns on the unit s CANCEL DEMO button 9 10 21 31 38 41 Continued Display Window 1 2 6 8 3 p 9 q w 7 4 5 d SOUND MODE control 11 f DOLBY DIGITAL lamp 14 17 PRO LOGIC lamp 33 SURROUND lamp 14 17 28 g SUBWOOFER LEVEL control 11 h TUNING buttons 13 1 fast reverse fast forward buttons 12 19 27 j VOLUME control 11 k 7 st...

Page 8: ...n 17 19 22 24 9 SHIFT button p DVD 3 play button 10 16 19 22 25 SELECT button 20 26 Pressing this button also turns on the unit q 4 reverse search button 17 18 23 PREV preview button 26 w 7 stop button 17 18 20 23 26 27 37 CLEAR button 22 e 8 pause button 16 25 STROBE button 25 r ENTER button 15 17 19 22 24 26 32 37 t Cursor 5 3 2 button 20 25 26 32 37 CONTROL button 15 17 19 22 24 y TAPE 2 3 butt...

Page 9: ...al 2 Extend the FM antenna 3 Fasten it up in the position which gives you the best reception then fix it on the wall etc About the supplied FM antenna The FM antenna supplied with this unit can be used as temporary measure If reception is poor you can connect an outdoor FM antenna To connect an outdoor FM antenna Before connecting it disconnect the supplied FM antenna Outdoor FM antenna not suppli...

Page 10: ...lic parts of the unit connecting cords and the AC power cord AM antenna Vinyl covered wire not supplied AM loop antenna supplied COAXIAL ANTENNA AM LOOP FM 75 AM EXT 1 2 Connecting Speakers IMPORTANT Use only speakers with the same speaker impedance as indicated by the speaker terminals on the rear of the unit To connect front speakers SUBWOOFERS MAIN SPEAKERS CAUTION SPEAKER IMPEDANCE 6 16 LEFT L...

Page 11: ...ROUND SPEAKERS jacks you can enjoy Dolby Digital multichannel sound and the DSP Surround modes see page 28 Connect the right rear speaker to the REAR RIGHT jack Connect the left rear speaker to the REAR LEFT jack Connect the center speaker to the CENTER jack To connect a subwoofer By connecting a subwoofer you can reproduce the LFE signals recorded in Dolby Digital 5 1ch multichannel software Conn...

Page 12: ...g the AC power cord When connecting the AC power cord into a wall outlet the unit automatically starts display demonstration IMPORTANT Be sure to check all connections to be done before plugging the AC power cord into a wall outlet Canceling the Display Demonstration On the unit ONLY To cancel the display demonstration press CANCEL DEMO until DEMO OFF appears on the display When you press other bu...

Page 13: ...hing again DAILY Canceled ON TIME Daily timer setting ON TIME Recording timer setting Clock setting The hour digits start flashing REC 3 Turn 4 to adjust the minute then press SET To check the clock time Press and hold SET while playing any source Pressing SET the source indication appears again To adjust the clock again If you have adjusted the clock before you need to press CLOCK TIMER repeatedl...

Page 14: ...l you can adjust the speaker output balance On the remote control ONLY 1 Press LEVEL SELECT until L and R appear on the display 2 Press LEVEL or to adjust the front speaker output balance Press LEVEL to increase the right channel output Press LEVEL to increase the left channel output Reinforcing the Bass Sound You can select one of the 4 subwoofer levels This function only affects the playback sou...

Page 15: ... SEA pattern 6 Press SET The SEA pattern you have created is stored into the MANUAL mode selected in step 5 To use your own sound mode Select MANUAL 1 MANUAL 2 or MANUAL 3 mode See Selecting the Sound Modes on page 11 When you unplug the AC power cord or if a power failure occurs The setting will be erased in a few days If this happens set the manual sound modes again Ex When D CLUB is selected as...

Page 16: ...ing Stations You can preset 30 FM and 15 AM stations In some cases test frequencies have been already memorized for the tuner since the factory examined the tuner preset function before shipment This is not a malfunction You can preset the stations you want into memory by following the presetting method There is a time limit in doing the following steps If the setting is canceled before you finish...

Page 17: ... of the following Check the connection with the TV Turn on the TV and select the correct input on the TV to view the pictures or on screen menus indications on the TV screen If appears on the screen when pressing a button the disc cannot accept an operation you have tried to do Disc Structure DVD A DVD disc consists of Titles and each title may be divided into some Chapters For example if a DVD di...

Page 18: ...ng multi angle views you can view the same scene at different angles On the remote control ONLY 1 Press ANGLE while holding down SHIFT The on screen indication appears on the TV 2 Press CONTROL or to select a desired multi angle view Each time you press the button the view angle changes Total number of subtitles 1 2 1 2 1 5 ENGLISH ENGLISH Total number of multi angle views Total number of audio la...

Page 19: ...e played in one of the following sequences When DVD1 is pressed DVD1 DVD2 DVD3 then stops When DVD2 is pressed DVD2 DVD3 DVD1 then stops When DVD3 is pressed DVD3 DVD1 DVD2 then stops When only 2 VCDs or CDs are loaded they are played in the same order but the disc tray without a disc is skipped This function cannot be used for VCD with the PBC function and DVD Common Basic Disc Operations While p...

Page 20: ...sing the number buttons during playback allows you to start playing from the chapter number of the currently playing title you want To select number 5 press 5 To select number 10 press 10 To select number 20 press 10 then 10 To select number 23 press 10 10 then 3 Current title number Current Chapter number Elapsed title playing time Title numbers of the currently playing disc Numbers exceeding 16 ...

Page 21: ...n stopped Resume play When using Resume play on VCD with the PBC function the playback starts from the earlier point you stop To use Resume play you need to turn on the Resume function see page 36 To stop completely press 7 twice To remove the disc press 0 for the corresponding disc tray To go to another track Turn 4 during playback or press 4 or on the remote control 4 Goes back to the beginning ...

Page 22: ...in a currently playing track To enter the time of 03 45 press 0 3 4 5 Always enter all 4 digits To cancel mis entry for Time Search press CONTROL Each time you press the button the last number you entry is erased 4 Press ENTER The unit starts playback from the selected point To erase the on screen indication press PLAY MODE again To show the on screen indication You can show the following informat...

Page 23: ...sing MENU or TITLE in step 1 the disc does not have a menu or title list 7When playing a VCD When a VCD with the Playback Control function PBC is detected the PBC indicator lights up on the display The PBC function allows you to operate the VCD using menus When you start playback a menu automatically appears on the TV screen A menu may be a list of items divided screens or some moving pictures See...

Page 24: ... you select a title or track the program item is added up to 18 steps 6 Press DVD 3 8 The titles and tracks are played in the order you have programed To stop playing press 7 To go to the next track turn 4 to the right Even if you turn 4 to the left It just goes back to the beginning of the current title or track but cannot go back to the previous titles or tracks To modify the program You can mod...

Page 25: ... step 5 To program another title or track from a different disc repeat steps 4 and 5 Each time you select a title or track the program item is added up to 18 steps 7 Press DVD 3 The titles and tracks are played in the order you have programed To stop playing press 7 To go to the next track press Even if you press 4 It just goes back to the beginning of the current title or track but cannot go back...

Page 26: ...ss 7 Random play also stops when the disc tray currently played is opened To exit from Random play mode when finished press RANDOM on the unit Or perform steps 3 and 4 on the remote control Each time you press ENTER the Random play turns on and off To skip the currently playing title or track turn 4 to the right or press on the remote control Even if you turn 4 to the left or press 4 on the remote...

Page 27: ...ARCH A 1 12 34 B When a DVD is a played back When a CD or VCD disc is played back To cancel Repeat play perform steps 1 and 2 then press ENTER repeatedly until the REPEAT indications disappear from the TV screen To erase the play mode screen press PLAY MODE On the unit Press REPEAT before or during play The REPEAT indicators also light up on the display Each time you press the button Repeat play m...

Page 28: ... back to normal play If you press and hold STROBE for more than 1 second during normal playback 9 pictures also appear but advance at normal speed DVD VCD Special Effect Playback 1 32 1 16 1 4 1 3 1 2 1 8 1 16 1 4 1 3 1 8 1 12 Slow Motion Playback Slow You can enjoy slow motion playback Reverse slow motion playback cannot be used on some VCDs On the remote control ONLY 1 Press 8 once during play A...

Page 29: ...hapters or tracks at a time and select desired scene from those displayed on the TV screen directly You can not use this function on VCD with the PBC function On the remote control ONLY 1 Press DIGEST while holding down SHIFT when stopped playing or during playback The opening scene appears in sequence up to 9 pictures at a time on the TV screen When DVD is a source disc and stopped the opening sc...

Page 30: ...ress REVERSE MODE so that the Reverse Mode indicator on the display lights up like To cancel Reverse Mode press the button again so that the Reverse Mode indicator on the display lights up like When Reverse Mode is on with cassettes in both decks A and B After the reverse 2 side of the tape finishes playing the tape in the other deck starts playing Locating the Beginning of a Song Music Scan You c...

Page 31: ...nd modes is activated the SURROUND lamp on the unit lights up 2 Press LEVEL SELECT repeatedly until DELAY appears on the display 3 Press LEVEL to adjust the delay time Each time you press the button the delay time changes as follows As the number increases the delay time increases so that you can obtain much larger sound field This setting does not affect the delay time setting of the SPEAKER SETT...

Page 32: ...rse Mode indicator lights up like IMPORTANT It should be noted that it may be unlawful to re record pre recorded tapes records or discs without the consent of the owner of copyright in the sound or video recording broadcast or cable programme and in any literary dramatic musical or artistic embodied therein The recording level is automatically set correctly so it is not affected by the VOLUME the ...

Page 33: ...rse Mode indicator lights up like When using the Reverse Mode for VCD CD Direct Recording start recording in the forward 3 direction first When the tape reaches its end while recording a song in the forward direction 3 the last song will be re recorded at the beginning of the reverse side 2 If you start recording on the reverse side 2 recording will stop when recording is done only on one side rev...

Page 34: ...e 5 Put a recordable cassette of appropriate length into deck B 6 Press REVERSE MODE so that the Reverse Mode indicator lights up like Without turning on the Reverse Mode recording will stop when the front side of the tape is recorded 7 Press CD REC START TAPE SIDE A STAND BY appears and the recording indicator lights up on the display Deck B starts recording then about 10 seconds later the DVD VC...

Page 35: ...m changes its color to green 3 Press Cursor or 5 to move to an item you want to set Selected item changes its color to green 4 Press Cursor 3 or 2 to select a proper setting you want When selecting EXPERT for SPEAKER SETTING on AUDIO menu press ENTER For details see page 34 5 To set the other items on the same menu repeat steps 3 and 4 To set the other items on the different menus repeat steps 2 t...

Page 36: ...er or a decoder compatible with DTS and Dolby Digital Select PCM ONLY when connecting a digital recording device such an MD recorder DAT deck etc Select DOLBY DIGITAL PCM when connecting an amplifier or a decoder compatible only with Dolby Digital DOWN MIX Set the output signal type through the AUX OUT jacks while playing Dolby Digital 5 1ch software Select L0 R0 to output left front and right fro...

Page 37: ...that of the sound from the front speakers If the distance to the center speaker and or rear speakers from your listening position is almost the same as that to the front speakers select 0 ms the default setting for 5 1CHANNEL settings 1 msec increase or decrease in delay time corresponds to 1 foot 30 cm increase or decrease in distance 1 Display EXPERT SPEAKER SETTING menu See page 32 2 Press Curs...

Page 38: ...ning to the test tone Make adjustments so that the sound level of the selected speaker is set at the same level as that of the front speakers To output test tone properly turn off the sound mode and the DSP Surround mode before entering on screen menu 1 Display EXPERT SPEAKER SETTING menu See page 32 2 Press Cursor 5 3 2 to select TEST TONE then press ENTER TEST TONE changes its color to green and...

Page 39: ...menu you can change the following settings AUTO STANDBY You can turn off into standby the unit automatically Select 30 to turn off the unit automatically if no operation is done for 30 minutes Select 60 to turn off the unit automatically if no operation is done for 60 minutes Select OFF to deactivate this function RESUME This unit can memorize the stop point where DVD or VCD playback stops When th...

Page 40: ...try Code Set Level PASSWORD A D EXIT PRESS KEY ENTER Temporary Level Change PASSWORD YES NO PRESS ENTER EXECUTIVE This DISC can t play now Using the Parental Lock 1 2 3 4 8 7 6 5 Initial PARENTAL LOCK screen 6 Press ENTER The parental lock level is set and PARENTAL LOCK screen disappears from the TV To exit from PARENTAL LOCK screen any time during the above procedure press ENTER while holding dow...

Page 41: ...and the correct input mode is selected Make sure there is a disc on the selected disc number tray When using an Audio CD as the source to play Make sure there is a disc on the selected disc number tray When using a tape as the source to play Make sure that a tape is in the deck whose deck indicator A or B is lit on the display Make sure that the tape direction is correct When using tuner as the so...

Page 42: ...e are shown on the display in sequence STANDBY ON STANDBY 9 Press STANDBY ON to turn off the unit on standby if you have set the Daily Timer with the unit turned on If the unit is turned on when the on time comes Daily Timer does not work If you select a disc tray loaded a DVD The unit turns on when on time for Daily Timer comes but the DVD are not played back Even if you unplug the AC power cord ...

Page 43: ...remains or not STANDBY ON STANDBY DAILY Canceled ON TIME Daily timer setting ON TIME Recording timer setting Clock setting The hour digits start flashing REC Using Recording Timer With Recording Timer you can make a tape of a radio broadcast automatically You can set the timer whether the system is on or off How Recording Timer actually works The unit automatically turns on tunes into the specifie...

Page 44: ...n the display The settings you have done are shown on the display in sequence for your confirmation Using Sleep Timer With Sleep Timer you can fall asleep to sound You can set Sleep Timer only while the unit is turned on How Sleep Timer actually works The unit automatically turns off after the specified time length passes On the remote control ONLY 1 Press SLEEP The time length until the shut off ...

Page 45: ... II AV COMPU LINK EX TV or Available operations You can use following functions by using AV COMPU LINK control system Automatic power on off The connected TV turns on and off along with this unit When you turn on the unit the connected TV automatically turns on and changes the input mode to the appropriate position Also when you turn off the unit the connected TV automatically turns off One touch ...

Page 46: ...ty become damaged or get its paint peeled off be careful about the followings DO NOT wipe it with a hard cloth DO NOT wipe it strong DO NOT wipe it with thinner or benzine DO NOT apply any volatile substance such as insecticides to it DO NOT allow any rubber or plastic to remain in contact with it for a long time Handling discs Remove the disc from its case by holding it at the edge while pressing...

Page 47: ...rrect output mode is selected Parental lock is in used 4 3 PS is selected when viewing on a conventional TV aspect ratio 4 3 Small tabs on the top of the cassette are removed The built in microprocessor may malfunction due to external electrical interference The path between the remote control and the remote sensor on the unit is blocked The batteries are exhausted Action Press CANCEL DEMO on the ...

Page 48: ... with DTS Digital Surround Video CD Audio CD Audio CD with DTS DIGITAL AUDIO OUT Appendix C Output Signals Through the OPTICAL DIGITAL OUTPUT Terminal Appendix D Channel Display Display LFE Channel 1 0 CH C ONLY 1 0 1 CH ON C ONLY 2 0 CH L R 2 0 1 CH ON L R 2 0 CH L R L0 R0 down mix 2 0 1 CH ON L R L0 R0 down mix 2 0 CH L R S Lt Rt down mix 2 0 1 CH ON L R S Lt Rt down mix 3 0 CH L C R 3 0 1 CH ON...

Page 49: ...miri KU Kurdish KY Kirghiz LA Latin LN Lingala LO Laothian LT Lithuanian LV Latvian Lettish MG Malagasy MI Maori MK Macedonian ML Malayalam MN Mongolian MO Moldavian MR Marathi MS Malay MAY MT Maltese MY Burmese NA Nauru NE Nepali NL Dutch NO Norwegian OC Occitan OM Afan Oromo OR Oriya PA Panjabi PL Polish PS Pashto Pushto PT Portuguese QU Quechua RM Rhaeto Romance This code list is used when you ...

Page 50: ...blic DE Germany DJ Djibouti DK Denmark DM Dominica DO Dominican Republic DZ Algeria EC Ecuador EE Estonia EG Egypt EH Western Sahara ER Eritrea ES Spain ET Ethiopia FI Finland FJ Fiji FK Falkland Islands Malvinas FM Micronesia Fedelated States of FO Faroe Islands FR France FX France Metropolitan GA Gabon GB United Kingdom GD Grenada GE Georgia GF French Guiana GH Ghana GI Gibraltar GL Greenland GM...

Page 51: ...omania RU Russian Federation RW Rwanda SA Saudi Arabia SB Solomon Islands SC Seychelles SD Sudan SE Sweden SG Singapore SH Saint Helena SI Slovenia SJ Svalbard and Jan Mayen SK Slovakia SL Sierra Leone SM San Marino SN Senegal SO Somalia SR Suriname ST Sao Tome and Principe SV El Salvador SY Syrian Arab Republic SZ Swaziland TC Turks and Caicos Islands TD Chad TF French Southern Territories TG Tog...

Page 52: ...loped by Digital Theater Systems Inc Compared to Dolby Digital audio compression rate is relatively low This fact allows DTS Digital Surround format to add breadth and depth to the reproduced sounds As a result DTS Digital Surround features natural solid and clear sound To reproduce these surround signals you need to connect an amplifier or a decoder compatible with DTS Digital Surround Linear PCM...

Page 53: ...B Wow and flutter Immeasurable Cassette deck Frequency response Normal type I 50 Hz 14 000 Hz Wow and flutter 0 15 WRMS General Power requirement AC 120 V 60 Hz Power consumption 210 W 250 VA at operation 33 W on standby Dimensions approx 265 mm x 335 mm x 401 mm W H D 107 16 in x 131 4 in x 1513 16 in Mass approx 10 3 kg 22 8 lbs Supplied accessories See page 6 Speaker section Front speakers SP M...

Page 54: ...rized servicer or visit our website at www JVC com Remember to retain your Bill of Sale for Warranty Service Do not service the television yourself Caution To prevent electrical shock do not open the cabinet There are no user serviceable parts inside Please refer to qualified service personnel for repairs Accessories To purchase accessories for your JVC product please call toll free 1 800 882 2345...

Page 55: ...ng 4 Damage that occurs in shipment due to act of God and cosmetic damage 5 Signal reception problems and failures due to line power surge 6 Video Pick up Tubes CCD Image Sensor Cartridge Stylus Needle are covered for 90 days from the date of purchase 7 Accessories 8 Batteries except that Rechargeable Batteries are covered for 90 days from the date of purchase There are no express warranties excep...

Page 56: ...VICTOR COMPANY OF JAPAN LIMITED 0701MWMMDWJEM EN J VC ...

Reviews: