background image

General  Operation

8

Network Connection 

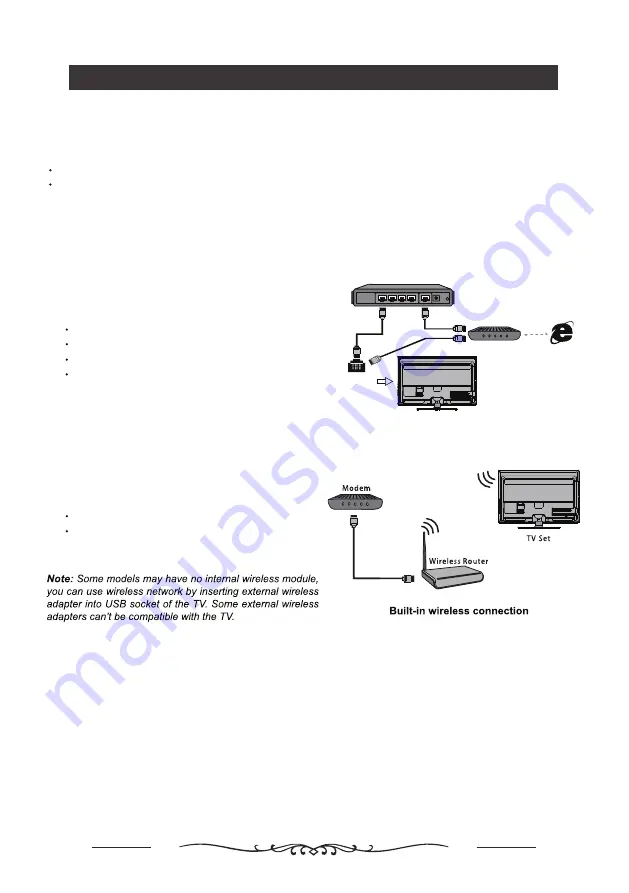
To access the internet, you must have access to high speed broadband internet service from your internet 
service provider. Your TV can be connected to your home network in two ways:

Wired, using the RJ45 (LAN) connector on the back panel.

Wireless, using the internal Wi-Fi and your home wireless network.

Modem

Internet

TV Set

Router

Ethernet

Port on the

back panel


or

Connecting to a wired network


To connect to a wired network:
1.  Ensure you have:

An ethernet cable long enough to reach your TV
A router or modem with an available Ethernet port
A high-speed internet connection
An Ethernet (LAN) port on the back of the TV

2.  Connect your ethernet cable to the router and to the 

Ethernet port on the back of the TV. 

3.  Use the Network Settings to configure the TV. 

Connecting to a wireless network

To connect to a wireless network 
1.  Ensure you have:

A router broadcasting a high-speed wireless signal
A high-speed internet connection

2.  Use the Network menu to configure the TV.

Note:

  Instructions below are just the usual ways to connect your TV to the wired or wireless network. 

The connection method may be different depending on your actual network configuration. If you have any 

questions about your home network, please refer to your ISP (Internet Service Provider).

Initial setup

The first time you switch the set on, the Initial setup screen appears, which guides you through the initial setup process. 

Follow the on-screen instructions to finish the initial setup process such as selecting the language,connecting to the 

network, scanning channels, and more. During each step, either make a choice or skip the step. If you skip a step, 

you can perform the setup later from the settings menu. 

Note: ATV channels are no longer broadcast in Australia, and so only DTV (Digital TV) channels will be tuned.

Summary of Contents for LT-55NQ7105AT

Page 1: ...LT 55NQ7105AT ...

Page 2: ......

Page 3: ... Apps Problems Solutions Using your TV Multimedia Troubleshooting Wall Mount Specifications Technical Features Accessing channels Watching connected devices Volume Using Quick Access Menu TV Settings Channels Setup Picture Display Sound Smart Zone System Program guide and PVR Display Sound TV 5 6 7 7 8 8 9 9 10 10 10 10 10 10 11 11 12 12 13 13 13 14 15 17 18 16 Base Installation 4 ...

Page 4: ......

Page 5: ......

Page 6: ......

Page 7: ...odel the menu Base Installation Important The TV stand must be installed correctly before using the TV unless the TV is wall mounted Incorrect installation can result in damage or injury due to tip over Note Make sure the AC cord is not connected to the power outlet Before starting assembly make sure that you have a clean safe and cushioned space to work in order to avoid any damage to the TV Do n...

Page 8: ...o though the same HDMI channel that is used to send video to the TV If switched on you won t need a separate audio cable to return sound from the TV ARC Feature is available on HDMI 1 USB sockets input These sockets can be used to connect an USB device for playback or PVR recording Note There are 2 USB ports available for this model LAN RJ45 plug for connecting to external modem or network access ...

Page 9: ... the Smart Zone access Enjoy Music Fast Cast Sleep Timer World Clock Night Mode Enter into Quick Access Menu To activate the virtual keyboard Goes to the YouTube homepage Step 1 Press button to enter the home page Step 2 Press button to enter the RC pairing screen Step 3 Step 4 The screen will display Pairing When pairing is complete the screen will display Success NOTE If you wait more than 2 min...

Page 10: ...ied Make sure you use the correct polarity Do not mix new and used batteries Do not use rechargeable batteries Do not expose batteries to excessive heat such as sunshine fire or the like throw them in a fire recharge them or try to open them as this could cause them to leak or explode Remove the batteries from the remote control if you are not using it for a long period of time 3 Connect an outsid...

Page 11: ... wireless network To connect to a wireless network 1 Ensure you have A router broadcasting a high speed wireless signal A high speed internet connection 2 Use the Network menu to configure the TV Note Instructions below are just the usual ways to connect your TV to the wired or wireless network The connection method may be different depending on your actual network configuration If you have any qu...

Page 12: ...ces of the contents provider an application s updates or the application itself may be discontinued Depending on your country s regulations some applications may have limited service or not be supported Using Homepage TV Source Select the input source from devices connected to TV through different ports Settings Allows you to adjust TV settings Using Homepage Apps Configure the network settings be...

Page 13: ... on screen display or guide 4 Press to return to the previous menu Volume Volume control press the VOL buttons on the remote control or the corresponding buttons on the TV set to increase or decrease the volume Sound mute press the button to temporatily mute the sound Press this button again or the VOL button to restore the sound Info Select this option to view TV infomation Picture adjustments En...

Page 14: ...nual Tuning Press OK to enter the interface Press to set program TV system or color system item then Press to select Frequency and press OK to search channel Digital Setup Digital Antenna Tuning Press OK to start the automatic search process The search may take a few minutes During the process you can press and choose YES to exit Subtitle Setup 1 Subtitle Setting Include off Basic Hearing impaired...

Page 15: ...ent Select how TV set is placed Include Desk Top and Wall Mount Digital Audio Out Optical out for audio signals from the Digtal Audio Out Sound Sound Ajustment Adjust sound and speaker related options Settings Sound Adjust sound and speaker related options TV Placement Desk Top Digital Audio Out PCM Picture Display Picture Adjustment Adjust the picture settings such as Brightness color and hue Set...

Page 16: ...nguage Use to scroll through Language Environment Enter to set Home or shop mode Home mode Standard picture and sound modes are available in this setting Choose this option for regular TV viewing at home Shop mode This setting is suitable for a retail environment In this mode picture menu settings will not be accessible Shop Demo Enter to set E sticker Note E sticker is not available for some mode...

Page 17: ...l show USB file name and then press OK to enter If no USB device is connected the USB interface will not be displayed Photo 1 Select Picture icon then press OK button to view the picture 2 Press Up Down Left or Right direction button to select your desired picture file and press OK to show 3 While showing picture press OK to display the play console For Previous and Next use remote left and Right ...

Page 18: ...rk 3 When two mobile hard disks are connected with the TV at the same time they will not be recognized some times All mobile hard disks consume a lot of power which may result in power supply problems We recommend inserting only one hard disk or a low power consumption mobile hard disk 4 The video from a mobile hard disk USB is playing with no sound The audio format of the video in your mobile har...

Page 19: ...ed in the fringe area of a television signal where the signal is weak the picture may be marred by dots When the signal is extremely weak it may be necessary to install a special antenna to improve the reception 1 Adjust the position and orientation of the indoor outdoor antenna 2 Check the connection of antenna 3 Fine tune the channel 4 Try another channel Broadcasting failure may happen Ignition...

Page 20: ...17 Model No LT 55NQ7105AT 400 200 6 12 400mm 200mm ...

Page 21: ...18 260 AC 110 240V 50 60Hz 125W 1231 6X260X782 4mm 13 9kg HEADPHONE OUT 1231 6X71 5X715 2mm WxDxH WxDxH ...

Page 22: ......

Page 23: ......

Page 24: ......

Reviews: