background image

10

USE

SETT

ING

TR
O

U

B

LE

?

PREPARE

IM

PORTANT

ENGLISH

ENG

LISH

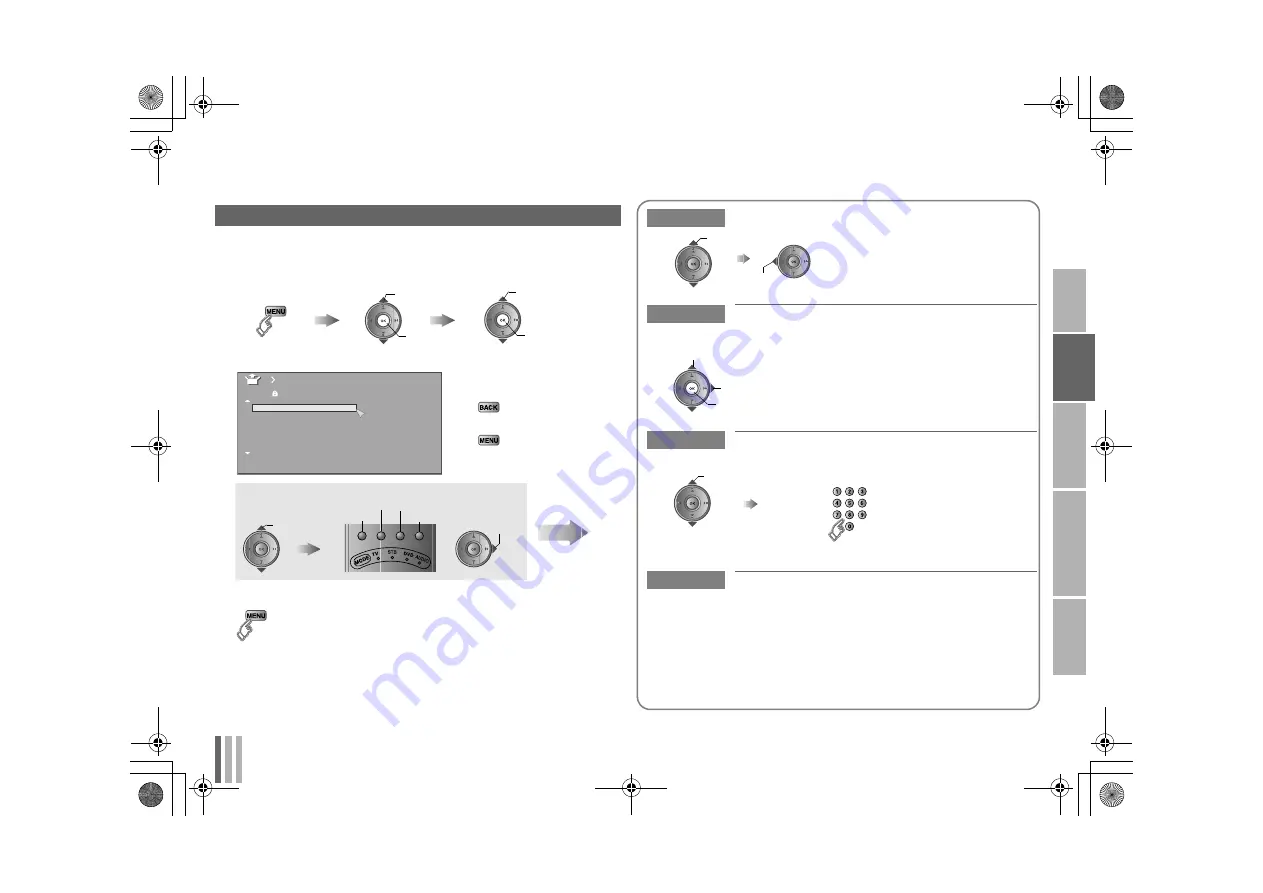
You can edit the channel list.

Editing channels

1

Display the “Edit” menu

2

Edit channels

To the previous menu

g

Exit

g

3

Finish

A

select

B

next

B

next

A

select 

Select “Set Up”

Select “Edit/Manual”

Display the menu bar

_ _ _ _ _

AV

PR

ID

Edit

CH/CC

01

02

CH

02

03

CH

03

04

CH

04

05

06

07

05

CH

06

CH

01

CC

02

CC

select a 

channel

Select channel

Select edit function

ID

Insert Delete

Manual

Move

Next

Move

Move a channel’s position (PR)

ID

Edit a channel name (ID)

Insert

Insert a new channel directly by entering the 

CH/CC number

Delete

Delete a channel

z

Pressing the button deletes the channel.

set

select

A

select character

B

move position

C

set

Naming a channel

z

“CH/CC” list 

g

(P. 30)

Select a “CH/CC”

z

Receives the 

broadcast signal.

Enter a number

LT-46SZ58_EN.book  Page 10  Wednesday, August 20, 2008  9:34 AM

Summary of Contents for LT-42SZ58

Page 1: ...WIDE LCD PANEL TV INSTRUCTIONS TV PANEL LCD LEBAR ARAHAN ENGLISH 95 LT 42SZ58 LT 46SZ58 GGT0270 001A H LT 46SZ58_EN book Page 0 Wednesday August 20 2008 9 34 AM ...

Page 2: ...ocedures z JVC assumes no responsibility for damage due to improper mounting Do not allow the TV to fall z Do not rest your elbows on or allow children to hang from the TV There is a risk that the TV will fall and cause injuries z Make use of the hole on the back of the stand to prevent the TV from falling easily P 6 If the TV is damaged or behaving strangely stop using it at once g Unplug the pow...

Page 3: ...ames and functions of parts 4 z Getting started 6 Let s try it out Try the advanced features z Enjoy your new TV 12 z Watching TV 13 z Viewing Teletext 14 z Watching videos DVDs 15 z Useful functions 16 Just the way you like it z Configuring your remote control 17 z Customising your TV 19 Picture 19 Features sub menu 20 Sound 21 Features 22 Set Up 24 When you have trouble z Troubleshooting 26 z Te...

Page 4: ... PR will appear To the previous screen Functions for viewing Teletext P 14 Set the sleep timer P 16 Select a picture mode P 16 Return to a frequently watched channel P 13 Turn on Clear SD P 20 Switch between TV STB DVD AUDIO P 17 Switch between TV VIDEO devices Volume control Turn off muting Display PR List and channel information Choose a favourite channel P 13 Change the aspect ratio P 16 Turn o...

Page 5: ...ls on menu operations refer to Customising your TV P 19 Change the direction of TV Power lamp ON Lit Blue OFF Unlit z When Power Lamp is set to Off the power lamp will not light up g Power Lamp P 23 Remote control sensor Eco Sensor g What is Eco Sensor P 29 Note Volume Switch to an external input P 15 Change channel Hyper Scan P 3 Menu operation Turn on off standby the TV VOL VOL z You will hear a...

Page 6: ...ssy finish first Then wipe softly with the cleaning cloth provided If you do not clear the dust first or you wipe the glossy finish too hard or a cleaning cloth other than the one provided is used the glossy finish may be scratched Attach the stand to the TV 1 2 When attaching the TV to the wall Handling the glossy finish of the TV Seal up the two holes at the bottom of the TV using the plates pro...

Page 7: ... from the surface of the TV z Seal up the two holes at the bottom of the TV with the plates provided P 5 Installation requirements z To avoid overheating ensure the unit has ample room z To prevent the TV from falling thread the belt through the hole on the back of the stand and secure it to the TV rack etc Use two AAA R03 dry cell batteries Insert the batteries from the end making sure the and po...

Page 8: ...posite input Game consoles Video camera VCR g signal direction Headphones A B C Getting started z Use component signal g VIDEO Setting P 24 z If both composite and S VIDEO cables are connected S VIDEO input takes priority over composite inputs z HDMI 1 Audio Setting g P 24 z HDMI 2 and HDMI 3 inputs do not support analogue sound OUTPUT Video and sound signals of a TV channel you are viewing output...

Page 9: ...IMPORTANT ENGLISH ENGLISH Connecting an aerial and VCR DVD player R L V AERIAL z After all the connections have been made insert the plug into an AC outlet VCR DVD player OR LT 46SZ58_EN book Page 8 Wednesday August 20 2008 9 34 AM ...

Page 10: ... cause all channel related settings to be lost Press the MENU button to display the menu then press and hold the number button 1 for more than 3 seconds to start initial settings If you wish to make changes later g Language and Auto Program P 24 Language B set A select 4 Select the Teletext language group 5 Automatically register channels 6 Check what was registered To edit channels g Editing chan...

Page 11: ...H 04 05 06 07 05 CH 06 CH 01 CC 02 CC select a channel Select channel Select edit function ID Insert Delete Manual Move Next Move Move a channel s position PR ID Edit a channel name ID Insert Insert a new channel directly by entering the CH CC number Delete Delete a channel z Pressing the button deletes the channel set select A select character B move position C set Naming a channel z CH CC list g...

Page 12: ...ired channel is displayed A Search a channel Fine tune B Set Select a system z If necessary press X to change the broadcasting system g Sound and colour system in your country or region P 28 AV PR ID Manual CH CC 01 02 03 CH 03 04 CH 04 05 06 07 05 CH 06 CH 01 CC 02 CC B G _ _ _ _ _ 02 CH Getting started LT 46SZ58_EN book Page 11 Wednesday August 20 2008 9 34 AM ...

Page 13: ...4 03 02 01 _ _ _ _ _ AV PR ID Picture settings Picture Mode Features etc Sound settings Stereo t u Cinema Surround etc Set Up settings Auto Program Language etc Features settings Sleep Timer Child Lock etc Customising your TV Change the aspect ratio Change the sound effect Select a preset picture setting Set the sleep timer 14 PAGE Viewing Teletext LT 46SZ58_EN book Page 12 Wednesday August 20 200...

Page 14: ...annel Using PR list The power lamp on the TV lights PR List 09 08 07 06 05 04 03 02 01 _ _ _ _ _ AV PR ID DISPLAY TOP MENU PR List z Channels registered in Initial settings will appear here z Select a page g select CH CH Press a channel number Move up or down a channel E g 15 1 up down z View a channel g B view A select 1 Channel information No indication Note Choose the channel you want to regist...

Page 15: ...g Press again MODE 1 Display your favourites list 2 Select a coloured button to save your page to 3 Enter the number of the page to save 4 Save Recall your favourite page 1 Display your favourites list 2 Press a coloured button MODE red green yellow blue Exit g MODE MODE red green yellow blue Viewing Teletext 1 2 Enter a Teletext page Move up or down a page TEXT TV TEXT CH CH up down When watching...

Page 16: ... you switch to watch TV z Useful when running a page search Returns to page 100 or a previously designated page 1 Select the video source 2 Operate the connected device and play a video To operate using the TV s touch sensor panel 1 Touch 2 Touch and to select 3 Touch AV Select 01 VIDEO 1 VIDEO 2 HDMI1 HDMI2 HDMI3 PC 0 1 2 3 4 5 6 E g For VIDEO 1 B watch A select TV VIDEO AV Select LCD LCD TV VIDE...

Page 17: ...m or when playing video games Sleep Timer Set a time for the TV to turn off automatically 1 2 Select the aspect ratio 3 z When Slim is selected a 4 3 image stretched out to 16 9 will revert back to its original aspect ratio with black bands z When Panoramic Zoom is selected a 4 3 image with black bands will be stretched out to 16 9 z Full Native g What is Full Native P 29 z Using Auto g Auto in Zo...

Page 18: ...each time the remote control is operated 3 Find the remote control code for your device according to its brand from the Remote control codes manual 4 Set the remote control code 5 Point the remote control at your device press and confirm that your device is turned off If your device does not respond try entering another available code TV STB AUDIO DVD Press and hold Enter four digit number Release...

Page 19: ...unction Hold down and until the mode indicator blinks 4 Point the remote control at your device and press If there is no response try the next code by pressing and press again Repeat the process until your device turns off 5 Press to register the code The code is now set Confirm that the mode indicator goes out If your TV s remote control still does not work even after using the search code functi...

Page 20: ... Reduction Colour System Zoom Off Digital VNR Off Off Auto On On On On On Picture Mode Bright in a fairly bright room Soft in a dark room Standard in a room with standard brightness Game Mode when playing video games Backlight Backlight brightness Darker l Brighter Contrast Contrast Lower l Higher Brightness Brightness Darker l Brighter Sharpness Sharpness Softer l Sharper Colour Colour Lighter l ...

Page 21: ... System Zoom Off Off Off Auto On On On On On Features Picture Management Make it easier to view bright dark pictures On Off Smart Picture Make it easier to view white areas On Off Dynamic Backlight Reduce the brightness of the backlight when the screen is dark On Off MPEG Noise Reduction Reduce MPEG video noise On Off Colour System When there is no colour change the colour system PAL SECAM NTSC3 5...

Page 22: ... Ambient sound High Low Mono Off Auto Volume Control Maintains a uniform sound volume even if the sound becomes loud suddenly during commercial breaks etc On Off MaxxBass Compensates low frequencies to widen the frequency band Low High Off z MaxxBass does not work with headphones MaxxBass is a registered trademark of Waves Audio Ltd in the USA Japan and other countries Sound Sound Off Off Off Bass...

Page 23: ...nel 01 0 0 0 0 On Timer On Timer PR A select On Timer B enter timer C set To off the On Timer set the On Timer to 00 00 or press blue button z If the TV is not in standby mode when On Timer has reached the time set the TV will automatically switch to the channel specified if it is already turned on Sleep Timer Set a time for the TV to turn off P 16 Channel Guard Stop children from watching specifi...

Page 24: ... Favourite Setting Remove a channel from the Favourite channel list For more details g Register a channel to a button Favourite channel P 13 Power Lamp Lights the power lamp P 4 while the TV is on On Off Eco Sensor Automatically adjusts the picture contrast according to the brightness of your room On Demo Off For more details g What is Eco Sensor P 29 Favourite Setting PR 01 1 PR 03 2 PR 05 3 PR 0...

Page 25: ..._ _ AV PR ID Edit CH CC 01 CH 02 CH 03 CH 04 05 06 07 CH CH CC CC 02 03 04 05 06 01 02 Language HDMI 1 Audio Setting Set to Digital or Auto for HDMI devices or Analogue or Auto for DVI devices Not available for HDMI 2 and HDMI 3 HDMI Mode Setting For setting the HDMI input If there is no picture displayed on the screen set Mode to 1 or 2 PC Setting For setting the PC input PC Position Adjust scree...

Page 26: ...ceed with setting Setting video terminals A select B next Display the menu bar Select VIDEO Setting Select Set Up A select B next VIDEO Setting VIDEO 2 SAT VIDEO 1 DVD select A Show the name list B Select a name from the list blue B set A select A Select VIDEO 1 B Set to component input VIDEO Setting VIDEO 2 SAT VIDEO 1 DVD VIDEO Setting VIDEO 2 SAT VIDEO 1 DVD select yellow V Pr Pb Y Customising ...

Page 27: ...0 DigiPure On P 20 LCD Troubleshooting Severe noise or snow z Is the TV connected correctly to the aerial z Change the direction of the aerial z Is the aerial or its cable damaged g Consult your retailer Patterns stripes or noise z Is the aerial receiving interference from high voltage power lines or wireless transmitters g Consult your retailer z Are connected devices too close to the TV g Place ...

Page 28: ...ction Depending on the situation some function items will be displayed in black colour and will not work P 19 HDMI Wrong screen size z Read the user manual of the connected device and perform the following g Check if the output setting of the device is correct g Change the signal format of the device to other format No picture no sound z Use the cable marked with HDMI logo Picture noise or no pict...

Page 29: ...umanian Group 3 English Russian Byelorussian Estonian Czech Slovak German Ukrainian Lettish Lithuanian Group 4 English French Swedish Finnish Hungarian Czech Slovak German Italian Arabic Hebrew Group 5 English French Turkish Farsi Sound and colour system in your country or region Area Country or Region Sound system Colour system Asia Middle East Bahrain Kuwait Oman Qatar United Arab Emirates Yemen...

Page 30: ...ing Demo in Eco Sensor you can display the effect of the Eco Sensor on the screen z With the full HD LCD display and Full Native you can enjoy full native HD resolution of 1920 x 1080 It exposes flaws in the video that were hidden when viewing on Full The illustrations are emphasised to make clear differences between Full and Full Native z Dark bar or noise may appear at the edges of the screen wh...

Page 31: ... W 74 E59 CH 22 US 22 W 37 E22 CH 60 US 60 W 75 E60 CH 23 US 23 W 38 E23 CH 61 US 61 W 76 E61 CH 24 US 24 W 39 E24 CH 62 US 62 W 77 E62 CH 25 US 25 W 40 E25 CH 63 US 63 W 78 E63 CH 26 US 26 W 41 E26 CH 64 US 64 W 79 E64 CH 27 US 27 W 42 E27 CH 65 US 65 W 80 E65 CH 28 US 28 W 43 E28 CH 66 US 66 W 81 E66 CH 29 US 29 W 44 E29 CH 67 US 67 W 82 E67 CH 30 US 30 W 45 E30 CH 68 US 68 W 83 E68 CH 31 US 31 ...

Page 32: ...NICAM I B G D K A2 B G D K Teletext systems FLOF Fastext WST World System Teletext Power requirements AC 110 V 240 V 50 60 Hz Audio output Rated power output 10 W 10 W Speakers 4 5 cm x 13 cm x 2 Power consumption standby 197 W 0 5 W 210 W 0 5 W Screen size visible area size measured diagonally 106 7 cm 116 8 cm Headphone jack Stereo mini jack 3 5 mm in diameter x 1 Dimensions W x H x D mm without...

Page 33: ... x 1 Composite video S Video Audio L R HDMI 1 HDMI connector x 1 HDMI 576i 625i 480i 525i 576p 625p 480p 525p 720p 750p 1080p 1125p 1080i 1125i HDMI 2 HDMI 3 HDMI 1 DVI ANALOG AUDIO RCA connectors x 2 Audio L R PC INPUT D SUB 15 pins x 1 Analogue PC signal PC AUDIO PC IN 3 5 pinjack x 1 Audio Output terminals OUTPUT RCA connectors x 3 Compositevideo Audio L R Headphone Stereo mini jack x 1 3 5 mm ...

Page 34: ...LT 46SZ58_EN book Page 33 Wednesday August 20 2008 9 34 AM ...

Page 35: ...LT 46SZ58_EN book Page 34 Wednesday August 20 2008 9 34 AM ...

Page 36: ...0708GLT SW MT 2008 Victor Company of Japan Limited LT 46SZ58_EN book Page 35 Wednesday August 20 2008 9 34 AM ...

Reviews: