background image

52

8

Entertainment

Listening to Music

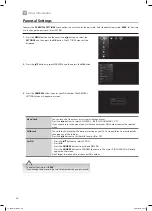
1.  Press the 

 button on the remote control. The MEDIA BROWSER will be 

displayed.

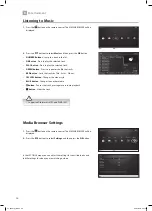
2.  Press the     buttons to select Music and then press the OK button.

•  NUMBER Buttons - Jump to a track in the list.
•  OK Button - Press to play the selected track.
•  PLAY button - Press to play the selected track.
•  GREEN button - Press to repeat or shuffle the tracks.
•  RED button - Sorts the tracks by Title - Artist - Album.
•  YELLOW button - Changes the menu style.
•  BLUE button - Changes to another media.
• 

 button - Pauses the track, press again to resume playback.

• 

 button - Stops the track.

Media Browser Settings

1.  Press the 

 button on the remote control. The MEDIA BROWSER will be 

displayed.

2.  Press the     buttons to select Settings and then press the OK button.

In the SETTINGS menu you can adjust the settings for your slideshows and 
subtile settings for when you are watching a video.

•  Supported file formats: MP3 and WMA /ASF.

LT-32C672_IB.indd   52

26/07/2017   08:14

Summary of Contents for LT-32C672

Page 1: ...Instruction Manual 32 LED Smart HD TV LT 32C672 GB LT 32C672_IB indd 1 26 07 2017 08 13 ...

Page 2: ...LT 32C672_IB indd 2 26 07 2017 08 13 ...

Page 3: ...ound Settings 22 Editing the Channel List 23 Viewing your Favourite Channel List 24 5 Using the Features 25 Programme Guide 25 Switch On Off Programme Guide 25 Select a Programme 25 Time Shift Recording onto a USB Storage Device 27 Recording DTV Programmes onto a USB Storage Device 28 Timer Programming 29 Recording Settings 30 Playing Recorded Programmes 31 Red Button Interactive services 32 Acces...

Page 4: ...bar HDMI ARC Audio Return Channel 45 Language Settings 46 Sources 46 Resetting your TV 47 Parental Settings 48 8 Entertainment 49 Connecting a USB Storage Device 49 Viewing Videos 50 Viewing Photos 51 Listening to Music 52 9 Technical Information and Help 53 Maintenance 53 Hints and Tips 54 Product Fiche and Specifications 56 License Information used with JVC Televisions 58 Declaration of Conformi...

Page 5: ...to complete your fuss free installation we ll test and demonstrate your TV s functions FREESAT INSTALLATION We ll set up the Freesat receiver and connect it to your existing dish TV and cabling We ll then tune in all available channels AERIAL INSTALLATION We ll supply install and align a new high quality aerial and connect it to your Freeview receiver and TV Then we ll scan and tune in all availab...

Page 6: ...le position on the wall and connect to your existing equipment so it s all ready to go We ll use neat wire management so you don t have to look at any untidy cabling and to complete your fuss free installation we ll test and demonstrate your TV s functions TV HOME CINEMA INSTALLATION We ll un box connect and set up your new and existing equipment We ll then configure calibrate and optimise the equi...

Page 7: ...et on cloth or other materials placed between the television and supporting furniture Educating children about the dangers of climbing on furniture to reach the television set or its controls If your existing television set is being retained and relocated the same considerations as above should be applied Wall Mounting Read the TV and wall mount instructions before mounting your TV on the wall For...

Page 8: ...in occurs it will never disappear completely Country Restrictions for Wireless Internet This device is intended for home and office use in all EU countries and other countries following the relevant EU directive without any limitation except for the countries mentioned below Country Restriction Bulgaria BG General authorization required for outdoor use and public service France FR In door use only...

Page 9: ...ilateral triangle is intended to alert the user to the presence of important operating and maintenance servicing instructions in the manual accompanying the unit Service To reduce the risk of electric shock do not remove screws The unit does not contain any user serviceable parts Please leave all maintenance work to qualified personnel Do not open any fixed covers as this may expose dangerous volt...

Page 10: ...HD TV LT 32C672 2 Insert two AAA size batteries Make sure to match the and ends of the batteries with the and ends indicated in the battery compartment 3 Slide the battery compartment cover back into place Make sure it clicks into place Do not connect the TV to the mains supply until you have completed all the connections Always disconnect the TV from the mains socket when not in use for a long pe...

Page 11: ...r TV Stand supplied Slide under the lip SCART SPDIF Optic OUT VGA ANT HDMI 1 ARC HDMI 2 LAN Fitting the Stand Neck and Base Together 1 Ensure the TV is switched off and not connected to the mains power supply 2 Lay the TV down on a flat surface ideally on the edge of a table so the base of the TV slightly overhangs the edge of the table with the back side facing up Please make sure a soft cushione...

Page 12: ...ely designed for flat panel TVs Mount this TV according to the instructions included in the mounting kit Due to space restrictions we recommend that you make all connections before mounting on to the wall SCART SPDIF Optic OUT VGA ANT HDMI 1 ARC HDMI 2 LAN x4 SCART SPDIF Optic OUT VGA ANT HDMI 1 ARC HDMI 2 LAN 200mm Four mounting holes size M4 screw 100mm 5 8mm M4 Front Right Side View and Control...

Page 13: ...via a VGA to component cable not supplied 5 SCART Connects to a VCR DVD Player or other AV device with a SCART output socket Select SCART 1 6 ANT Connects to the aerial socket on the wall with the RF coaxial cable 7 COMMON INTERFACE Allows the insertion of a Common Access Module 8 USB Allows the insertion of a USB storage device to play video audio photo and text files USB mode and record DTV prog...

Page 14: ...ld cause fire personal injury or damage to property Only use the battery type indicated in this manual When the batteries are exhausted the remote will not function Replace both batteries at the same time with new ones Do not install new batteries with used ones and do not mix different types of batteries Do not dispose of used batteries as domestic waste Dispose of them in accordance with local r...

Page 15: ...selected 7 MUTE Mute and restore the sound 8 V Adjust the volume 9 P P Press to select the next channel up or down the channel list 10 SMART HUB Connects to the Smart Hub internet connection required 11 MENU Display the main menu 12 Q MENU Press the select the Settings menu 13 OK Press OK to select or save a setting in menus Press OK to select the Channel list while watching TV Allows you to navig...

Page 16: ... ratio Press to adjust the aspect ratio of the picture AUTO 16 9 Subtitle 14 9 14 9 Zoom 4 3 Cinema 24 LANG Selects the Current Language menu 25 PLAYBACK and RECORD buttons starts a recording continue to press will add more recordings plays a recording pauses a recording and starts timeshifting in TV mode if you have a hard drive attached to the USB port stops a recording searches forwards and bac...

Page 17: ...tion menu Please ensure the aerial is plugged in Press the buttons to highlight your language then press OK 5 Press the buttons to select your country 6 Press the button to highlight Teletext Language then press the buttons to select your language The majority of people will want this set to West 7 Press the button to highlight Scan Encrypted pay per view Channel then press the buttons to select O...

Page 18: ...ons to highlight Home Mode then press OK To access all the features of your Smart TV you must be connected to the internet If you do not wish to set up your network connection you can skip this section by pressing selecting NO however we recommend you set up your network connection now 11 Select Yes and Press OK 14 You now need to enter your password a keyboard will appear Press the buttons to sel...

Page 19: ...hlight Tertiary region then press the buttons to select your Tertiary Region e g Greater London Press the button to highlight Save then press OK Your TV is now fully tuned in Country Code This will be shown as UK Primary Region This will show the regional country England Wales Scotland NI Secondary Region This will allow you to set the region for your local news service on BBC and ITV London Beds ...

Page 20: ...hannel will then be unlocked refer to Locking Channel for details Press the button to return to the previously viewed channel Display Channel Information Press the i button to view the current information Volume Adjustment Press the V or button on the remote control or rotate the multi function switch up or down on the back of the TV If you wish to switch the sound off press the button You can tur...

Page 21: ...ximum Auto Screen Off Adjusting this setting will reduce the brightness and power consumption of your TV or turn the screen off altogether Backlight Adjusts the backlight setting Only available when Custom Energy Saving is selected above Advanced Picture Settings Select to have more advanced adjustments to your TVs picture Dynamic Contrast Adjusts the contrast to pre set levels OFF LOW MEDIUM HIGH...

Page 22: ...equalizer mode then press OK to enter the EQUALIZER SETTINGS menu The equalizer modes are MOVIE SPEECH FLAT CLASSIC USER MUSIC Balance Adjusts the sound level from the left and right speakers Headphone Adjusts the volume level when listening to the TV with headphones To prevent damaging your hearing set the volume level low and gradually increase the level until you re happy Sound Mode Selects the...

Page 23: ...deleted To get the channel back you will need to tune your TV in again Edit name 1 Press the buttons to select the channel that you wish to change the name of 2 Press OK then press the buttons to select EDIT NAME then press OK 3 Press the NUMBER buttons and buttons to enter the new name of the channel then press OK Lock Unlock 1 Press the buttons to select the channel that you wish to lock 2 Press...

Page 24: ... the OK button 2 Press the BLUE button to view the CHANNEL LIST FILTER 3 Press buttons to select FAVOURITES then press the buttons to select the favourite list 1 4 that you want to view The channel list will now just show you your favourite channels To see the full list of channels again select NONE under Favourites LT 32C672_IB indd 24 26 07 2017 08 13 ...

Page 25: ...grammes Press the YELLOW button to return back to the Timeline schedule GREEN List Schedule 1 Press the GREEN button to view the List Schedule It will list the next programmes that are on the selected channel 2 Press the RED button to see the previous programmes or press GREEN to see the next programmes in the list YELLOW Zoom Press the YELLOW button to condense the programme information so you ca...

Page 26: ... on a particular day Search This is the field that you wish to search though Select ALL CHANNELS ALL TV CHANNELS ALL RADIO CHANNELS CURRENT CHANNEL LIST SINGLE CHANNEL Channel If you have selected SINGLE CHANNEL you can now select the channel you wish to search From Select the day you want to search from To select from your current day select TODAY Until Select the day you want to search until Mak...

Page 27: ...e currently displayed video 2 Channel name being recorded 3 Programme name being recorded 4 Indicates the amount of time recorded 2 3 4 1 While watching your TV you may press the button to pause the live programme if you want to go out for a while e g going to the bathroom kitchen will show on the screen When you have returned press the PLAY button to play the missed broadcast programme will brief...

Page 28: ...ng message will pop up You can only record the programme that you are currently watching 1 Press the button to record the programme that you are currently watching 2 To stop a recording press the button then select YES and press OK Recording will stop automatically when the disk is full The recording screen will briefly appear It will display the channel and programme name and the minutes of that ...

Page 29: ...w anyone to change or delete the recording DISALLOWED You will have to enter the PIN code to change or delete the recording Playback Press the buttons to select USE PARENTAL SETTINGS DISALLOWED or ALLOWED You will need to enter the PIN number if you want to play a recording when you select use parental settings and disallowed 2 Press the to highlight TIMERS then press OK Timer Programming This fun...

Page 30: ...d like the recording to start before the programme starts max 10 mins End late Press the buttons to select an amount of time you would like the recording to end after the programme finishes max 10 mins Max Timeshift Press the buttons to select a maximum amount of time you would like the timeshift recording to record from 10 mins to 2 hours Auto discard Discard Press the buttons to select the recor...

Page 31: ...rting option then press OK NAME NAME REVERSED START OLDEST FIRST START NEWEST FIRST LENGTH SHORTEST FIRST LENGTH LONGEST FIRST UNVIEWED FIRST VIEWED FIRST OK Play Options Press the buttons to select the recording that you wish to play then press OK The PLAY OPTIONS menu will be displayed PLAY FROM START This option will play the recording from the start RESUME This option with play the recording f...

Page 32: ...mode press the TXT button to display the main information page You may see slightly different looking pages depending if your TV is accessing the page over air or via the internet 2 Follow the instructions on the interactive services page and move around the page by pressing OK RED GREEN YELLOW BLUE or 0 9 buttons etc To change digital teletext services you will need to exit the current text servi...

Page 33: ... then press to select SETTINGS then press OK 2 Press the buttons to select NETWORK INTERNET SETTINGS then press OK 3 Press the buttons to select wired The word connected will appear to show you are now connected to the internet SCART SPDIF Optic OUT VGA ANT HDMI 1 ARC HDMI 2 LAN SCART SPDIF Optic OUT VGA ANT HDMI 1 ARC HDMI 2 LAN Connect your ethernet cable to the LAN socket LT 32C672_IB indd 33 2...

Page 34: ...SSWORD option 1 Press the buttons to select WIRELESS DEVICE 2 Press the YELLOW button to scan for your wireless network router A message saying Please wait will appear while your TV searches for all the wireless networks in your area 3 Press the buttons to select your wireless network then press OK You now need to enter your password a keyboard will appear Press the buttons to select a letter numb...

Page 35: ...me Guide Simply scroll back through the guide Any programme with an next to it can be viewed 1 Press the F Play button on your remote control to access the Programme Guide 2 Press the to highlight the program that you wish to view Remember it has to have a next to it to be available for playback 3 Press the OK button the view the programme Freeview Apps Updating From time to time you might enter t...

Page 36: ...s i e iPlayer by highlighting the apps at the top of screen Press the to highlight the desired app then press OK Genre Search You can search for content by genre All Comedy Drama Soaps Entertainment Kids Factual Lifestyle Movies Sport Press the to highlight your desired genre and all the available content for that genre will be displayed Direct Search If you know the name of the program you would ...

Page 37: ...arket 1 Press the RED button to open the Market The TV picture will change to a list of Apps 2 The Apps can be viewed in 5 different tabs 1 New Apps 2 Services 3 Videos 4 TV Apps 5 All Apps Press the NUMBER buttons to select these tabs 3 To select an App press the to highlight the App then press OK If the App is already in your My Apps section you will be given the option to GO TO APP or REMOVE Se...

Page 38: ...OK Deleting an app from My Apps 1 Press the YELLOW button to make sure you are in the My Apps section 2 Press the buttons to highlight the app that you would like to delete 3 Press the NUMBER 1 to open the OPTIONS menu Select REMOVE and press OK The app will be deleted from the My Apps section but will remain in the Market section if you want it back in the future Key Apps The Key Apps are the app...

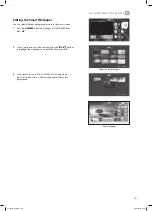
Page 39: ...n highlight EDIT WALLPAPER and press OK 2 A list of wallpapers will be displayed press the buttons to highlight the wallpaper you would like then press OK 3 The display will say its SAVED SUCCESSFULLY and when the smart screen returns the new wallpaper will be in the background New wallpaper Selection of wallpapers LT 32C672_IB indd 39 26 07 2017 08 13 ...

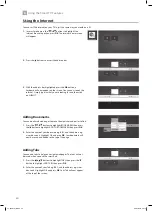
Page 40: ...rk web pages to make them quicker and easier to find 1 Press the buttons to highlight BOOKMARKS then press the button to highlight ADD TO BOOKMARKS then press OK 2 Enter the name of your bookmark e g BBC and the address e g www bbc co uk Highlight OK and press OK Your bookmark will now be saved and added to the top of the page Adding Tabs You can add tabs to help you navigate webpages The tabs wil...

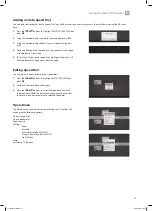
Page 41: ...als highlight it and press OK The web browser will open and show the page Editing Speed Dial You can move re name or delete your speed dials 1 Press the buttons to highlight EDIT SPEED DIAL then press OK 2 A tick and the word done will appear 3 Press the buttons to select the speed dial you wish to edit and press OK The edit menu will appear you can now choose to move edit or delete the selected s...

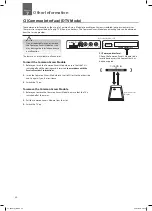
Page 42: ...ains 2 Pull the Common Access Module from the slot 3 Switch the TV on CI Common Interface DTV Mode The common interface allows the use of a Common Access Module to enable you to view scrambled pay per view services These services are provided by TopUp TV UK only and others The Common Access Module and viewing card can be obtained from the service provider CI CARD IN Common Access Module Rear Left ...

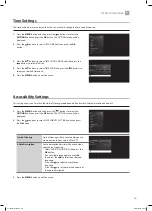
Page 43: ...ss the buttons to select ACCESSIBILITY SETTINGS and then press the OK button 3 Press the buttons to select TIME SETTING MODE and then press the buttons to select MANUAL 4 Press the buttons to select TIME ZONE then press the buttons to select your desired time zone 5 Press the MENU button to exit the menu Hard of Hearing Hard of Hearing will enhance the dialogue to make it easier to hear Select ON ...

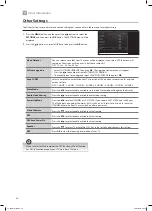
Page 44: ...sed for a certain amount of time OFF 1 HOUR 2 HOURS 3 HOURS 4 HOURS 5 HOURS 6 HOURS 7 HOURS 8 HOURS Store Mode Press the to select enable or disable store mode Store mode will brighten the display Audio Video Sharing Press the to select enable or disable audio video sharing Power Up Mode Press the to select STANDBY or LAST STATE If you choose LAST STATE and switch your TV off and back on again at ...

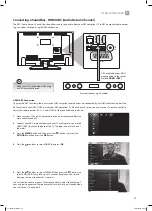
Page 45: ...olume output VOL and MUTE of the connected audio device 1 Make sure your TV and ARC compliant device are disconnected from the main and switched off 2 Connect your ARC compliant device to your TV making sure you use the HDMI1 ARC socket on the back of the TV The plug in and switch on at the mains 3 Press the MENU button and then press the buttons to select the SETTINGS and then press the OK button...

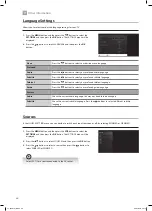
Page 46: ...etext language Guide Press the buttons to select your preferred guide language Current Audio Shows the current audio language this may not be able to be changed Subtitle Shows the current subtitle language Press the buttons to select a different subtitle language Sources In the SOURCE SETTING menu you can decide to switch each input source on or off by selecting ENABLED or DISABLED 1 Press the MEN...

Page 47: ... then press the OK button The INSTALL AND RETUNE menu will be displayed 2 Press the buttons to select FIRST TIME INSTALLATION and then press the OK button 3 Press the buttons to select YES the press OK The screen will turn black and then in a few seconds you will see the FIRST TIME INSTALLATION MENU All channel and user settings will be lost and the TV will revert to First Time Installation LT 32C...

Page 48: ...ust the installation menus Press the buttons to select ALL MENUS INSTALLATION MENUS OFF If you choose to lock the menus you will have to enter your PIN number to enter the selected menu Child Lock The child lock will prevent the buttons working on your TV to stop children from accidentally changing any of the settings Press the buttons to set the child lock to ON or OFF Set PIN Press the buttons t...

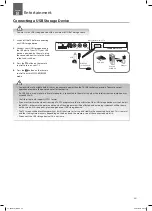
Page 49: ...pter for that device If a USB hub is used make sure its mains adapter is connected to the mains supply as the total current consumption may exceed 500mA The file system only supports FAT32 format If you want to store the video streaming of a DTV programme the transfer rate of the USB storage device must not be less than 5MB s otherwise the picture and sound of the programme will be affected and a ...

Page 50: ...ayed 3 Press the buttons to select the video you wish to play then press the OK button The video will start to play buttons Plays the next or previous video button Stops the video LANG button Shows the Subtitle Audio menu button Pauses the video press again to resume playback BACK button Returns back to the video menu buttons Rewind and fast forward the video 2x 4x 8x GREEN button Press to jump to...

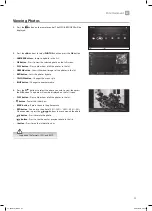
Page 51: ...button Changes the menu style BLUE button Changes to another media 3 Press the buttons to select the photo you wish to view then press the OK button The photo will now be displayed on the full screen PLAY button Plays a slide show of all the photos in the list button Pauses the slide show BACK button Returns back to the photo menu RED button Zooms into the photo 150 200 300 400 50 When zoomed in p...

Page 52: ... button Sorts the tracks by Title Artist Album YELLOW button Changes the menu style BLUE button Changes to another media button Pauses the track press again to resume playback button Stops the track Media Browser Settings 1 Press the button on the remote control The MEDIA BROWSER will be displayed 2 Press the buttons to select Settings and then press the OK button In the SETTINGS menu you can adju...

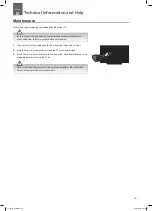
Page 53: ...vaporate before switching the TV on Maintenance Careful and regular cleaning can prolong the life of your TV Be sure to press the button on the remote control and disconnect the mains cable from the mains socket before any cleaning Never use alcohol benzine paint thinner cleaning fluid or other chemicals Do not use compressed air to remove dust 9 Technical Information and Help Chapter 9 LT 32C672_...

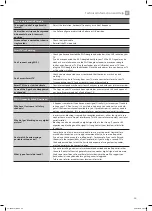
Page 54: ...he picture has not appeared after five minutes No or poor colour or poor picture Adjust the settings in the PICTURE menu Try another channel The problem may be caused by the broadcaster Check if the video cables are connected properly Horizontal Vertical bar or picture shaking Check for local interference such as an electrical appliance or power tool Poor reception on some channels Station or cabl...

Page 55: ...f my channels It happens sometimes if you have a weak signal Usually it just means you ll need to re tune your TV Don t worry it is easy to do And once you ve done it you should get all the Freeview channels available to you If problems persist you may need to get your aerial checked Talk to your retailer or contact your local aerial installer Why do I get blocking on my digital picture In most ca...

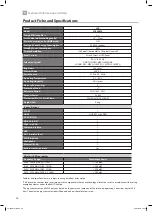
Page 56: ...with base 735 W x 478 H x 185 D Weight Net 5 4kg Inputs Output SCART 1 HDMI 2 HDMI 1 with ARC PC RGB VGA 1 SIDE AV L R 1 YPbPr via VGA 1 Common Interface 1 USB 1 ANT Aerial socket 1 SPDIF Optical 1 Headphone 1 Ethernet RJ 45 1 Built in wireless network Yes Features and specifications are subject to change without prior notice This television contains lead in certain parts or components where no te...

Page 57: ...57 9 Technical Information and Help LT 32C672_IB indd 57 26 07 2017 08 14 ...

Page 58: ...ess specified under the applicable laws or in a written agreement a party who changes or redistributes the software with consent from the copyright holders or based on the aforementioned licenses shall not be held liable whatsoever for any loss arising from the use of or inability to use such software components The same applies even when the copyright holders or relevant third parties have been i...

Page 59: ...d other intellectual property rights of Rovi Corporation Reverse engineering and disassembly are prohibited Restriction on Use Rovi Trade Mark Rights Use of the copyright protection technology contained in this product must be authorised by Rovi Corporation and is intended for home and other limited viewing uses only unless otherwise authorised by Rovi Corporation The names Rovi Corporation and Ma...

Page 60: ...G Retail Ltd under license Dear Customer This apparatus is in conformance with the valid European directives compatibility and electrical safety European representative of the manufacturer is DSG Retail Ltd co no 504877 1 Portal Way London W3 6RS UK For Help and Support Call UK 0344 561 1234 Ireland 1890 818 575 LT 32C672_IB indd 60 26 07 2017 08 14 ...

Reviews: