background image

Setting up your TV

9

ENGLISH

LT-32/26AX5 / LCT1926-001A / English

• If the JVC logo does not appear this is 

because your TV has already been 
turned on for the first time: 

use the “LANGUAGE”, “TELETEXT 
LANGUAGE” and “AUTO 
PROGRAM” functions to make the 

initial settings. For details, see “SET 
UP menu” on page 29.

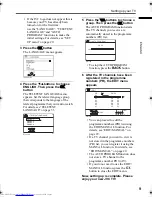
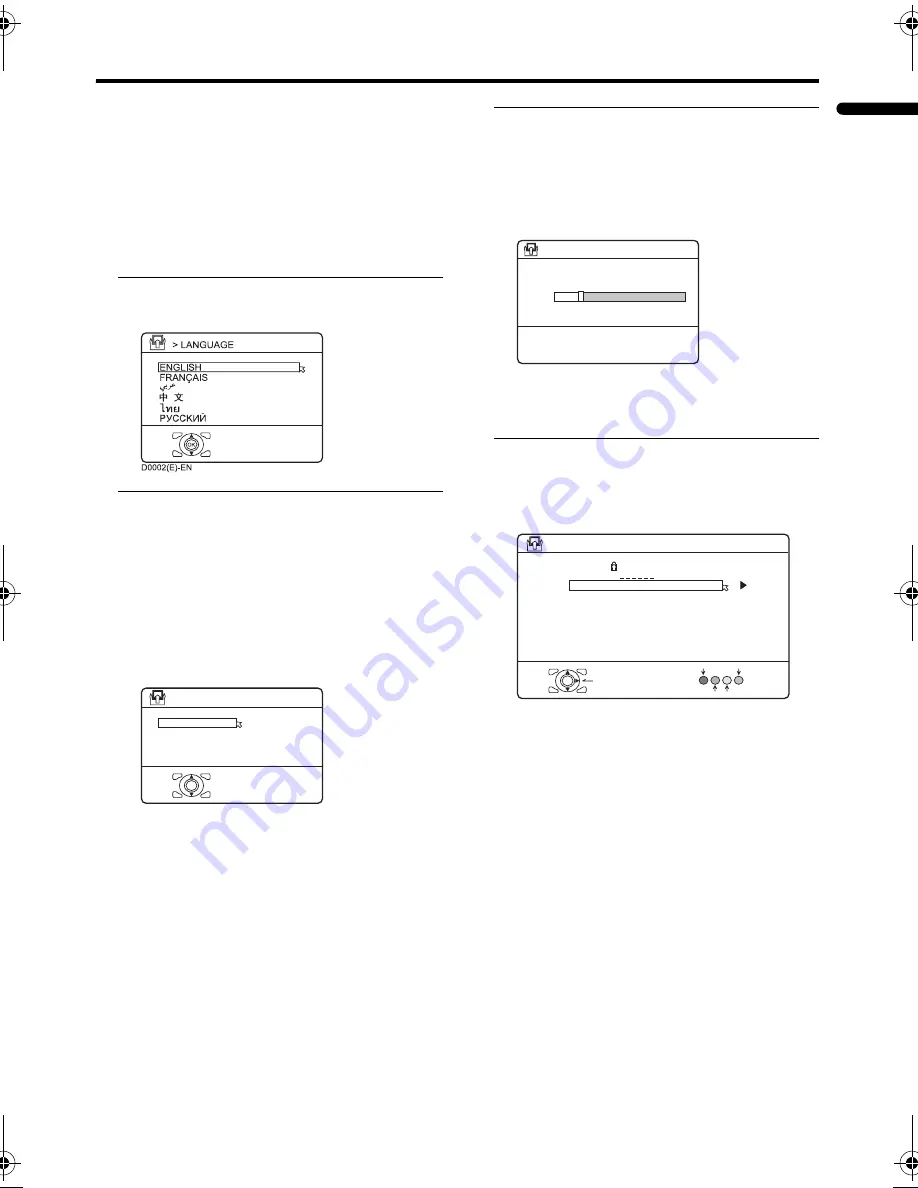
3 Press the 

a

 button

The LANGUAGE menu appears.

4 Press the 

6

 buttons to choose 

ENGLISH. Then press the 

a


button

The TELETEXT LANGUAGE menu 
appears. Set the teletext language group 
that corresponds to the language of the 

teletext programme that you want to watch. 
For details, see “TELETEXT 
LANGUAGE” on page 33.

5 Press the 

6

 buttons to choose a 

group. Then press the 

a

 button

The AUTO PROGRAM function starts. 
The TV channels you receive are 
automatically stored in the programme 

numbers (PR) list.

• To stop the AUTO PROGRAM 

function, press the 

b

 button.

6 After the TV channels have been 

registered in the programme 

numbers (PR), the EDIT menu 

appears

• You can proceed to edit the 

programme numbers (PR) list using 

the EDIT/MANUAL function. For 
details, see “EDIT/MANUAL” on 
page 29.

• If a TV channel you want to view is 

not stored in the programme numbers 

(PR) list, you can register it using the 
MANUAL function. For details, see 
“EDIT/MANUAL” on page 29.

• The AUTO PROGRAM function does 

not store a TV channel to the 

programme number PR 0 (AV).

• If you do not need to use the EDIT/

MANUAL function, press the 

a


button to close the EDIT menu.

Now, setting up is complete. Please 

enjoy your new JVC TV!

D1003

OK

GROUP-1

> TELETEXT LANGUAGE

GROUP-2

GROUP-3

GROUP-4

-EN

CH

>>

14%

D0004

28

AUTO PROGRAM

-EN

>

PR

ID

AV

21

22

23

24

25

26

D0038

OK

DELETE

MANUAL

ID

MOVE

INSERT

CC

01

CH

CH

CH

CH

CH

CH

CH/CC

EDIT

02

03

05

04

06

07

01

-EN

LT-32&26AX5_Eng.book  Page 9  Thursday, August 18, 2005  10:07 AM

Summary of Contents for LT-26AX5

Page 1: ...WIDE LCD PANEL TV INSTRUCTIONS LT 32AX5 LT 26AX5 ENGLISH LCT1926 001A H ...

Page 2: ......

Page 3: ...NOT EXPOSE THIS APPLIANCE TO RAIN OR MOISTURE WARNING Fingers may be trapped under the TV causing injuries Hold the TV at the bottom in the middle and do not allow it to tilt up or down WARNING The TV may fall causing injuries Hold the bottom of the stand with your hand and tilt the TV up and down Do not allow children to hang from the TV place their elbows on the TV or lean against the TV Doing s...

Page 4: ... installation and never position the unit where good ventilation is impossible When installing this TV distance recommendations must be maintained between the set and the wall as well as inside a tightly enclosed area or piece of furniture Keep to the minimum distance guidelines shown for safe operation Pixel defects LCDs use collections of fine points pixels to display images While there is no pr...

Page 5: ...rn to TV channel instantly 16 Favourite channel function 17 Operating a JVC brand VCR or DVD player 18 Teletext function 19 Basic operation 19 Using the List Mode 19 Hold 20 Sub page 20 Reveal 20 Size 20 Index 21 Cancel 21 Using the TV s menu 22 Basic operation 22 PICTURE menu 23 PICTURE MODE 23 BACK LIGHT 23 CONTRAST 23 BRIGHT 23 SHARP 23 COLOUR 23 TINT 23 WHITE BALANCE 23 FEATURES 24 SOUND menu ...

Page 6: ...ect the equipment to the TV making the correct rear panel and front panel connections Before connecting anything Read the manuals that came with the equipment Depending on the equipment the connection method may be different from the diagram Also the equipment settings may need to change depending on the connection method Turn off all the equipment including the TV The Specifications on page 38 gi...

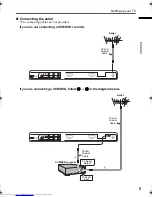
Page 7: ...ing cables are not provided If you are not connecting a VCR DVD recorder If you are connecting a VCR DVD follow A B in the diagram below Aerial 75 ohm Coaxial Cable 75 ohm Coaxial Cable 75 ohm Coaxial Cable To Aerial Output To Aerial Input VCR DVD recorder Aerial ...

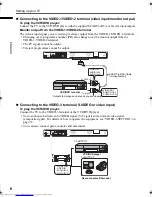
Page 8: ...utput Teletext programmes cannot be output Connecting to the VIDEO 3 terminal S VIDEO or video input To play the VCR DVD player Connect the TV to the VIDEO 3 terminal of the VCR DVD player You can choose between an S VIDEO signal Y C signal and a normal video signal composite signal For details of how to operate the equipment see VIDEO 3 SETTING on page 33 You can also connect game consoles and ca...

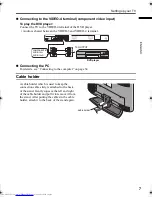
Page 9: ...cting the PC For details see Connecting to the computer on page 34 Cable holder A cable holder which is used to keep the connection cables tidy is attached to the back of the stand Gently squeeze the left and right of the cable holder and pull it to remove it from the stand After putting the cables in the cable holder attach it to the back of the stand again DVD player To OUTPUT COMPONENT IN AUDIO...

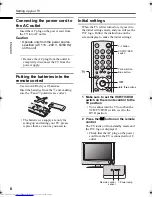
Page 10: ... setting up and testing your TV please replace them as soon as you need to Initial settings When the TV is first turned on it goes into the initial settings mode and you will see the JVC logo Follow the instructions on the screen display to make the initial settings 1 Make sure to set the VCR TV DVD switch on the remote control to the TV position You cannot turn the TV on when the VCR TV DVD switc...

Page 11: ... the programme numbers PR list To stop the AUTO PROGRAM function press the b button 6 After the TV channels have been registered in the programme numbers PR the EDIT menu appears You can proceed to edit the programme numbers PR list using the EDIT MANUAL function For details see EDIT MANUAL on page 29 If a TV channel you want to view is not stored in the programme numbers PR list you can register ...

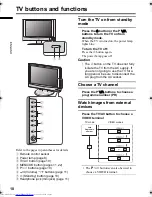
Page 12: ...om standby mode When the TV is turned on the power lamp lights blue To turn the TV off Press the A button again The power lamp goes off Caution The A button on the TV does not fully isolate the TV from the AC supply If you are not going to use the TV for a long period be sure to disconnect the AC plug from the AC socket Choose a TV channel Press the P p buttons to choose a programme number PR Watc...

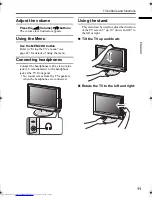
Page 13: ...etails of using the menu Connecting headphones Connect the headphones with a stereo mini jack 3 5 mm diameter to the headphone jack at the TV front panel No sound comes from the TV speakers when the headphones are connected Using the stand This stand can be used to adjust the direction of the TV screen 5 up 10 down and 20 to the left or right Tilt the TV up and down Rotate the TV to the left and r...

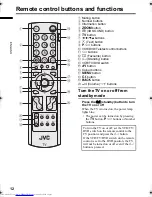
Page 14: ...b button r Volume q buttons Turn the TV on or off from standby mode Press the standby button to turn the TV on or off When the TV is turned on the power lamp lights blue The power can be turned on by pressing the b button p p buttons or Number buttons 0 3 4 5 9 6 7 8 1 2 To turn the TV on or off set the VCR TV DVD switch on the remote control to the TV position and press the button If the VCR TV D...

Page 15: ...inal video source the motion may appear unnatural when the video source is input with progressive scanning component signals If this happens change the output setting of the connected device to interlace scanning component signal output See the instructions that came with the device for more information The PC sound is the same as the VIDEO 3 sound To return to a TV channel Press the b button the ...

Page 16: ... the display as follows Channel number display The channel number and channel name when the channel name is registered of the programme you are watching or the VIDEO terminal number is displayed PR LIST The programme number PR and VIDEO terminal list is displayed Pressing the a button after choosing the programme number PR or VIDEO terminal with the 7 buttons will display the chosen programme or V...

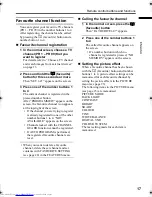
Page 17: ...t ratio to the upper and lower limits of the screen 16 9 ZOOM This zooms up the wide picture 16 9 aspect ratio to the full screen 16 9 ZOOM SUBTITLE This zooms up the wide picture 16 9 aspect ratio with subtitles to the full screen FULL This uniformly stretches the left and right sides of a normal picture 4 3 aspect ratio to fill the wide TV screen For 16 9 aspect ratio pictures that have been squ...

Page 18: ...e performed The power is turned off on g Text button is pressed The TV is switched between TV mode and VIDEO mode 3D SOUND function You can enjoy sounds with a wider ambience This function does not work for the sound from headphones Press the 3 button to select one of 3D SOUND modes ON When you listen to stereo sound please select ON mode You can enjoy sound similar to the experience at the theatr...

Page 19: ... 4 NOT AVAILABLE appears on the screen Channels locked with the CHANNEL GUARD function cannot be registered If AUTO PROGRAM is performed the registered favourite channels are reset When you want to delete a favourite channel delete the set channel and set contents with FAVOURITE SETTING see page 28 in the FEATURES menu Calling the favourite channel 1 In the normal screen press the d favourite butt...

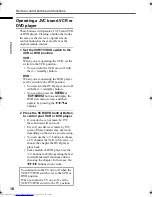
Page 20: ...an also press the H or T button and display the DVD disc menu screen and then operate by pressing the 7 buttons 2 Press the VCR DVD Control Button to control your VCR or DVD player If your device is not made by JVC these buttons will not work Even if your device is made by JVC some of these buttons may not work depending on the device you are using You can use the p buttons to choose a TV channel ...

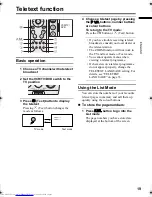
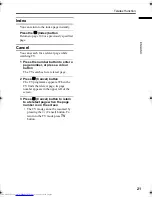
Page 21: ...sult your local dealer or the teletext station The ZOOM function will not work in the TV and text mode or Text mode You cannot operate menus when viewing a teletext programme If characters on a teletext programme do not appear properly change the TELETEXT LANGUAGE setting For details see TELETEXT LANGUAGE on page 33 Using the List Mode You can store the numbers of your favourite teletext pages in ...

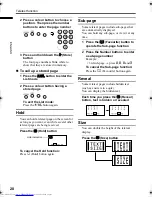
Page 22: ... are being received Press the C Hold button To cancel the Hold function Press C Hold button again Sub page Some teletext pages include sub pages that are automatically displayed You can hold any sub page or view it at any time 1 Press the d Favourite button to operate the Sub page function 2 Press the Number buttons to enter a sub page number Example 3rd sub page press 0 0 0 and 3 To cancel the Su...

Page 23: ...mber button to enter a page number or press a colour button The TV searches for a teletext page 2 Press H Cancel button The TV programme appears When the TV finds the teletext page its page number appears in the upper left of the screen 3 Press H Cancel button to return to a teletext page when the page number is on the screen The TV mode cannot be resumed by pressing the H Cancel button To return ...

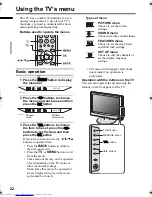
Page 24: ...or H button to exit from the menu Some menu items may not be operated or set depending on the TV status or other menu item settings Menu items that cannot be operated or set are displayed in grey in the menu and cannot be chosen Types of menu The menu will disappear after about one minute if no operation is performed Operation with the buttons on the TV You can also operate the menus using the but...

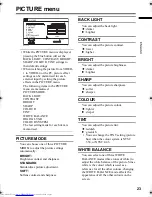
Page 25: ...djustment SOFT Softens contrast and sharpness BACK LIGHT You can adjust the back light 2 darker 3 brighter CONTRAST You can adjust the picture contrast 2 lower 3 higher BRIGHT You can adjust the picture brightness 2 darker 3 brighter SHARP You can adjust the picture sharpness 2 softer 3 sharper COLOUR You can adjust the picture colour 2 lighter 3 deeper TINT You can adjust the picture tint 2 reddi...

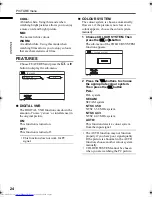
Page 26: ...M The colour system is chosen automatically However if the picture is not clear or no colour appears choose the colour system manually 1 Choose COLOUR SYSTEM Then press the a or 3 button The sub menu of the COLOUR SYSTEM function appears 2 Press the 6 buttons to choose the appropriate colour system Then press the a button PAL PAL system SECAM SECAM system NTSC 3 58 NTSC 3 58 MHz system NTSC 4 43 N...

Page 27: ...h tone of the sound 2 weaker 3 strong BALANCE You can adjust the volume balance between the left and right speaker 2 turn the left speaker s volume level up 3 turn the right speaker s volume level up 3D SOUND You can enjoy Surround sound with a live effect by using the 3D SOUND function You can choose a 3D SOUND mode from ON MONO and OFF modes For details see 3D SOUND function on page 16 You can a...

Page 28: ...ging the remaining time To cancel the SLEEP TIMER function Press the 2 button to set the period of time to OFF CHANNEL GUARD When there is a TV channel you do not want your children to watch you can use the CHANNEL GUARD function to lock out the TV channel Even when a child chooses a programme number PR for a locked TV channel the screen will change to blue and display n CHANNEL GUARD so the TV ch...

Page 29: ...n button to display ID NO ID No input screen 3 Press the number buttons to enter the ID number The lock is temporarily released so you can view the TV channel If you have forgotten the ID number Perform step 1 of To set the CHANNEL GUARD function After confirming the ID number press the b button to exit the menu Even if you reset the lock temporarily it does not mean that the CHANNEL GUARD functio...

Page 30: ...n is turned on OFF This function is turned off FAVOURITE SETTING Chose when deleting the favourite channels registered in the buttons 1 to 4 1 Choose FAVOURITE SETTING then press the a or 3 button The FAVOURITE SETTING menu appears 2 Press the 6 buttons and chose the favourite channel that you want to delete 3 Press the blue button The chosen favourite channel and set contents are deleted For deta...

Page 31: ...t need to use the EDIT MANUAL function press the a button to exit the EDIT menu Starting the AUTO PROGRAM deletes the registered favourite channel EDIT MANUAL The EDIT MANUAL functions are divided into two types editing the current programme numbers PR EDIT functions and manually storing a TV channel you want to view on a particular programme number PR MANUAL function Here are the details about th...

Page 32: ... then press the a or 3 button The EDIT menu appears 2 Follow the description for the function you want to use 3 Press the a button to complete the settings For programme number PR 0 AV appears in the programme numbers PR list A VIDEO terminal number does not appear in the programme numbers PR list MOVE 1 Press the 6 buttons to choose a TV channel 2 Press the 3 button to start the MOVE function 3 P...

Page 33: ...mber of the TV channel 1 Press the 6 buttons to choose a programme number PR for which you will register a new TV channel 2 Press the green button and start the INSERT function 3 Press the 6 buttons to choose CC or CH according to the CH CC number of the TV channel To cancel the INSERT function Press the b button 4 Press the number buttons to enter the remaining CH CC number The TV shifts to regis...

Page 34: ...llow button to fine tune the TV channel If you cannot hear the normal sound even when the picture of the TV channel appears normally The SYSTEM setting is wrong Press the 3 button and choose a SYSTEM that has normal sound 6 Press the a button and register the TV channel to a Programme number PR The normal EDIT menu is resumed Area Country or Region System Asia Middle East Bahrain Kuwait Oman Qatar...

Page 35: ... the teletext language group that corresponds to the language of the teletext programme that you want to watch 1 Choose TELETEXT LANGUAGE then press the a or 3 button 2 Press the 6 buttons to choose a group 3 Press the a button to complete the setting The menu disappears Languages that are not included in the teletext language group that you select the sub titles of the teletext programme will not...

Page 36: ... VIDEO 4 You can listen to the sound when the sound from the computer is connected to the VIDEO 3 AUDIO L R sound input terminal When the sound from the computer is connected to VIDEO 3 by choosing external input VIDEO 3 the sound from the computer can be listened to but the images from the computer cannot be seen Table of signals for each type of computer Only the above formats are supported Even...

Page 37: ...38 W 53 E38 CH39 US 39 W 54 E39 CH40 US 40 W 55 E40 CH41 US 41 W 56 E41 CH42 US 42 W 57 E42 CH43 US 43 W 58 E43 CH44 US 44 W 59 E44 CH45 US 45 W 60 E45 CH46 US 46 W 61 E46 CH47 US 47 W 62 E47 CH48 US 48 W 63 E48 CH49 US 49 W 64 E49 CH50 US 50 W 65 E50 CH51 US 51 W 66 E51 CH52 US 52 W 67 E52 CH53 US 53 W 68 E53 CH54 US 54 W 69 E54 CH55 US 55 W 70 E55 CH56 US 56 W 71 E56 CH57 US 57 W 72 E57 CH58 US ...

Page 38: ...sound is muted If you still want to view the TV channel follow the description BLUE BACK on page 28 to change the BLUE BACK function setting to OFF If the SYSTEM setting for a TV channel is incorrect it may prevent the sound from being issued Follow the description EDIT MANUAL on page 29 to use the MANUAL function to try to change the SYSTEM setting Poor picture If noise snow totally blocks out th...

Page 39: ...t programme you cannot operate the menus Press the b button to return to the ordinary TV programme and then try operating the menus If the TV suddenly stops responding disconnect the power cord of the TV from the AC outlet Connect them to the AC outlet again to turn on the TV If the TV returns to a normal state it is not a failure Other issues When the SLEEP TIMER function operates the TV is autom...

Page 40: ...uroconnector 21 pin SCART Video input and Audio L R inputs are available Monitor outputs Video and Audio L R are available VIDEO 2 terminal Euroconnector 21 pin SCART Video input and Audio L R inputs are available Monitor outputs Video and Audio L R are available VIDEO 3 terminal RCA connectors 3 S VIDEO connector 1 Video input S VIDEO Y C input and Audio L R inputs are available VIDEO 4 terminal ...

Page 41: ...uroconnector 21 pin SCART Video input and Audio L R inputs are available Monitor outputs Video and Audio L R are available VIDEO 2 terminal Euroconnector 21 pin SCART Video input and Audio L R inputs are available Monitor outputs Video and Audio L R are available VIDEO 3 terminal RCA connectors 3 S VIDEO connector 1 Video input S VIDEO Y C input and Audio L R inputs are available VIDEO 4 terminal ...

Page 42: ...40 ENGLISH ...

Page 43: ......

Page 44: ... 2005 Victor Company of Japan Limited 0805HHH CR JMT ...

Reviews: