background image


ENGLISH 

Installation 

Please follow the instructions in this chapter to install your LCD Monitor. 

Note:


Before connecting your monitor, first read through the instructions in this chapter and the safety precautions in 
the previous chapter. 


Unpacking the Monitor 

When you are unpacking the monitor, make sure that you have the following items: 

Ö

  The LCD monitor 

Ö

  AC power cord 

Ö

  Stand and screw 

Ö

  This instruction book 

Note: 

Place the monitor on a flat, sturdy surface. Choose an area free from excessive heat, moisture, and sunlight.


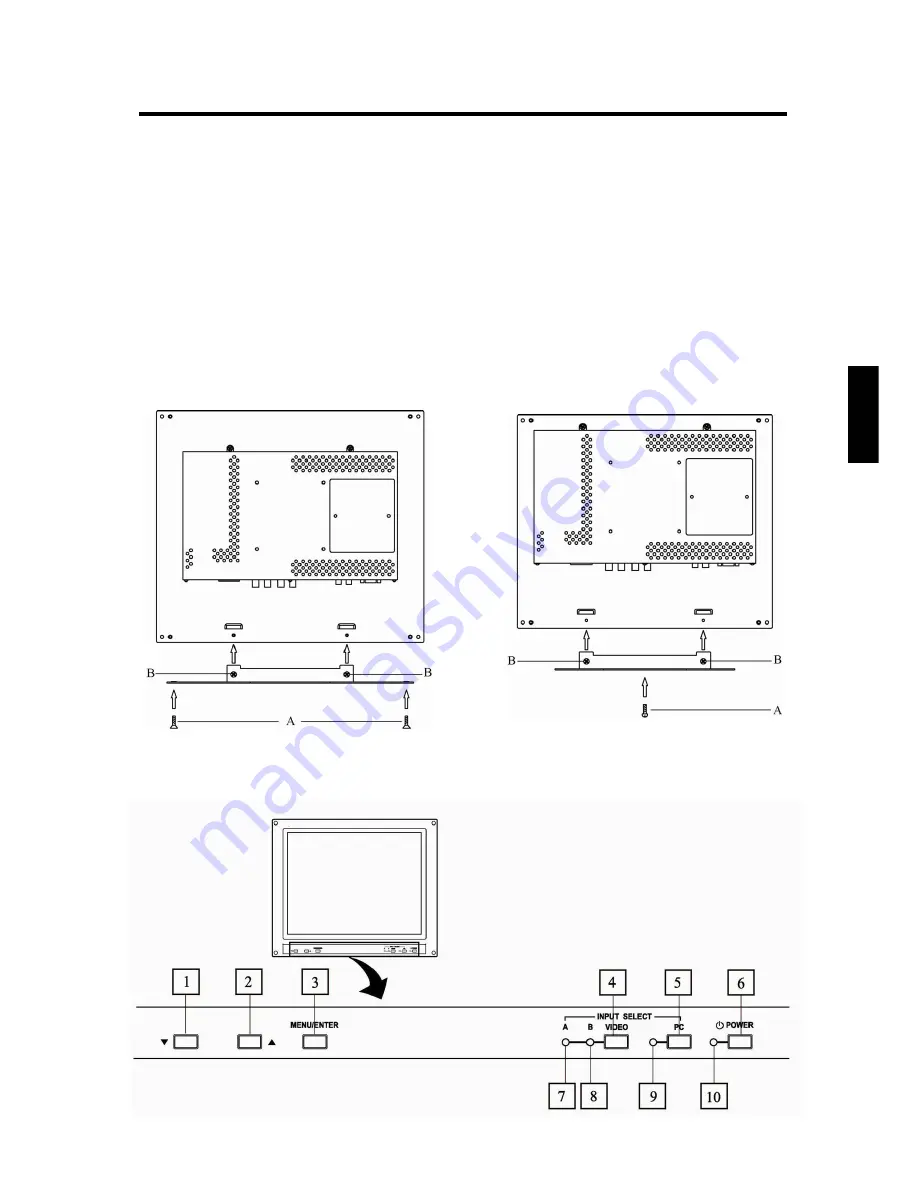
<LM-17G>                                                          <LM-15G> 


Attach the supplied stand to the monitor as shown, and then fix it with the screws. Please fix the stand with the 
supplied screw (A) first, and then fix it with the screws (B). 

Controls and Features 


Summary of Contents for LM-15G

Page 1: ...ANLEITUNG LCD VIDEO MONITOR MANUEL D INSTRUCTIONS MONITEUR VIDEO LCD MANUALE DI ISTRUZIONI MONITOR VIDEO LCD INSTRUCCIONES MONITOR DE VIDEO LCD 使用说明书 液晶视频监视器 LM 17G INSTRUCTIONS LM 15G ENGLISH DEUTSCH FRANÇAIS ITALIANO ESPAÑOL 中 文 ...

Page 2: ...re using it read and follow all instructions carefully to take full advantage of the monitor s capabilities LCD stands for Liquid Crystal Display For Customer Use Enter below the Serial No which is located on the rear of the cabinet Retain this information for future reference Model No LM 17G LM 15G Serial No ...

Page 3: ...r and Cleaning the Monitor 7 Using the Menu 8 Summary of Control Buttons 8 Menu Operations 8 Using the Monitor in the PC mode 13 Basic Connection Example 16 Troubleshooting 17 Specifications 18 Warning This is a class A product In a domestic environment this product may cause radio interference in which case the user may be required to take adequate measures ...

Page 4: ...erated in a commercial environment This equipment generates uses and can radiate radio frequency energy and if not installed and used in accordance with the instruction manual may cause harmful interference to radio communications Operation of this equipment in a residential area is likely to cause harmful interference in which case the user will be required to correct the interference at his own ...

Page 5: ...e When this unit reaches the end of its useful life improper disposal could result in a picture tube implosion Ask qualified service personnel to dispose of this unit POWER CONNECTION The power supply voltage rating of this product is AC 120 V For U S A and Canada only and AC 230 V For European countries or United Kingdom the power cord attached conforms to the following power supply voltage and c...

Page 6: ... you are unpacking the monitor make sure that you have the following items Ö The LCD monitor Ö AC power cord Ö Stand and screw Ö This instruction book Note Place the monitor on a flat sturdy surface Choose an area free from excessive heat moisture and sunlight LM 17G LM 15G Attach the supplied stand to the monitor as shown and then fix it with the screws Please fix the stand with the supplied scre...

Page 7: ...Then connect the AC power cord 16 to the AC outlet 120V AC 220V AC or 230V AC 50Hz 60Hz 12 VIDEO A terminals Video signal input IN and output OUT terminals for VIDEO A input 13 VIDEO B terminals Video signal input IN and output OUT terminals for VIDEO B input 14 Remote external control terminals Terminals for controlling the monitor from external unit You can select input signals or change the ASP...

Page 8: ... and Cleaning the Monitor To maximize screen life and prevent damage to the LCD panel we recommend that you Ö Turn the monitor off when you are not using this monitor for a long period of time Ö Don t press rub or poke the monitor with your finger or other object Ö Handle your monitor with care Your LCD module is a high quality optical device that requires special care when cleaning To clean the s...

Page 9: ...s button increases the setting value Ö Down Move downward through the choice in the submenu If an adjustment bar is displayed this button decreases the setting value Menu Operation 1 Press the MENU ENTER button to display the BACK LIGHT menu 2 Press the MENU ENTER button repeatedly to display the menu you want to use 3 Press the UP and DOWN button to choose the item and then press the MENU ENTER b...

Page 10: ...t the picture color density When the COLOR SYSTEM is BW60 or BW50 you cannot adjust the CHOROMA ASPECT You can choose the screen aspect ratio between 4 3 and 16 9 COLOR TEMP If you select COLOR TEMP and press the MENU ENTER button the COLOR TEMP menu will appear For details see the following COLOR TEMP menu LOW LIGHT ADJ At the video mode You can adjust the brightness of the dark part of picture A...

Page 11: ...W you cannot use HIGH LIGHT ADJ 1 Press the UP or DOWN button to choose the USER and then press the MENU ENTER button to return to the HIGH LIGHT ADJ menu 2 Press UP and DOWN button to choose RED and then press MENU ENTER button to display the adjusting menu 3 Press UP or DOWN button to adjust the level and then press MENU ENTER button to return to the sub menu 4 Repeat step 3 and 4 for other colo...

Page 12: ... by using the monitor s buttons Exit If you select Exit and press the MENU ENTER button the menu will disappear All reset If you select All reset and press the MENU ENTER button the settings will be return to the factory settings COLOR SYSTEM and the input select will not be return to the factory settings OSD POSITION You can adjust the position of the menu on the screen as following procedure 1 S...

Page 13: ... and press the MENU ENTER button the next menu will appear DISPLAY ADJ menu You can do the necessary adjustments to display the image from the PC DISPLAY ADJ Next page AUTO SET UP CLOCK PHASE AUTO SET UP We recommend you to do the AUTO SET UP first And then adjust the CLOCK or PHASE if necessary To use the AUTO SET UP select this item and press MENU ENTER button And follow the step 2 of the descri...

Page 14: ...rate from the PC 1 Press UP or DOWN button while no menu appears on the screen The AUTO SET UP menu appears on the screen 2 Press UP or DOWN button to choose YES and then press MENU ENTER button to start the AUTO SET UP The monitor will do the necessary settings for new PC input automatically When you start the AUTO SET UP do not display moving images games videos etc on the screen 3 After the AUT...

Page 15: ...14 The menu flowchart of the VIDEO mode The menu can not be displayed when No Sync is displayed ...

Page 16: ...15 ENGLISH The menu flowchart of the PC mode The menu cannot be displayed when No Sync is displayed ...

Page 17: ...T terminal be sure not to connect any other cables to the bridged output OUT terminal as this will cause the terminating resistance switch to open auto terminate function When making a bridge connection connect the input IN and output OUT terminals on the monitor to separate video components For example if both terminals are connected to the same VCR resonance may occur except during playback This...

Page 18: ...on my monitor This message appears when the input signal is beyond the monitor capability Set your PC to a supported video mode preferably 1024 x 768 at 60 Hz for LM 15G 1280x1024 at 60Hz for LM 17G F The image is very unstable in the PC mode Set your PC to a supported video mode preferably 1024 x 768 at 60 Hz for LM 15G 1280x1024 at 60Hz for LM 17G Restore the original factory settings by All res...

Page 19: ...ected auto termination Video B Composite video 1line BNC connector x 2 1 V p p 75 Ω bridge connected auto termination PC input Analog RGB D sub 15 pins x1 positive 0 7V P P Recommended mode 1280 x 1024 at 60Hz Analog 1024 x 768 at 60Hz Analog REMOTE For INPUT 1 line RCA pin x 1 REMOTE For ASPECT 1 line RCA pin x 1 Conditions Temperature 5 35 at altitude 0 2000m 5 30 at altitude 2000 3000m Humidity...

Page 20: ...19 ENGLISH Dimensions LM 17G Front View LM 15G Front View Side View Side View ...

Page 21: ...al Like all other monitors the your LCD monitor is designed to work with standard video modes However not all video graphic cards use only standard display modes Your LCD monitor uses state of the art technology which is designed to synchronize to any display mode We recommend choosing one of the supported modes listed above If you want to use an unknown mode do the AUTO SET UP at first If AUTO SE...

Page 22: ...LM 17G LM 15G LCD VIDEO MONITOR P N 5030053031A 2005 Victor Company of Japan Limited 0205MKH TU ...

Reviews: