


9
3. CONNECTIONS
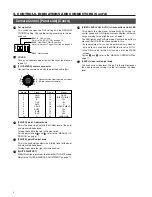
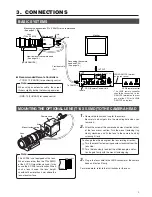
BASIC SYSTEMS
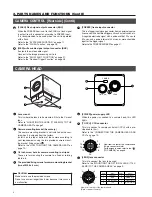
CAMERA CONTROL UNIT KY-F58
FREEZE
FILES
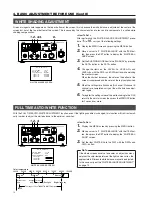
WHITE PAINT
POWER
VIDEO LEVEL
TO CAMERA
4
3
2
1
MEMORY
SELECT
MENU
FULL AUTO
R
B
LEVEL
ON
OFF
PAINT
SET
PULL OPEN
COLOR VIDEO CAMERA
KY-F58
Lens
(T14 x 5.5 MD)
[LENS REMOTE]
Camera head
How to mount the camera head
(See page 10.)
Mounting the optional lens (T14 X 5.5MD) to the camera head
(See page 9.)
Connecting the camera
head and CCU
(See page 10.)
Provided cable
(5m)
Monitor
CCU (Camera Control Unit)
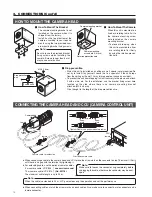
OUTPUT
To CAMERA
To CCU
male
male
To LENS
LENS remote control
LENS REMOTE terminal
on the rear panel
female
female
• The LENS remote controller
should be connected to the
REMOTE terminal on the rear
panel of the CCU or to LENS
REMOTE on the lens.
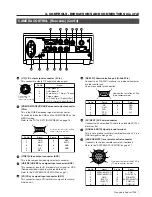
MOUNTING THE OPTIONAL LENS (T14 X 5.5MD) TO THE CAMERA HEAD
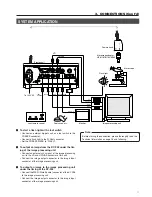
1.
Remove the lens mount cap for the camera.
Be careful no dust gets into the mounting hole when you
remove it.
2.
Attach the screw of the camera head mount section to that
of the lens mount section. Turn the mount fastening ring
slowly clockwise and fix the lens to the camera head by
screwing it firmly.
To change the attitude angle of the lens rotating direction.
1
Turn the mount fastening ring counter-clockwise from the
lens side.
2
Turn the lens slowly to adjust the attitude angle, and fas-
ten it again firmly with the mount fastening ring.
3.
Plug in the lens cable to the LENS connector of the camera
head and fasten it firmly.
For more details, refer to the Instructions for the Lens.
Note:
The KY-F58 is not equipped with a lens.
When a lens other than the T14x5.5MD
of the 3-CCD C-mount lens is used, it may
cause the KY-F58 to malfunction. When
such a lens is used, the lens' height
should not be more than 4 mm above the
lens mount surface.
4mm or less
Lens
2.
3.
Camera head
Mount fastening ring
Screws
Lens
䢇
Recommended Remote Controllers
• TCR-201F (CANON) for positioning control
Note:
When using an extension cable, the screen
flickers slightly during the focusing operation..
• RMD-10 (FUJINON) for speed control


