18
6. SETTING ON THE MENU SCREEN
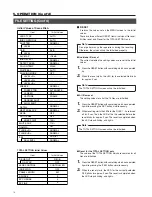
<How To Operate>
1.
Set the LOCK switch to OFF.
2.
Press the MENU button to display the MENU screen.
3.
Move the cursor to the required item (SUB MENU) by press-
ing the ITEM
+
or ITEM– button.
4.
Press the SET button to display the SUB MENU screen.
5.
Select the required item in the SUB MENU by pressing the
ITEM
+
or ITME– button.
6.
Change the setting value of the item by pressing the DATA
+
or DATA– button.
7.
When the change is completed, press the MENU button to
return to the normal screen. To prevent from the error op-
eration, set the LOCK switch to ON.
MENU OPERATION
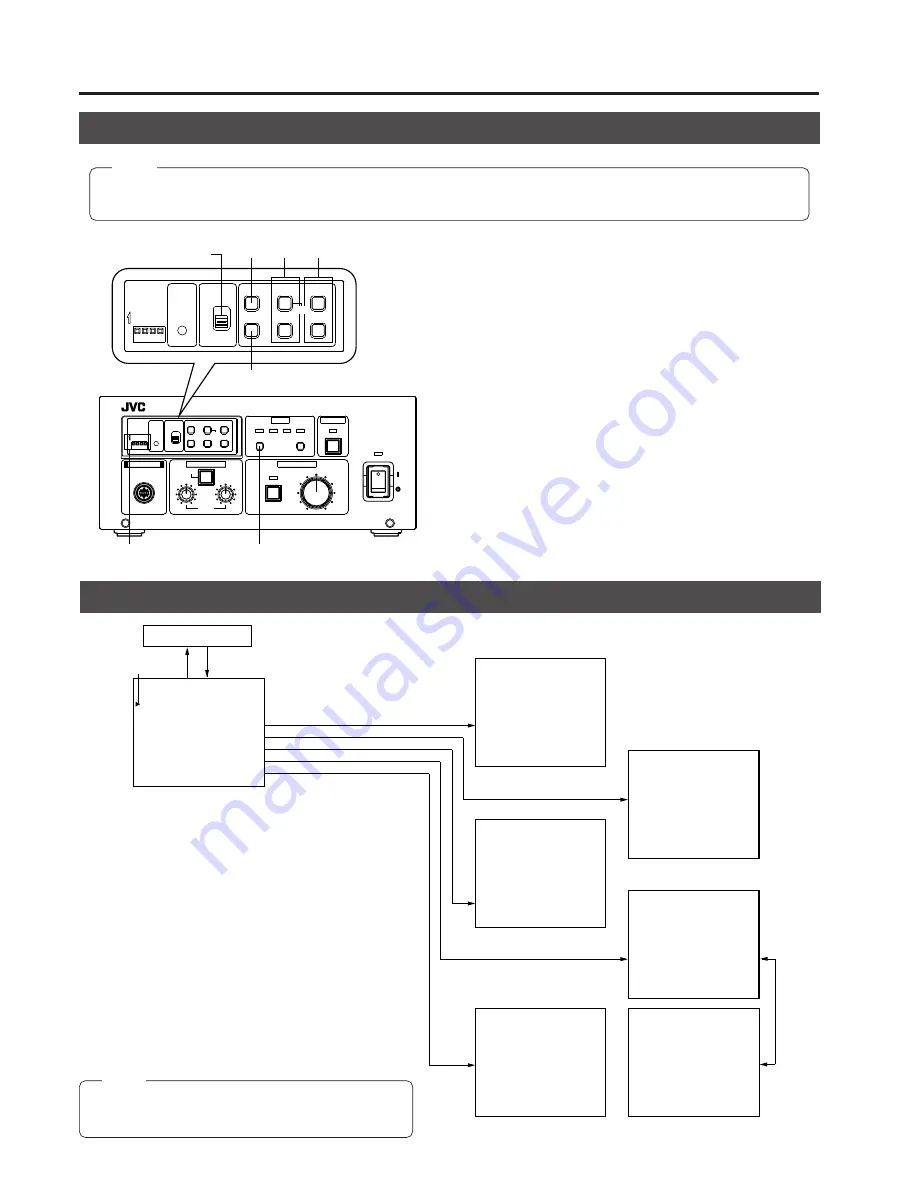
MENU SCREEN FLOW
CAMERA CONTROL UNIT KY-F58
FREEZE
FILES
WHITE PAINT
POWER
VIDEO LEVEL
TO CAMERA
4
3
2
1
MEMORY
SELECT
FULL AUTO
R
B
LEVEL
ON
OFF
PAINT
SET
LOCK
MENU
SET
ITEM-
ITEM+
DATA+
DATA-
RESET
BARS
ON
4
3
2
1
ON
OFF
LOCK
MENU
SET
ITEM-
ITEM+
DATA+
DATA-
RESET
BARS
ON
4
3
2
1
ON
OFF
1.7.
2.
4.7.
3.5. 6.
Set up switch
SELECT button
– – – M E N U – – –
1 : V I D E O L E V E L . .
2 : W H I T E B A L A N C E . .
3 : F R E E Z E . .
4 : P R O C E S S . .
5 : T O T A L S E T T I N G . .
Normal screen
MENU
MENU
MAIN MENU screen
– – – S I G N A L L E V E L – – –
L E N S T Y P E
I R I S C O N T R O L
S H U T T E R
L E V E L
L E V E L
G A I N
A L C M A X
I R I S D E T E C T
D E T E C T A R E A
: A U T O
: A U T O
: N O R M A L
: - - - - - - - - - -
: 0 d B
: - - - - - - - - - -
: + 1 8 d B
: N O R M A L
: N O R M A L
Image setting menu screen
(SUB MENU SCREEN)
– – – M E M O R Y – – –
F R E E Z E
F R E E Z E T R G
H I - R E S O
C A P T U R E
S L O W S H U T
R A N D O M S H U T
: N O R M A L
: A L T E R N A T E
: O F F
: F R A M E
: - - - - - - - - - -
: - - - - - - - - - -
Memory environment setting screen
ITEM+, –
button
– – – T O T A L S E T T I N G S – – –
D - S U B O U T
O N S Y N C
L E N S C O N T R O L
I N D I C A T O R
S C C O R A S E
S C F I N E
H P H A S E
: R / G / B
: O F F
: C O N T R O L L E R
: O F F
C A B L E L E N G T H : 5 M
: 0
: 0
: 0
Total setting menu screen
– – – W H I T E B A L A N C E – – –
C O L O R T E M P
W H I T E B A L
S H A D I N G M O D E
L E V E L < R >
L E V E L < G >
L E V E L < B >
: 3 2 0 0 K
: A U T O
: O F F
: - - - - - - - - - -
: - - - - - - - - - -
: - - - - - - - - - -
White balance setting menu screen
– – – P R O C E S S ( 1 / 2 ) – – –
D E T A I L
M A S T E R B L A C K
N E G A
A U T O K N E E
K N E E P O I N T
W H I T E C L I P
: N O R M A L
: N O R M A L
: O F F
: O F F
: 1 0 0 %
: 1 1 0 %
G A M M A
: O N
F L A R E < R >
: N O R M A L
F L A R E < B >
: N O R M A L
– – – P R O C E S S ( 2 / 2 ) – – –
A B L
L E V E L
: A D J U S T
: N O R M A L
Process setting screen
Move the cursor with the ITEM+
or ITEM- button to select the SUB
MENU with the SET button.
(Press the MENU button to
return to the normal screen.)
CURSOR
Note:
To register the setting values which are changed on the MENU screen to the FILE, select the FILE with the set up SW and the
SELECT button before displaying the MENU screen. Also, make sure to turn off the power before switching the set up SW.
<Sub Menu screen>
VIDEO LEVEL
This sets video signals such as shutter, iris, sensitivity, etc.
WHITE BALANCE
This sets items for WHITE BALANCE and WHITE SHADING.
FREEZE
This sets items regarding the memory such as timing to input
images into the KY-F58 memory, slow shutter function, etc.
PROCESS
This sets fine settings for output signals such as contour com-
pensation, KNEE POINT, etc.
TOTAL SETTING
For setting the connection to units other than KY-F58 such as
D-SUB terminal, lens control terminal, external sync, etc.
Note:
The data set at the TOTAL SETTING is common to all
files.

