background image

12

Using the Bluetooth ® devices

For Bluetooth operations, it is required to connect the 

Bluetooth Adapter

 (KS-BTA200) to the CD changer jack on 

the rear of this unit. See also page 21.
•  Refer also to the instructions supplied with the Bluetooth adapter and the Bluetooth device.
•  Refer to the list (included in the box) to see the countries where you may use the Bluetooth® function.

To use a Bluetooth device through the unit (“BT-PHONE” and “BT-AUDIO”) for the first time, you need to establish 
Bluetooth wireless connection between the unit and the device.
•  Once the connection is established, it is registered in the unit even if you reset your unit. Up to five devices can be 

registered in total.

•  Only one device can be connected at a time for each source (“BT-PHONE” and “BT-AUDIO”).

Registering a Bluetooth device 

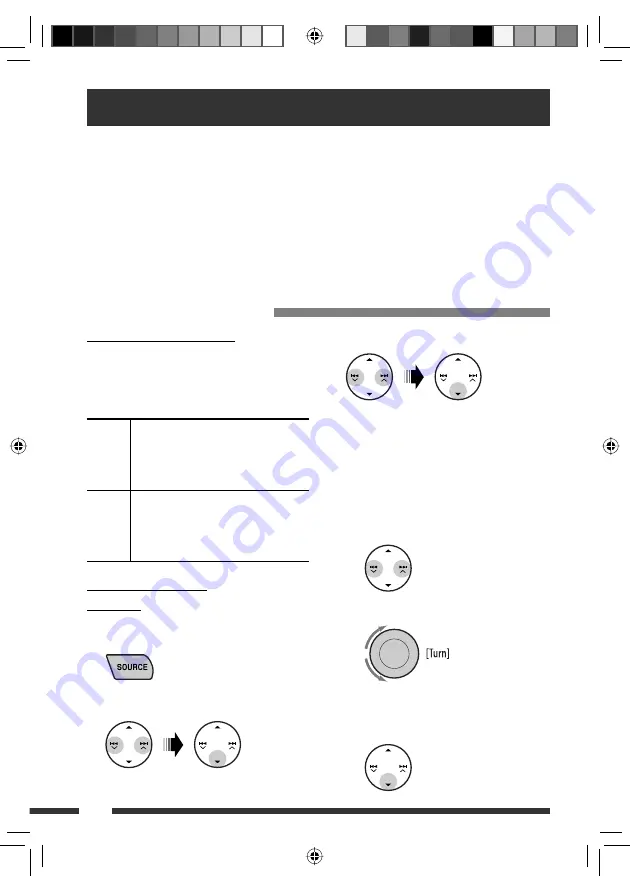
3

  Select “OPEN.”

4

  Enter a PIN (Personal Identification 

Number) code to the unit.


•  You can enter any number you like (1-digit to 

16-digit number). [Initial: 0000]

Some devices have their own PIN code. Enter the 
specified PIN code to the unit.


1


Move to the next (or previous) number 
position.


2


Select a number or blank space.


3


Repeat steps 

1

 and 

2

 until you finish 

entering a PIN code.


4


Confirm the entry.


“OPEN...” flashes on the display.

Registration (Pairing) methods

Use either of the following items in the Bluetooth menu 
to register and establish the connection with a device.
•  Select “BT-PHONE” or “BT-AUDIO” as the source to 

operate the Bluetooth menu. 

OPEN

Make the unit ready to establish a new 
Bluetooth connection.
Connection is established by operating the 
Bluetooth device.

SEARCH

Make the unit ready to establish a new 
Bluetooth connection. 
Connection is established by operating 
the unit.

Registering using “OPEN”

Preparation

Operate the device to turn on its Bluetooth function.

1

  Select “BT-PHONE” or “BT-AUDIO.”

2

  Select “NEW.”

EN08-13_KW-XG704[UI]f.indd   12

EN08-13_KW-XG704[UI]f.indd   12

4/13/07   12:56:19 PM

4/13/07   12:56:19 PM

Summary of Contents for KW-XG704

Page 1: ...nceling the display demonstration see page 4 For installation and connections refer to the separate manual INSTRUCTIONS GET0459 001A UI Cover_KW XG704 UI f indd 1 Cover_KW XG704 UI f indd 1 4 13 07 12 57 50 PM 4 13 07 12 57 50 PM ...

Page 2: ...y with optical instruments 4 REPRODUCTION OF LABEL CAUTION LABEL PLACED OUTSIDE THE UNIT European Union only Forsafety Do not raise the volume level too much as this will block outside sounds making driving dangerous Stop the car before performing any complicated operations Temperatureinsidethecar If you have parked the car for a long time in hot or cold weather wait until the temperature in the c...

Page 3: ...ns 5 Usingthecontrolpanel 5 Usingtheremotecontroller RM RK50 6 Listeningtotheradio 8 Discoperations 9 EXTERNAL DEVICES ListeningtotheUSBdevice 11 UsingtheBluetooth devices 12 UsingtheBluetoothcellular phone 14 UsingtheBluetoothaudio player 16 ListeningtotheCDchanger 17 ListeningtotheiPod D player 19 Listeningtotheotherexternal components 20 SETTINGS Selectingapresetsoundmode 22 Generalsettings PSM...

Page 4: ...ust the minute Finish the procedure Cautiononvolumesetting Digital devices CD USB produce very little noise compared with other sources Lower the volume before playing these digital devices to avoid damaging the speakers by the sudden increase of the output level When the power is turned off Check the current clock time When the power is turned on Change the display information EN02 07_KW XG704 UI...

Page 5: ...DIO Bluetooth Audio AUX IN back to the beginning Youcannotselectthesesourcesiftheyarenot readyornotconnected 7 Eject disc 8 Select the bands 9 Reset button p FM AM Select preset station CD USB CD CH Select folder track disc for CD changer BT PHONE Select preset phone number q Enter functions mode Press MODE then one of the following buttons within 5 seconds MO Turn on off monaural reception SSM Au...

Page 6: ... information 4 Tuner reception indicators 5 Playback mode item indicators Random Repeat 6 Spectrum analyzer meter Volume level indicator 7 Sound mode indicators 8 Equalizer indicator 9 Loudness indicator p Clock indicator q Analyzer indicator w Bluetooth indicator e Track indicator r Source display Preset No Track No Folder No Disc No t Status of Bluetooth device Device number 1 5 signal strength ...

Page 7: ...disc on an MP3 compatible CD changer Changes the disc if pressed briefly Changes the folder if pressed and held While listening to an Apple iPod or a JVC D player Pauses stops or resumes playback with D Enters the main menu with 5 U Now 5 U D 2 R F 3 work as the menu selecting buttons 5 U Returnstothepreviousmenu D Confirmstheselection 3 Adjusts the volume level 4 Selects the sound mode iEQ intell...

Page 8: ...ars Toassignatitletoastation seepage27 Select preset station WhenanFMstereobroadcastishard toreceive 1 2 Reception improves but stereo effect will be lost MO indicator lights up FMstationautomaticpresetting SSM Strong stationSequential Memory You can preset up to six stations for each band 1 2 Lights up when receiving an FM stereo broadcast with sufficient signal strength EN08 13_KW XG704 UI f ind...

Page 9: ...tion MP3 WMA Album name performer folder name 1 Track title file name 1 Elapsed playing time and Current track number back to the beginning Audio CD CD Text Disc title performer 2 Track title 2 Elapsed playing time and Current track number back to the beginning 1 IfthefiledoesnothaveTaginformation or TAGDISP issetto TAGOFF see page25 foldernameandfilename appear TAGindicatorwillnotlightup 2 NONAME...

Page 10: ...umber1to6 holdtoselectnumber7to12 2 Itisrequiredthatfoldersbeassignedwith2 digitnumbersatthebeginningoftheirfoldernames 01 02 03 and soon After pressing MODE press the following buttons to Disc type MP3 WMA Skip 10 tracks within the same folder TRK RPT Repeat current track FLDR RPT Repeat current folder FLDR RND Randomly play all tracks of current folder then tracks of next folders DISC RND Random...

Page 11: ...vice You cannot connect a computer to the USB input terminal of the unit Make sure all important data has been backed up to avoid losing the data Do not leave a USB device in the car expose to direct sunlight or high temperature to avoid deformation or cause damages to the device If a USB device has been attached Playback starts from where it has been stopped previously If a different USB device i...

Page 12: ...n Number code to the unit You can enter any number you like 1 digit to 16 digit number Initial 0000 SomedeviceshavetheirownPINcode Enterthe specifiedPINcodetotheunit 1 Move to the next or previous number position 2 Select a number or blank space 3 Repeat steps 1 and 2 until you finish entering a PIN code 4 Confirm the entry OPEN flashes on the display Registration Pairing methods Use either of the...

Page 13: ...ction is established and you can use the device through the unit The device remains registered even after you disconnect the device Use CONNECT or activate AUTO CNT to connect the same device from next time See the right column and page 26 Tosearchforavailabledevices Perform steps 1 and 2 on page 12 then 1 Select SEARCH The unit searches and displays the list of the available devices If no availab...

Page 14: ...crophone volume level see page 26 Whenatextmessagecomesin If the cellular phone is compatible with text message and MSG INFO message info is set to AUTO see page 26 the unit rings and RCV MSG receiving message appears on the display to inform you the arrival of the message UsingtheBluetoothcellularphone Select BT PHONE Ÿ Enter Bluetooth menu Make a call or settings using the Bluetooth menu See pag...

Page 15: ... BOOK The list of phone number appears Select a name from the list Direct dialing Select NUMBER Enter the phone number Voice command 1 SAY NAME appears on the display 2 Speak the name you want to call You can also use voice command from the Dial Menu Select VOICE from the Dial Menu If your cellular phone does not support the voice recognition system ERROR appears on the display Preset phone number...

Page 16: ...ctedphone Bluetooth Information If you wish to receive more information about Bluetooth visit our JVC web site Presettingthephonenumber You can preset up to six phone numbers 1 Display the Dial Menu 2 Select PH BOOK MISSED or RECEIVED whichever you want to use 3 Select a phone number 4 Reverse skip forward skip Pause start play back Enter setting menu Device list EN14 21_KW XG704 UI f indd 16 EN14...

Page 17: ...ected for the external input setting see page 25 Select CD CH Ÿ Select a disc to start playing Press For selecting disc number 1 6 Hold For selecting disc number 7 12 Pressing or holding the following buttons allows you to Disc type Press Select track Hold Reverse fast forward track Select folder Press Select track Hold Reverse fast forward track Change the display information see page 9 Continued...

Page 18: ...acks of next folders DISC RND Randomly play all tracks of current disc MAG RND Randomly play all tracks of the inserted discs Skip 10 tracks TRK RPT Repeat current track DISC RPT Repeat all tracks of the current disc DISC RND Randomly play all tracks of current disc MAG RND Randomly play all tracks of the inserted discs To cancel repeat play or random play select RPT OFF or RND OFF EN14 21_KW XG70...

Page 19: ...f this unit See also page 21 Interface adapter for iPod KS PD100 for controlling an iPod D player interface adapter KS PD500 for controlling a D player Preparations Make sure CHANGER is selected for the external input setting see page 25 Select IPOD or D PLAYER Ÿ Select a song to start playing For iPod PLAYLIST Ô ARTISTS Ô ALBUMS Ô SONGS Ô GENRES Ô COMPOSER Ô back to the beginning For D player PLA...

Page 20: ... the same as Repeat One or Repeat Mode One ALL RPT Functions the same as Repeat All or Repeat Mode All ALBM RND Functions the same as Shuffle Albums of the iPod SONG RND RND ON Functions the same as Shuffle Songs or Random Play On To cancel repeat play or random play select RPT OFF or RND OFF iPod Functionsonlyifyouselect ALL in ALBUMS of themain MENU Listeningtotheotherexternalcomponents Portable...

Page 21: ...source Adjust the volume Adjust the sound as you want see pages 22 and 23 JVC CD changer 17 Apple iPod 19 JVC D player 19 Unit CD changer jack see page 25 of the EXT IN setting see page 25 of the EXT IN setting Conceptdiagramoftheexternaldeviceconnection For connection see Installation Connection manual separate volume MD player etc 20 Adapter separately purchased MD player etc 20 AUX input jack o...

Page 22: ...sound 00 00 00 OFF ROCK Rock or disco music 03 00 02 ON CLASSIC Classical music 01 00 03 OFF POPS Light music 02 01 02 OFF HIP HOP Funk or rap music 04 02 01 ON JAZZ Jazz music 03 00 03 OFF Preset values EN22 27_KW XG704 UI f indd 22 EN22 27_KW XG704 UI f indd 22 4 13 07 12 55 21 PM 4 13 07 12 55 21 PM ...

Page 23: ...ial 04 VOL volume Adjust the volume 00 to 30 or 50 4 1 Whenyouadjustthebass mid range treble or loudness theadjustmentyouhavemadeisstored forthecurrentlyselectedsoundmode iEQ including USER 2 Ifyouareusingatwo speakersystem setthefader levelto 00 3 Theadjustmentwillnotaffectthesubwooferoutput 4 Dependingontheamplifiergaincontrolsetting See page25fordetails Generalsettings PSM You can change PSM Pr...

Page 24: ... you turn on the headlights The display color changes accordingly DIM ON DIM OFF Activates dimmer The display color changes to the color you set on DIM ON of COLOR Cancels The display color changes to the color you set on DIM OFF of COLOR TEL Telephone muting MUTING 1 MUTING 2 OFF Select either one which mutes the sounds while using a cellular phone Cancels Playback pauses mutes while telephone mu...

Page 25: ...e interference noises between adjacent stations Stereo effect may be lost Subject to interference noises from adjacent stations but sound quality will not be degraded and the stereo effect will remain COLOR Color setting RED GREEN BLUE DIM ON DIM OFF 00 06 00 06 00 06 Initial RGB 1 1 2 Create the color to be displayed when DIMMER is set to ON Initial RGB 4 4 6 Create the color to be displayed when...

Page 26: ...laying RCV MSG receiving message MANUAL The unit does not inform you of the arrival of a message MIC SET microphone setting Only for the device being connected for BT PHONE Adjust microphone volume connected to the Bluetooth adapter LEVEL 01 02 03 VERSION The Bluetooth software and hardware versions are shown You can change the registered Bluetooth device setting listed on the right column accordi...

Page 27: ... title entry screen Assign a title 1 Select a character 2 Move to the next or previous character position 3 Repeat steps 1 and 2 until you finish entering the title Finish the procedure Toerasetheentiretitle In step Ÿ on the left Availablecharacters EN22 27_KW XG704 UI f indd 27 EN22 27_KW XG704 UI f indd 27 4 13 07 12 55 27 PM 4 13 07 12 55 27 PM ...

Page 28: ... If a disc does become dirty wipe it with a soft cloth in a straight line from center to edge Do not use any solvent for example conventional record cleaner spray thinner benzine etc to clean discs Toplaynewdiscs New discs may have some rough spots around the inner and outer edges If such a disc is used this unit may reject the disc To remove these rough spots rub the edges with a pencil or ball p...

Page 29: ...P3 WMA files This unit can play back multi session discs however unclosed sessions will be skipped while playing Some CD Rs or CD RWs may not play back on this unit because of their disc characteristics or for the following reasons Discs are dirty or scratched Moisture condensation occurs on the lens inside the unit The pickup lens inside the unit is dirty CD R CD RW on which the files are written...

Page 30: ...evice automatically changes the source to USB While playing from a USB device the playback order may differ from other players This unit may be unable to play back some USB devices or some files due to their characteristics or recording conditions Depending on the shape of the USB devices and connection ports some USB devices may not be attached properly or the connection might be loose When conne...

Page 31: ...um number of characters for folder and file names is 25 characters 128 characters for MP3 WMA WAV Tag This unit can recognize a total of 50 000 files and 5 000 folders 999 files per folder However the display can shows until 9 999 folders files The unit cannot recognize a USB mass storage class device whose rating is other than 5 V and does not exceed 500 mA This unit may not recognized a USB devi...

Page 32: ...ly on some vehicles particularly on those having a control dial for dimming In this case change the DIMMER setting to any other than AUTO If you change the AMP GAIN setting from HIGH PWR to LOW PWR while the volume level is set higher than VOL 30 the unit automatically changes the volume level to VOL 30 Troubleshooting What appears to be trouble is not always serious Check the following points bef...

Page 33: ...termined when files are recorded Elapsed playing time is not correct This sometimes occurs during play This is caused by how the tracks are recorded on the disc PLEASE and EJECT appear alternately on the display Insert a disc that contains MP3 WMA tracks Correct characters are not displayed e g album name This unit can only display letters upper case numbers and a limited number of symbols USB dev...

Page 34: ...detects the unit select OPEN on the unit to connect the device See page 12 The unit does not make pairing with the Bluetooth device Enter the same PIN code for both the unit and target device Select the device name from SPECIAL then try to connect again See page 13 Echo or noise occurs Adjust the microphone unit position Phone sound quality is poor Reduce the distance between the unit and the Blue...

Page 35: ...d its connection Charge the battery Playback stops The headphones are disconnected during playback Restart the playback operation see page 19 No sound can be heard when connecting an iPod nano Disconnect the headphones from the iPod nano Update the firmware version of the iPod nano No sound can be heard ERROR 01 appears on the display when connecting a D player Disconnect the adapter from the D pl...

Page 36: ...vel Impedance 2 5 V 20 kΩ load full scale Output Impedance 1 kΩ Subwoofer Out Level Impedance 2 5 V 20 kΩ load full scale Other Terminal CD changer USB input terminal Subwoofer input AUX auxiliary input jack TUNER SECTION Frequency Range FM 87 5 MHz to 108 0 MHz AM 531 kHz to 1 602 kHz FM Tuner Usable Sensitivity 11 3 dBf 1 0 μV 75 Ω 50 dB Quieting Sensitivity 16 3 dBf 1 8 μV 75 Ω Alternate Channe...

Page 37: ... Power Requirement Operating Voltage DC 14 4 V 11 V to 16 V allowance Grounding System Negative ground Allowable Operating Temperature 0 C to 40 C Dimensions W H D approx Installation Size 178 mm 100 mm 158 mm Set Size 178 mm 100 mm 178 mm Mass 1 8 kg excluding accessories Designandspecificationsaresubjecttochangewithoutnotice Microsoft and Windows Media are either registered trademarks or tradema...

Page 38: ...007 Victor Company of Japan Limited Having TROUBLE with operation Please reset your unit Refer to page of How to reset your unit Rear_KW XG704 UI f indd 2 Rear_KW XG704 UI f indd 2 4 13 07 12 50 14 PM 4 13 07 12 50 14 PM ...

Reviews: