background image

2

ENGLISH

CAUTION:

This monitor should be used on DC 12 V only. To 

prevent electric shocks and fire hazards, DO NOT 

use any other power source.

Installation requires some special 
knowledge.
Do not install the monitor yourself. 
Consult a dealer having special 
knowledge of this kind for safe and 
reliable installation.

CAUTIONS on the supplied headphones
—KS-HP2:

•  DO NOT leave the headphones in a place 

exposed to direct sunlight for a long 
time, such as a dashboard, as they may be 
damaged.

•  Keep the headphones away from a cellular 

phone to avoid interference.

•  DO NOT turn off the power with the 

volume set at high level, as the sudden 
blast of sound can damage your hearing 
and/or headphones next time you use the 
headphones.

•  If you experience a ringing in your 

ears, reduce volume or stop using the 
headphones.

WARNINGS

•  DO NOT INSTALL THE MONITOR IN A 

LOCATION WHICH OBSTRUCTS DRIVING, 
VISIBILITY, SAFETY DEVICE FUNCTION 
SUCH AS AIR BAGS OR WHICH IS 
PROHIBITED BY APPLICABLE LAWS AND 
REGULATIONS.

•  There may be legal regulations defining the 

permissible installation locations for the monitor 
which differ by country or by state. Be sure 
to install the monitor in a correct location 
according to such laws.

•  The driver must not operate the monitor while 

driving.

*  Stop your vehicle in a safe location when 

operating the monitor.

•  The driver must not watch the television or 

playback pictures while driving.
If the driver does it while driving, it may lead to 
carelessness and cause an accident.

•  Keep the monitor at an appropriate sound level 

while driving.
Driving with the sound at a level that prevents 
you from hearing sounds outside of and around 
the vehicle may cause an accident.

•  Be sure not to let the monitor fall or be strongly 

impacted since this may cause a malfunction or 
fire.

•  Do not use the monitor with the engine off.
  Doing so with the engine off will consume 

battery power and may prevent the engine from 

starting.

•  When not in use, close the liquid crystal panel 

and store it into the compartment.

•  Do not touch the surface of the liquid crystal 

panel directly.

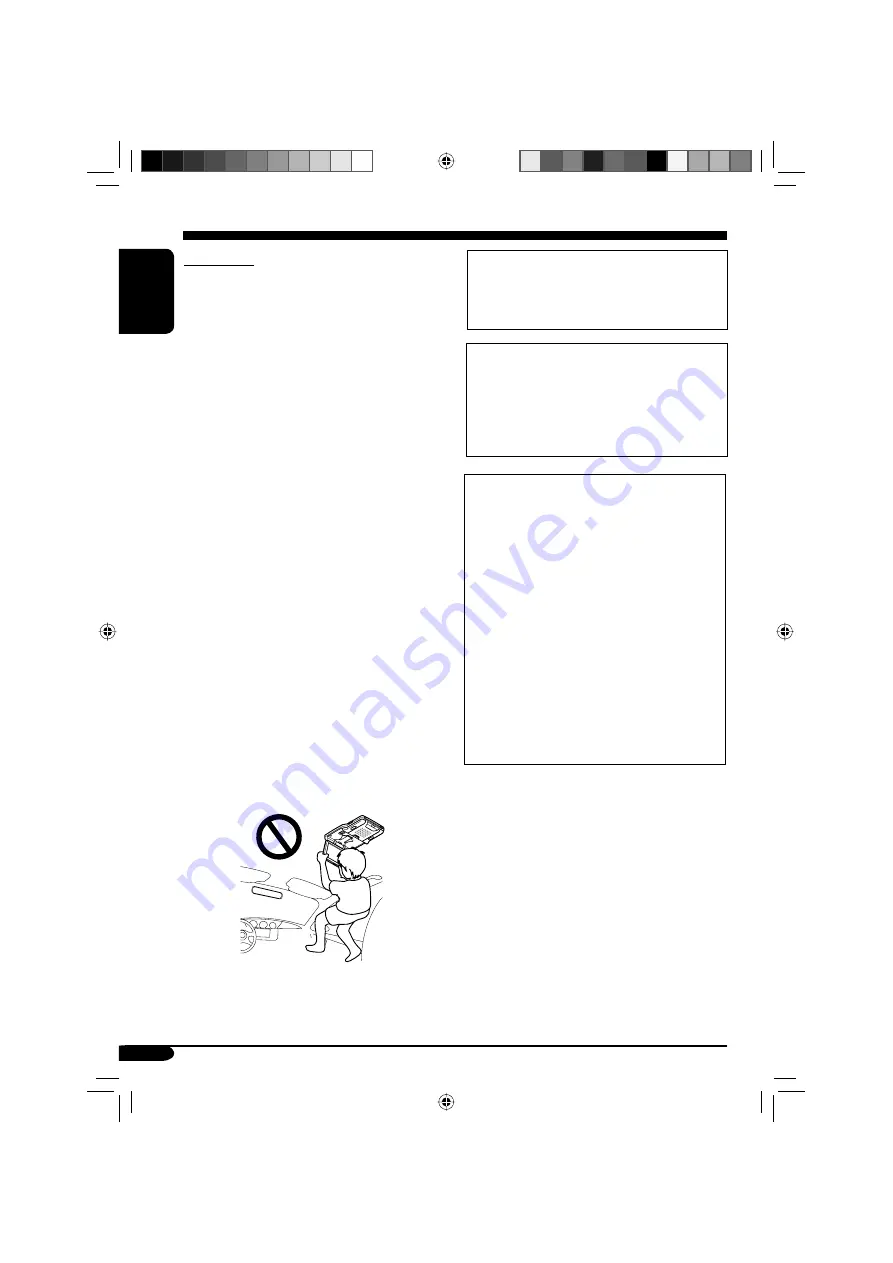
•  Do not hang any object on the monitor or hang 

down, as this may damage the monitor.

EN02-06_KV-MRD900[E]f.indd   2

EN02-06_KV-MRD900[E]f.indd   2

05.3.19   0:20:25 PM

05.3.19   0:20:25 PM

Summary of Contents for KD-MRD900

Page 1: ...ernsehsignale zu empfangen Ce système ne peut pas recevoir les émissions de télévision Utilisez le module de tuner de télévision mobile KV C1001 vendu séparément afin de pouvoir recevoir les émissions de télévision Met dit systeem kunt u geen televisie uitzendingen ontvangen Gebruik de los verkrijgbare draagbare KV C1001 TV tuner voor ontvangst van televisie uitzendingen For installation and conne...

Page 2: ...s defining the permissible installation locations for the monitor which differ by country or by state Be sure to install the monitor in a correct location according to such laws The driver must not operate the monitor while driving Stop your vehicle in a safe location when operating the monitor The driver must not watch the television or playback pictures while driving If the driver does it while ...

Page 3: ...he speakers by the sudden increase of the output level Thank you for purchasing a JVC product Please read all instructions carefully before operation to ensure your complete understanding and to obtain the best possible performance from the unit IMPORTANT FOR LASER PRODUCTS 1 CLASS 1 LASER PRODUCT 2 CAUTION Do not open the top cover There are no user serviceable parts inside the unit leave all ser...

Page 4: ...d hold until your desired response begins Press and hold both buttons at the same time How to reset your monitor This will reset the microcomputer Your preset adjustments will also be erased How to forcibly eject a disc If a disc cannot be recognized by the monitor or cannot be ejected The disc comes out If this does not work reset your monitor Be careful not to drop the disc when it ejects Monito...

Page 5: ...or 7 Parts identification 7 Remote controller RM RK230 8 Main elements and features 8 Headphones KS HP2 10 Main elements and features 10 Basic operations 11 Adjustments 13 Using the monitor menu 13 Changing the aspect ratio 15 Playable discs 17 Disc operations 18 Playing a disc 18 Starting playback 18 Basic operations 19 Temperature inside the car If you have parked the car for a long time in hot ...

Page 6: ...clearly or may move slowly The image may not be synchronized with the sound or the image quality may decline in such environments Note that this is not a malfunction or problem Usage temperature range 0 C to 40 C 0 C or colder 40 C or hotter When the liquid crystal panel reaches high temperatures or low temperatures chemical changes occur within the liquid crystal panel which may cause it to malfu...

Page 7: ... button Parts identification 8 Screen Liquid crystal panel 9 Disc loading slot p 0 eject button q 3 play button w Disc loading lamp e White LED r PUSH OPEN button t Screen compartment y Screen arm When you watch the screen at an angle the picture might not be clear This is not a malfunction The finest picture can be seen when you watch the screen straight on EN07 10_KV MRD900 E f indd 7 EN07 10_KV...

Page 8: ...at the remote sensor on the monitor Make sure there is no obstacle in between Do not expose the remote sensor to strong light direct sunlight or artificial lighting Warning Do not install any battery other than CR2025 or its equivalent otherwise it may explode Store the battery in a place where children cannot reach to avoid risk of accident To prevent the battery from over heating cracking or sta...

Page 9: ...ons see right column e MENU button 2 Displays the DVD and VCD 3 disc menu r Menu operation buttons 2 Cursor fi and ENTER t RETURN button 2 y DVD VCD special function buttons DVD VCD audio DVD subtitle angle 1 Controllable only if your car receiver which is connected to this monitor is one of the JVC receivers 2 These buttons function as the number buttons when pressed with SHIFT button 3 Only when ...

Page 10: ...d Main elements and features 1 IR sensors DO NOT cover the IR sensors as reception will become poor 2 ON OFF button The power automatically shuts off in the following cases The headphones are used for about 4 hours No signal is received for about 4 minutes You can turn on the power again by pressing the button 3 POWER lamp 4 Volume control Playback sounds are transmitted through IR transmitters to...

Page 11: ...Do not touch the surface of the liquid crystal panel directly When closing the liquid crystal panel store it in the screen compartment until it is locked To change the monitor position You can select a monitor position from the four positions 1 Slide the arm lock lever to RELEASE then pull down or push up the monitor 2 Slide the arm lock lever to HOLD then remove the screen arm to the nearest lock...

Page 12: ...s 5 Adjust the volume on the car receiver When using the headphones adjust its volume level To turn off the power When using the headphones turn off the power after turning off the headphones To activate the door sensor OFF Turns off the dome lights DOOR Activates the door sensor which turns on the dome lights when a door is open ON Turns on the dome lights MODE Monitor Remote control Monitor Remo...

Page 13: ...s are done or no operation is done for about 5 seconds 2 Select an item you want to adjust 3 Adjust the level of the selected item or select an appropriate setting for the selected item 4 Exit from the menu Press the button repeatedly until the menu is erased Adjustments MENU MENU BRIGHT CONTRAST TINT COLOR IR ON DIMMER DVD SURROUND OFF NTSC PAL PAL WHITE LED ON Current menu item Not used for chan...

Page 14: ...OUND This function allows you to get a surround effect from your stereo system When connecting a receiver incompatible with the multi channel sources you can enjoy the virtual surround sound with your 2 channel stereo system If you turn off the monitor the setting is initialized Selectable settings OFF ACTION DRAMA THEATER ACTION Suitable for action movies and sports programs DRAMA Creates natural...

Page 15: ... bars will be shown at the left and right sides of the screen In some cases the black bars may be shown also at the top and bottom sides of the screen JUST The middle of pictures are reduced horizontally and the left and right side of the picture enlarged horizontally In some cases the black bars may be shown at the top and bottom sides of the screen ZOOM Pictures are enlarged on the screen so tha...

Page 16: ...e shown at the left and right sides of the screen JUST Pictures are enlarged horizontally The extension ratio increases toward the both sides of the screen ZOOM Pictures are enlarged on the screen so that no black bars will be shown on the screen The entire picture cannot be shown on the screen EN11 16_KV MRD900 E f indd 16 EN11 16_KV MRD900 E f indd 16 05 3 19 0 23 21 PM 05 3 19 0 23 21 PM ...

Page 17: ...ies Dolby and the double D symbol are trademarks of Dolby Laboratories 3 DTS and DTS 2 0 Digital Out are trademarks of Digital Theater Systems Inc DVD Logo is a trademark of DVD Format Logo Licensing Corporation registered in the US Japan and other countries Discs you can play You can play back the following discs 12 cm and 8 cm on the built in DVD player DVD Video Recorded in the PAL color system...

Page 18: ...the following For DVD playback you can change the setup menu setting as you like See pages 28 30 For DVD CD playback using the remote controller is more attractive You can enjoy more functions Starting playback 1 Open the liquid crystal panel You can play a disc even if the monitor is closed 2 Turn on the power 3 Insert a disc into the loading slot When a disc is inserted into the loading slot the...

Page 19: ...ves back about 10 seconds before the current position This function works only within the same title For some DVDs this function does not work To stop playback When you start playback again playback starts from where it has been stopped Resume play When you start playback again playback starts from the beginning of the last playing track During play on screen guide icons appear on the monitor for ...

Page 20: ...he number button s it is required that folders be assigned 2 digit numbers at the beginning of their folder names 01 02 03 and so on To go to the next or previous chapters tracks For DVD During play or pause To the following chapters tracks To go back to the beginning of the current chapter track then the previous chapters tracks To fast forward or reverse the chapter track Fast forwards Reverses ...

Page 21: ...ect the language to listen to if the disc has multiple audio languages Ex When the disc has 3 options For VCD You can select the audio channel to play This is convenient when playing a Karaoke VCD ST To listen to normal stereo left right playback L To listen to the L left audio channel R To listen to the R right audio channel For some DVDs and VCDs changing the subtitle language audio language or ...

Page 22: ...ures or a VCD with the PBC PlayBack Control While playing a DVD 1 A title list or disc menu will appear on the monitor 2 Select the item you want on the menu Selected item starts playback On some discs you can also select items using the corresponding number buttons While playing a VCD When a list of items is displayed on the monitor To select a number greater than 9 see How to select a number on ...

Page 23: ...ck information T02 C03 Current title chapter TRACK 01 Current track TOTAL Elapsed playing time of the disc T REM Remaining disc time for VCD remaining title time for DVD TIME Elapsed playing time of the current chapter track REM Remaining time of the current chapter track 4 Playback condition Playback Forward reverse search Forward reverse slow motion Pause Stop 5 Operation icons TIME Time indicat...

Page 24: ...eat Intro Random plays OFF You can repeat the current title or chapter DVD during play or pause OFF CHAP TITLE REPEAT You can repeat the current track except for JPEG or the tracks in the current folder only for MP3 WMA JPEG VCD while PBC is not in use REPEAT Canceled MP3 WMA REPEAT TRACK REPEAT FOLDER Canceled JPEG Canceled REPEAT FOLDER CD Text audio CD REPEAT TRACK Canceled DVD V 2ch T02 C03 TO...

Page 25: ...00 58 To search for a particular point by playing time For VCD while PBC is not in use 1 Select 2 Enter the elapsed playing time of the current title or of the disc Ex To enter 1 hours 02 minutes 00 seconds press 1 0 2 0 then 0 To enter 54 minutes 00 seconds press 0 5 4 0 then 0 It is always required to enter the hour digit even 0 hour but it is not required to enter trailing zeros the last two di...

Page 26: ...items through the control screen For MP3 WMA CD Text audio CD The control screen automatically appears on the monitor when you insert a disc JPEG Press TOP M menu MENU or 7 Playback stops and the control screen appears MP3 WMA JPEG control screen 1 Current folder 2 Current folder number total folder number 3 Folder list 4 Selected playback mode 5 Elapsed playing time of the current track only for ...

Page 27: ... CD 3 Current page total number of the pages included in the list 4 Current folder track highlighted bar Folder 153 240 Track 154 198 Page 4 6 fol130 fol131 fol132 fol133 fol134 fol135 fol136 fol137 fol138 fol139 fol160 fol161 fol162 fol163 fol164 fol165 fol166 fol167 fol168 fol169 fol150 fol151 fol152 fol153 fol154 fol155 fol156 fol157 fol158 fol159 fol140 fol141 fol142 fol143 fol144 fol145 fol14...

Page 28: ...to 6 To return to the normal screen DVD setup menu ENGLISH ENGLISH ENGLISH LANGUAGE MENU LANGUAGE ON SCREEN LANGUAGE AUDIO LANGUAGE SUBTITLE ENGLISH STEREO ON AUDIO DIGITAL AUDIO OUTPUT DOWN MIX D RANGE COMPRESSION STREAM PCM ON AUDIO DIGITAL AUDIO OUTPUT DOWN MIX D RANGE COMPRESSION STREAM PCM STEREO ON AUDIO DIGITAL AUDIO OUTPUT DOWN MIX D RANGE COMPRESSION STREAM PCM STEREO STEREO DOLBY SURROUN...

Page 29: ...viewing a wide screen picture the black bars appear on the top and the bottom of the screen 4 3 PAN SCAN Select this when the aspect ratio of your monitor is 4 3 While viewing a wide screen picture the black bars do not appear however the left and right edges of the pictures will not be shown on the screen OSD POSITION Select the on screen bar position on the monitor 1 Higher position 2 Lower posi...

Page 30: ... DVD disc this setting affects the signals reproduced through the analog terminals AV OUT and cordless headphones and through the DIGITAL OUT terminal when PCM ONLY is selected for DIGITAL AUDIO OUTPUT DOLBY SURROUND Select this when you want to enjoy multi channel surround audio by connecting an amplifier compatible with Dolby Surround to this monitor STEREO Normally select this D Dynamic RANGE C...

Page 31: ...sists of plastic materials Do not wipe with benzine thinner or similar substances because this will results in discoloration or removal of the paint When a cloth with a cleansing chemical is used follow the caution points Do not leave the unit in contact with rubber or vinyl products for long periods of time Do not use cleansers which have polishing granules because this could damage the cabinet C...

Page 32: ...landic Hebrew Yiddish Javanese Georgian Kazakh Greenlandic Cambodian Kannada Korean KOR Kashmiri Kurdish Kirghiz Latin Lingala Laothian Lithuanian Latvian Lettish Malagasy Maori Macedonian Malayalam Mongolian Moldavian Marathi Malay MAY Maltese Burmese Nauru Nepali Norwegian Occitan Afan Oromo Oriya Panjabi Polish Pashto Pushto Portuguese Quechua Rhaeto Romance RN RO RW SA SD SG SH SI SK SL SM SN ...

Page 33: ...DVDs and VCDs changing the subtitle language audio language or audio channel without using the disc menu is prohibited While zoomed in the picture may look coarse Playing a DVD R DVD RW or CD R CD RW Use only finalized discs This unit can play back only the files of the same type which is first detected if a disc includes both audio CD CD DA files and MP3 WMA JPEG files This unit can play back eit...

Page 34: ...ack and select a baseline JPEG file Note that it may take a long time to select another file Do not use the following DVD R DVD RW or CD R CD RW Discs with stickers labels or protective seal stuck to the surface Discs on which labels can be directly printed by an ink jet printer Using these discs under high temperatures or high humidities may cause malfunctions or damages to discs Playing an MP3 W...

Page 35: ... playing or pausing you cannot change these languages After you change any of these language settings eject the disc and insert it or another disc again so that your setting takes effect When you select 16 9 for a picture whose aspect ratio is 4 3 the picture slightly changes due to the process for converting the picture width Even if 4 3 PAN SCAN is selected the screen size may become 4 3 LETTER ...

Page 36: ...correctly See page 30 Output signals through the DIGITAL OUT terminal Output signals are different depending on the DIGITAL AUDIO OUTPUT setting on the setup menu see page 30 DIGITAL AUDIO OUTPUT Output Signals Playback Disc STREAM PCM DOLBY DIGITAL PCM PCM ONLY DVD 48 kHz 16 20 24 bits Linear PCM 48 kHz 16 bits stereo Linear PCM 96 kHz Linear PCM with DTS DTS bitstream 48 kHz 16 bits stereo Linea...

Page 37: ...arge Install a new battery The sensor is exposed to strong light Do not expose the sensor to strong light Howling occurs from the speakers or the headphones It may be caused by a camcorder connected to the monitor Camcorder is now in recording mode Deactivate the recording mode Disc playback NO DISC appears on the screen Disc is inserted upside down Insert the disc correctly CD R CD RW or DVD R DV...

Page 38: ...the disc Record MP3 WMA JPEG tracks using a compliant application see page 17 MP3 WMA JPEG tracks are recorded in DVD R DVD RW media Change the disc Record MP3 WMA JPEG tracks using DVD R DVD RW media Noise is generated The track played back is not an MP3 WMA file although it has the extension code mp3 or wma Skip to another track or change the disc Do not add the extension code mp3 or wma to non ...

Page 39: ...e limit MP3 MPEG Audio Layer 3 Max Bit Rate 320 kbps WMA Windows Media Audio Max Bit Rate 192 kbps GENERAL Power requirement Operating voltage DC 14 4 V 11 V to 16 V allowance Grounding system Negative ground Allowable operating temperature 0 C to 40 C Allowable storage temperature 20 C to 80 C Dimensions W H D Installation size approx 250 mm 49 mm 374 mm Mass approx 2 9 kg excluding accessories C...

Page 40: ...en Sie Ihr Gerät zurück Siehe Seite Zurücksetzen des Geräts Vous avez des PROBLÈMES de fonctionnement Réinitialisez votre appareil Référez vous à la page intitulée Comment réinitialiser votre appareil Hebt u PROBLEMEN met de bediening Stel het apparaat terug Zie de pagina met de paragraaf Het apparaat terugstellen Rear_KV MRD900 E f indd 2 Rear_KV MRD900 E f indd 2 05 3 19 0 37 22 PM 05 3 19 0 37 ...

Reviews: