background image

20

Indications

Selectable settings, [reference page]

DEMO MODE

  Display 

demonstration

DEMO ON 

:


[Initial];

 Display demonstration will be activated 

automatically if no operation is done for about 
20 seconds, [8].

DEMO OFF 

:

   Cancels.

CLOCK HOUR

  Hour adjustment

1 – 12, [8]

[Initial: 1 (1:00)]

CLOCK MINUTE

  Minute adjustment

00 – 59, [8]

[Initial: 00 (1:00)]

CLOCK DISP


Clock display

CLK DISP ON  :


[Initial];

 Clock display is shown on the lower part of 

the display.

CLK DISP OFF  :


Current source indication (ex. station band, disc 
number, etc.) is shown on the lower part of the display.

•  Press DISP repeatedly to show the other information for about 

5 seconds.

LEVELMETER
 

Audio/volume 
level meter

LEVEL 1

[Initial]

/LEVEL 2:

  Display the audio level meter with different 

illumination pattern.

EQ & LEVEL 

:

  Display the equalizer pattern and the audio level 

meter.

SILENT :

  Display the equalizer pattern and volume level meter.

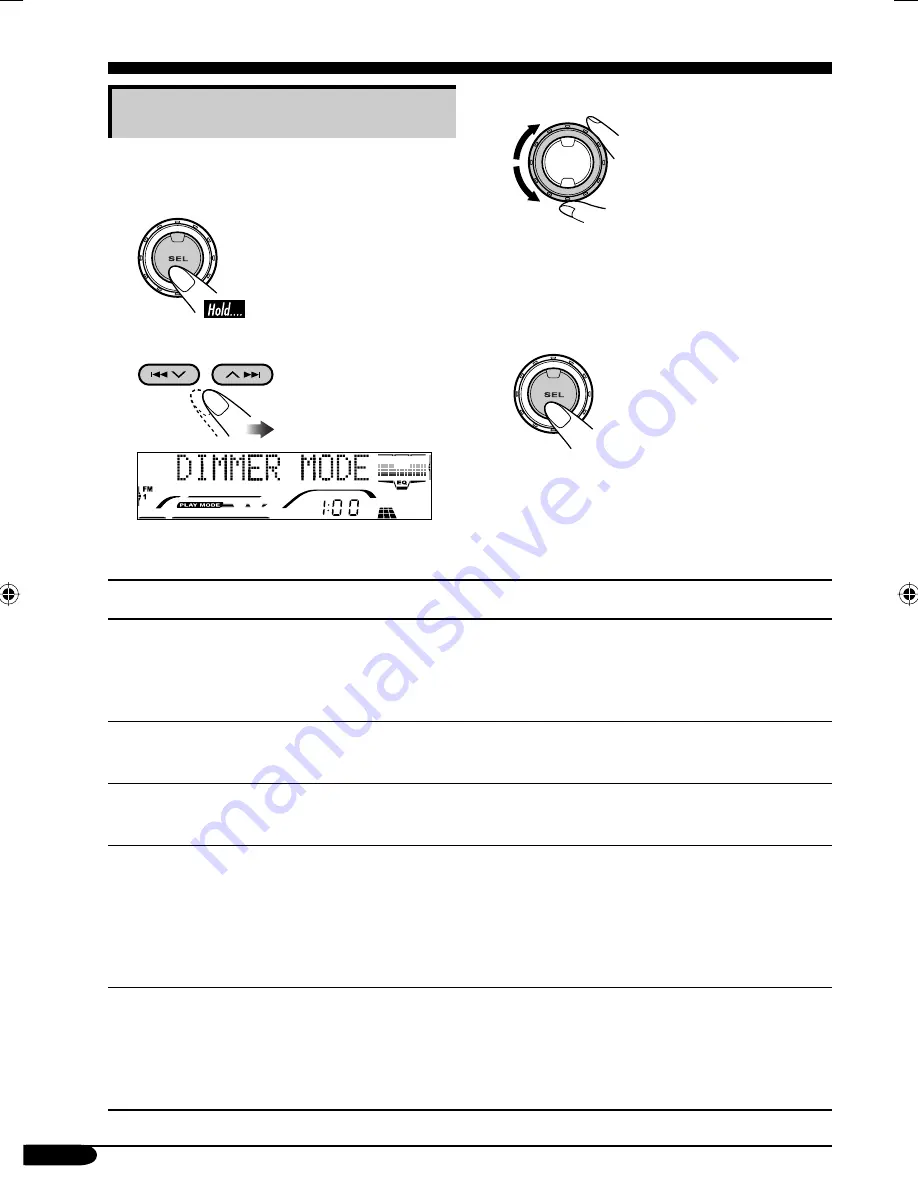
General settings — PSM

Basic procedure

You can change PSM (Preferred Setting Mode) 
items listed in the table that follows.

1


2

  Select a PSM item.


Ex.: When “DIMMER MODE” is selected

3

  Adjust the PSM item selected.

4

  Repeat steps 

2

 and 

3

 to adjust the 

other PSM items if necessary.

5

  Finish the procedure.

EN18-23_KD-G814[UI]f.indd   20

EN18-23_KD-G814[UI]f.indd   20

1/27/05   11:37:12 AM

1/27/05   11:37:12 AM

Summary of Contents for KD-G814

Page 1: ...CD RECEIVER For canceling the display demonstration see page 8 For installation and connections refer to the separate manual INSTRUCTIONS GET0306 001A UI KD G814 ...

Page 2: ...urces Lower the volume before playing a disc to avoid damaging the speakers by the sudden increase of the output level Thank you for purchasing a JVC product Please read all instructions carefully before operation to ensure your complete understanding and to obtain the best possible performance from the unit IMPORTANT FOR LASER PRODUCTS 1 CLASS 1 LASER PRODUCT 2 CAUTION Do not open the top cover T...

Page 3: ...Sound adjustments 17 Selecting preset sound modes iEQ intelligent equalizer 17 Adjusting the sound 18 Storing your own sound adjustments 19 General settings PSM 20 Basic procedure 20 Other main functions 22 Assigning titles to the sources 22 Changing the control panel angle 23 Detaching the control panel 23 External component operations 24 Playing an external component 24 Maintenance 25 More about...

Page 4: ... hold both buttons at the same time The following marks are used to indicate Built in CD player operations External CD changer operations How to use the MODE button If you press MODE the receiver goes into functions mode then the number buttons and 5 buttons work as different function buttons Ex When number button 2 works as MO monaural button Time countdown indicator To use these buttons for orig...

Page 5: ...repeat button o RND random button Number buttons a 4 buttons s control panel release button Display window d Disc information indicators TAG ID3 Tag track file folder f MP3 indicator g CH CD changer indicator Lights up only when CD CH is selected for the playback source h CD indicator j WMA indicator k Main display l Equalizer pattern indicator Audio level indicator EQ equalizer indicator z Band i...

Page 6: ...se F forward 3 buttons Searches for stations if pressed briefly Fast forwards or reverses the track if pressed and held Changes the tracks of the disc Installing the lithium coin battery CR2025 When operating aim the remote controller directly at the remote sensor on the receiver Make sure there is no obstacle in between Warning Store the battery in a place where children cannot reach to avoid ris...

Page 7: ...dy For FM AM tuner only Adjust the volume Volume level appears Volume level indicator Adjust the sound as you want See pages 17 19 To drop the volume in a moment ATT To restore the sound press it again To turn off the power Getting started Basic operations ...

Page 8: ...al DEMO ON see page 20 1 2 3 4 Finish the procedure To activate the display demonstration In step 3 above Setting the clock 1 2 Set the hour and minute 1 Select CLOCK HOUR then adjust the hour 2 Select CLOCK MINUTE then adjust the minute 3 Finish the procedure To check the current clock time when the power is turned off ...

Page 9: ...ption improves but stereo effect will be lost To restore the stereo effect repeat the same procedure so that the MO indicator goes off Radio operations Listening to the radio Ÿ Selected band appears Lights up when receiving an FM stereo broadcast with sufficient signal strength Start searching for a station When a station is received searching stops To stop searching press the same button again ...

Page 10: ...band FM station automatic presetting SSM Strong station Sequential Memory 1 2 Select the FM band FM1 FM3 you want to store into 3 4 SSM appears then disappears when automatic presetting is over Local FM stations with the strongest signals are searched and stored automatically in the FM band Manual presetting Ex Storing FM station of 92 5 MHz into the preset number 4 of the FM1 band 1 ...

Page 11: ...ay and eject the disc The receiver draws the disc then the control panel goes back to previous position see page 23 Total file number Total playing time of the inserted disc Total track number of the inserted disc Elapsed playing time Current track number All tracks will be played repeatedly until you change the source or eject the disc Total folder number Elapsed playing time Current track number...

Page 12: ...0 However they are not compatible with MP3 discs so you cannot play back MP3 discs You cannot use the KD MK series CD changers with this receiver Disc text information recorded in the CD Text can be displayed when a JVC CD Text compatible CD changer is connected Before operating your CD changer Refer also to the Instructions supplied with your CD changer You cannot control and play any WMA disc in...

Page 13: ...s For MP3 discs For WMA discs To next folders To previous folders When the current disc is an MP3 disc ROOT appears if no folder is included in the disc When the current disc is an audio CD or a CD Text disc Elapsed playing time Current track number Folder name Selected folder number Elapsed playing time Current track number Disc information appears automatically see page 15 CD Text Disc title per...

Page 14: ...ng a folder Other main functions Skipping a track quickly during play For MP3 or WMA disc you can skip a track within the same folder Ex To select track 32 while playing track 6 1 2 First time you press 10 or 10 button the track skips to the nearest higher or lower track with a track number of multiple ten ex 10th 20th 30th Then each time you press the button you can skip 10 tracks After the last ...

Page 15: ... CD NO NAME appears To assign a title to an audio CD see page 22 While playing an MP3 or WMA disc When TAG DISPLAY is set to TAG DISP ON see page 21 2 If an MP3 WMA file does not have ID3 tags folder name and file name appear In this case the TAG indicator will not light up When TAG DISPLAY is set to TAG DISP OFF ...

Page 16: ...he receiver Mode Plays at random FLDR RND 1 All tracks of the current folder then tracks of the next folder and so on and RND light up DISC RND All tracks of the current disc and RND light up MAG RND 2 All tracks of the inserted discs RND lights up RND OFF Cancels Intro scan Ex When TRK INT is selected while playing an MP3 disc in the receiver Mode Plays the beginning 15 seconds of TRK INT All tra...

Page 17: ... a preset sound mode suitable to the music genre Ÿ FLAT no sound mode is applied HARD ROCK R B POP JAZZ DANCE MUSIC COUNTRY REGGAE CLASSIC USER 1 USER 2 USER 3 back to the beginning Indication pattern changes for each sound mode Ex When HARD ROCK is selected To select the sound mode directly ...

Page 18: ...06 Right only LOUD loudness Boost low and high frequencies to produce a well balanced sound at low volume level LOUD ON LOUD OFF WOOFER 2 Adjust the subwoofer output level 00 min to 08 max VOL 3 volume Adjust the volume 00 min to 30 or 50 max 4 1 If you are using a two speaker system set the fader level to 00 2 This takes effect only when a subwoofer is connected 3 Normally the control dial works ...

Page 19: ...ent level FREQ LOW HI Select the center frequency to adjust WIDTH LOW MID Select the band width level By pressing 4 or you can directly move as follows 5 Adjust the selected sound elements Indication Preset values LOW MID HI LEVEL 06 min to 06 max 06 min to 06 max 06 min to 06 max FREQ 60Hz 80Hz 100Hz 120Hz 8kHz 10kHz 12kHz 15kHz WIDTH 1 min to 4 max 1 min to 2 max 6 Repeat steps 4 and 5 to set or...

Page 20: ...nd disc number etc is shown on the lower part of the display Press DISP repeatedly to show the other information for about 5 seconds LEVELMETER Audio volume level meter LEVEL 1 Initial LEVEL 2 Display the audio level meter with different illumination pattern EQ LEVEL Display the equalizer pattern and the audio level meter SILENT Display the equalizer pattern and volume level meter General settings...

Page 21: ...ls Pressing DISP for more than one second can scroll the display regardless of the setting WOOFER FREQ Subwoofer cutoff frequency FREQ 55 Hz Frequencies lower than 55 Hz are sent to the subwoofer FREQ 85 Hz Initial Frequencies lower than 85 Hz are sent to the subwoofer FREQ 115 Hz Frequencies lower than 115 Hz are sent to the subwoofer EXTERNAL IN 2 External input CHANGER Initial To use a JVC CD c...

Page 22: ...t or an MP3 WMA disc 1 Select the sources For FM AM tuner Select a station For a CD in this receiver Insert a CD For CDs in the CD changer Select CD CH then select a disc number 2 Enter the title assignment mode Ex When you assign a title to a CD 3 Assign a title 1 Select a character set 2 Select a character For available characters see page 25 3 Move to the next or previous character position 4Re...

Page 23: ... on the back of the control panel and on the panel holder Detaching the control panel Before detaching the control panel be sure to turn off the power Attaching the control panel Changing the control panel angle The control panel changes its angle as follows Caution Do not insert your finger behind the control panel ...

Page 24: ...not supplied Before operating the external component select the external input correctly see page 21 For connection see Installation Connection Manual separate volume If EXTERNAL does not appear see page 21 and select the external input EXTERNAL IN Ÿ Turn on the connected component and start playing the source Adjust the volume Adjust the sound as you want See pages 17 19 ...

Page 25: ...isc out holding it by the edges Always hold the disc by the edges Do not touch its recording surface When storing a disc into its case gently insert the disc around the center holder with the printed surface facing up Make sure to store discs into the cases after use Center holder Warped disc Sticker Sticker residue Disc Stick on label Do not use the following discs To keep discs clean A dirty dis...

Page 26: ...serted upside down the control panel moves down and the disc automatically ejects from the loading slot If you keep the control panel open for about 1 minute beep sound when the BEEP SWITCH setting is turned BEEP ON see page 21 the control panel returns to its previous position Do not insert 8 cm discs single CD and unusual shape discs heart flower etc into the loading slot Playing a disc While pl...

Page 27: ... discrepancy in elapsed time display and do not show the actual elapsed time Especially after performing the search function this difference becomes noticeable This receiver cannot play back the following files MP3 files encoded with MP3i and MP3 PRO format MP3 files encoded in an unappropriated format MP3 files encoded with Layer 1 2 WMA files encoded with lossless professional and voice format W...

Page 28: ...playback Disc cannot be played back Disc is inserted upside down Insert the disc correctly CD R CD RW cannot be played back Tracks on the CD R CD RW cannot be skipped CD R CD RW is not finalized Insert a finalized CD R CD RW Finalize the CD R CD RW with the component which you used for recording Disc can be neither played back nor ejected Disc is locked Unlock the disc see page 14 The CD player ma...

Page 29: ...he disc Do not add the extension code mp3 or wma to non MP3 or WMA tracks A longer readout time is required FILE CHECK keeps flashing on the display Readout time varies due to the complexity of the folder file configuration Do not use too many hierarchies and folders Tracks cannot be played back as you have intended them to play Playback order is determined when the files are recorded Elapsed play...

Page 30: ...eceiver is not connected to the CD changer correctly Connect this receiver and the CD changer correctly and press the reset button of the CD changer RESET 1 RESET 7 appears on the display Press the reset button of the CD changer The CD changer does not work at all The built in microcomputer may function incorrectly due to noise etc Reset the receiver see page 2 Microsoft and Windows Media are eith...

Page 31: ...nsitivity 11 3 dBf 1 0 µV 75 Ω 50 dB Quieting Sensitivity 16 3 dBf 1 8 µV 75 Ω Alternate Channel Selectivity 400 kHz 65 dB Frequency Response 40 Hz to 15 000 Hz Stereo Separation 35 dB Capture Ratio 1 5 dB AM Tuner Sensitivity 20 µV Selectivity 35 dB CD PLAYER SECTION Type Compact disc player Signal Detection System Non contact optical pickup semiconductor laser Number of Channels 2 channels stere...

Page 32: ... 2005 Victor Company of Japan Limited EN 0105DTSMDTJEIN Having TROUBLE with operation Please reset your unit Refer to page of How to reset your unit ...

Page 33: ...irst remove the car radio and install the receiver in its place When using the optional stay Note When installing the receiver on the mounting bracket make sure to use the 8 mm long screws If longer screws are used they could damage the receiver Bracket Bracket 2 2 Not included for this receiver Flat type screws M5 x 8 mm 2 Pocket Flat type screws M5 x 8 mm 2 Screw option Stay option Fire wall Das...

Page 34: ...lack stripe White White with black stripe To the remote lead of other equipment 200 mA max Blue To CD changer or another external component see diagram C Connecting other external components CD changer JVC CD changer CAUTION Before connecting the CD changer make sure that the receiver is turned off External component KS U57 6 6 Line Input Adapter KS U57 not supplied for this receiver External comp...

Reviews: