background image

7

OPERATIONS

Continued on the next page

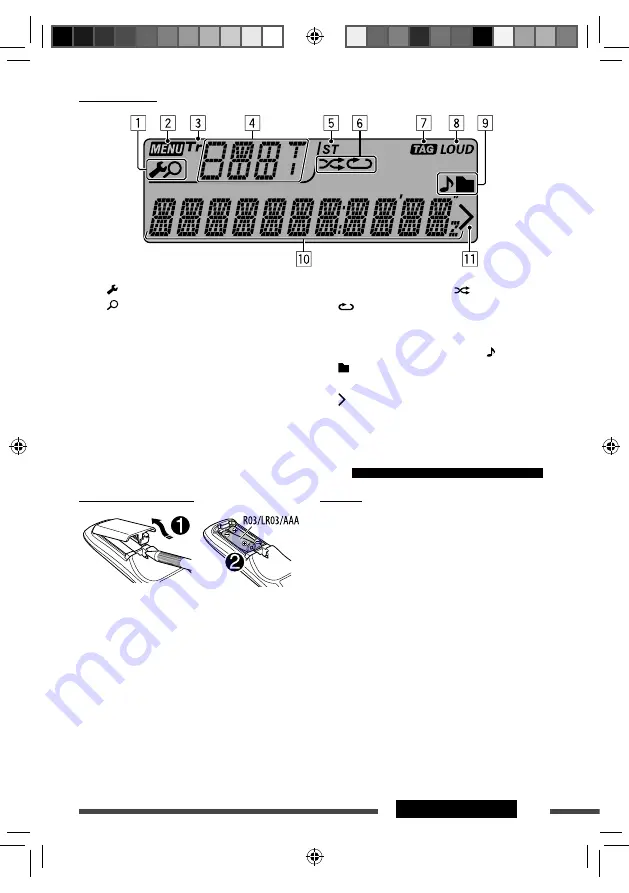
Display window

1

 •   (setting) indicator

 •  (search) indicator

2

 MENU indicator

3

  Tr (track) indicator

4

  Source display / Track number / Folder number / 

Title number / PBC indicator / Time countdown 
indicator / Setting and list operation information

5

  ST (stereo) indicator

6

  Playback mode indicators— 

 (random), 

 (repeat)

7

  TAG (Tag information) indicator

8

  LOUD (loudness) indicator

9

  Disc/device information indicators—  (track/file), 

 (folder)

p

 Main display

q


 (next level) indicator

Using the remote controller (RM-RK255) 

Installing the batteries

Insert the batteries into the remote controller by 
matching the polarity (+ and –) correctly.

If the effectiveness of the remote controller 
decreases, replace the batteries.

Caution:

•  Danger of explosion if battery is incorrectly replaced. 

Replace only with the same or equivalent type.

•  Battery shall not be exposed to excessive heat such as 

sunshine, fire, or the like.

Before using the remote controller:

•  Aim the remote controller directly at the remote 

sensor on the unit.

•  DO NOT expose the remote sensor to bright light 

(direct sunlight or artificial lighting).

EN02-09_KD-DV5606_001A_1.indd   7

EN02-09_KD-DV5606_001A_1.indd   7

12/12/09   4:23:30 PM

12/12/09   4:23:30 PM

Summary of Contents for KD-DV5604

Page 1: ... How to reset your unit DVD CD RECEIVER INSTRUCTIONS GET0654 001A U UH UI For canceling the display demonstration see page 4 For installation and connections refer to the separate manual KD DV5606 KD DV5605 KD DV5604 CoverRear_KD DV5606_001A_f indd 1 CoverRear_KD DV5606_001A_f indd 1 12 24 09 10 45 30 AM 12 24 09 10 45 30 AM ...

Page 2: ...lume setting Digital devices CD USB produce very little noise compared with other sources Lower the volume before playing these digital sources to avoid damaging the speakers by sudden increase of the output level European Union only WARNINGS To prevent accidents and damage DO NOT install any unit or wire any cable in a location where it may obstruct the steering wheel and gearshift lever operatio...

Page 3: ...al before operating the unit CONTENTS How to attach detach the control panel 3 How to reset your unit 3 How to forcibly eject a disc 3 PREPARATIONS Canceling the display demonstration 4 Setting the clock 4 INTRODUCTIONS Playable disc type 5 OPERATIONS Basic operations 6 Using the control panel 6 Using the remote controller RM RK255 7 Listening to the radio 10 Disc operations 12 Operations using th...

Page 4: ...LOCK 4 Select CLOCK SET 5 Adjust the hour 6 Adjust the minute 7 Finish the procedure 4 Select DEMO OFF 5 6 Finish the procedure Initial setting Initial setting Hold Press Press Turn Hold Turn Turn Turn Press Press Press Press EN02 09_KD DV5606_001A_f indd 4 EN02 09_KD DV5606_001A_f indd 4 1 6 10 11 56 22 AM 1 6 10 11 56 22 AM ...

Page 5: ...ble Rewritable CD R RW ISO 9660 level 1 level 2 Romeo Joliet CD DA VCD Video CD MPEG1 MPEG2 JPEG MP3 WMA WAV DivX AAC MPEG4 1 IfyouinsertaDVDVideodiscofanincorrectRegionCode REGIONCODEERROR appearsonthemonitor 2 DVD Rrecordedinmulti borderformatisalsoplayable exceptforduallayerdiscs DVD RWduallayerdiscsarenot playable 3 Itispossibletoplaybackfinalized R RW Videoformatonly discs RWdoublelayerdiscsa...

Page 6: ...ct the sound mode 9 Change the display information if the power is turned on Check the current clock time if the power is turned off p Detach the panel q FM AM Select preset station DISC Select title program playlist folder USB Select folder w Return to the previous menu e Enter list operations Enter Menu setting Hold r Remote sensor t AUX auxiliary input jack y USB Universal Serial Bus input term...

Page 7: ...controller RM RK255 Installing the batteries Insert the batteries into the remote controller by matching the polarity and correctly If the effectiveness of the remote controller decreases replace the batteries Caution Danger of explosion if battery is incorrectly replaced Replace only with the same or equivalent type Battery shall not be exposed to excessive heat such as sunshine fire or the like ...

Page 8: ...VD VR Shows the Original Program screen VCD Resumes PBC playback 8 OSD on screen display button Shows the on screen bar 9 SHIFT button Functions with other buttons p DISP display button Changes the display information if the power is turned on Checks the current clock time if the power is turned off 1 button Turns on the power When the power is on pressing on the remote controller also mutes the s...

Page 9: ...es selection settings buttons DVD Video Makes selection settings JPEG MPEG Video Skips back or forward by about five minutes ENT enter button Confirms selection i DUAL button Not applicable for this unit o DIRECT button DISC USB Enters direct search mode for chapter title program playlist folder track when pressed with SHIFT button see page 16 for details CLR clear button DISC USB Erases the misen...

Page 10: ... same button again You can also search for a station manually Manual Search Hold either one of the buttons until M flashes on the display then press it repeatedly When receiving an FM stereo broadcast with sufficient signal strength the ST indicator lights up on the display Storing stations in memory Automatic presetting FM SSM Strong station Sequential Memory You can preset up to 18 stations for ...

Page 11: ... FM and 6 stations for AM Ex Storing FM station of 92 50 MHz into preset number 04 1 2 3 Select preset number 04 and store Selecting preset station or Title assignment You can assign titles to 30 station frequencies FM and AM using 8 characters maximum for each title If you try to assign titles to more than 30 station frequencies NAME FULL appears Delete unwanted titles before assignment Turn Hold...

Page 12: ...n the unit cannot accept the operation you have tried to do In some cases without showing operations will not be accepted 1 Turn on the power 2 Insert a disc All tracks will be played repeatedly until you change the source or eject the disc Selecting a track folder MP3 WMA WAV CD For MP3 WMA WAV discs select the desired folder then the desired track by repeating the control dial procedures To retu...

Page 13: ...lder name Track title back to the beginning 4 DISP Press Select track Hold Reverse fast forward track 1 Current track number and Elapsed playing time Current track number and Clock back to the beginning 4 5 DISP Press Select track Hold Reverse fast forward track 1 Select folder Current track number and Elapsed playing time Current track number and Clock Album name performer folder name 3 Track tit...

Page 14: ...r then tracks of next folders ALL RND Randomly play all tracks TRACK RPT Repeat current track PBC not in use ALL RND Randomly play all tracks PBC not in use TRACK RPT Repeat current track FOLDER RPT Repeat current folder FOLDER RND Randomly play all tracks of current folder then tracks of next folders ALL RND Randomly play all tracks TRACK RPT Repeat current track ALL RND Randomly play all tracks ...

Page 15: ...rk MPEG Reverse forward track search 4 No sound can be heard Press Select chapter during play or pause Hold Reverse fast forward chapter search 3 Press Select track Hold MPEG Reverse fast forward track search 5 No sound can be heard DVD Video Select title during play or pause DVD VR Select program Select playlist during play or pause Select folder MPEG Skip back or forward the scenes MPEG Select c...

Page 16: ...nd can be heard Press Select track Hold Reverse fast forward track search 3 Press Select track Hold Reverse fast forward track search 3 Select folder 1 3 Seepage15 Searching for chapter title program playlist folder track directly DVD JPEG MPEG Video MP3 WMA WAV CD 1 While holding SHIFT press DIRECT repeatedly to select the desired search mode DVD Video DVD VR JPEG MPEG Video MP3 WMA WAV CD 2 Whil...

Page 17: ...thin the same folder For DVD VR program playlist search is possible during Original program playback PG Playlist playback PL To erase a misentry press CLR clear while holding SHIFT To return to the previous screen press RETURN Using menu driven features DVD Video DVD VR 1 Press TOP MENU DVD MENU to enter the menu screen 2 Press fi to select an item you want to start play 3 Press ENT enter to confir...

Page 18: ...hange or turn off the subtitle language Change the view angle Repeat play 1 Random play 1 1 Forrepeatplay randomplay seealsopage14 2 WhilePBCisnotinuse 3 NotapplicableforDVD VR Removing the on screen bar Operations using the control screen JPEG MPEG Video MP3 WMA WAV CD These operations are possible on the monitor using the remote controller 1 Show the control screen JPEG MPEG Video Press 7 during...

Page 19: ...election Operations using the list screen These operations are possible on the monitor using the remote controller Before playing you can display the folder list track list to confirm the contents and start playing a track List screen JPEG MPEG Video MP3 WMA WAV 1 Display the folder list while stop 1 Current folder number total folder number 2 Current track number total number of tracks in the cur...

Page 20: ...VR with its data recorded 1 Select a list screen 1 Program playlist number 2 Recording date 3 Recording source TV station the input terminal of the recording equipment etc 4 Start time of recording 5 Title of the program playlist 6 Current selection highlighted bar 7 Creating date of playlist 8 Number of chapters 9 Playback time Thetitleoftheoriginalprogramorplaylistmay notbedisplayeddependingonth...

Page 21: ...RROUND COMPATIBLE Select to enjoy multi channel surround audio by connecting an amplifier compatible with Dolby Surround STEREO Normally select this D RANGE COMPRESSION You can enjoy a powerful sound at low or middle volume levels while playing a Dolby Digital software AUTO Select to apply the effect to multi channel encoded software excluding 1 channel and 2 channel software ON Select to always u...

Page 22: ...s been attached Playback starts from where it has been stopped previously If a different USB device is currently attached playback starts from the beginning Stop playing and detaching the USB device Straightly pull it out from the USB input terminal NO USB appears Press SOURCE to listen to another playback source Cautions Avoid using the USB device if it might hinder your safety driving While READ...

Page 23: ... IN 2 Turn on the connected component and start playing the source 3 Adjust the volume Connecting an external component to the AUX input jack Turn Portable audio player etc 3 5 mm stereo mini plug not supplied Some USB devices may not work immediately after you turn on the power The detect time and response time may be very long for some USB devices such as Digital Audio Player etc For more detail...

Page 24: ...0 Hz 00 Q1 0 1 0 kHz 00 Q1 0 10 0 kHz 00 Q1 25 OFF ROCK 100 Hz 03 Q1 0 1 0 kHz 00 Q1 25 10 0 kHz 02 Q1 25 CLASSIC 80 Hz 01 Q1 0 1 0 kHz 00 Q1 25 10 0 kHz 03 Q1 25 POPS 100 Hz 02 Q1 0 1 0 kHz 01 Q1 25 10 0 kHz 02 Q1 25 HIP HOP 60 Hz 04 Q1 0 1 0 kHz 02 Q1 0 10 0 kHz 01 Q1 25 JAZZ 80 Hz 03 Q1 0 1 0 kHz 00 Q1 25 10 0 kHz 03 Q1 25 Freq Frequency Q Q slope Turn Press Hold back to the beginning EN22 29_K...

Page 25: ...our own adjustments in memory 1 Select USER 2 While USER is shown on the display 3 Select a tone Turn Press Hold Hold Turn Press Turn Press Menu operations 1 Call up the menu 2 Select the desired item 3 Repeat step 2 if necessary To confirm the setting press the control dial To return to the previous menu press BACK To exit from the menu press DISP or MENU Category Menu item Selectable setting ref...

Page 26: ...onitor is of the NTSC color system TUNER SSM 4 Strong station Sequential Memory MONO ON MONO OFF Activate monaural mode to improve FM reception but stereo effect will be lost 10 Restore the stereo effect MONO 4 Monaural mode MONO ON MONO OFF Activate monaural mode to improve FM reception but stereo effect will be lost 10 Restore the stereo effect IF BAND Intermediate frequency band AUTO WIDE Incre...

Page 27: ...he output level when changing the source to external component connected to the AUX input jack on the control panel BEEP Key touch tone BEEP ON BEEP OFF Activates the keypress tone Deactivates the keypress tone AMP GAIN 7 Amplifier gain control LOW POWER HIGH POWER VOLUME 00 VOLUME 30 Select if the maximum power of each speaker is less than 50 W to prevent damaging the speaker VOLUME 00 VOLUME 50 ...

Page 28: ...nually the previously preset station is erased when a new station is stored in the same preset number More about this unit Disc operations General In this manual words track and file are interchangeably used This unit can only play back audio CD CD DA files if different type of files are recorded in the same disc Playing Recordable Rewritable discs This unit can recognize a total of 5 000 files an...

Page 29: ...e is automatically used as the initial language In addition for some discs the initial languages settings will not work as you set due to their internal disc programming When you select 16 9 for a picture whose aspect ratio is 4 3 the picture slightly changes due to the process for converting the picture width Even if 4 3 PAN SCAN is selected the screen size may become 4 3 LETTERBOX for some discs...

Page 30: ...aining Multi subtitle languages Multi audio languages Multi angle views Manufactured under license from Dolby Laboratories Dolby and the double D symbol are trademarks of Dolby Laboratories DVD Logo is a trademark of DVD Format Logo Licensing Corporation registered in the US Japan and other countries Microsoft and Windows Media are either registered trademarks or trademarks of Microsoft Corporatio...

Page 31: ...yarwanda TO Tonga BI Bislama HR Croatian LV Latvian Lettish SA Sanskrit TR Turkish BN Bengali Bangla HU Hungarian MG Malagasy SD Sindhi TS Tsonga BO Tibetan HY Armenian MI Maori SG Sangho TT Tatar BR Breton IA Interlingua MK Macedonian SH Serbo Croatian TW Twi CA Catalan IE Interlingue ML Malayalam SI Singhalese UK Ukrainian CO Corsican IK Inupiak MN Mongolian SK Slovak UR Urdu CS Czech IN Indones...

Page 32: ...oring a disc in its case gently insert the disc around the center holder with the printed surface facing up Make sure to store discs in cases after use Connectors Center holder To keep discs clean A dirty disc may not play correctly If a disc does become dirty wipe it with a soft cloth in a straight line from center to edge Do not use any solvents for example conventional record cleaner spray thin...

Page 33: ...in general Disc cannot be played back Insert the disc correctly Disc can be neither played back nor ejected Unlock the disc see page 12 Eject the disc forcibly see page 3 Recordable Rewritable discs cannot be played back Tracks on the Recordable Rewritable discs cannot be skipped Insert a finalized disc Finalize the discs with the component which you have used for recording Disc cannot be recogniz...

Page 34: ...er track or change the disc Tracks cannot play back as you have intended them to play Playback order is determined when files are recorded Longer readout time is required Readout time varies due to the complexity of the folder file configuration Do not use too many hierarchies and folders No sound can be heard when picture is displayed while playing a MPEG Video file Record the audio track using M...

Page 35: ...e stamp The first track folder written into the USB device will be the first track folder for playback While playing a track sound is sometimes interrupted The tracks have not been properly copied into the USB device Copy tracks again into the USB device and try again CANNOT PLAY appears on the display NO USB appears on the display The unit cannot detect the USB device Connect a USB device that co...

Page 36: ... Noise Ratio 80 dB Audio Output Level Line Out Level Impedance 2 5 V 20 kΩ load full scale Output Impedance 1 kΩ Color System PAL NTSC Video Output composite 1 Vp p 75 Ω Other Terminal USB input terminal AUX auxiliary input jack Antenna input TUNER SECTION Frequency Range FM 87 5 MHz to 108 0 MHz AM 531 kHz to 1 602 kHz FM Tuner Usable Sensitivity 9 3 dBf 0 8 μV 75 Ω 50 dB Quieting Sensitivity 16 ...

Page 37: ...bps 320 kbps Sampling Frequency 22 05 kHz 32 kHz 44 1 kHz 48 kHz WAV Quantization Bit Rate 16 bit Sampling Frequency 44 1 kHz USB SECTION USB Standard USB 1 1 USB 2 0 Data Transfer Rate Full Speed Max 12 Mbps Compatible Device Mass storage class except HDD Compatible File System FAT 32 16 12 Playable Audio Format JEPG MPEG1 MPEG2 MP3 WMA WAV Max Current DC 5 V 500 mA GENERAL Power Requirement Oper...

Reviews: