background image

9

ENGLISH

Canceling the display
demonstration

When shipped from the factory, display
demonstration has been activated, and starts
automatically when no operations are done for
about 20 seconds.
• It is recommended to cancel the demonstration

before you use the unit for the first time.

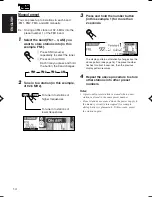
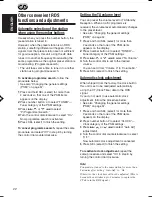
To cancel the display demonstration,

 follow

the procedure below:

1

Press and hold SEL (select) for more
than 2 seconds so that one of the
PSM items appears on the display.
(PSM: see pages 58 and 59.)

2

Press number button 1 to select
“MOVIE”—Movie category of the PSM
settings.

The “Graphics” setting screen appears on
the display.

3

Select “Off.”

4

Finish the setting.

SEL

To activate the display demonstration,

 repeat

the same procedure and select “Int Demo” or
“All Demo” in step 

3

.

• For more details, see “To set the movie

demonstration—Graphics” on page 59.

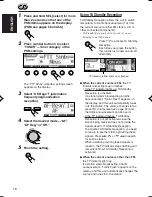
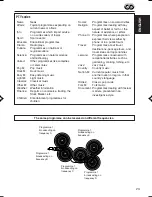
Setting the clock

You can also set the clock system to 24 hours or
12 hours.

1

Press and hold SEL (select) for more
than 2 seconds so that one of the
PSM items appears on the display.
(PSM: see pages 58 and 59.)

2

Press number button 2 to select
“CLOCK”—Clock category of the
PSM settings.

The “Clock Hr” setting screen appears on
the display.

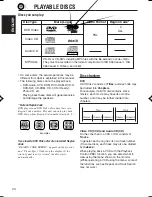
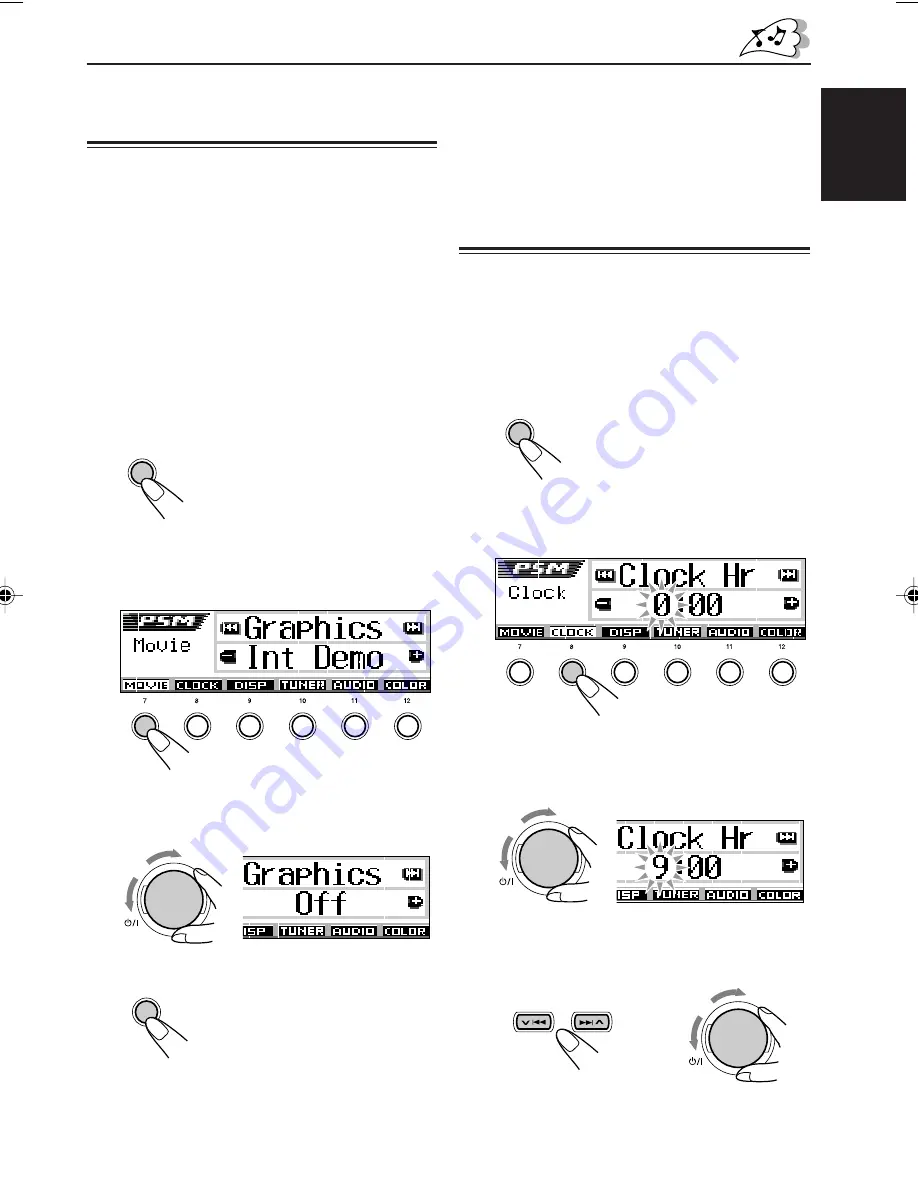
3

Adjust the hour.

4

Set the minute.

1

Select “Clock Min (minute).”

2

Adjust the minute.

SEL

SEL

1

2

CONTINUED ON THE NEXT PAGE

3

4

5

6

2

1

3

4

5

6

2

1

ATT

ATT

ATT

EN08-10DV5000[E]f.p65

03.3.23, 18:47

9

Summary of Contents for KD-DV5000

Page 1: ...is equipped with the display demonstration To cancel it see page 9 Dieses Gerät ist mit einer Demonstrationsfunktion für das Display ausgestattet Auf Seite 9 wird beschrieben wie Sie diese Demonstrationsfunktion deaktivieren können Cet appareil est équipé d une démonstration des affichages Pour l annuler référez vous à la page 9 Dit toestel heeft een display demonstratiefunctie Zie bladzijde 9 voo...

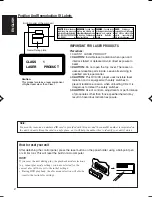
Page 2: ...yer uses invisible laser radiation and is equipped with safety switches to prevent radiation emission when unloading CDs It is dangerous to defeat the safety switches 5 CAUTION Use of controls adjustments or performance of procedures other than those specified herein may result in hazardous radiation exposure Note For security reasons a numbered ID card is provided with this unit and the same ID n...

Page 3: ...p the car before performing any complicated operations Temperature inside the car If you have parked the car for a long time in hot or cold weather wait until the temperature in the car becomes normal before operating the unit Caution If the temperature inside the car is below 0 C the movement of animation and text scroll will be halted on the display to prevent the display from being blurred LOW ...

Page 4: ... 37 DUAL ZONE OPERATIONS 40 Listening with headphones 40 OTHER DISC OPERATIONS 42 Basic disc playback 42 Locating a title chapter track on a disc 43 Selecting a folder track to play using the lists 44 Selecting playback modes 45 Prohibiting disc ejection 48 Changing the display pattern 48 DVD SETUP MENU 50 Basic setting procedure 50 SOUND ADJUSTMENTS 54 Adjusting the sound 54 Selecting preset soun...

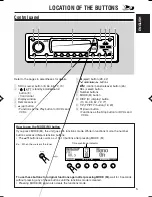
Page 5: ...wn button Functions as the Stop button for DVDs and VCDs How to use the MODE M button If you press MODE M the unit goes into functions mode While in functions mode the number buttons work as different function buttons The 5 buttons also work as 10 10 buttons after pressing MODE M Ex When the source is the tuner To use these buttons for original functions again after pressing MODE M wait for 5 seco...

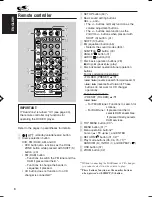
Page 6: ...2 Cursor 5 2 3 and ENTER t RETURN button 31 32 2 y Play mode buttons 35 36 70 71 2 RANDOM R INTRO I and REPEAT u OSD button 37 i ZOOM button 32 1 Without connecting the DAB tuner or CD changer you cannot select it as the source to play 2 These buttons function as the number buttons when pressed with SHIFT S button TOP MENU RETURN REPEAT INTRO RANDOM OSD EQ S ZOOM SETUP SEL CH AM FM DVD R I SUBTITL...

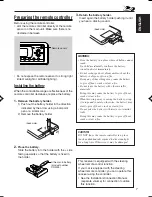
Page 7: ...re children cannot reach If a child accidentally swallows the battery consult a doctor immediately Do not recharge short disassemble or heat the battery or dispose of it in a fire Doing any of these things may cause the battery to give off heat crack or start a fire Do not leave the battery with other metallic materials Doing this may cause the battery to give off heat crack or start a fire When t...

Page 8: ...u want See pages 54 56 Note While playing a source you can also show the level meter on the display For details see Activating the level meter on page 10 To drop the volume in a moment Press briefly while listening to any source ATT starts flashing on the display and the volume level will drop in a moment To resume the previous volume level press the button briefly again If you turn the control di...

Page 9: ...e Graphics setting screen appears on the display 3 Select Off 4 Finish the setting SEL To activate the display demonstration repeat the same procedure and select Int Demo or All Demo in step 3 For more details see To set the movie demonstration Graphics on page 59 Setting the clock You can also set the clock system to 24 hours or 12 hours 1 Press and hold SEL select for more than 2 seconds so that...

Page 10: ...display Each time you press the button the adjustable items change as follows For iEQ sound mode settings see pages 55 and 56 For SEL basic sound settings see page 54 1 2 SEL Off 1 2 3 Meter 1 The audio level meter fluctuates vertically Meter 2 The speaker on the display vibrates as input audio level changes Meter 3 The left and right audio level meters appear If the display pattern is changed onl...

Page 11: ...r 1 Select the band FM1 3 AM 1 Press SRC source repeatedly to select the tuner 2 Press and hold SRC Each time you press and hold the button the band changes Note This receiver has three FM bands FM1 FM2 FM3 You can use any one of them to listen to an FM broadcast 2 Start searching for a station When a station comes in searching stops To stop searching before a station is received press the same bu...

Page 12: ...nds If you hold down the button the frequency keeps changing in 50 kHz intervals for FM and 9 kHz for AM MW LW until you release the button When an FM stereo broadcast is hard to receive 1 Press MODE M to enter the functions mode while listening to an FM stereo broadcast Mode appears on the display 2 Press number button 1 to select Mono On while Mode is still on the display Each time you press the...

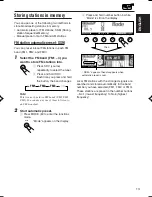
Page 13: ...stations in memory Automatic preset of FM stations SSM Strong station Sequential Memory Manual preset of both FM and AM stations FM station automatic preset SSM You can preset 6 local FM stations in each FM band FM1 FM2 and FM3 1 Select the FM band FM1 3 you want to store FM stations into 1 Press SRC source repeatedly to select the tuner 2 Press and hold SRC Each time you press and hold the button...

Page 14: ...er frequencies To tune in to stations of lower frequencies The display pattern automatically changes like the above pattern see page 16 The preset number flashes for about 5 seconds then the previous display pattern resumes Manual preset You can preset up to 6 stations in each band FM1 FM2 FM3 and AM manually Ex Storing an FM station of 92 5 MHz into the preset number 1 of the FM1 band 1 Select th...

Page 15: ...tation frequency 3 Select the number 1 6 for the preset station you want FM1 FM2 FM3 AM 3 4 5 6 2 1 SRC FM1 FM2 FM3 AM Tuning in to a preset station You can easily tune in to a preset station Remember that you must store stations first If you have not stored them yet see Storing stations in memory on pages 13 and 14 Selecting a preset station directly 1 Select the band FM1 3 AM 1 Press SRC source ...

Page 16: ...Each time you press the button the display patterns change as follows D DISP Appears only when selecting a preset station number Clock time When receiving an AM or FM non RDS station When receiving an FM RDS station Clock time PTY code see page 23 PS station name Appears only when receiving an FM non RDS station ...

Page 17: ...3 Two types of the RDS data are used to make Network Tracking Reception work correctly PI Programme Identification and AF Alternative Frequency Without receiving these data correctly from the RDS station you are listening to Network Tracking Reception will not operate To use Network Tracking Reception You can select the different modes of network tracking reception to continue listening to the sam...

Page 18: ...lashes If the TP indicator lights up TA Standby Reception is activated If a station starts broadcasting a traffic announcement Traffic Flash appears on the display and this unit automatically tunes in to the station The volume changes to the preset TA volume level see page 22 and the traffic announcement can be heard If the TP indicator flashes TA Standby Reception is not yet activated since the s...

Page 19: ...ner category of the PSM settings The PTY Stnby standby setting screen appears on the display 3 Select one of the twenty nine PTY codes See page 23 Selected code name appears on the display and is stored into memory 4 Finish the setting To set PTY Standby Reception 1 Press MODE M while listening to an FM stereo broadcast Mode appears on the display 2 Press number button 3 to activate PTY Standby Re...

Page 20: ...ally tunes in to the station If the PTY indicator flashes PTY Standby Reception is not yet activated since the station being received does not provide the signals used for PTY Standby Reception To activate PTY Standby Reception you need to tune in to another station providing these signals Press or 4 to search for such a station When a station providing these signals is tuned in the PTY indicator ...

Page 21: ...you can show the list of your preset PTY codes and all twenty nine PTY codes six PTY codes at a time First the list of your stored PTY codes appears then all twenty nine PTY codes six PTY codes at a time appears in sequence Press the number button to select your desired PTY code on the list currently shown on the display 3 Start PTY search for your favorite programme If there is a station broadcas...

Page 22: ...adjustment repeat the same procedure and select On in step 4 by turning the control dial clockwise Note You must stay tuned to the same station for more than 2 minutes after setting Auto Adj to On Otherwise the clock time will not be adjusted This is because the unit takes up to 2 minutes to capture the CT data in the RDS signal Other convenient RDS functions and adjustments Automatic selection of...

Page 23: ...n Programmes dealing with any aspect of belief or faith or the nature of existence or ethics Phone In Programmes where people can express their views either by phone or in a public forum Travel Programmes about travel destinations package tours and travel ideas and opportunities Leisure Programmes concerned with recreational activities such as gardening cooking fishing etc Jazz Jazz music Country ...

Page 24: ...sc consists of Titles and each title may be divided into Chapters For example if a DVD disc contains some movies each movie may have its own title number and it may be further divided into chapters Video CD VCD and Audio CD CD On the other hand a VCD or CD consists of Tracks In general each song has its own track number On some discs each track may also be divided by Indexes When playing back a VC...

Page 25: ...commended that MP3 files be recorded at a sample rate of 44 1 kHz and at a data transfer rate of 128 kbps For more information about MP3 discs see A Guide to MP3 separate volume About sounds reproduced through the rear terminals Through the analog terminals Speaker out LINE OUT 2nd AUDIO OUT 2 channel signal is emitted When playing a multi channel encoded disc multi channel signals are downmixed A...

Page 26: ...appears while playing a DVD or VCD with PBC function see Menu operations on page 31 Disc loading lamp Video CD with without PBC Audio CD DVD Video MP3 disc Video CD with PBC Before performing any operations make sure the following Turn on the monitor for playing a DVD or VCD If you turn on the monitor you can also control the CD and MP3 playback by referring to the monitor screen For DVD playback ...

Page 27: ...slot selecting DISC as the source starts disc play This unit cannot read or play an MP3 file without the extension code mp3 When a disc is inserted upside down the disc automatically ejects if the control panel is open If the control panel is closed the source changes to the previously selected source Please Eject flashes on the display 1 2 3 1 2 4 5 3 1 2 4 5 3 Note When a new folder starts playi...

Page 28: ...art playback again playback begins from the beginning of the same track To eject a disc Press 0 on the control panel Playback stops and the control panel flips down The disc comes out of the loading slot To stop playback temporarily Press 8 on the remote controller Pause flashes on the display For DVD and VCD only A still picture appears Frame by Frame Playback You can advance the still picture fr...

Page 29: ...a title For VCD While PBC see page 32 is not in use From the remote controller While holding SHIFT S press number buttons to select a title chapter or track number you want Examples To select number 5 press 5 while pressing SHIFT S To select number 10 press 10 while pressing SHIFT S To select number 23 press 10 10 then 3 while pressing SHIFT S Notes If you directly select the track number for a VC...

Page 30: ...sc containing multiple audio languages ex English French Spanish you can select the language to listen to You can also set your favorite language as the initial audio language See pages 50 to 52 For VCD When you play a VCD you can select the audio channel to play This is convenient when playing a Karaoke VCD Select a desired audio language or audio channel The following pop up window appears on th...

Page 31: ...ck is possible while playing back a DVD with menu driven features or a VCD with the PBC PlayBack Control function While playing a DVD DVD discs generally have their own menus or title lists A title list usually contains titles of movies and songs recorded On the other hand a menu usually contains various information about the disc and playback selections 1 Press TOP MENU or MENU A title list or me...

Page 32: ... previous menu Press RETURN To cancel the PBC playback You can cancel the menu driven operations PBC function 1 Press 7 to stop playback 2 Press number buttons to select a track Normal playback starts from the selected track To resume the PBC function again press TOP MENU or MENU S SHIFT TOP MENU REPEAT RETURN RANDOM SETUP R 5 6 4 2 3 1 DISC ENTER MENU DISC 10 10 8 9 7 Zoom in You can zoom into a ...

Page 33: ...1 Press OSD twice The on screen bar appears on the monitor For details on the on screen bar see pages 37 and 38 2 Move to Time Search then press ENTER The time entry window appears 3 Press number buttons 0 to 9 to enter the time while holding SHIFT S 1 3 1 3 OFF 1 5 TITLE 33 TOTAL 1 25 58 CHAP 33 CHAP 5 1ch OSD 6 4 5 ENTER 1 3 1 3 OFF 1 5 TITLE 33 TOTAL 1 25 58 CHAP 33 CHAP TIME _ __ __ 5 1ch S SH...

Page 34: ...irst then enter the correct number 4 Finish entry The unit starts playback from the selected chapter To erase the on screen bar press OSD once Example for DVD VIDEO To play back from 2 H 34 M 00 S Press number buttons 2 3 then 4 TIME 2 34 _ _ To play back from 58 M 00 S Press number buttons 0 5 then 8 TIME 0 58 _ _ Example for Video CD Audio CD To play back from 23 M 40 S Press number buttons 2 3 ...

Page 35: ...epeated OFF indicator appears on the monitor CHAP Current or specified chapter will be repeated CHAP indicator appears on the monitor TITLE Current title will be repeated TITLE indicator appears on the monitor OFF Repeat Play is canceled OFF indicator appears on the monitor For DVD OFF TRACK REPEAT 10 Playing in various play modes You can use any of three methods to activate various play modes Usi...

Page 36: ...d at random RND DISC appears on the MP3 CONTROL screen see page 39 OFF Random Play is canceled Intro Scan You can play back the first 15 seconds of each track sequentially For VCD While PBC see page 32 is not in use Select the intro scan mode you want The menu bar icon appears on the monitor to show the selected mode Each time you press the button the intro scan mode changes as follows For MP3 For...

Page 37: ...disc inserted appears on the monitor For details see the left column Note When you start playing a CD the status bar automatically appears 2 Press OSD again A menu bar appears under the status bar For details about the items on the menu bar see page 38 OFF INTRO RND TIME 25 58 TRACK 38 OFF ST RND TIME 25 58 TRACK 38 INTRO For DVD For VCD For CD TOP MENU RETURN REPEAT INTRO RANDOM OSD EQ S ZOOM SET...

Page 38: ...or details see page 36 Turns on and off Random Play only for VCD and CD Each time you press ENTER in step 3 Random Play modes change For details see page 36 5 ENTER 3 Move to an item on the menu bar then press ENTER The pull down window for the selected items appears When you select or the pull down window does not appear Skip the following steps See the following explanation 4 Select an option or...

Page 39: ...e remote controller To select highlight a Folder column or Track column on the screen press cursor 3 or 2 To select a folder press cursor 5 or when the cursor highlighted position is in the Folder column If there are unshown folders they will appear in this column as you selecting folders By pressing FOLDER PRESET 5 or FOLDER PRESET you can change the folder without respect to the cursor highlight...

Page 40: ... to DISC To select a different source except AM to listen through the speakers press SRC on the control panel By using the buttons on the control panel you can operate the newly selected source without affecting Dual Zone operations TOP MENU RETURN REPEAT INTRO RANDOM OSD EQ S ZOOM SETUP SEL CH AM FM DVD R I SUBTITLE AUDIO ANGLE 2ndVOL 2ndVOL 5 6 4 2 3 1 DISC ENTER MENU FOLDER PRESET DAB ATT SHIFT...

Page 41: ...play 2 Press number button 6 while Mode is still on the display The source automatically changes to DISC S SHIFT 2ndVOL 2ndVOL 6 DUAL indicator appears Then To cancel Dual Zone operations repeat steps 1 and 2 Dual Zone Off appears on the display When the sounds through the rear speakers are troublesome while listening with the headphones You can deactivate the rear speaker sound output See also Ch...

Page 42: ...ER DISC OPERATIONS Press briefly to go ahead to the beginning of the next chapter track Each time you press the button consecutively the beginning of the next chapter track is located and played back Press 4 briefly to go back to the beginning of the current chapter track Each time you press the button consecutively the beginning of the previous chapter track is located and played back 3 4 5 6 T P...

Page 43: ...lect a chapter or track during pause To go to a chapter track quickly For DVD During play or pause For VCD While PBC see page 32 is not in use 1 Press MODE M to enter the functions mode Mode appears on the display 3 4 5 6 2 1 While playing a DVD 2 Press 5 up or down while Mode is still on the display First time you press 5 up or down the chapter track skips to the nearest higher or lower chapter t...

Page 44: ...he folder name list of the inserted disc appears on the display The name of the currently playing folder will be highlighted on the display Notes The display can show only six items at a time You can show the other items on the next lists by pressing 5 up or down If you press or 4 the track name list of the current playing folder appears See the following column Only folders including MP3 tracks w...

Page 45: ...how the other items on the next lists by pressing 5 up or down 3 Select the number 1 6 for the track you want to play Selecting playback modes Repeat Play You can repeat a title chapter track or disc For DVD During play or pause For VCD While PBC see page 32 is not in use 1 Press MODE M to enter the functions mode Mode appears on the display 2 Press number button 2 while Mode is still on the displ...

Page 46: ... on the display Off All the tracks in the disc will be repeated To cancel Repeat Play select Repeat Off by pressing number button 2 repeatedly or press number button 4 in step 2 Notes On some DVDs Repeat Play may be canceled by the disc itself On CD VCD and MP3 discs Repeat Play mode cannot be turned off Repeat Play mode will be canceled when you start playing back a VCD with the PBC function Rand...

Page 47: ...be played at random indicator appears on the display Off Random Play is canceled Folder All the tracks in the folder will be played at random then move to the next folder and so on indicator appears on the display Disc All the tracks in the disc will be played at random indicator appears on the display Off Random Play is canceled To cancel Random Play select Random Off by pressing number button 3 ...

Page 48: ...C press again for more than 2 seconds Eject OK flashes on the display for about 5 seconds and the disc is unlocked Changing the display pattern By pressing DISP D you can change the information shown on the display If the information cannot be shown at a time it will scroll on the display Some characters or symbols will not be shown will be blanked or substituted on the display Each time you press...

Page 49: ...or appears for track title Notes When the disc title performer is shown the disc indicator lights up When the track title is shown the track indicator lights up If no name is assigned to the conventional CD NO NAME will appear To assign a name to a conventional CD see page 64 If no disc title performer or no track title is recorded for the CD Text NO NAME will appear The above diagram shows exampl...

Page 50: ...or to an item you want to set up 4 Press ENTER The pop up window listing the selectable options appear on the screen EX When selecting the AUDIO screen EX When selecting ANALOG DOWN MIX 6 4 STREAM PCM STEREO ON AUDIO DIGITAL AUDIO OUTPUT ANALOG DOWN MIX D RANGE COMPRESSION STREAM PCM STEREO ON AUDIO DIGITAL AUDIO OUTPUT ANALOG DOWN MIX D RANGE COMPRESSION STREAM PCM STEREO ON AUDIO DIGITAL AUDIO O...

Page 51: ...s unit 4 3LB PICTURE MONITOR TYPE USE TO SELECT USE ENTER TO CONFIRM TO EXIT PRESS SETUP ENTER SELECT 5 Move cursor to select an option 6 Confirm and enter your selection 2 DISC DISC 8 STREAM PCM STEREO ON AUDIO DIGITAL AUDIO OUTPUT ANALOG DOWN MIX D RANGE COMPRESSION USE TO SELECT USE ENTER TO CONFIRM TO EXIT PRESS SETUP ENTER SELECT STREAM PCM STEREO ON AUDIO DIGITAL AUDIO OUTPUT ANALOG DOWN MIX...

Page 52: ...ent function 4 3 LB Letter Box Select this when the aspect ratio of your monitor is 4 3 While viewing a wide screen picture the black bars appear on the top and the bottom of the screen 4 3 PS Pan Scan 3 Select this when the aspect ratio of your monitor is 4 3 While viewing a wide screen picture the black bars do not appear however the left and right edges of the pictures will not be shown on the ...

Page 53: ...TS ANALOG DOWN MIX When playing back a multi channel DVD disc this setting affects the sounds reproduced through the analog terminals STEREO Normally select this to enjoy and reproduce conventional 2 channel stereo sound from the original multi channel sounds DOLBY SURROUND Select this when you want to enjoy multi channel surround audio by connecting an amplifier compatible with Dolby Surround to ...

Page 54: ...eft L06 Left only and right speaker balance R06 Right only Vol Adj Adjust and store 12 min the input level of each source 12 max 2 Make adjustments To adjust fader and balance Fad Bal You can make these two adjustments at the same time by referring to the indication on the display Press 5 up or down to adjust the fader Press or 4 to adjust the balance Note You can also use the or 4 buttons and FOL...

Page 55: ...lled up If you press the button more than twice the unit enters different sound adjustment modes For SEL basic sound settings see page 54 For METER level meter settings see page 10 Ex If you have selected Flat previously 2 Press the number button to select the sound mode you want This unit has two sound mode selection screens To move to the other screen press 5 up or down To cancel the preset soun...

Page 56: ...User 2 or User 3 you want to store into Storing your own sound adjustments You can adjust the sound modes to your preference and store your own adjustments in memory User 1 User 2 and User 3 There is a time limit in doing the following procedure If the setting is canceled before you finish start from step 1 again 1 Press SEL select once to show the sound selection screen Last selected sound mode i...

Page 57: ...nd COLOR Basic Procedure Ex To change Contrast 1 Press and hold SEL select for more than 2 seconds so that one of the PSM items appears on the display 2 Press number button in this example 3 to select one of the PSM categories The first listed item in the selected category appears 3 Select the PSM item you want to adjust By pressing or 4 repeatedly you can also move to other categories 4 Adjust th...

Page 58: ...ey touch tone Ext Input 4 External component Rear SPK Rear speaker output Telephone Telephone Muting DISP display Once Auto Off Auto Off On 1 10 1 2 On Off Positive Negative Auto Off Changer Line In Indications Selectable values items Factory preset See settings page AUDIO Once 59 Auto 61 5 60 Auto 60 1 60 On 60 On 60 Changer 60 Time Set Any time Any time 18 7 61 Preferred Setting Mode PSM items M...

Page 59: ...ic Label Segment Once While showing the disc information scrolls the disc information only once While showing the DAB text scrolls the detailed DAB text only once Auto While showing the disc information repeats the scroll in 5 second intervals While showing the DAB text scrolls the detailed DAB text only once Off While showing the disc information cancels scroll mode While showing the DAB text sho...

Page 60: ...l separate volume To adjust the display contrast level Contrast You can adjust the display contrast level among 1 to 10 Adjust it to make the display indications clear and legible To select the display illumination pattern LCD Type You can select the display illumination patterns according to your preference Auto Positive pattern will be selected during the day time depending on the Dimmer setting...

Page 61: ...ss or 4 to select Dimmer 4 Set the dimmer mode to your preference Auto Activates Auto Dimmer When you turn on the car head lights the display automatically dims Off Cancels Auto Dimmer On Always dims the display Time Set Used to set the timer for the dimmer function Note Selecting Auto or Time Set may change the display pattern to the Negative or Positive pattern if LCD Type is set to Auto If you ...

Page 62: ... FM or AM that you want to set the display color for 1 When you select All SRC the same color will be used for all sources 2 Either component which is selected in the Ext Input setting appears 4 Select the display color As you turn the control dial the colors change as follows Every 1 O Aqua O Sky O Sea O Leaves O Grass O Red O Rose O Amber O Honey O Violet O Cotton O Snow O User 2 O back to the b...

Page 63: ...r The user color will be applied to the currently selected source the one shown on the upper portion of the display In this example All SRC To select which source to apply your user color to select the target source first by pressing 5 up or down before selecting User in this step SEL SEL 3 4 5 6 2 1 4 Select the user color adjustment screen One of the user color adjustment screens appears User Da...

Page 64: ...Assigning names to the sources You can assign names to CDs both in this unit and in the CD changer and the external component After assigning a name it will appears on the display when you select the source CDs Up to 32 characters up to 40 discs External component Up to 8 characters You can assign a name only to conventional CDs 1 Select a source you want to assign a name to When you select a sour...

Page 65: ...el 2 Pull the control panel out of the unit 3 Put the detached control panel into the provided case Attaching the control panel 1 Insert the right side of the control panel into the groove on the panel holder 2 Press the left side of the control panel to fix it to the panel holder Note on cleaning the connectors If you frequently detach the control panel the connectors will deteriorate To minimize...

Page 66: ...ther CH X series CD changers except CH X99 and CH X100 However they are not compatible with MP3 discs so you cannot play back MP3 discs You cannot use the KD MK series CD changers with this unit Before operating your CD changer Refer also to the Instructions supplied with your CD changer If no discs are in the magazine of the CD changer or the discs are inserted upside down No Disc will flash on t...

Page 67: ...r reverse the track Note During this operation on an MP3 disc you can only hear intermittent sounds The elapsed playing time also changes intermittently on the display To go to the next or previous tracks Press and hold during play to fast forward the track Press and hold 4 during play to reverse the track Press 4 briefly during play to skip back to the beginning of the current track Each time you...

Page 68: ... same folder To skip to the next or previous folder only for MP3 discs To skip 10 tracks forward to the last track To skip 10 tracks backward to the first track Press 5 up while playing an MP3 disc to go to the next folder Each time you press the button consecutively the next folder is located and the first track in the folder starts playback Press down while playing an MP3 disc to go to the previ...

Page 69: ...6 for the disc you want to play While playing an MP3 disc you can also show the folder list s and track list s on the display then select a folder or track 1 While playing an MP3 disc press and hold 5 up or down until a disc name list appears on the display 2 Press or 4 to show a folder list of the current disc or track list of the current folder Each time you press the button lists on the display...

Page 70: ...e Folder indicator current or lights up specified folder of the current disc Repeat All tracks of the Disc indicator current or lights up specified disc Selecting the playback modes To play back tracks repeatedly Repeat Play From the remote controller Press REPEAT repeatedly until the Repeat Play mode you want is selected On the control panel 1 Press MODE M to enter the functions mode during play ...

Page 71: ...inserted discs lights up 2 Press number button 3 repeatedly while Mode is still on the display Each time you press the button Random Play mode changes as follows For MP3 discs For CDs Note MP3 indicator also lights up if the current playing disc is an MP3 disc 3 Random Off Random All Random Disc Random All Random Disc Random Folder Random Off To play back only intros Intro Scan From the remote con...

Page 72: ...items appears on the display 2 Press number button 5 to select AUDIO Audio category of the PSM settings 3 Press or 4 to select Ext Input 4 Turn the control dial clockwise to select Line In 5 Press SEL select to finish the setting For details see To select the external component to use Ext Input on page 60 Displayed only when one of the following sources is selected FM AM and CD 1 Select the extern...

Page 73: ...0 or KT DB1000 with your unit If you have another DAB tuner consult your JVC IN CAR ENTERTAINMENT dealer Refer also to the Instructions supplied with your DAB tuner What is DAB system DAB is one of the digital radio broadcasting systems available today It can deliver CD quality sound without any annoying interference and signal distortion Furthermore it can carry text pictures and data In contrast...

Page 74: ... press the button the DAB tuner and the FM tuner is selected alternately 2 Tune in to an ensemble you want 3 Select a service of the ensemble you want to listen to Press to search for ensembles of higher frequency Press 4 to search for ensembles of lower frequency 2 Start searching for an ensemble When an ensemble is received searching stops To stop searching before an ensemble is received press t...

Page 75: ...ed in what preset number you can check the preset service list then select your desired service on the list 1 Select the DAB tuner 1 Press SRC source repeatedly to select the DAB tuner 2 Press and hold SRC Each time you press and hold the button the DAB band changes DAB1 DAB3 The display pattern automatically changes to the non animation display and the preset number flashes then the previous disp...

Page 76: ...from the factory Alternative Reception is activated See also Changing the general settings PSM on page 57 1 Press and hold SEL select for more than 2 seconds so that one of the PSM items appears on the display 2 Press number button 4 to select TUNER Tuner category of the PSM settings 3 Press or 4 to select DAB AF alternative frequency 4 Turn the control dial to select the desired mode On Traces th...

Page 77: ...semble label primary service indicator The different indicator will be displayed when the secondary service is selected 4 Dynamic Label Segment DLS will be displayed See To select the scroll mode Scroll on page 59 Channel number Text indicator 1 Ensemble label and Frequency Clock time PTY code 2 Service label Dynamic Label Segment DLS display 4 3 D DISP Note When Alternative Reception for DAB serv...

Page 78: ...02 01 R B 03 02 02 00 01 01 03 Pop 00 02 00 00 01 01 02 Jazz 03 02 01 01 01 03 02 Dance Music 04 02 00 02 01 01 01 Country 02 01 00 00 00 01 02 Reggae 03 00 00 01 02 02 03 Classic 02 03 01 00 00 02 00 User 1 00 00 00 00 00 00 00 User 2 00 00 00 00 00 00 00 User 3 00 00 00 00 00 00 00 Available characters In addition to the alphabets A Z a z you can use the following characters to assign names to C...

Page 79: ... Persian FI Finnish FJ Fiji FO Faroese FY Frisian GA Irish GD Scots Gaelic GL Galician GN Guarani GU Gujarati HA Hausa HI Hindi HR Croatian HU Hungarian HY Armenian IA Interlingua IE Interlingue IK Inupiak IN Indonesian IS Icelandic IW Hebrew JI Yiddish JW Javanese Code Language KA Georgian KK Kazakh KL Greenlandic KM Cambodian KN Kannada KO Korean KOR KS Kashmiri KU Kurdish KY Kirghiz LA Latin LN...

Page 80: ...o Dolby Digital the audio compression rate is relatively low This fact allows DTS Digital Surround format to add breadth and depth to the reproduced sounds As a result DTS Digital Surround features natural solid and clear sound To reproduce these surround signals you need to connect an amplifier or a decoder compatible with DTS Digital Surround ID3 Tag MP3 An MP3 file can contain file information ...

Page 81: ...seconds to eject the disc Causes The volume level is set to the minimum level Connections are incorrect The built in microcomputer may have functioned incorrectly due to noise etc The control panel is not attach correctly and firmly Dual Zone is not activated Signals are too weak The antenna is not connected firmly Dual Zone is activated Disc is inserted upside down CD R CD RW is not finalized Dis...

Page 82: ... selected when viewing on a conventional TV aspect ratio 4 3 The built in microcomputer may function incorrectly due to noise etc MP3 files do not have the extension code mp3 in their file names MP3 files are not recorded in a format compliant with ISO 9660 Level 1 ISO 9660 Level 2 Romeo or Joliet The file played back is not an MP3 file although it has the extension code mp3 Playback order is dete...

Page 83: ...oms No Disc flashes on the display No Magazine flashes on the display Reset 8 flashes on the display Reset 1 Reset 7 flashes on the display The CD changer does not work at all CD Changer While playing some DVDs digital signals may be emitted at 20 bits or 24 bits at their original bit rate through the DIGITAL OUT terminal if the discs are not copy protected Output signals through the DIGITAL OUT t...

Page 84: ...or CD RW Before playing back CD Rs or CD RWs read their instructions or cautions carefully Use only finalized CD Rs or CD RWs Some CD Rs or CD RWs may not play back on this unit because of their disc characteristics and for the following reasons Discs are dirty or scratched Moisture condensation on the lens inside the unit The pickup lens inside the unit is dirty CD RWs may require a longer readou...

Page 85: ...ternate Channel Selectivity 400 kHz 65 dB Frequency Response 40 Hz to 15 000 Hz Stereo Separation 30 dB Capture Ratio 1 5 dB MW Tuner Sensitivity 20 µV Selectivity 35 dB LW Tuner Sensitivity 50 µV DVD CD PLAYER SECTION Signal Detection System Non contact optical pickup semiconductor laser Number of channels 2 channels stereo Frequency Response DVD fs 48 kHz 16 Hz to 22 000 Hz DVD fs 96 kHz 16 Hz t...

Page 86: ... Ihr Gerät zurück Siehe Seite Zurücksetzen des Geräts Vous avez des PROBLÈMES de fonctionnement Réinitialisez votre appareil Référez vous à la page intitulée Comment réinitialiser votre appareil Hebt u PROBLEMEN met de bediening Stel het apparaat terug Zie de pagina met de paragraaf Het apparaat terugstellen 0503MNMMDWJEIN EN GE FR NL 2003 VICTOR COMPANY OF JAPAN LIMITED J VC ...

Page 87: ...uur of de versnelling aangezien elke belemmering van de juiste werking van het stuur en de versnelling tot een ongeluk kan lijden dit een gevaar vormt voor de airbag aangezien elke belemmering van de werking van de airbag tot een dodelijk ongeluk kan lijden dit het uitzicht belemmert Bedien GEEN enkele eenheid terwijl u uw handen aan het stuur nodig hebt aangezien dit anders tot een ongeluk kan li...

Page 88: ... la verticale Remarque Lorsque vous mettez l appareil à la verticale faire attention de ne pas endommager le fusible situé sur l arrière 2 Insérer les 2 poignées entre l appareil et le manchon comme indiqué pour désengagé les verrous de manchon 3 Retirer le manchon Remarque S assurer de garder les poignées pour une utilisation ultérieur après l installation de l appareil 4 Installer le manchon dan...

Page 89: ...stemen die werken op 12 V gelijkstroom met negatieve aarding Als uw auto niet is uitgerust met een dergelijk systeem is een spanningsomzetter vereist Dit instrument kan worden aangeschaft bij JVC car audio dealers Vervang de zekering door een exemplaar met het aangegeven vermogen Als de zekering vaak doorslaat moet u uw JVC car audio dealer raadplegen Als u geluidsproblemen hebt De krachtschakelin...

Page 90: ...geven From the car body Von der Karosserie De la carrosserie de la voiture Vanaf de auto ISO connector of the supplied power cord ISO Stecker am Stromkabel Connecteur ISO pour le cordon d alimentation fourni ISO connector van het meegeleverde snoer For some VW Audi or Opel Vauxhall automobile Für manche VW Audi oder Opel Vauxhall Fahrzeuge Pour certaine voiture VW Audi ou Opel Vauxhall Voor bepaal...

Page 91: ...6 Brown to cellular phone system for details refer to the instructions of the cellular phone 7 Light green to parking brake metallic body or chassis of the car 8 Others to speakers 3 Connect the aerial cord 4 Finally connect the wiring harness to the unit Avant de commencer la connexion Vérifiez attentivement le câblage du véhicule Une connexion incorrecte peut endommager sérieusement l appareil L...

Page 92: ...re it cannot be seen by the driver Wenn der Monitor an einer vom Fahrer nicht einsehbaren Stelle installiert wird Lorsqu on installe le moniteur à un emplacement où il ne peut pas être vu du conducteur Wanneer de monitor op een plaats geïnstalleerd wordt waar hij niet door de bestuurder gezien kan worden Connect the parking brake wire to metallic body or chassis of the car Schließen Sie das Handbr...

Page 93: ...The search function works but search speed is not constant during search When skip is tried at the last file in a folder the next folder is selected A Guide to MP3 LVT1082 002A E Questions and Answers An MP3 disc requires a long readout time When an MP3 disc is inserted information inside the disc number of folders and files and positions of data is first read So in the following cases a fairly lo...

Page 94: ...KD DV5000 MP3 Bit rate 8 kbps 320 kbps VBR Sampling frequency MPEG 1 48 kHz 44 1 kHz 32 kHz MPEG 2 24 kHz 22 05 kHz 16 kHz Joint stereo Emphasis ID3 Tag Ver 1 0 1 1 m3u playlist Not available Manual search Search speed is not constant Maximum number of folder hierarchy 10 Maximum number Files on each folder 150 of files folders Folders on a disc 99 Total 14850 Maximum number of characters on the d...

Reviews: