background image

16

Installation/Connection

 Warning

•  The unit can only be used with a 12 V DC power supply, negative ground.
•  Disconnect the battery’s negative terminal before wiring and mounting.
•  Do not connect Battery wire (yellow) and Ignition wire (red) to the car 

chassis or Ground wire (black) to prevent a short circuit.

•  Insulate unconnected wires with vinyl tape to prevent a short circuit.
•  Be sure to ground this unit to the car’s chassis again after installation.

 Caution

•  For safety’s sake, leave wiring and mounting to professionals. Consult 

the car audio dealer.

•  Install this unit in the console of your vehicle. Do not touch the metal 

parts of this unit during and shortly after use of the unit. Metal parts 
such as the heat sink and enclosure become hot.

•  Do not connect the 

·

 wires of speaker to the car chassis, Ground wire 

(black), or in parallel.

•  Mount the unit at an angle of less 30°.
•  If your vehicle wiring harness does not have the ignition terminal, 

connect Ignition wire (red) to the terminal on the vehicle’s fuse box 
which provides 12 V DC power supply and is turned on and off by the 
ignition key.

•  After the unit is installed, check whether the brake lamps, blinkers, 

wipers, etc. on the car are working properly.

•  If the fuse blows, first make sure the wires are not touching car’s 

chassis, then replace the old fuse with one that has the same rating.

Basic procedure

Remove the key from the ignition switch, then 
disconnect the 

·

 terminal of the car battery.

Connect the wires properly.


  See Wiring connection.


(

 17)

Install the unit to your car.


  See Installing the unit (in-dash mounting).

Connect the 

·

 terminal of the car battery.

Reset the unit. 

(

 4)

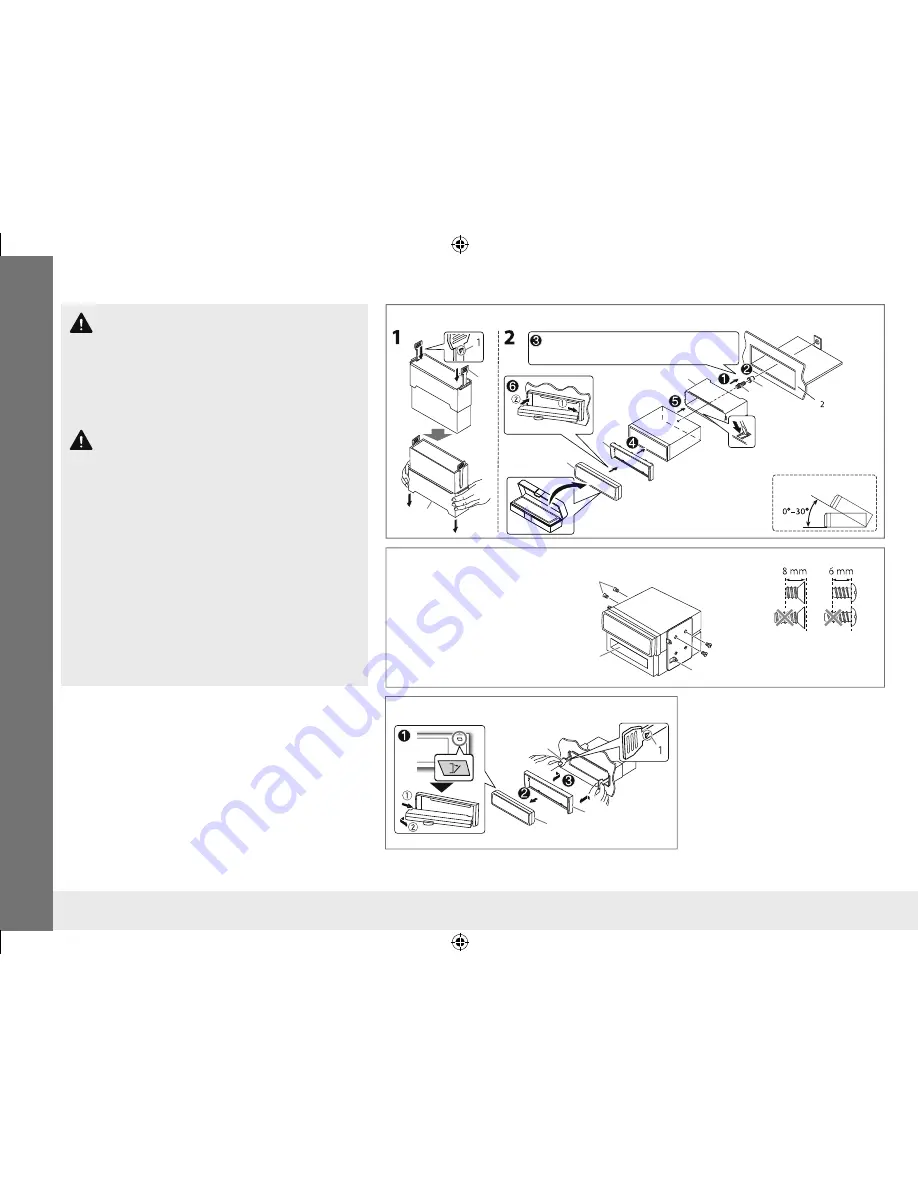
Installing the unit (in-dash mounting)

When installing without the mounting sleeve

How to remove the unit

Bracket (not supplied)

Pocket

Flat head screws (supplied (

I

): M5 × 8 mm) or 

round head screws (not supplied: M5 × 6 mm)

B

F

*

*

B

C

A

H G

*

1

 Face the side with the protrusion 

inside when inserting the extraction 
keys.

*

2

 If the panel opening of your vehicle is 

too small to fit the unit, trim the upper 
and lower sides of the panel opening 
about 0.5 mm to 3 mm.

Do the required wiring.

(

 17)

Bend the appropriate tabs 
to hold the sleeve firmly 
in place.

F

C

A

*

EN̲KD-AV300̲J̲JW̲r1.indd 16

EN̲KD-AV300̲J̲JW̲r1.indd   16

13/10/21 12:56

13/10/21   12:56

Summary of Contents for KD-AV300

Page 1: ...nidamente este manual para comprender a fondo todas las instrucciones y obtener un máximo disfrute de esta unidad MONITOR WITH DVD RECEIVER INSTRUCTION MANUAL MONITOR CON RECEPTOR DE DVD MANUAL DE INSTRUCCIONES KD AV300 LVT2501 001B J JW Cover1 KD AV300 J JW r1 indd 1 Cover1 KD AV300 J JW r1 indd 1 13 10 21 12 55 13 10 21 12 55 ...

Page 2: ...GRANTED OR SHALL BE IMPLIED FOR ANY OTHER USE ADDITIONAL INFORMATION INCLUDING THAT RELATING TO PROMOTIONAL INTERNAL AND COMMERCIAL USES AND LICENSING FCC WARNING This equipment may generate or use radio frequency energy Changes or modifications to this equipment may cause harmful interference unless the modifications are expressly approved in the instruction manual The user could lose the authori...

Page 3: ... might hinder safety driving Make sure all important data has been backed up We shall bear no responsibility for any loss of recorded data Never put or leave any metallic objects such as coins or metal tools inside the unit to prevent a short circuit If a disc error occurs due to condensation on the laser lens eject the disc and wait for the moisture to evaporate Remote control RM RK257 Do not lea...

Page 4: ...eral menu 5 Turn the volume knob to select Time then press the knob 6 Turn the volume knob to select the time format 12 Hour or 24 Hour then press the knob 7 Turn the volume knob to select Adjust then press the knob 8 Turn the volume knob to adjust the hour then press the knob 9 Turn the volume knob to adjust the minute then press the knob 10When 12 Hour is selected in Step 6 turn the volume knob ...

Page 5: ...evious layer during menu operation EQ Selects the preset equalizer HBS Activates deactivate HBS Hyper Bass Sound FUNC Displays the function menu for the source 0 9 Enters the number BAND Selects the band Button Operations G Exits from the menu Mutes restores the sound SOURCE Selects a source LIST Displays the item list for the selected source 7 Stops playback 6 Starts pauses playback CLOCK Display...

Page 6: ...ume knob to select the item to set see the table below then press the knob to make a selection 3 Press G to exit If no operation is done for about 10 seconds the operation will be canceled Default XX Manual Store Stores a station manually up to 6 stations for each band While listening to a station you want to store turn the volume knob to select a preset number then press the knob The preset numbe...

Page 7: ...elect an item then press the knob 1 Select category Playlists Artists Albums Genres Songs Composers Audiobooks Podcasts 2 Select desired item If no operation is done for about 10 seconds the operation will be canceled To return to the previous layer press T To exit press G Other settings iPod function 1 Press FUNC to display the iPod function menu 2 Turn the volume knob to select the item to set s...

Page 8: ...o select an item then press the knob 1 MP3 WMA Select a folder if contained 2 Select a track file If no operation is done for about 10 seconds the operation will be canceled To return to the previous layer press T Other settings CD function Media function 1 Press FUNC to display CD function CD or Media function MP3 WMA menu 2 Turn the volume knob to select the item to set see the table below then ...

Page 9: ...yback information DVD Video Title no Chapter no Playing time VCD MPEG1 MPEG2 MPEG4 Playing time Various disc operations from the remote control RM RK257 Display the playback information Press DISP To erase press the button again Display the disc menu DVD Press DVD MENU or TOP MENU Search for a chapter title scene directly DVD 1 Press GOTO Each time you press the button the target item switches bet...

Page 10: ...ration will be canceled Default XX DVD VCD MPEG1 MPEG2 MPEG4 Repeat DVD OFF Normal playback Ch Repeats current chapter Tt Repeats current title VCD All Repeats all tracks files One Repeats current track file MPEG1 MPEG2 MPEG4 All Repeats all tracks files One Repeats current track file Folder Repeats all files in the current folder DVD DVD Audio Selects the audio language Subtitle Selects the subti...

Page 11: ...t Dimmer Low or Dimmer High Change the general settings check information on the Setting menu 1 Press MENU to display the top menu screen 2 Turn the volume knob to select Setting then press the knob to display the setting menu 3 Turn the volume knob to select the category Setting Audio Setting General then press the knob 4 Turn the volume knob to select the item to set see the table below then pre...

Page 12: ...Disc on this product cannot be recommended About USB devices This unit can play MPEG1 MPEG2 MPEG4 JPEG MP3 WMA files stored on a USB mass storage class device You cannot connect a USB device via a USB hub and Multi Card Reader Connecting a cable whose total length is longer than 5 m may result in abnormal playback The maximum number of characters for Folder names 50 characters File names 50 charac...

Page 13: ...sic iPod nano 6th generation iPod nano 5th generation iPod nano 4th generation iPod nano 3rd generation iPhone 4S iPhone 4 iPhone 3GS iPhone 3G The song order displayed on the selection menu of this unit may differ from that of the iPod iPhone Video playback is not compatible with this unit Maintenance Cleaning the unit Wipe off dirt on the faceplate with a dry silicon or soft cloth Cleaning the c...

Page 14: ...files Recordable Rewritable discs cannot be played back Tracks on the Recordable Rewritable discs cannot be skippped Insert a finalized disc Finalize the discs with the component which you used for recording DVD Region Error appears and DVD Video does not play Insert a disc with the correct Region Code Playback order is not as intended The playback order is determined by the file name USB or the o...

Page 15: ...5 dB USB USB Standard USB 1 1 Full Speed Compatible Device Mass storage class Compatible File System FAT 32 16 12 Maximum Supply Current DC 5 V 1 A DVD CD player Signal Detection System Non contact optical pickup semiconductor laser Frequency Response DVD fs 48 kHz 96 kHz 17 Hz to 20 000 Hz VCD CD 17 Hz to 20 000 Hz Dynamic Range 90 dB Signal to Noise Ratio 80 dB Wow and Flutter Less than measurab...

Page 16: ...power supply and is turned on and off by the ignition key After the unit is installed check whether the brake lamps blinkers wipers etc on the car are working properly If the fuse blows first make sure the wires are not touching car s chassis then replace the old fuse with one that has the same rating Basic procedure 1 Remove the key from the ignition switch then disconnect the terminal of the car...

Page 17: ...ess To the power control terminal when using an optional power amplifier or to the antenna control terminal in the vehicle 150 mA max Audio output Rear Car fuse box Battery Ignition switch Red Ignition wire Blue Yellow Battery wire Black Ground wire To the metallic body or chassis of the car White ª White Black To front speaker left Gray ª Gray Black To front speaker right Green ª Green Black To r...

Page 18: ...Apple performance standards Apple is not responsible for the operation of this device or its compliance with safety and regulatory standards Please note that the use of this accessory with iPod or iPhone may affect wireless performance iPhone iPod iPod classic iPod nano and iPod touch are trademarks of Apple Inc registered in the U S and other countries ESTE PRODUCTO SE CONCEDE BAJO LA LICENCIA DE...

Reviews: