background image

26

ENGLISH

Maintenance

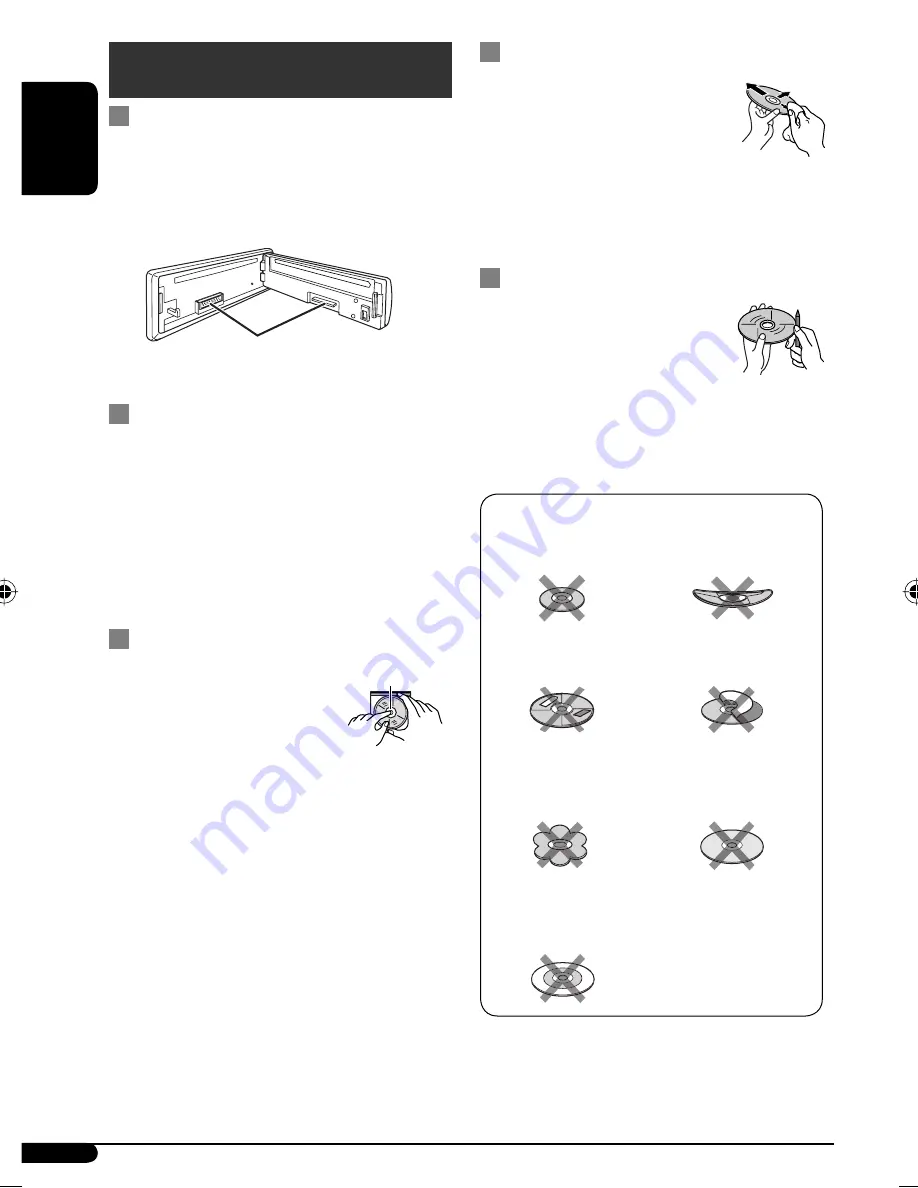
  How to clean the connectors

Frequent detachment will deteriorate the connectors.
To minimize this possibility, periodically wipe the 
connectors with a cotton swab or cloth moistened with 
alcohol, being careful not to damage the connectors.

  Moisture condensation

Moisture may condense on the lens inside the unit in 
the following cases:
•  After starting the heater in the car.
•  If it becomes very humid inside the car.
Should this occur, the unit may malfunction. In this 
case, eject the disc and leave the unit turned on for a 
few hours until the moisture has evaporated.

  How to handle discs

When removing a disc from its 
case,

 press down the center holder 

of the case and lift the disc out, 
holding it by the edges.
•  Always hold the disc by the edges. Do not touch its 

recording surface.

When storing a disc in its case,

 gently insert the 

disc around the center holder (with the printed surface 
facing up).
•  Make sure to store discs in cases after use.

Connectors

Center holder

  To keep discs clean

A dirty disc may not play correctly. 
If a disc does become dirty, wipe it with 
a soft cloth in a straight line from center 
to edge.
•  Do not use any solvents (for example, conventional 

record cleaner, spray, thinner, benzine, etc.) to clean 
discs.

  To play new discs

New discs may have some rough spots 
around the inner and outer edges. If such 
a disc is used, this unit may reject the disc.
To remove these rough spots, rub the 
edges with a pencil or ball-point pen, etc.

Warped disc

Sticker and sticker residue

Stick-on label

Do not use the following discs:

Unusual shape

Single CD (8 cm disc)

C-thru Disc 
(semi-transparent disc)

Transparent or semi-transparent 
parts on its recording area

EN26-31_KD-G446_001A_2.indd   26

EN26-31_KD-G446_001A_2.indd   26

11/29/07   4:36:11 PM

11/29/07   4:36:11 PM

Summary of Contents for KD-AR390

Page 1: ...ges référez vous à la page 4 For installation and connections refer to the separate manual Para la instalación y las conexiones refiérase al manual separado Pour l installation et les raccordements se référer au manuel séparé INSTRUCTIONS MANUAL DE INSTRUCCIONES MANUEL D INSTRUCTIONS GET0487 001A J For customer Use Enter below the Model No and Serial No which are located on the top or bottom of th...

Page 2: ... the equipment and receiver Connect the equipment into an outlet on a circuit different from that to which the receiver is connected Consult the dealer or an experienced radio TV technician for help Caution Changes or modifications not approved by JVC could void the user s authority to operate the equipment IMPORTANT FOR LASER PRODUCTS 1 CLASS 1 LASER PRODUCT 2 CAUTION Do not open the top cover Th...

Page 3: ...th other sources Lower the volume before playing a disc to avoid damaging the speakers by the sudden increase of the output level CONTENTS INTRODUCTIONS Preparation 4 OPERATIONS Basic operations 5 Using the control panel 5 Using the remote controller RM RK50 6 Listening to the radio 8 Disc operations 9 EXTERNAL DEVICES Using the Bluetooth devices 10 Using the Bluetooth cellular phone 12 Using the ...

Page 4: ...beginning MP3 WMA Album name performer folder name 3 Track title file name 3 Current track number with the elapsed playing time Current track number with the clock time back to the beginning IPOD Folder name Track name Current track number with the elapsed playing time Current track number with the clock time back to the beginning HD RADIO Call Sign 4 Frequency Title artist album name of the curre...

Page 5: ...diotunerboxisconnected the built intunerofthisunitwillbedisable Tolisten totheHDRadiobroadcast referto Listeningtothe radio onpage8 Formorefeatures seepage14 2 Youcannotselectthesesourcesiftheyarenotready ornotconnected 1 FM AM Select preset station HD RADIO Select channel SIRIUS XM Select category CD CD CH Select folder IPOD Enter the main menu Pause playback Confirm selection BT PHONE BT AUDIO E...

Page 6: ...rchlorate Display window 1 Status of Bluetooth device Device number 1 5 signal strength 0 3 battery reminder 0 3 Asthenumberincreases thesignal batterypower becomesstronger 2 Tr track indicator 3 Source display Track number Folder number Time countdown indicator 4 Bluetooth indicator 5 Playback source indicators CH CD changer DISC 6 Sound mode iEQ intelligent equalizer indicators CLASSIC HIP HOP J...

Page 7: ... pressed briefly Fast forwards or reverses the track if pressed and held Changes the tracks if pressed briefly While listening to the satellite radio Changes the channels if pressed briefly Changes the channels rapidly if pressed and held While listening to an iPod in menu selecting mode Selects an item if pressed briefly Then press D to confirm the selection Skips 10 items at a time if pressed an...

Page 8: ... the display When an FM stereo broadcast is hard to receive Reception improves but stereo effect will be lost MO lights up on the display To restore the stereo effect repeat the same procedure MONO OFF appears and the MO indicator goes off FM station automatic presetting SSM Strong station Sequential Memory You can preset up to six stations for each band 1 While listening to a station 2 Local FM s...

Page 9: ...rectly 1 Presstoselectnumber1to6 holdtoselectnumber7 to12 2 Itisrequiredthatfoldersbeassignedwith2 digit numbersatthebeginningoftheirfoldernames 01 02 03 andsoon All tracks will be played repeatedly until you change the source or eject the disc After pressing M MODE press the following buttons to Skip 10 tracks MP3 WMA Within the same folder TRACK RPT Repeat current track FOLDER RPT MP3 Repeat cur...

Page 10: ...Refer to the list included in the box to check the countries where you may use the Bluetooth function To use a Bluetooth device through the unit BT PHONE and BT AUDIO for the first time you need to establish Bluetooth wireless connection between the unit and the device Once the connection is established it is registered in the unit even if you reset your unit Up to five devices can be registered i...

Page 11: ...ce is detected UNFOUND appears Select SPECIAL to connect a special device The unit displays the list of the preset devices 2 Select a device you want to connect 3 For available devices Enter the specific PIN code of the device to the unit Refer to the instructions supplied with the device to check the PIN code Use the Bluetooth device to connect Now connection is established and you can use the de...

Page 12: ... you of the message arrival RCV MESSAGE receiving message appears on the display Making a call You can make a call using the following methods Select BT PHONE then follow the following steps to make a call 1 Display the Dial Menu Using the Bluetooth cellular phone 1 Select BT PHONE 2 Enter Bluetooth menu 3 Make a call or setting using the Bluetooth setting menu See the following and page 24 2 Call...

Page 13: ...hever you want to use Then select a phone number Displaysonlywhenyourcellularphoneis equippedwiththesefunctionsandiscompatible withthisunit 3 Using the Bluetooth audio player Select BT AUDIO If playback does not start automatically operate the Bluetooth audio player to start playback Operate the Bluetooth audio player to pause playback if playback does not pause when you change the source Reverse ...

Page 14: ...ppears while linking to a multicast channel Listening to the HD Radio Broadcast HD Station Call Sign appears Lights up When digital audio is broadcast Flashes When analog audio is broadcast Channel number First four letters of Call Sign Searching for HD Radio stations only 1 2 Changing HD Radio reception mode While receiving an HD Radio broadcast the unit tunes to digital or analog audio automatic...

Page 15: ...ss For selecting disc number 1 6 Hold For selecting disc number 7 12 Press Select track Hold Reverse fast forward track MP3 Select folders After pressing M MODE press the following buttons to Skip 10 tracks MP3 Within the same folder TRACK RPT Repeat current track FOLDER RPT MP3 Repeat all tracks of current folder DISC RPT Repeat all tracks of the current disc FOLDER RND MP3 Randomly play all trac...

Page 16: ...tically 3 Check your XM Satellite radio ID labelled on the casing of the XMDirect Universal Tuner Box or tune in to Channel 0 see page 17 4 Contact XM Satellite radio on the internet at http xmradio com activation to activate your subscription or you can call 1 800 XM RADIO 1 800 967 2346 Once completed the unit tunes in to one of the available channels Channel 4 or higher Before operating connect...

Page 17: ...l within 15 seconds category selected in step 3 is canceled You can select all channels of all categories now including non categorised channels Storing channels in memory You can preset six channels for each band Ex Storing channels into preset number 4 1 Tune in to a channel you want 2 Checking the XM Satellite radio ID While selecting XM1 XM2 or XM3 select Channel 0 The display alternately show...

Page 18: ...ct tracks Hold Reverse fast forward track After pressing M MODE press the following buttons to ONE RPT Functions the same as Repeat One of the iPod ALL RPT Functions the same as Repeat All of the iPod ALBUM RND Functions the same as Shuffle Albums of the iPod SONG RND Functions the same as Shuffle Songs of the iPod To cancel repeat play or random play select RPT OFF or RND OFF Functionsonlyifyouse...

Page 19: ...ted for the external input setting see page 23 AUX auxiliary input jack on the control panel 1 Select EXT IN or AUX IN If an external component has been connected to the AUX auxiliary input jack pressing AUX can directly select AUX IN as the playback source 2 Turn on the connected component and start playing the source 3 Adjust the volume 4 Adjust the sound as you want see pages 20 and 21 Connecti...

Page 20: ... USER 60 Hz 00 Q1 0 1 0 kHz 00 Q1 25 7 5 kHz 00 Q1 25 OFF ROCK 100 Hz 03 Q1 0 1 0 kHz 00 Q1 25 10 0 kHz 02 Q1 25 CLASSIC 80 Hz 01 Q1 0 1 0 kHz 00 Q1 25 10 0 kHz 03 Q1 25 POP 100 Hz 02 Q1 0 1 0 kHz 01 Q1 25 10 0 kHz 02 Q1 25 HIP HOP 60 Hz 04 Q1 0 1 0 kHz 02 Q1 0 10 0 kHz 01 Q1 25 JAZZ 80 Hz 03 Q1 0 1 0 kHz 00 Q1 25 10 0 kHz 03 Q1 25 Freq Frequency Q Quality slope Storing your own sound mode You can...

Page 21: ... 50 or 00 to 30 5 1 Ifyouareusingatwo speakersystem setthefader levelto 00 2 Thisadjustmentwillnotaffectthesubwooferoutput 3 Loudnesssettingwillbeappliedtoallsoundmodes 4 Displayedonlywhen L OMODE issetto SUB W seepage23 5 Dependingontheamplifiergaincontrolsetting See page23fordetails Sound elements Range selectable items BASS MID TRE Frequency 60 Hz 80 Hz 100 Hz 120 Hz 500 Hz 1 0 kHz 1 5 kHz 2 5 ...

Page 22: ...OCK OFF The clock time is shown on the display at all times when the power is turned off Cancels pressing DISP will show the clock time for about 5 seconds when the power is turned off 4 CLOCK HOUR Hour adjustment 1 12 Initial 1 1 00 4 CLOCK MIN Minute adjustment 00 59 Initial 00 1 00 4 CLOCK ADJ 2 Clock adjustment AUTO OFF The built in clock is automatically adjusted using the clock data provided...

Page 23: ...e audio player to the CD changer jack 19 TAG DISPLAY Tag display TAG ON TAG OFF Shows the Tag information while playing MP3 WMA tracks Cancels AMP GAIN Amplifier gain control LOW POWER HIGH POWER VOLUME 00 VOLUME 30 Select this if the maximum power of the speaker is less than 50 W to avoid damaging the speaker VOLUME 00 VOLUME 50 AREA Tuner channel interval AREA US AREA EU AREA SA When using in No...

Page 24: ... you of the arrival of a message by ringing and displaying RCV MESSAGE receiving message MANUAL The unit does not inform you of the arrival of a message MIC SET microphone setting Only for the device being connected for BT PHONE Adjust microphone volume connected to the Bluetooth adapter LEVEL 01 02 03 VERSION The Bluetooth software and hardware versions are shown You can change the settings liste...

Page 25: ... you turn off the power while listening to a track playback will start from where it had been stopped previously next time you turn on the power General If you change the source while listening to a disc playback stops Next time you select CD as the playback source playback will start from where it had been stopped previously After ejecting a disc NO DISC appears and you cannot operate some of the...

Page 26: ...longer readout time since the reflectance of CD RWs is lower than that of regular CDs Do not use the following CD Rs or CD RWs Discs with stickers labels or a protective seal stuck to the surface Discs on which labels can be directly printed by an ink jet printer Using these discs under high temperature or high humidity may cause malfunctions or damage to the unit Playing an MP3 WMA disc This unit...

Page 27: ...erations ERROR CNNCT Error Connection The device is registered but the connection has failed Use CONNECT to connect the device again See page 11 ERROR Try the operation again If ERROR appears again check if the device supports the function you have tried UNFOUND No available Bluetooth device is detected by SEARCH LOADING The unit is updating the phone book Displaysonlywhenyourcellularphoneisequipp...

Page 28: ...dnanototheinterface adapter besuretodisconnecttheheadphones otherwise nosoundisheard 2 Itisnotpossibletobrowsevideofilesonthe Videos menuwhiletheiPodisconnectedtothe interfaceadapter If the iPod does not play correctly please update your iPod software to the latest version For details about updating your iPod visit http www apple com When you turn on this unit the iPod is charged through this unit...

Page 29: ...nalize the CD R CD RW with the component which you used for recording Disc can neither be played back nor ejected Unlock the disc see page 9 Eject the disc forcibly see page 3 Disc sound is sometimes interrupted Stop playback while driving on rough roads Change the disc Check the cords and connections NO DISC appears on the display PLEASE and EJECT appear alternately on the display Insert a playab...

Page 30: ...vice After the device detects the unit select OPEN on the unit to connect the device See page 10 The unit does not make pairing with the Bluetooth device Enter the same PIN code for both the unit and target device Select the device name from SPECIAL then try to connect again See page 11 Try to pair connect from the Bluetooth device Echo or noise occurs Adjust the microphone unit position Phone sou...

Page 31: ...lay Connect this unit and the CD changer correctly and press the reset button of the CD changer RESET 1 RESET 7 appears on the display Press the reset button of the CD changer The CD changer does not work at all Reset the unit see page 3 Satellite radio CALL 1 888 539 SIRIUS TO SUBSCRIBE scrolls on the display while listening to the SIRIUS Satellite radio Starts subscribing to SIRIUS Satellite rad...

Page 32: ...play Satellite radio does not work at all Reconnect this unit and the satellite radio correctly and reset this unit iPod The iPod does not turn on or does not work Check the connecting cable and its connection Update the firmware version Charge the battery The sound is distorted Deactivate the equalizer either on this unit or the iPod NO IPOD appears on the display Check the connecting cable and i...

Page 33: ...isc by the edges Do not touch its recording surface When storing a disc in its case gently insert the disc around the center holder with the printed surface facing up Make sure to store discs in cases after use Connectors Center holder To keep discs clean A dirty disc may not play correctly If a disc does become dirty wipe it with a soft cloth in a straight line from center to edge Do not use any ...

Page 34: ... 0 V 20 kΩ load full scale KD G340 2 5 V 20 kΩ load full scale Output Impedance 1 kΩ Other Terminal AUX auxiliary input jack CD changer jack Steering wheel remote input only for KD AR390 Antenna TUNER SECTION Frequency Range FM with channel interval set to 100 kHz or 200 kHz 87 5 MHz to 107 9 MHz with channel interval set to 50 kHz 87 5 MHz to 108 0 MHz AM with channel interval set to 10 kHz 530 k...

Page 35: ...WMA Windows Media Audio Decoding Format Max Bit Rate 192 kbps GENERAL Power Requirement Operating Voltage DC 14 4 V 11 V to 16 V allowance Grounding System Negative ground Allowable Operating Temperature 0 C to 40 C 32 F to 104 F Dimensions W H D approx Installation Size 182 mm 52 mm 160 mm 7 3 16 2 1 16 6 5 16 Panel Size 188 mm 58 mm 6 mm 7 7 16 2 5 16 1 4 Mass 1 3 kg 2 9 lbs excluding accessorie...

Page 36: ...th operation Please reset your unit Refer to page of How to reset your unit Still having trouble USA ONLY Call 1 800 252 5722 http www jvc com We can help you EN SP FR 1007DTSMDTJEIN 2007 Victor Company of Japan Limited ...

Page 37: ...nsulating tape The heat sink becomes very hot after use Be careful not to touch it when removing this unit ADVERTENCIAS Para evitar cortocircuitos recomendamos que desconecte el terminal negativo de la batería y que efectúe todas las conexiones eléctricas antes de instalar la unidad Asegúrese de volver a conectar a masa esta unidad al chasis del automóvil después de la instalación Notas Reemplace ...

Page 38: ...ent cet appareil le faire installer par un technicien qualifié Bracket 2 Ménsula 2 Support 2 When installing the unit without using the sleeve Instalación de la unidad sin utilizar la cubierta Lors de l installation de l appareil scans utiliser de manchon In a Toyota car for example first remove the car radio and install the unit in its place En un automóvil Toyota por ejemplo en primer lugar desm...

Page 39: ...ande blanche Red Rojo Rouge Yellow 2 Amarillo 2 Jaune 2 To the metallic body or chassis of the car A un cuerpo metálico o chasis del automóvil Vers corps métallique ou châssis de la voiture Ignition switch Interruptor de encendido Interrupteur d allumage Fuse block Bloque de fusibles Porte fusible To an accessory terminal in the fuse block A un terminal accesorio del bloque de fusibles Vers borne ...

Page 40: ...mmande spécialisé non fourni correspondant à votre voiture Pour en savoir plus consultez le revendeur autoradio où vous avez acheté votre autoradio Si su automóvil está equipado con control remoto en el volante de dirección podrá controlar este receptor utilizando el control remoto Para la conexión se requiere un adaptador remoto exclusivo no suministrado que sea adecuado para su automóvil Para lo...

Page 41: ...For canceling the display demonstration see page 6 For installation and connections refer to the separate manual INSTRUCTIONS GET0538 001A UI CD RECEIVER KD G444 ...

Page 42: ...all instructions carefully before operation to ensure your complete understanding and to obtain the best possible performance from the unit IMPORTANT FOR LASER PRODUCTS 1 CLASS 1 LASER PRODUCT 2 CAUTION Do not open the top cover There are no user serviceable parts inside the unit leave all servicing to qualified service personnel 3 CAUTION Visible and or invisible class 1M laser radiation when ope...

Page 43: ...Remote controller RM RK50 5 Getting started 6 Basic operations 6 Radio operations 7 Disc operations 8 Playing a disc in the unit 8 Playing discs in the CD changer 9 Sound adjustments 11 General settings PSM 13 Using the Bluetooth devices 15 Using the Bluetooth cellular phone 16 Using the Bluetooth audio player 18 Bluetooth settings 18 iPod operations 19 Other external component operations 21 Title...

Page 44: ...onaural button i SSM Strong station Sequential Memory button o Number buttons RPT repeat button a RND random button s AUX auxiliary input jack d Status of Bluetooth device Device number 1 5 signal strength 0 3 battery reminder 0 3 Asthenumberincreases thesignal battery strengthbecomesstronger f Tr track indicator g Source display Track number Folder number Time countdown indicator h Bluetooth indi...

Page 45: ...an MP3 disc on an MP3 compatible CD changer Changes the disc if pressed briefly Changes the folder if pressed and held While listening to an Apple iPod Pauses or resumes playback with D Enters the main menu with 5 U Now 5 U D 2 R F 3 work as the menu selecting buttons 5 U Returnstothepreviousmenu D Confirmstheselection 3 VOL VOL buttons Adjusts the volume level 4 SOUND button Selects the sound mod...

Page 46: ...osed to direct sunlight for a long time otherwise it may explode Store the battery in a place where children cannot reach to avoid risk of accident To prevent the battery from over heating cracking or starting a fire Do not recharge short disassemble heat the battery or dispose of it in a fire Do not leave the battery with other metallic materials Do not poke the battery with tweezers or similar t...

Page 47: ...g the clock Select CLOCK HOUR then adjust the hour Select CLOCK MIN minute then adjust the minute 3 Finish the procedure To check the current clock time while the power is turned off Clock time is shown on the display for about 5 seconds See also page 13 Radiooperations Ÿ Start searching for a station When a station is received searching stops To stop searching press the same button again Lights u...

Page 48: ...D changer operations All tracks will be played repeatedly until you change the source or eject the disc Storing stations in memory You can preset six stations for each band FM station automatic presetting SSM Strong station Sequential Memory 1 Select the FM band FM1 FM3 you want to store into 2 3 SSM flashes then disappears when automatic presetting is over Local FM stations with the strongest sig...

Page 49: ... CH X99 CH X100 and KD MK series CD changers with this unit You cannot play any WMA disc in the CD changer Disc text information recorded in the CD Text can be displayed when a JVC CD Text compatible CD changer is connected For connection see Installation Connection Manual separate volume To fast forward or reverse the track To go to the next or previous tracks To go to the next or previous folder...

Page 50: ...ing indicator lights up on the display 1 IfthecurrentdiscisanaudioCD NONAME appears 2 IfanMP3 WMAfiledoesnothaveTaginformation foldernameandfilenameappear Inthiscase the TAGindicatorwillnotlightup Other main functions Skipping tracks quickly during play Only possible on JVC MP3 compatible CD changer For MP3 or WMA discs you can skip tracks within the same folder Ex To select track 32 while playing...

Page 51: ...D CD All tracks of the inserted disc CD CH All tracks of the discs in the magazine RND OFF Cancels 1 OnlywhileplayinganMP3oraWMAdisc 2 OnlywhileplayingdiscsintheCDchanger Corresponding indicator lights up on the display Continuedonthenextpage Soundadjustment You can select a preset sound mode suitable to the music genre iEQ intelligent equalizer Storing your own sound mode You can adjust the sound...

Page 52: ...R06 to F06 BALANCE 3 Adjust the left and right speaker output balance L06 to R06 LOUD 4 loudness Boost low and high frequencies to produce a well balanced sound at a low volume level LOUD ON or LOUD OFF SUB W 1 subwoofer Adjust the subwoofer output level 00 to 08 initial 04 VOL ADJ volume adjust Adjust the volume level of each source except FM compared to the FM volume level The volume level will ...

Page 53: ... OFF The display demonstration will be activated automatically if no operation is done for about 20 seconds 6 Cancels CLOCK DISP 1 Clock display CLOCK ON CLOCK OFF The clock time is shown on the display at all times when the power is turned off Cancels pressing DISP will show the clock time for about 5 seconds when the power is turned off 6 CLOCK HOUR Hour adjustment 1 12 Initial 1 1 00 6 CLOCK MI...

Page 54: ...off frequency LOW MID HIGH Frequencies lower than 90 Hz are sent to the subwoofer Frequencies lower than 135 Hz are sent to the subwoofer Frequencies lower than 180 Hz are sent to the subwoofer EXT INPUT 4 External input CHANGER EXT INPUT To use a JVC CD changer 8 an Apple iPod 19 To use any other external component 21 TAG DISPLAY Tag display TAG ON TAG OFF Shows the Tag information while playing ...

Page 55: ... Refer to the list included in the box to check the countries where you may use the Bluetooth function To use a Bluetooth device through the unit BT PHONE and BT AUDIO for the first time you need to establish Bluetooth wireless connection between the unit and the device Once the connection is established it is registered in the unit even if you reset your unit Up to five devices can be registered ...

Page 56: ...w connection is established and you can use the device through the unit The device remains registered even after you disconnect the device Use CONNECT or activate AUTO CNNCT to connect the same device from next time on See the following and pages 18 and 19 Connecting a device Perform steps 1 and 2 on page 15 then 1 Select SEARCH to search for available devices The unit searches and displays the li...

Page 57: ...ge appears on the display Making a call You can make a call using the following methods Select BT PHONE then follow the following steps to make a call 1 Display the Dial Menu 2 Call history 1 Select a call history REDIAL RECEIVED MISSED 2 Then select a name if it is acquired or phone number Phone book 1 Select PHONE BOOK The list of phone number appears 2 Select a name from the list Direct dialing...

Page 58: ...start playback Operate the Bluetooth audio player to pause playback if playback does not pause when you change the source Reverse skip forward skip Pause start playback Operationmaybedifferentaccording totheconnectedphone Enter setting menu Device list Refer also to page 16 for connecting disconnecting deleting a registered device Bluetooth Information If you wish to receive more information about...

Page 59: ...ts all incoming calls MSG INFO message info Only for the device being connected for BT PHONE AUTOMATIC The unit informs you of the arrival of a message by ringing and displaying RCV MESSAGE receiving message MANUAL The unit does not inform you of the arrival of a message MIC SETTING microphone setting Only for the device being connected for BT PHONE Adjust microphone volume connected to the Blueto...

Page 60: ...rack is selected playback starts automatically If the selected item has another layer you will enter the layer Repeat steps 2 and 3 until the desired track is played Holding 4 can skip 10 items at a time Themenuselectingmodewillbecanceled If no operations are done for about 5 seconds When you confirm the selection of a track Selecting the playback modes 1 2 Select your desired playback mode 7 Repe...

Page 61: ... input jack on the control panel Connecting an external component to the AUX input jack For selecting the external component connected to AUX input jack You can also select AUX IN as the playback source by pressing the SRC source button CD changer jack on the rear using KS U57 or KS U58 If EXT IN does not appear see page 14 and select the external input EXT INPUT Ÿ Turn on the connected component ...

Page 62: ...n is erased when a new station is stored in the same preset number Disc operations Caution for DualDisc playback The Non DVD side of a DualDisc does not comply with the Compact Disc Digital Audio standard Therefore the use of Non DVD side of a DualDisc on this product may not be recommended General This unit has been designed to reproduce CDs CD Texts and CD Rs Recordable CD RWs Rewritable in audi...

Page 63: ...bels can be directly printed by an ink jet printer Using these discs under high temperature or high humidity may cause malfunctions or damage to the unit Playing an MP3 WMA disc This unit can play back MP3 WMA files with the extension code mp3 or wma regardless of the letter case upper lower This unit can show the names of albums artists performer and Tag Version 1 0 1 1 2 2 2 3 or 2 4 for MP3 fil...

Page 64: ...ending on the Bluetooth version of the device This unit may not work for some Bluetooth devices Connecting condition may vary depending on the circumstances around you When the unit is turned off the device is disconnected Warning messages for Bluetooth operations ERROR CNNCT Error Connection The device is registered but the connection has failed Use CONNECT to connect the device again See page 16...

Page 65: ... Q Freq Level Q Freq Level Q USER 60 Hz 00 Q1 0 1 0 kHz 00 Q1 25 7 5 kHz 00 Q1 25 OFF ROCK 100 Hz 03 Q1 0 1 0 kHz 00 Q1 25 10 0 kHz 02 Q1 25 CLASSIC 80 Hz 01 Q1 0 1 0 kHz 00 Q1 25 10 0 kHz 03 Q1 25 POP 100 Hz 02 Q1 0 1 0 kHz 01 Q1 25 10 0 kHz 02 Q1 25 HIP HOP 60 Hz 04 Q1 0 1 0 kHz 02 Q1 0 10 0 kHz 01 Q1 25 JAZZ 80 Hz 03 Q1 0 1 0 kHz 00 Q1 25 10 0 kHz 03 Q1 25 Freq Frequency Q Quality slope General...

Page 66: ... the disc by the edges Do not touch its recording surface When storing a disc in its case gently insert the disc around the center holder with the printed surface facing up Make sure to store discs in cases after use Connectors Center holder To keep discs clean A dirty disc may not play correctly If a disc does become dirty wipe it with a soft cloth in a straight line from center to edge Do not us...

Page 67: ...mponent which you used for recording Disc can be neither played back nor ejected Unlock the disc see page 10 Eject the disc forcibly see page 3 Disc sound is sometimes interrupted Stop playback while driving on rough roads Change the disc Check the cords and connections NO DISC appears on the display PLEASE and EJECT appear alternately on the display Insert a playable disc into the loading slot MP...

Page 68: ...er the device detects the unit select OPEN on the unit to connect the device See page 15 The unit does not make pairing with the Bluetooth device Enter the same PIN code for both the unit and target device Select the device name from SPECIAL then try to connect again See page 16 Try to pair connect from the Bluetooth device Echo or noise occurs Adjust the microphone unit position Phone sound quali...

Page 69: ...ted Deactivate the equalizer either on the unit or the iPod NO IPOD appears on the display Check the connecting cable and its connection Charge the battery Playback stops The headphones are disconnected during playback Restart the playback operation using the control panel see pages 19 and 20 No sound can be heard when connecting an iPod nano Disconnect the headphones from the iPod nano Update the...

Page 70: ...z Q Q slope Q0 5 to Q2 0 Frequency Response 40 Hz to 20 000 Hz Signal to Noise Ratio 70 dB Line Out Level Impedance 2 5 V 20 kΩ load full scale Subwoofer Out Level Impedance 2 5 V 20 kΩ load full scale Output Impedance 1 kΩ Other Terminal AUX auxiliary input jack CD changer jack TUNER SECTION Frequency Range FM 87 5 MHz to 108 0 MHz AM 531 kHz to 1 602 kHz FM Tuner Usable Sensitivity 11 3 dBf 1 0 ...

Page 71: ...rable limit MP3 Decoding Format MPEG1 2 Audio Layer 3 Max Bit Rate 320 kbps WMA Windows Media Audio Decoding Format Max Bit Rate 320 kbps GENERAL Power Requirement Operating Voltage DC 14 4 V 11 V to 16 V allowance Grounding System Negative ground Allowable Operating Temperature 0 C to 40 C Dimensions W H D approx Installation Size 182 mm 52 mm 160 mm Panel Size 187 mm 58 mm 6 mm Mass 1 3 kg exclu...

Page 72: ... 2007 Victor Company of Japan Limited EN 1107DTSMDTJEIN Having TROUBLE with operation Please reset your unit Refer to page of How to reset your unit ...

Page 73: ... this unit If any item is missing consult your JVC car audio dealer immediately D Trim plate 1 When you stand the unit be careful not to damage the fuse on the rear 2 Not supplied for this unit Insert the two handles then pull them as illustrated so that the unit can be removed When installing the unit without using the sleeve In a Toyota car for example first remove the car radio and install the ...

Page 74: ...ENGLISH KD G446 KD G445 CD RECEIVER KD G446 KD G445 INSTRUCTIONS GET0537 001A U UH For canceling the display demonstration see page 6 For installation and connections refer to the separate manual ...

Page 75: ...ead all instructions carefully before operation to ensure your complete understanding and to obtain the best possible performance from the unit IMPORTANT FOR LASER PRODUCTS 1 CLASS 1 LASER PRODUCT 2 CAUTION Do not open the top cover There are no user serviceable parts inside the unit leave all servicing to qualified service personnel 3 CAUTION Visible and or invisible class 1M laser radiation when...

Page 76: ...6 KD G445 4 Remote controller RM RK50 5 Getting started 6 Basic operations 6 Radio operations 7 Disc operations 8 Playing a disc in the unit 8 Playing discs in the CD changer 9 Sound adjustments 11 General settings PSM 13 Using the Bluetooth devices 15 Using the Bluetooth cellular phone 16 Using the Bluetooth audio player 18 Bluetooth settings 18 iPod operations 19 Other external component operati...

Page 77: ...utton u MO monaural button i SSM Strong station Sequential Memory button o Number buttons RPT repeat button a RND random button s AUX auxiliary input jack d Status of Bluetooth device Device number 1 5 signal strength 0 3 battery reminder 0 3 Asthenumberincreases thesignal battery strengthbecomesstronger f Tr track indicator g Source display Track number Folder number Time countdown indicator h Bl...

Page 78: ...ing an MP3 disc on an MP3 compatible CD changer Changes the disc if pressed briefly Changes the folder if pressed and held While listening to an Apple iPod Pauses or resumes playback with D Enters the main menu with 5 U Now 5 U D 2 R F 3 work as the menu selecting buttons 5 U Returnstothepreviousmenu D Confirmstheselection 3 VOL VOL buttons Adjusts the volume level 4 SOUND button Selects the sound...

Page 79: ... exposed to direct sunlight for a long time otherwise it may explode Store the battery in a place where children cannot reach to avoid risk of accident To prevent the battery from over heating cracking or starting a fire Do not recharge short disassemble heat the battery or dispose of it in a fire Do not leave the battery with other metallic materials Do not poke the battery with tweezers or simil...

Page 80: ...tting the clock Select CLOCK HOUR then adjust the hour Select CLOCK MIN minute then adjust the minute 3 Finish the procedure To check the current clock time while the power is turned off Clock time is shown on the display for about 5 seconds See also page 13 Radiooperations Ÿ Start searching for a station When a station is received searching stops To stop searching press the same button again Ligh...

Page 81: ...al CD changer operations All tracks will be played repeatedly until you change the source or eject the disc Storing stations in memory You can preset six stations for each band FM station automatic presetting SSM Strong station Sequential Memory 1 Select the FM band FM1 FM3 you want to store into 2 3 SSM flashes then disappears when automatic presetting is over Local FM stations with the strongest...

Page 82: ... the CH X99 CH X100 and KD MK series CD changers with this unit You cannot play any WMA disc in the CD changer Disc text information recorded in the CD Text can be displayed when a JVC CD Text compatible CD changer is connected For connection see Installation Connection Manual separate volume To fast forward or reverse the track To go to the next or previous tracks To go to the next or previous fo...

Page 83: ...ponding indicator lights up on the display 1 IfthecurrentdiscisanaudioCD NONAME appears 2 IfanMP3 WMAfiledoesnothaveTaginformation foldernameandfilenameappear Inthiscase the TAGindicatorwillnotlightup Other main functions Skipping tracks quickly during play Only possible on JVC MP3 compatible CD changer For MP3 or WMA discs you can skip tracks within the same folder Ex To select track 32 while pla...

Page 84: ...L RND CD All tracks of the inserted disc CD CH All tracks of the discs in the magazine RND OFF Cancels 1 OnlywhileplayinganMP3oraWMAdisc 2 OnlywhileplayingdiscsintheCDchanger Corresponding indicator lights up on the display Continuedonthenextpage Soundadjustment You can select a preset sound mode suitable to the music genre iEQ intelligent equalizer Storing your own sound mode You can adjust the s...

Page 85: ...nce R06 to F06 BALANCE 3 Adjust the left and right speaker output balance L06 to R06 LOUD 4 loudness Boost low and high frequencies to produce a well balanced sound at a low volume level LOUD ON or LOUD OFF SUB W 1 subwoofer Adjust the subwoofer output level 00 to 08 initial 04 VOL ADJ volume adjust Adjust the volume level of each source except FM compared to the FM volume level The volume level w...

Page 86: ...DEMO OFF The display demonstration will be activated automatically if no operation is done for about 20 seconds 6 Cancels CLOCK DISP 1 Clock display CLOCK ON CLOCK OFF The clock time is shown on the display at all times when the power is turned off Cancels pressing DISP will show the clock time for about 5 seconds when the power is turned off 6 CLOCK HOUR Hour adjustment 1 12 Initial 1 1 00 6 CLOC...

Page 87: ... cutoff frequency LOW MID HIGH Frequencies lower than 90 Hz are sent to the subwoofer Frequencies lower than 135 Hz are sent to the subwoofer Frequencies lower than 180 Hz are sent to the subwoofer EXT INPUT 4 External input CHANGER EXT INPUT To use a JVC CD changer 8 an Apple iPod 19 To use any other external component 21 TAG DISPLAY Tag display TAG ON TAG OFF Shows the Tag information while play...

Page 88: ...vice Refer to the list included in the box to check the countries where you may use the Bluetooth function To use a Bluetooth device through the unit BT PHONE and BT AUDIO for the first time you need to establish Bluetooth wireless connection between the unit and the device Once the connection is established it is registered in the unit even if you reset your unit Up to five devices can be registe...

Page 89: ...y Now connection is established and you can use the device through the unit The device remains registered even after you disconnect the device Use CONNECT or activate AUTO CNNCT to connect the same device from next time on See the following and pages 18 and 19 Connecting a device Perform steps 1 and 2 on page 15 then 1 Select SEARCH to search for available devices The unit searches and displays th...

Page 90: ...essage appears on the display Making a call You can make a call using the following methods Select BT PHONE then follow the following steps to make a call 1 Display the Dial Menu 2 Call history 1 Select a call history REDIAL RECEIVED MISSED 2 Then select a name if it is acquired or phone number Phone book 1 Select PHONE BOOK The list of phone number appears 2 Select a name from the list Direct dia...

Page 91: ... to start playback Operate the Bluetooth audio player to pause playback if playback does not pause when you change the source Reverse skip forward skip Pause start playback Operationmaybedifferentaccording totheconnectedphone Enter setting menu Device list Refer also to page 16 for connecting disconnecting deleting a registered device Bluetooth Information If you wish to receive more information a...

Page 92: ...ejects all incoming calls MSG INFO message info Only for the device being connected for BT PHONE AUTOMATIC The unit informs you of the arrival of a message by ringing and displaying RCV MESSAGE receiving message MANUAL The unit does not inform you of the arrival of a message MIC SETTING microphone setting Only for the device being connected for BT PHONE Adjust microphone volume connected to the Bl...

Page 93: ... a track is selected playback starts automatically If the selected item has another layer you will enter the layer Repeat steps 2 and 3 until the desired track is played Holding 4 can skip 10 items at a time Themenuselectingmodewillbecanceled If no operations are done for about 5 seconds When you confirm the selection of a track Selecting the playback modes 1 2 Select your desired playback mode 7 ...

Page 94: ...iary input jack on the control panel Connecting an external component to the AUX input jack For selecting the external component connected to AUX input jack You can also select AUX IN as the playback source by pressing the SRC source button CD changer jack on the rear using KS U57 or KS U58 If EXT IN does not appear see page 14 and select the external input EXT INPUT Ÿ Turn on the connected compon...

Page 95: ...ation is erased when a new station is stored in the same preset number Disc operations Caution for DualDisc playback The Non DVD side of a DualDisc does not comply with the Compact Disc Digital Audio standard Therefore the use of Non DVD side of a DualDisc on this product may not be recommended General This unit has been designed to reproduce CDs CD Texts and CD Rs Recordable CD RWs Rewritable in ...

Page 96: ...h labels can be directly printed by an ink jet printer Using these discs under high temperature or high humidity may cause malfunctions or damage to the unit Playing an MP3 WMA disc This unit can play back MP3 WMA files with the extension code mp3 or wma regardless of the letter case upper lower This unit can show the names of albums artists performer and Tag Version 1 0 1 1 2 2 2 3 or 2 4 for MP3...

Page 97: ... depending on the Bluetooth version of the device This unit may not work for some Bluetooth devices Connecting condition may vary depending on the circumstances around you When the unit is turned off the device is disconnected Warning messages for Bluetooth operations ERROR CNNCT Error Connection The device is registered but the connection has failed Use CONNECT to connect the device again See pag...

Page 98: ...evel Q Freq Level Q Freq Level Q USER 60 Hz 00 Q1 0 1 0 kHz 00 Q1 25 7 5 kHz 00 Q1 25 OFF ROCK 100 Hz 03 Q1 0 1 0 kHz 00 Q1 25 10 0 kHz 02 Q1 25 CLASSIC 80 Hz 01 Q1 0 1 0 kHz 00 Q1 25 10 0 kHz 03 Q1 25 POP 100 Hz 02 Q1 0 1 0 kHz 01 Q1 25 10 0 kHz 02 Q1 25 HIP HOP 60 Hz 04 Q1 0 1 0 kHz 02 Q1 0 10 0 kHz 01 Q1 25 JAZZ 80 Hz 03 Q1 0 1 0 kHz 00 Q1 25 10 0 kHz 03 Q1 25 Freq Frequency Q Quality slope Gen...

Page 99: ...hold the disc by the edges Do not touch its recording surface When storing a disc in its case gently insert the disc around the center holder with the printed surface facing up Make sure to store discs in cases after use Connectors Center holder To keep discs clean A dirty disc may not play correctly If a disc does become dirty wipe it with a soft cloth in a straight line from center to edge Do no...

Page 100: ...e component which you used for recording Disc can be neither played back nor ejected Unlock the disc see page 10 Eject the disc forcibly see page 3 Disc sound is sometimes interrupted Stop playback while driving on rough roads Change the disc Check the cords and connections NO DISC appears on the display PLEASE and EJECT appear alternately on the display Insert a playable disc into the loading slo...

Page 101: ... After the device detects the unit select OPEN on the unit to connect the device See page 15 The unit does not make pairing with the Bluetooth device Enter the same PIN code for both the unit and target device Select the device name from SPECIAL then try to connect again See page 16 Try to pair connect from the Bluetooth device Echo or noise occurs Adjust the microphone unit position Phone sound q...

Page 102: ...storted Deactivate the equalizer either on the unit or the iPod NO IPOD appears on the display Check the connecting cable and its connection Charge the battery Playback stops The headphones are disconnected during playback Restart the playback operation using the control panel see pages 19 and 20 No sound can be heard when connecting an iPod nano Disconnect the headphones from the iPod nano Update...

Page 103: ...5 kHz Q Q slope Q0 5 to Q2 0 Frequency Response 40 Hz to 20 000 Hz Signal to Noise Ratio 70 dB Line Out Level Impedance 2 5 V 20 kΩ load full scale Subwoofer Out Level Impedance 2 5 V 20 kΩ load full scale Output Impedance 1 kΩ Other Terminal AUX auxiliary input jack CD changer jack TUNER SECTION Frequency Range FM 87 5 MHz to 108 0 MHz AM 531 kHz to 1 602 kHz FM Tuner Usable Sensitivity 11 3 dBf ...

Page 104: ...easurable limit MP3 Decoding Format MPEG1 2 Audio Layer 3 Max Bit Rate 320 kbps WMA Windows Media Audio Decoding Format Max Bit Rate 320 kbps GENERAL Power Requirement Operating Voltage DC 14 4 V 11 V to 16 V allowance Grounding System Negative ground Allowable Operating Temperature 0 C to 40 C Dimensions W H D approx Installation Size 182 mm 52 mm 160 mm Panel Size 187 mm 58 mm 6 mm Mass 1 3 kg e...

Page 105: ...EN TH 1107DTSMDTJEIN 2007 Victor Company of Japan Limited Having TROUBLE with operation Please reset your unit Refer to page of How to reset your unit ...

Page 106: ...ling the unit Be sure to ground this unit to the car s chassis again after installation Notes Replace the fuse with one of the specified rating If the fuse blows frequently consult your JVC car audio dealer It is recommended to connect speakers with a maximum power of more than 50 W both at the rear and at the front with an impedance of 4 Ω to 8 Ω If the maximum power is less than 50 W change AMP ...

Page 107: ...ºËπ æ ËÕ ª Õ ÀȵËÕ π È Ë INSTALLATION IN DASH MOUNTING The following illustration shows a typical installation If you have any questions or require information regarding installation kits consult your JVC car audio dealer or a company supplying kits If you are not sure how to install this unit correctly have it installed by a qualified technician When installing the unit without using the sleeve Ë...

Page 108: ... black stripe Ë ß Green Green with black stripe Gray Gray with black stripe White White with black stripe Right speaker rear æß À ß Left speaker rear æß È À ß Right speaker front æß ÀπÈ Left speaker front æß È ÀπÈ 1 Ë È ÀÈ ÿ ª Õ π È 2 ËÕπ µ Õ ß π Õß ÿ ª Õ π È ËÕπ Ë µ µ Èß µÈÕßµËÕ µ Ë π È ËÕπ π Èπ ª ËÕß Blue with white stripe πÈ ß π To the remote lead of other equipment 200 mA max µËÕ È Õª ÏÕË π π ...

Page 109: ...ke sure that the unit is turned off You can connect the following JVC components to the CD changer jack JVC component Model name CD changer CD CH CH X1500 etc You can also connect the following components through the various JVC adapters Connection cords may need to be purchased separately Component Adapter Model name Bluetooth device Bluetooth adapter KS BTA200 iPod Interface adapter for iPod KS ...

Page 110: ...nt Y connector not supplied for this unit Remote lead Subwoofer Rear speakers JVC Amplifier JVC Amplifier Set L O MODE to SUB W See page 14 of the INSTRUCTIONS Set L O MODE to REAR See page 14 of the INSTRUCTIONS Front speakers Signal cord not supplied for this unit Remote lead blue with white stripe To the remote lead of other equipment or automatic antenna if any C Connecting the external compon...

Page 111: ...G445 For canceling the display demonstration see page 6 Untuk membatalkan tampilan demonstrasi lihat halaman 6 For installation and connections refer to the separate manual Untuk instalasi dan penyambungan lihat buku pedoman terpisah INSTRUCTIONS BUKU PETUNJUK GET0537 004A UN ...

Page 112: ...ead all instructions carefully before operation to ensure your complete understanding and to obtain the best possible performance from the unit IMPORTANT FOR LASER PRODUCTS 1 CLASS 1 LASER PRODUCT 2 CAUTION Do not open the top cover There are no user serviceable parts inside the unit leave all servicing to qualified service personnel 3 CAUTION Visible and or invisible class 1M laser radiation when...

Page 113: ...6 KD G445 4 Remote controller RM RK50 5 Getting started 6 Basic operations 6 Radio operations 7 Disc operations 8 Playing a disc in the unit 8 Playing discs in the CD changer 9 Sound adjustments 11 General settings PSM 13 Using the Bluetooth devices 15 Using the Bluetooth cellular phone 16 Using the Bluetooth audio player 18 Bluetooth settings 18 iPod operations 19 Other external component operati...

Page 114: ...utton u MO monaural button i SSM Strong station Sequential Memory button o Number buttons RPT repeat button a RND random button s AUX auxiliary input jack d Status of Bluetooth device Device number 1 5 signal strength 0 3 battery reminder 0 3 Asthenumberincreases thesignal battery strengthbecomesstronger f Tr track indicator g Source display Track number Folder number Time countdown indicator h Bl...

Page 115: ...ing an MP3 disc on an MP3 compatible CD changer Changes the disc if pressed briefly Changes the folder if pressed and held While listening to an Apple iPod Pauses or resumes playback with D Enters the main menu with 5 U Now 5 U D 2 R F 3 work as the menu selecting buttons 5 U Returnstothepreviousmenu D Confirmstheselection 3 VOL VOL buttons Adjusts the volume level 4 SOUND button Selects the sound...

Page 116: ... exposed to direct sunlight for a long time otherwise it may explode Store the battery in a place where children cannot reach to avoid risk of accident To prevent the battery from over heating cracking or starting a fire Do not recharge short disassemble heat the battery or dispose of it in a fire Do not leave the battery with other metallic materials Do not poke the battery with tweezers or simil...

Page 117: ...tting the clock Select CLOCK HOUR then adjust the hour Select CLOCK MIN minute then adjust the minute 3 Finish the procedure To check the current clock time while the power is turned off Clock time is shown on the display for about 5 seconds See also page 13 Radiooperations Ÿ Start searching for a station When a station is received searching stops To stop searching press the same button again Ligh...

Page 118: ...al CD changer operations All tracks will be played repeatedly until you change the source or eject the disc Storing stations in memory You can preset six stations for each band FM station automatic presetting SSM Strong station Sequential Memory 1 Select the FM band FM1 FM3 you want to store into 2 3 SSM flashes then disappears when automatic presetting is over Local FM stations with the strongest...

Page 119: ... the CH X99 CH X100 and KD MK series CD changers with this unit You cannot play any WMA disc in the CD changer Disc text information recorded in the CD Text can be displayed when a JVC CD Text compatible CD changer is connected For connection see Installation Connection Manual separate volume To fast forward or reverse the track To go to the next or previous tracks To go to the next or previous fo...

Page 120: ...ponding indicator lights up on the display 1 IfthecurrentdiscisanaudioCD NONAME appears 2 IfanMP3 WMAfiledoesnothaveTaginformation foldernameandfilenameappear Inthiscase the TAGindicatorwillnotlightup Other main functions Skipping tracks quickly during play Only possible on JVC MP3 compatible CD changer For MP3 or WMA discs you can skip tracks within the same folder Ex To select track 32 while pla...

Page 121: ...L RND CD All tracks of the inserted disc CD CH All tracks of the discs in the magazine RND OFF Cancels 1 OnlywhileplayinganMP3oraWMAdisc 2 OnlywhileplayingdiscsintheCDchanger Corresponding indicator lights up on the display Continuedonthenextpage Soundadjustment You can select a preset sound mode suitable to the music genre iEQ intelligent equalizer Storing your own sound mode You can adjust the s...

Page 122: ...nce R06 to F06 BALANCE 3 Adjust the left and right speaker output balance L06 to R06 LOUD 4 loudness Boost low and high frequencies to produce a well balanced sound at a low volume level LOUD ON or LOUD OFF SUB W 1 subwoofer Adjust the subwoofer output level 00 to 08 initial 04 VOL ADJ volume adjust Adjust the volume level of each source except FM compared to the FM volume level The volume level w...

Page 123: ...DEMO OFF The display demonstration will be activated automatically if no operation is done for about 20 seconds 6 Cancels CLOCK DISP 1 Clock display CLOCK ON CLOCK OFF The clock time is shown on the display at all times when the power is turned off Cancels pressing DISP will show the clock time for about 5 seconds when the power is turned off 6 CLOCK HOUR Hour adjustment 1 12 Initial 1 1 00 6 CLOC...

Page 124: ... cutoff frequency LOW MID HIGH Frequencies lower than 90 Hz are sent to the subwoofer Frequencies lower than 135 Hz are sent to the subwoofer Frequencies lower than 180 Hz are sent to the subwoofer EXT INPUT 4 External input CHANGER EXT INPUT To use a JVC CD changer 8 an Apple iPod 19 To use any other external component 21 TAG DISPLAY Tag display TAG ON TAG OFF Shows the Tag information while play...

Page 125: ...vice Refer to the list included in the box to check the countries where you may use the Bluetooth function To use a Bluetooth device through the unit BT PHONE and BT AUDIO for the first time you need to establish Bluetooth wireless connection between the unit and the device Once the connection is established it is registered in the unit even if you reset your unit Up to five devices can be registe...

Page 126: ...y Now connection is established and you can use the device through the unit The device remains registered even after you disconnect the device Use CONNECT or activate AUTO CNNCT to connect the same device from next time on See the following and pages 18 and 19 Connecting a device Perform steps 1 and 2 on page 15 then 1 Select SEARCH to search for available devices The unit searches and displays th...

Page 127: ...essage appears on the display Making a call You can make a call using the following methods Select BT PHONE then follow the following steps to make a call 1 Display the Dial Menu 2 Call history 1 Select a call history REDIAL RECEIVED MISSED 2 Then select a name if it is acquired or phone number Phone book 1 Select PHONE BOOK The list of phone number appears 2 Select a name from the list Direct dia...

Page 128: ... to start playback Operate the Bluetooth audio player to pause playback if playback does not pause when you change the source Reverse skip forward skip Pause start playback Operationmaybedifferentaccording totheconnectedphone Enter setting menu Device list Refer also to page 16 for connecting disconnecting deleting a registered device Bluetooth Information If you wish to receive more information a...

Page 129: ...ejects all incoming calls MSG INFO message info Only for the device being connected for BT PHONE AUTOMATIC The unit informs you of the arrival of a message by ringing and displaying RCV MESSAGE receiving message MANUAL The unit does not inform you of the arrival of a message MIC SETTING microphone setting Only for the device being connected for BT PHONE Adjust microphone volume connected to the Bl...

Page 130: ... a track is selected playback starts automatically If the selected item has another layer you will enter the layer Repeat steps 2 and 3 until the desired track is played Holding 4 can skip 10 items at a time Themenuselectingmodewillbecanceled If no operations are done for about 5 seconds When you confirm the selection of a track Selecting the playback modes 1 2 Select your desired playback mode 7 ...

Page 131: ...iary input jack on the control panel Connecting an external component to the AUX input jack For selecting the external component connected to AUX input jack You can also select AUX IN as the playback source by pressing the SRC source button CD changer jack on the rear using KS U57 or KS U58 If EXT IN does not appear see page 14 and select the external input EXT INPUT Ÿ Turn on the connected compon...

Page 132: ...ation is erased when a new station is stored in the same preset number Disc operations Caution for DualDisc playback The Non DVD side of a DualDisc does not comply with the Compact Disc Digital Audio standard Therefore the use of Non DVD side of a DualDisc on this product may not be recommended General This unit has been designed to reproduce CDs CD Texts and CD Rs Recordable CD RWs Rewritable in ...

Page 133: ...h labels can be directly printed by an ink jet printer Using these discs under high temperature or high humidity may cause malfunctions or damage to the unit Playing an MP3 WMA disc This unit can play back MP3 WMA files with the extension code mp3 or wma regardless of the letter case upper lower This unit can show the names of albums artists performer and Tag Version 1 0 1 1 2 2 2 3 or 2 4 for MP3...

Page 134: ... depending on the Bluetooth version of the device This unit may not work for some Bluetooth devices Connecting condition may vary depending on the circumstances around you When the unit is turned off the device is disconnected Warning messages for Bluetooth operations ERROR CNNCT Error Connection The device is registered but the connection has failed Use CONNECT to connect the device again See pag...

Page 135: ...evel Q Freq Level Q Freq Level Q USER 60 Hz 00 Q1 0 1 0 kHz 00 Q1 25 7 5 kHz 00 Q1 25 OFF ROCK 100 Hz 03 Q1 0 1 0 kHz 00 Q1 25 10 0 kHz 02 Q1 25 CLASSIC 80 Hz 01 Q1 0 1 0 kHz 00 Q1 25 10 0 kHz 03 Q1 25 POP 100 Hz 02 Q1 0 1 0 kHz 01 Q1 25 10 0 kHz 02 Q1 25 HIP HOP 60 Hz 04 Q1 0 1 0 kHz 02 Q1 0 10 0 kHz 01 Q1 25 JAZZ 80 Hz 03 Q1 0 1 0 kHz 00 Q1 25 10 0 kHz 03 Q1 25 Freq Frequency Q Quality slope Gen...

Page 136: ...hold the disc by the edges Do not touch its recording surface When storing a disc in its case gently insert the disc around the center holder with the printed surface facing up Make sure to store discs in cases after use Connectors Center holder To keep discs clean A dirty disc may not play correctly If a disc does become dirty wipe it with a soft cloth in a straight line from center to edge Do no...

Page 137: ...e component which you used for recording Disc can be neither played back nor ejected Unlock the disc see page 10 Eject the disc forcibly see page 3 Disc sound is sometimes interrupted Stop playback while driving on rough roads Change the disc Check the cords and connections NO DISC appears on the display PLEASE and EJECT appear alternately on the display Insert a playable disc into the loading slo...

Page 138: ... After the device detects the unit select OPEN on the unit to connect the device See page 15 The unit does not make pairing with the Bluetooth device Enter the same PIN code for both the unit and target device Select the device name from SPECIAL then try to connect again See page 16 Try to pair connect from the Bluetooth device Echo or noise occurs Adjust the microphone unit position Phone sound q...

Page 139: ...storted Deactivate the equalizer either on the unit or the iPod NO IPOD appears on the display Check the connecting cable and its connection Charge the battery Playback stops The headphones are disconnected during playback Restart the playback operation using the control panel see pages 19 and 20 No sound can be heard when connecting an iPod nano Disconnect the headphones from the iPod nano Update...

Page 140: ...5 kHz Q Q slope Q0 5 to Q2 0 Frequency Response 40 Hz to 20 000 Hz Signal to Noise Ratio 70 dB Line Out Level Impedance 2 5 V 20 kΩ load full scale Subwoofer Out Level Impedance 2 5 V 20 kΩ load full scale Output Impedance 1 kΩ Other Terminal AUX auxiliary input jack CD changer jack TUNER SECTION Frequency Range FM 87 5 MHz to 108 0 MHz AM 531 kHz to 1 602 kHz FM Tuner Usable Sensitivity 11 3 dBf ...

Page 141: ...easurable limit MP3 Decoding Format MPEG1 2 Audio Layer 3 Max Bit Rate 320 kbps WMA Windows Media Audio Decoding Format Max Bit Rate 320 kbps GENERAL Power Requirement Operating Voltage DC 14 4 V 11 V to 16 V allowance Grounding System Negative ground Allowable Operating Temperature 0 C to 40 C Dimensions W H D approx Installation Size 182 mm 52 mm 160 mm Panel Size 187 mm 58 mm 6 mm Mass 1 3 kg e...

Page 142: ...imited EN IN 1107DTSMDTJEIN Having TROUBLE with operation Please reset your unit Refer to page of How to reset your unit Ada MASALAH dengan cara pengoperasian Setel kembali unit Anda Lihat halaman mengenai Bagaimana mereset unit anda ...

Page 143: ... speakers from being damaged see page 14 of the INSTRUCTIONS To prevent short circuits cover the terminals of the UNUSED leads with insulating tape The heat sink becomes very hot after use Be careful not to touch it when removing this unit INDONESIA Unit ini didisain untuk beroperasi hanya pada 12 V DC sistem listrik tanah NEGATIVE Jika kendaraan anda tidak memiliki sistem ini sebuah pembalik tega...

Page 144: ...a kuat pada tempatnya INSTALLATION IN DASH MOUNTING The following illustration shows a typical installation If you have any questions or require information regarding installation kits consult your JVC car audio dealer or a company supplying kits If you are not sure how to install this unit correctly have it installed by a qualified technician When installing the unit without using the sleeve Keti...

Page 145: ...ih White with black stripe Putih dengan strip hitam Right speaker rear Speaker kanan belakang Left speaker rear Speaker kiri belakang Right speaker front Speaker kanan depan Left speaker front Speaker kiri depan 1 Tidak disediakan untuk unit ini 2 Sebelum pengecekan pengoperasian dari unit ini sebelum pemasangan ujung ini harus sudah dihubungkan selain itu power tidak dapat dihidupkan Blue with wh...

Page 146: ... to the manuals supplied for the components and adapter CAUTION Before connecting the external components make sure that the unit is turned off You can connect the following JVC components to the CD changer jack JVC component Model name CD changer CD CH CH X1500 etc You can also connect the following components through the various JVC adapters Connection cords may need to be purchased separately C...

Page 147: ...ENGLISH CD RECEIVER KD G446 KD G445 KD G446 KD G445 For canceling the display demonstration see page 6 For installation and connections refer to the separate manual INSTRUCTIONS GET0537 005A UT ...

Page 148: ...ead all instructions carefully before operation to ensure your complete understanding and to obtain the best possible performance from the unit IMPORTANT FOR LASER PRODUCTS 1 CLASS 1 LASER PRODUCT 2 CAUTION Do not open the top cover There are no user serviceable parts inside the unit leave all servicing to qualified service personnel 3 CAUTION Visible and or invisible class 1M laser radiation when...

Page 149: ...6 KD G445 4 Remote controller RM RK50 5 Getting started 6 Basic operations 6 Radio operations 7 Disc operations 8 Playing a disc in the unit 8 Playing discs in the CD changer 9 Sound adjustments 11 General settings PSM 13 Using the Bluetooth devices 15 Using the Bluetooth cellular phone 16 Using the Bluetooth audio player 18 Bluetooth settings 18 iPod operations 19 Other external component operati...

Page 150: ...utton u MO monaural button i SSM Strong station Sequential Memory button o Number buttons RPT repeat button a RND random button s AUX auxiliary input jack d Status of Bluetooth device Device number 1 5 signal strength 0 3 battery reminder 0 3 Asthenumberincreases thesignal battery strengthbecomesstronger f Tr track indicator g Source display Track number Folder number Time countdown indicator h Bl...

Page 151: ...ing an MP3 disc on an MP3 compatible CD changer Changes the disc if pressed briefly Changes the folder if pressed and held While listening to an Apple iPod Pauses or resumes playback with D Enters the main menu with 5 U Now 5 U D 2 R F 3 work as the menu selecting buttons 5 U Returnstothepreviousmenu D Confirmstheselection 3 VOL VOL buttons Adjusts the volume level 4 SOUND button Selects the sound...

Page 152: ... exposed to direct sunlight for a long time otherwise it may explode Store the battery in a place where children cannot reach to avoid risk of accident To prevent the battery from over heating cracking or starting a fire Do not recharge short disassemble heat the battery or dispose of it in a fire Do not leave the battery with other metallic materials Do not poke the battery with tweezers or simil...

Page 153: ...tting the clock Select CLOCK HOUR then adjust the hour Select CLOCK MIN minute then adjust the minute 3 Finish the procedure To check the current clock time while the power is turned off Clock time is shown on the display for about 5 seconds See also page 13 Radiooperations Ÿ Start searching for a station When a station is received searching stops To stop searching press the same button again Ligh...

Page 154: ...al CD changer operations All tracks will be played repeatedly until you change the source or eject the disc Storing stations in memory You can preset six stations for each band FM station automatic presetting SSM Strong station Sequential Memory 1 Select the FM band FM1 FM3 you want to store into 2 3 SSM flashes then disappears when automatic presetting is over Local FM stations with the strongest...

Page 155: ... the CH X99 CH X100 and KD MK series CD changers with this unit You cannot play any WMA disc in the CD changer Disc text information recorded in the CD Text can be displayed when a JVC CD Text compatible CD changer is connected For connection see Installation Connection Manual separate volume To fast forward or reverse the track To go to the next or previous tracks To go to the next or previous fo...

Page 156: ...ponding indicator lights up on the display 1 IfthecurrentdiscisanaudioCD NONAME appears 2 IfanMP3 WMAfiledoesnothaveTaginformation foldernameandfilenameappear Inthiscase the TAGindicatorwillnotlightup Other main functions Skipping tracks quickly during play Only possible on JVC MP3 compatible CD changer For MP3 or WMA discs you can skip tracks within the same folder Ex To select track 32 while pla...

Page 157: ...L RND CD All tracks of the inserted disc CD CH All tracks of the discs in the magazine RND OFF Cancels 1 OnlywhileplayinganMP3oraWMAdisc 2 OnlywhileplayingdiscsintheCDchanger Corresponding indicator lights up on the display Continuedonthenextpage Soundadjustment You can select a preset sound mode suitable to the music genre iEQ intelligent equalizer Storing your own sound mode You can adjust the s...

Page 158: ...nce R06 to F06 BALANCE 3 Adjust the left and right speaker output balance L06 to R06 LOUD 4 loudness Boost low and high frequencies to produce a well balanced sound at a low volume level LOUD ON or LOUD OFF SUB W 1 subwoofer Adjust the subwoofer output level 00 to 08 initial 04 VOL ADJ volume adjust Adjust the volume level of each source except FM compared to the FM volume level The volume level w...

Page 159: ...DEMO OFF The display demonstration will be activated automatically if no operation is done for about 20 seconds 6 Cancels CLOCK DISP 1 Clock display CLOCK ON CLOCK OFF The clock time is shown on the display at all times when the power is turned off Cancels pressing DISP will show the clock time for about 5 seconds when the power is turned off 6 CLOCK HOUR Hour adjustment 1 12 Initial 1 1 00 6 CLOC...

Page 160: ... cutoff frequency LOW MID HIGH Frequencies lower than 90 Hz are sent to the subwoofer Frequencies lower than 135 Hz are sent to the subwoofer Frequencies lower than 180 Hz are sent to the subwoofer EXT INPUT 4 External input CHANGER EXT INPUT To use a JVC CD changer 8 an Apple iPod 19 To use any other external component 21 TAG DISPLAY Tag display TAG ON TAG OFF Shows the Tag information while play...

Page 161: ...vice Refer to the list included in the box to check the countries where you may use the Bluetooth function To use a Bluetooth device through the unit BT PHONE and BT AUDIO for the first time you need to establish Bluetooth wireless connection between the unit and the device Once the connection is established it is registered in the unit even if you reset your unit Up to five devices can be registe...

Page 162: ...y Now connection is established and you can use the device through the unit The device remains registered even after you disconnect the device Use CONNECT or activate AUTO CNNCT to connect the same device from next time on See the following and pages 18 and 19 Connecting a device Perform steps 1 and 2 on page 15 then 1 Select SEARCH to search for available devices The unit searches and displays th...

Page 163: ...essage appears on the display Making a call You can make a call using the following methods Select BT PHONE then follow the following steps to make a call 1 Display the Dial Menu 2 Call history 1 Select a call history REDIAL RECEIVED MISSED 2 Then select a name if it is acquired or phone number Phone book 1 Select PHONE BOOK The list of phone number appears 2 Select a name from the list Direct dia...

Page 164: ... to start playback Operate the Bluetooth audio player to pause playback if playback does not pause when you change the source Reverse skip forward skip Pause start playback Operationmaybedifferentaccording totheconnectedphone Enter setting menu Device list Refer also to page 16 for connecting disconnecting deleting a registered device Bluetooth Information If you wish to receive more information a...

Page 165: ...ejects all incoming calls MSG INFO message info Only for the device being connected for BT PHONE AUTOMATIC The unit informs you of the arrival of a message by ringing and displaying RCV MESSAGE receiving message MANUAL The unit does not inform you of the arrival of a message MIC SETTING microphone setting Only for the device being connected for BT PHONE Adjust microphone volume connected to the Bl...

Page 166: ... a track is selected playback starts automatically If the selected item has another layer you will enter the layer Repeat steps 2 and 3 until the desired track is played Holding 4 can skip 10 items at a time Themenuselectingmodewillbecanceled If no operations are done for about 5 seconds When you confirm the selection of a track Selecting the playback modes 1 2 Select your desired playback mode 7 ...

Page 167: ...iary input jack on the control panel Connecting an external component to the AUX input jack For selecting the external component connected to AUX input jack You can also select AUX IN as the playback source by pressing the SRC source button CD changer jack on the rear using KS U57 or KS U58 If EXT IN does not appear see page 14 and select the external input EXT INPUT Ÿ Turn on the connected compon...

Page 168: ...ation is erased when a new station is stored in the same preset number Disc operations Caution for DualDisc playback The Non DVD side of a DualDisc does not comply with the Compact Disc Digital Audio standard Therefore the use of Non DVD side of a DualDisc on this product may not be recommended General This unit has been designed to reproduce CDs CD Texts and CD Rs Recordable CD RWs Rewritable in ...

Page 169: ...h labels can be directly printed by an ink jet printer Using these discs under high temperature or high humidity may cause malfunctions or damage to the unit Playing an MP3 WMA disc This unit can play back MP3 WMA files with the extension code mp3 or wma regardless of the letter case upper lower This unit can show the names of albums artists performer and Tag Version 1 0 1 1 2 2 2 3 or 2 4 for MP3...

Page 170: ... depending on the Bluetooth version of the device This unit may not work for some Bluetooth devices Connecting condition may vary depending on the circumstances around you When the unit is turned off the device is disconnected Warning messages for Bluetooth operations ERROR CNNCT Error Connection The device is registered but the connection has failed Use CONNECT to connect the device again See pag...

Page 171: ...evel Q Freq Level Q Freq Level Q USER 60 Hz 00 Q1 0 1 0 kHz 00 Q1 25 7 5 kHz 00 Q1 25 OFF ROCK 100 Hz 03 Q1 0 1 0 kHz 00 Q1 25 10 0 kHz 02 Q1 25 CLASSIC 80 Hz 01 Q1 0 1 0 kHz 00 Q1 25 10 0 kHz 03 Q1 25 POP 100 Hz 02 Q1 0 1 0 kHz 01 Q1 25 10 0 kHz 02 Q1 25 HIP HOP 60 Hz 04 Q1 0 1 0 kHz 02 Q1 0 10 0 kHz 01 Q1 25 JAZZ 80 Hz 03 Q1 0 1 0 kHz 00 Q1 25 10 0 kHz 03 Q1 25 Freq Frequency Q Quality slope Gen...

Page 172: ...hold the disc by the edges Do not touch its recording surface When storing a disc in its case gently insert the disc around the center holder with the printed surface facing up Make sure to store discs in cases after use Connectors Center holder To keep discs clean A dirty disc may not play correctly If a disc does become dirty wipe it with a soft cloth in a straight line from center to edge Do no...

Page 173: ...e component which you used for recording Disc can be neither played back nor ejected Unlock the disc see page 10 Eject the disc forcibly see page 3 Disc sound is sometimes interrupted Stop playback while driving on rough roads Change the disc Check the cords and connections NO DISC appears on the display PLEASE and EJECT appear alternately on the display Insert a playable disc into the loading slo...

Page 174: ... After the device detects the unit select OPEN on the unit to connect the device See page 15 The unit does not make pairing with the Bluetooth device Enter the same PIN code for both the unit and target device Select the device name from SPECIAL then try to connect again See page 16 Try to pair connect from the Bluetooth device Echo or noise occurs Adjust the microphone unit position Phone sound q...

Page 175: ...storted Deactivate the equalizer either on the unit or the iPod NO IPOD appears on the display Check the connecting cable and its connection Charge the battery Playback stops The headphones are disconnected during playback Restart the playback operation using the control panel see pages 19 and 20 No sound can be heard when connecting an iPod nano Disconnect the headphones from the iPod nano Update...

Page 176: ...5 kHz Q Q slope Q0 5 to Q2 0 Frequency Response 40 Hz to 20 000 Hz Signal to Noise Ratio 70 dB Line Out Level Impedance 2 5 V 20 kΩ load full scale Subwoofer Out Level Impedance 2 5 V 20 kΩ load full scale Output Impedance 1 kΩ Other Terminal AUX auxiliary input jack CD changer jack TUNER SECTION Frequency Range FM 87 5 MHz to 108 0 MHz AM 531 kHz to 1 602 kHz FM Tuner Usable Sensitivity 11 3 dBf ...

Page 177: ...easurable limit MP3 Decoding Format MPEG1 2 Audio Layer 3 Max Bit Rate 320 kbps WMA Windows Media Audio Decoding Format Max Bit Rate 320 kbps GENERAL Power Requirement Operating Voltage DC 14 4 V 11 V to 16 V allowance Grounding System Negative ground Allowable Operating Temperature 0 C to 40 C Dimensions W H D approx Installation Size 182 mm 52 mm 160 mm Panel Size 187 mm 58 mm 6 mm Mass 1 3 kg e...

Page 178: ... 2007 Victor Company of Japan Limited EN CT 1107DTSMDTJEIN Having TROUBLE with operation Please reset your unit Refer to page of How to reset your unit ...

Page 179: ...ircuits we recommend that you disconnect the battery s negative terminal and make all electrical connections before installing the unit Be sure to ground this unit to the car s chassis again after installation Notes Replace the fuse with one of the specified rating If the fuse blows frequently consult your JVC car audio dealer It is recommended to connect speakers with a maximum power of more than...

Page 180: ... to hold the sleeve firmly in place 弄彎機殼的突舌 把外套機殼牢固 在儀表板內 INSTALLATION IN DASH MOUNTING The following illustration shows a typical installation If you have any questions or require information regarding installation kits consult your JVC car audio dealer or a company supplying kits If you are not sure how to install this unit correctly have it installed by a qualified technician When installing th...

Page 181: ...Purple 紫色 Purple with black stripe 紫色帶有黑色條紋 Green 綠色 Green with black stripe 綠色帶有黑色條紋 Gray 灰色 Gray with black stripe 灰色帶有黑色條紋 White 白色 White with black stripe 白色帶有黑色條紋 Right speaker rear 右揚聲器 後置 Left speaker rear 左揚聲器 後置 Right speaker front 右揚聲器 前置 Left speaker front 左揚聲器 前置 1 不隨本機提供 2 本機未安裝時 進行工作狀況檢查之前 必須把這導線接上 否則不能開啟電源 Blue with white stripe 藍色帶有白色條紋 To the remote lead of other equipment 200 mA ...

Page 182: ...el name CD changer CD CH CH X1500 etc You can also connect the following components through the various JVC adapters Connection cords may need to be purchased separately Component Adapter Model name Bluetooth device Bluetooth adapter KS BTA200 iPod Interface adapter for iPod KS PD100 Portable audio player with line output jacks Line input adapter KS U57 Portable audio player with 3 5 mm stereo min...

Reviews: