background image

15

HV-Z34L1/29V1/ LCT1457-001A / English

Remote control buttons and functions

Freeze function 

1 Set the PIP/TV/DVD switch to the PIP 

position.

2 Press the 

 (

Freeze) button.

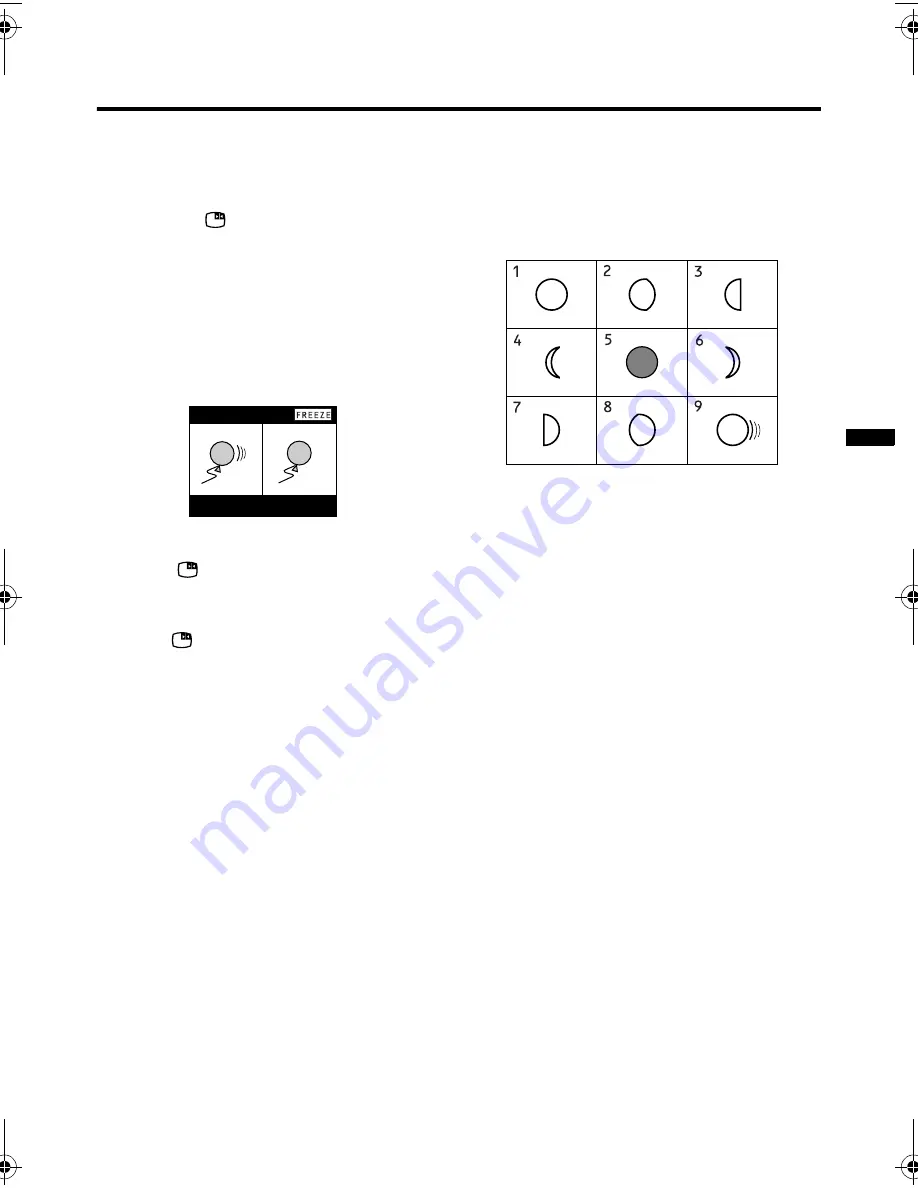
Still picture is captured and displayed on 
the right side of the screen. On the left, 

the moving picture is displayed.

While watching a picture, you can 
capture a still picture you want. The 

captured still picture and the moving 

picture are displayed at a time. (They are 
the pictures of the same source.)

To return to the normal screen:

Press the 

 (Freeze) button again or 

press the BACK button, the CHANNEL 

p


buttons or the number buttons.

• The 

 (Freeze) button do not work in 

the Text mode, Twin mode, or PIP 
mode.

• The FREEZE function does not work 

for picture of 1125i signal.

Strobe function 

You can display eight consecutive still 
pictures and one moving picture at a time. 
(They are the pictures of the same source.)

1 Set the PIP/TV/DVD switch to the PIP 

position.

2 Press the STROBE button.

Eight consecutive still pictures which are 
captured at intervals of about 0.2 second 

are displayed in the order of “1” to “9”. 

(These numbers are not actually 
displayed.)

To return to the normal screen:

Press the STROBE button again or press 
the BACK button, the CHANNEL 

p


buttons or the number buttons.

• If signal level of the main picture is 

weak, the still images become 
abnormal.

• The STROBE button do not work in the 

Text mode, Twin mode, or PIP mode.

• The STROBE function does not work 

for picture of 1125i signal.

• The menu cannot be displayed in the 

STROBE mode.

Moving 

picture

Still 

picture

HVZ34L1_Z29V1.book  Page 15  Friday, November 7, 2003  9:30 AM

Summary of Contents for HV-Z29V1, HV-Z34L1

Page 1: ...2003 VICTOR COMPANY OF JAPAN LIMITED Setting up your TV 3 TV buttons and functions 6 Remote control buttons and functions 8 Using the TV s menu 19 PICTURE menu 20 FEATURES menu 21 SOUND menu 24 FEATURES menu 26 SETUP menu 29 Additional preparation 36 Troubleshooting 40 Specifications 43 ...

Page 2: ... damaged Be very careful with it when handling the TV Should the TV screen become soiled wipe it with a soft dry cloth Never use rub it forcefully Never use any cleaner or detergent on it 7 If you are not going to use this TV for a long period of time be sure to disconnect the AC plug from the AC socket 8 The apparatus shall not be exposed to dripping or splashing and that no objects filled with l...

Page 3: ...quality 75 ohm coaxial cable Read the manual that came with the VCR before connecting If not connecting a VCR see Fig A Connect an aerial cable to the aerial socket on this TV If connecting a VCR see Fig B 1 Connect the aerial cable to the aerial input socket on the VCR and connect the VCR and TV with another aerial cable 2 Connect the VCR s VIDEO OUT video output jack and the TV s VIDEO jack with...

Page 4: ...d the JVC logo is displayed 1 Press the main power button on the TV The TV is turned on and the JVC logo appears If the POWER lamp on the TV lights red and does not change to green your TV is in the standby mode Press the button on the remote control to turn the TV on If the JVC logo does not appear your TV has already been turned before In this case use the LANGUAGE TELETEXT LANGUAGE and AUTO PRO...

Page 5: ...e numbers PR list the EDIT menu appears You can proceed to edit the programme numbers list using the EDIT MANUAL function For details see EDIT MANUAL on page 30 If a TV channel you want to view is not stored in the programme numbers list you can register it using the MANUAL function For details see EDIT MANUAL on page 30 The AUTO PROGRAM function does not store a TV channel to the programme number...

Page 6: ... while it is in standby mode Choose a TV channel Press the CHANNEL buttons 5 Choose a VIDEO terminal Press the TV VIDEO button 3 or CHANNEL buttons 5 Adjust the volume Press the VOLUME buttons 4 The volume level indicator appears MENU button 6 Press to open the menu For details see Operation with the buttons on the TV on page 20 Remote control sensor 7 VIDEO 4 terminal 8 See page 36 Headphone jack...

Page 7: ...2 COMPONENT terminal See pages 33 and 36 VIDEO 3 COMPONENT terminal See pages 33 and 36 OUTPUT terminal See page 37 Aerial socket Connect the aerial cable See page 3 AV COMPU LINK terminal See page 38 BASS SPEAKER OUT terminal only for HV Z29V1 See page 3 0 Back of the TV ...

Page 8: ...rogramme number PR with the number buttons Example PR 6 press 6 PR 12 press 1 and 2 You can select a channel from the PR LIST For details see DISPLAY button on page 11 If you do not have a clear picture or no colour appears follow the operation procedure COLOUR SYSTEM on page 23 SOUND MODE CINEMA SURROUND BASS ZOOM F T L TOP MENU STROBE DVD PIP T V 1 2 3 4 5 6 7 8 9 0 RETURN TV VIDEO MENU DISPLAY ...

Page 9: ...V screen The left side and right side of the Wide picture 16 9 aspect ratio will be cut off 16 9 This mode converts a normal picture 4 3 aspect ratio into a Wide picture 16 9 aspect ratio Use for picture with a 16 9 aspect ratio that have been squeezed into a normal picture 4 3 aspect ratio you can restore their original dimensions When a 1125i signal is input the 16 9 aspect ratio is chosen autom...

Page 10: ...s sound and choosing HIGH will increase the bass sound RETURN button The RETURN button has two functions the RETURN function and the RETURN function If a channel has been registered as the Return Channel the RETURN function operates If there is no setting for the Return Channel the RETURN function operates RETURN function By registering a channel you frequently view as the Return Channel you can s...

Page 11: ... PR LIST 2 Press the 6 and 5 buttons to choose a programme number or VIDEO terminal Then press the OK button For programme numbers with the CHANNEL GUARD function set the n CHANNEL GUARD mark is displayed next to the programme number in the PR LIST The VIDEO terminals are registered after the programme number PR99 The AV channel channel number 0 in the PR LIST will be chosen only if you connect th...

Page 12: ...ting the picture effect below Setting the picture effect Each colour button has a dedicated picture effect When you choose a favorite channel with a colour button the dedicated picture effect is used When shipped the factory set picture effect is used for this purpose However you can set this picture effect as required For details see FAVORITE SETTING on page 28 Showing the favorite channels Press...

Page 13: ...s while listening to the sound of the main picture from the TV speakers For details see HEADPHONE VOLUME on page 25 The sub picture sound is monaural TV channel selection For the main picture Choose a channel using the CHANNELp buttons or the number buttons For the sub picture Choose a channel using the SUB P6 buttons Input source selection TV VIDEO 1 2 3 or 4 For the main picture Press the TV VID...

Page 14: ...e picture you choose changes to a moving picture 9 pictures multi Choose by pressing 56 5 pictures multi Choose by pressing 6 4 Press the OK button The multi pictures disappears and the chosen picture appears Changing the multi picture mode See MULTI on page 24 Cancelling the multi pictures Press the BACK button CHANNELp buttons the number buttons or OK button You can also enter this mode while in...

Page 15: ...unction does not work for picture of 1125i signal Strobe function You can display eight consecutive still pictures and one moving picture at a time They are the pictures of the same source 1 Set the PIP TV DVD switch to the PIP position 2 Press the STROBE button Eight consecutive still pictures which are captured at intervals of about 0 2 second are displayed in the order of 1 to 9 These numbers a...

Page 16: ...depending on the device Viewing a teletext programme 1 Choose a TV channel with a teletext broadcast 2 Set the PIP TV DVD switch to the TV position 3 Press P Text button to display the teletext Pressing P Text button changes the mode as follows 4 Choose a teletext page by pressing the CHANNEL p buttons number buttons or colour buttons To return to the TV mode Press the P Text BACK or TV VIDEO butt...

Page 17: ...tton In the List mode you can return to the page number displayed in the lower left area of the screen Cancel button You can search for a teletext page while watching TV 1 Press the number button to enter a page number or press the colour button The TV searches for a teletext page 2 Press the Cancel button The TV programme appears When the TV finds the teletext page its page number appears in the ...

Page 18: ...tored page numbers are displayed at the bottom of the screen 2 Press a colour button to choose a position Then press the number buttons to enter the page number 3 Press and hold down the Store button The four page numbers blink white to indicate that they are stored in memory To call up a stored page 1 Press the F T L button to engage the List mode 2 Press a colour button to which a page has been ...

Page 19: ...ypes of menu The menu guide area can be made to appear and disappear for some menus While the menu is displayed press the DISPLAY button to change between the guide area being displayed and not displayed The guide area for some menus will still be displayed even if the DISPLAY button is pressed This is not a malfunction 7 8 9 0 RETURN TV VIDEO MENU DISPLAY CHANNEL VOLUME BACK FAVORITE CHANNEL SUB ...

Page 20: ...DARD Standardizes picture adjustment SOFT Softens contrast and sharpness Adjusting the picture You can change the picture settings of each picture mode as you like The picture settings changed are stored in the picture mode CONTRAST You can adjust the picture contrast 2 lower 3 higher BRIGHT You can adjust the picture brightness 2 darker 3 brighter SHARP You can adjust the picture sharpness 2 soft...

Page 21: ... films FEATURES menu Choose FEATURES in the PICTURE menu and press the a or 3 button to display the sub menu DIGITAL VNR The DIGITAL VNR function cuts down the amount of noise in the original picture You can choose from the four DIGITAL VNR function settings of AUTO LOW AUTO HIGH MIN and MAX AUTO LOW AUTO HIGH The TV will automatically adjust the level of the DIGITAL VNR effect to match the amount...

Page 22: ...lly on the screen The effect level of the picture motion compensation function cannot be changed The effect level is the same no matter which of the AUTO MIN or MAX settings is used AUTO The TV will automatically adjust the level of the DigiPure effect to match the amount of noise in the picture giving the best possible picture MIN The level of DigiPure effect is set to the minimum When you set th...

Page 23: ... appropriate colour system Then press the a button PAL PAL system SECAM SECAM system NTSC 3 58 NTSC 3 58 MHz system NTSC 4 43 NTSC 4 43 MHz system AUTO This function detects a colour system from the input signal The AUTO function may not function properly if you have poor signal quality If the picture is abnormal in the AUTO function choose another colour system manually For colour system in your ...

Page 24: ...work for the sound from the headphones When the headphones are connected and only one screen is displayed STEREO I II and HEADPHONE VOLUME can be used STEREO I II When you are viewing a bilingual broadcast programme you can choose the sound from Bilingual I sub I or Bilingual II sub II When the stereo broadcasting is received poorly you can change from stereo to mono sound so that you can hear the...

Page 25: ...sub picture sound which is heard through the headphones when set to Twin mode PIP mode or 5 pictures multi 2 Reduce volume 3 Increase volume When not set to Twin mode or PIP mode the headphone volume is adjusted with the r q volume buttons CINEMA SURROUND You can enjoy Surround sound with a live effect by using the CINEMA SURROUND function You can choose a CINEMA SURROUND mode from HIGH LOW MONO a...

Page 26: ...do not want your children to watch you can lock out the channel Even when a child chooses a programme number for a locked out channel the screen will change to blue and display n so the channel cannot be viewed To set this function 1 Choose CHANNEL GUARD then press the number 0 button 2 Set the ID number you want To choose a number Press the 6 buttons To move a cursor Press the 5 buttons 3 Press t...

Page 27: ... the 5 button and choose the format in which the channel number is displayed from the three types TYPE A TYPE B and TYPE C BLUE BACK You can set the TV to automatically change to a blue screen and mute the sound if the signal is weak or absent or when there is no input from an external device ON This function is turned on OFF This function is turned off CHILD LOCK You can disable the front control...

Page 28: ...is used For details of each item see PICTURE MODE on page 20 DIGITAL VNR on page 21 WHITE BALANCE on page 21 Super DigiPure on page 22 When shipped Pressing the blue button returns each setting back to initial setting and cancels the favorite channel registration 5 Press the OK button to complete the setting VIDEO SETTING You can set a dedicated picture effect for the video inputs VIDEO 1 to 4 1 C...

Page 29: ...O PROGRAM You can automatically register the TV channels which can be received well at your residence in the TV s programme numbers by performing the following 1 Choose AUTO PROGRAM then press the OK button The AUTO PROGRAM function starts The TV channels you receive are automatically stored in the programme numbers list To stop the AUTO PROGRAM function press the OK button 2 After the TV channels...

Page 30: ...programme number of some of the TV channels will change When a TV channel which has been locked out using the CHANNEL GUARD function using the MANUAL function for that TV channel cancels the CHANNEL GUARD function When a TV channel has already been registered in PR 99 using the INSERT function deletes the TV channel 1 Choose EDIT MANUAL then press the OK or 3 button 2 Follow the operation descript...

Page 31: ...E 1 Press the 6 buttons to choose a TV channel 2 Press the yellow button to delete the TV channel The TV channel is deleted from the programme numbers list MANUAL 1 Press the 6 buttons to choose a programme number to which you want to register a new TV channel 2 Press the blue button to activate the MANUAL function At the right side following the CH CC number the SYSTEM sound system of the TV chan...

Page 32: ...page 35 1 Press the 6 buttons to choose a programme number for which you will register a new TV channel 2 Press the green button to start the INSERT function 3 Press the 6 buttons to choose CC or CH according to the CH CC number of the TV channel To cancel the INSERT function Press the BACK button 4 Press the Number buttons to enter the remaining CH CC number The TV shifts to registration mode Whe...

Page 33: ...nput from the external device connected to the VIDEO 2 or VIDEO 3 terminal If this setting is incorrect images will not be displayed VIDEO If a normal video signal composite video signal is input COMPONENT If a Component video signal Y Cb Pb Cr Pr signals is input For detailed connecting methods see Additional preparation on page 36 This Television is compatible with the 1125i 625p or 525p video s...

Page 34: ...t language group that you select the sub titles of the teletext program will not be displayed properly Group Languages GROUP 1 Turkish Hungarian English German French Italian Spanish Portuguese Greek Swedish Finnish GROUP 2 Polish Serbian Croatian Slovenian Czech Slovak Rumanian Hungarian German French Italian Swedish Finnish GROUP 3 Russian Bulgarian Lettish Lithuanian Estonian Ukrainian Serbian ...

Page 35: ... 75 X CC 76 Y R3 CC 77 Z R4 AU 3 CC 78 Z 1 R5 CC 79 Z 2 AU 4 CC 95 A 5 CC 96 A 4 CC 97 A 3 CC 98 A 2 CC 99 A 1 CH US CCIR OIRT AUSTRALIA CH 02 US 2 E2 R1 AU 0 CH 03 US 3 E3 AU 1 CH 04 US 4 E4 R2 AU 2 CH 05 US 5 E5 R6 AU 6 CH 06 US 6 E6 R7 AU 7 CH 07 US 7 E7 R8 AU 8 CH 08 US 8 E8 R9 AU 9 CH 09 US 9 E9 CH 10 US 10 E10 R10 AU 10 CH 11 US 11 E11 R11 AU 11 CH 12 US 12 E12 R12 CH 13 US 13 CH 14 US 14 W ...

Page 36: ...ications on page 43 contains the details of the VIDEO terminals If you are connecting a device not listed in the following connection diagram see the Specifications to choose the best VIDEO terminal Note that connecting cables are not supplied 1 VCR composite signal 2 VCR S VIDEO signal Y C 3 VCR for recording composite signal 4 DVD player composite signal 5 DVD player S VIDEO signal Y C 6 DVD pla...

Page 37: ... the VIDEO 2 COMPONENT or VIDEO 3 COMPONENT terminal with a video cable Connect the TV s VIDEO jack and the device s VIDEO OUT video output jack with a video cable Then set the VIDEO 2 SETTING or VIDEO 3 SETTING to VIDEO according to VIDEO 2 SETTING VIDEO 3 SETTING on page 33 In the VIDEO 4 terminal the VIDEO jack is indicated by V 2 Connect the TV s AUDIO jacks L MONO and R and the device s AUDIO...

Page 38: ...ns or the MUTING button on the TV s remote control to cancel the MUTING function You can regain the sound from the TV s speakers Conditions to use the AV COMPU LINK remote control system A device equipped with an AV COMPU LINK terminal is required You must connect the TV and the device with an AV COMPU LINK cable AV COMPU LINK cable is not supplied with this TV If an AV COMPU LINK cable is unavail...

Page 39: ...ENT terminal Set the VCR s remote control code to B code If a DVD player is connected to the VIDEO 2 COMPONENT terminal Set the DVD player s AV COMPULINK MODE to DVD3 If a DVD player is connected to the VIDEO 3 COMPONENT terminal with a component video cable Set the DVD player s AV COMPULINK MODE to DVD1 For instructions on how to change the device s setting refer to the device s instruction manua...

Page 40: ...picture No sound Have you chosen a TV channel whose reception is extremely bad In this case the BLUE BACK function will be activated the entire screen becomes blue and the sound is muted In spite of this if you want to view the TV channel follow the description BLUE BACK on page 27 to try to change the BLUE BACK function setting to OFF Are your SOUND SYSTEM settings for the TV channels correct Fol...

Page 41: ...he batteries of the remote control become exhausted Follow the description Putting the batteries into the remote control on page 4 and replace them with new batteries to try solve the problem Have you attempted to use the remote control at the sides or rear of the TV or at a location more than seven meters apart from the TV location Operate the remote control in the front of your TV or a location ...

Page 42: ...lete the tilt It takes a short period of time from the time an operation such as changing channels is performed until an image is displayed This is not a malfunction This is the time required for the image to stabilize before it can be displayed The TV may emit a crackling sound due to a sudden change in temperature It does not matter if a picture or sound does not show any abnormality If you hear...

Page 43: ...T LANGUAGE on page 34 Power requirements AC 110 to 240V 50 60Hz Audio output Rated Power output 15W 15W HV Z34L1 10W 10W 18W HV Z29V1 VIDEO 1 terminal RCA connector 3 S VIDEO connector 1 Video input S VIDEO Y C input and Audio L R inputs are available VIDEO 2 COMPONENT RCA connector 6 Video input Componet video Y Cb Pb Cr Pr input and Audio L R inputs are available 625p 525p and 1125i signals are ...

Page 44: ...VICTOR COMPANY OF JAPAN LIMITED VICTOR COMPANY OF JAPAN LIMITED ...

Page 45: ...2003 VICTOR COMPANY OF JAPAN LIMITED Setting up your TV 3 TV buttons and functions 6 Remote control buttons and functions 8 Using the TV s menu 19 PICTURE menu 20 FEATURES menu 21 SOUND menu 24 FEATURES menu 26 SETUP menu 29 Additional preparation 36 Troubleshooting 40 Specifications 43 ...

Page 46: ... damaged Be very careful with it when handling the TV Should the TV screen become soiled wipe it with a soft dry cloth Never use rub it forcefully Never use any cleaner or detergent on it 7 If you are not going to use this TV for a long period of time be sure to disconnect the AC plug from the AC socket 8 The apparatus shall not be exposed to dripping or splashing and that no objects filled with l...

Page 47: ...quality 75 ohm coaxial cable Read the manual that came with the VCR before connecting If not connecting a VCR see Fig A Connect an aerial cable to the aerial socket on this TV If connecting a VCR see Fig B 1 Connect the aerial cable to the aerial input socket on the VCR and connect the VCR and TV with another aerial cable 2 Connect the VCR s VIDEO OUT video output jack and the TV s VIDEO jack with...

Page 48: ...d the JVC logo is displayed 1 Press the main power button on the TV The TV is turned on and the JVC logo appears If the POWER lamp on the TV lights red and does not change to green your TV is in the standby mode Press the button on the remote control to turn the TV on If the JVC logo does not appear your TV has already been turned before In this case use the LANGUAGE TELETEXT LANGUAGE and AUTO PRO...

Page 49: ...e numbers PR list the EDIT menu appears You can proceed to edit the programme numbers list using the EDIT MANUAL function For details see EDIT MANUAL on page 30 If a TV channel you want to view is not stored in the programme numbers list you can register it using the MANUAL function For details see EDIT MANUAL on page 30 The AUTO PROGRAM function does not store a TV channel to the programme number...

Page 50: ... while it is in standby mode Choose a TV channel Press the CHANNEL buttons 5 Choose a VIDEO terminal Press the TV VIDEO button 3 or CHANNEL buttons 5 Adjust the volume Press the VOLUME buttons 4 The volume level indicator appears MENU button 6 Press to open the menu For details see Operation with the buttons on the TV on page 20 Remote control sensor 7 VIDEO 4 terminal 8 See page 36 Headphone jack...

Page 51: ...2 COMPONENT terminal See pages 33 and 36 VIDEO 3 COMPONENT terminal See pages 33 and 36 OUTPUT terminal See page 37 Aerial socket Connect the aerial cable See page 3 AV COMPU LINK terminal See page 38 BASS SPEAKER OUT terminal only for HV Z29V1 See page 3 0 Back of the TV ...

Page 52: ...rogramme number PR with the number buttons Example PR 6 press 6 PR 12 press 1 and 2 You can select a channel from the PR LIST For details see DISPLAY button on page 11 If you do not have a clear picture or no colour appears follow the operation procedure COLOUR SYSTEM on page 23 SOUND MODE CINEMA SURROUND BASS ZOOM F T L TOP MENU STROBE DVD PIP T V 1 2 3 4 5 6 7 8 9 0 RETURN TV VIDEO MENU DISPLAY ...

Page 53: ...V screen The left side and right side of the Wide picture 16 9 aspect ratio will be cut off 16 9 This mode converts a normal picture 4 3 aspect ratio into a Wide picture 16 9 aspect ratio Use for picture with a 16 9 aspect ratio that have been squeezed into a normal picture 4 3 aspect ratio you can restore their original dimensions When a 1125i signal is input the 16 9 aspect ratio is chosen autom...

Page 54: ...s sound and choosing HIGH will increase the bass sound RETURN button The RETURN button has two functions the RETURN function and the RETURN function If a channel has been registered as the Return Channel the RETURN function operates If there is no setting for the Return Channel the RETURN function operates RETURN function By registering a channel you frequently view as the Return Channel you can s...

Page 55: ... PR LIST 2 Press the 6 and 5 buttons to choose a programme number or VIDEO terminal Then press the OK button For programme numbers with the CHANNEL GUARD function set the n CHANNEL GUARD mark is displayed next to the programme number in the PR LIST The VIDEO terminals are registered after the programme number PR99 The AV channel channel number 0 in the PR LIST will be chosen only if you connect th...

Page 56: ...ting the picture effect below Setting the picture effect Each colour button has a dedicated picture effect When you choose a favorite channel with a colour button the dedicated picture effect is used When shipped the factory set picture effect is used for this purpose However you can set this picture effect as required For details see FAVORITE SETTING on page 28 Showing the favorite channels Press...

Page 57: ...s while listening to the sound of the main picture from the TV speakers For details see HEADPHONE VOLUME on page 25 The sub picture sound is monaural TV channel selection For the main picture Choose a channel using the CHANNELp buttons or the number buttons For the sub picture Choose a channel using the SUB P6 buttons Input source selection TV VIDEO 1 2 3 or 4 For the main picture Press the TV VID...

Page 58: ...e picture you choose changes to a moving picture 9 pictures multi Choose by pressing 56 5 pictures multi Choose by pressing 6 4 Press the OK button The multi pictures disappears and the chosen picture appears Changing the multi picture mode See MULTI on page 24 Cancelling the multi pictures Press the BACK button CHANNELp buttons the number buttons or OK button You can also enter this mode while in...

Page 59: ...unction does not work for picture of 1125i signal Strobe function You can display eight consecutive still pictures and one moving picture at a time They are the pictures of the same source 1 Set the PIP TV DVD switch to the PIP position 2 Press the STROBE button Eight consecutive still pictures which are captured at intervals of about 0 2 second are displayed in the order of 1 to 9 These numbers a...

Page 60: ...depending on the device Viewing a teletext programme 1 Choose a TV channel with a teletext broadcast 2 Set the PIP TV DVD switch to the TV position 3 Press P Text button to display the teletext Pressing P Text button changes the mode as follows 4 Choose a teletext page by pressing the CHANNEL p buttons number buttons or colour buttons To return to the TV mode Press the P Text BACK or TV VIDEO butt...

Page 61: ...tton In the List mode you can return to the page number displayed in the lower left area of the screen Cancel button You can search for a teletext page while watching TV 1 Press the number button to enter a page number or press the colour button The TV searches for a teletext page 2 Press the Cancel button The TV programme appears When the TV finds the teletext page its page number appears in the ...

Page 62: ...tored page numbers are displayed at the bottom of the screen 2 Press a colour button to choose a position Then press the number buttons to enter the page number 3 Press and hold down the Store button The four page numbers blink white to indicate that they are stored in memory To call up a stored page 1 Press the F T L button to engage the List mode 2 Press a colour button to which a page has been ...

Page 63: ...ypes of menu The menu guide area can be made to appear and disappear for some menus While the menu is displayed press the DISPLAY button to change between the guide area being displayed and not displayed The guide area for some menus will still be displayed even if the DISPLAY button is pressed This is not a malfunction 7 8 9 0 RETURN TV VIDEO MENU DISPLAY CHANNEL VOLUME BACK FAVORITE CHANNEL SUB ...

Page 64: ...DARD Standardizes picture adjustment SOFT Softens contrast and sharpness Adjusting the picture You can change the picture settings of each picture mode as you like The picture settings changed are stored in the picture mode CONTRAST You can adjust the picture contrast 2 lower 3 higher BRIGHT You can adjust the picture brightness 2 darker 3 brighter SHARP You can adjust the picture sharpness 2 soft...

Page 65: ... films FEATURES menu Choose FEATURES in the PICTURE menu and press the a or 3 button to display the sub menu DIGITAL VNR The DIGITAL VNR function cuts down the amount of noise in the original picture You can choose from the four DIGITAL VNR function settings of AUTO LOW AUTO HIGH MIN and MAX AUTO LOW AUTO HIGH The TV will automatically adjust the level of the DIGITAL VNR effect to match the amount...

Page 66: ...lly on the screen The effect level of the picture motion compensation function cannot be changed The effect level is the same no matter which of the AUTO MIN or MAX settings is used AUTO The TV will automatically adjust the level of the DigiPure effect to match the amount of noise in the picture giving the best possible picture MIN The level of DigiPure effect is set to the minimum When you set th...

Page 67: ... appropriate colour system Then press the a button PAL PAL system SECAM SECAM system NTSC 3 58 NTSC 3 58 MHz system NTSC 4 43 NTSC 4 43 MHz system AUTO This function detects a colour system from the input signal The AUTO function may not function properly if you have poor signal quality If the picture is abnormal in the AUTO function choose another colour system manually For colour system in your ...

Page 68: ...work for the sound from the headphones When the headphones are connected and only one screen is displayed STEREO I II and HEADPHONE VOLUME can be used STEREO I II When you are viewing a bilingual broadcast programme you can choose the sound from Bilingual I sub I or Bilingual II sub II When the stereo broadcasting is received poorly you can change from stereo to mono sound so that you can hear the...

Page 69: ...sub picture sound which is heard through the headphones when set to Twin mode PIP mode or 5 pictures multi 2 Reduce volume 3 Increase volume When not set to Twin mode or PIP mode the headphone volume is adjusted with the r q volume buttons CINEMA SURROUND You can enjoy Surround sound with a live effect by using the CINEMA SURROUND function You can choose a CINEMA SURROUND mode from HIGH LOW MONO a...

Page 70: ...do not want your children to watch you can lock out the channel Even when a child chooses a programme number for a locked out channel the screen will change to blue and display n so the channel cannot be viewed To set this function 1 Choose CHANNEL GUARD then press the number 0 button 2 Set the ID number you want To choose a number Press the 6 buttons To move a cursor Press the 5 buttons 3 Press t...

Page 71: ... the 5 button and choose the format in which the channel number is displayed from the three types TYPE A TYPE B and TYPE C BLUE BACK You can set the TV to automatically change to a blue screen and mute the sound if the signal is weak or absent or when there is no input from an external device ON This function is turned on OFF This function is turned off CHILD LOCK You can disable the front control...

Page 72: ...is used For details of each item see PICTURE MODE on page 20 DIGITAL VNR on page 21 WHITE BALANCE on page 21 Super DigiPure on page 22 When shipped Pressing the blue button returns each setting back to initial setting and cancels the favorite channel registration 5 Press the OK button to complete the setting VIDEO SETTING You can set a dedicated picture effect for the video inputs VIDEO 1 to 4 1 C...

Page 73: ...O PROGRAM You can automatically register the TV channels which can be received well at your residence in the TV s programme numbers by performing the following 1 Choose AUTO PROGRAM then press the OK button The AUTO PROGRAM function starts The TV channels you receive are automatically stored in the programme numbers list To stop the AUTO PROGRAM function press the OK button 2 After the TV channels...

Page 74: ...programme number of some of the TV channels will change When a TV channel which has been locked out using the CHANNEL GUARD function using the MANUAL function for that TV channel cancels the CHANNEL GUARD function When a TV channel has already been registered in PR 99 using the INSERT function deletes the TV channel 1 Choose EDIT MANUAL then press the OK or 3 button 2 Follow the operation descript...

Page 75: ...E 1 Press the 6 buttons to choose a TV channel 2 Press the yellow button to delete the TV channel The TV channel is deleted from the programme numbers list MANUAL 1 Press the 6 buttons to choose a programme number to which you want to register a new TV channel 2 Press the blue button to activate the MANUAL function At the right side following the CH CC number the SYSTEM sound system of the TV chan...

Page 76: ...page 35 1 Press the 6 buttons to choose a programme number for which you will register a new TV channel 2 Press the green button to start the INSERT function 3 Press the 6 buttons to choose CC or CH according to the CH CC number of the TV channel To cancel the INSERT function Press the BACK button 4 Press the Number buttons to enter the remaining CH CC number The TV shifts to registration mode Whe...

Page 77: ...nput from the external device connected to the VIDEO 2 or VIDEO 3 terminal If this setting is incorrect images will not be displayed VIDEO If a normal video signal composite video signal is input COMPONENT If a Component video signal Y Cb Pb Cr Pr signals is input For detailed connecting methods see Additional preparation on page 36 This Television is compatible with the 1125i 625p or 525p video s...

Page 78: ...t language group that you select the sub titles of the teletext program will not be displayed properly Group Languages GROUP 1 Turkish Hungarian English German French Italian Spanish Portuguese Greek Swedish Finnish GROUP 2 Polish Serbian Croatian Slovenian Czech Slovak Rumanian Hungarian German French Italian Swedish Finnish GROUP 3 Russian Bulgarian Lettish Lithuanian Estonian Ukrainian Serbian ...

Page 79: ... 75 X CC 76 Y R3 CC 77 Z R4 AU 3 CC 78 Z 1 R5 CC 79 Z 2 AU 4 CC 95 A 5 CC 96 A 4 CC 97 A 3 CC 98 A 2 CC 99 A 1 CH US CCIR OIRT AUSTRALIA CH 02 US 2 E2 R1 AU 0 CH 03 US 3 E3 AU 1 CH 04 US 4 E4 R2 AU 2 CH 05 US 5 E5 R6 AU 6 CH 06 US 6 E6 R7 AU 7 CH 07 US 7 E7 R8 AU 8 CH 08 US 8 E8 R9 AU 9 CH 09 US 9 E9 CH 10 US 10 E10 R10 AU 10 CH 11 US 11 E11 R11 AU 11 CH 12 US 12 E12 R12 CH 13 US 13 CH 14 US 14 W ...

Page 80: ...ications on page 43 contains the details of the VIDEO terminals If you are connecting a device not listed in the following connection diagram see the Specifications to choose the best VIDEO terminal Note that connecting cables are not supplied 1 VCR composite signal 2 VCR S VIDEO signal Y C 3 VCR for recording composite signal 4 DVD player composite signal 5 DVD player S VIDEO signal Y C 6 DVD pla...

Page 81: ... the VIDEO 2 COMPONENT or VIDEO 3 COMPONENT terminal with a video cable Connect the TV s VIDEO jack and the device s VIDEO OUT video output jack with a video cable Then set the VIDEO 2 SETTING or VIDEO 3 SETTING to VIDEO according to VIDEO 2 SETTING VIDEO 3 SETTING on page 33 In the VIDEO 4 terminal the VIDEO jack is indicated by V 2 Connect the TV s AUDIO jacks L MONO and R and the device s AUDIO...

Page 82: ...ns or the MUTING button on the TV s remote control to cancel the MUTING function You can regain the sound from the TV s speakers Conditions to use the AV COMPU LINK remote control system A device equipped with an AV COMPU LINK terminal is required You must connect the TV and the device with an AV COMPU LINK cable AV COMPU LINK cable is not supplied with this TV If an AV COMPU LINK cable is unavail...

Page 83: ...ENT terminal Set the VCR s remote control code to B code If a DVD player is connected to the VIDEO 2 COMPONENT terminal Set the DVD player s AV COMPULINK MODE to DVD3 If a DVD player is connected to the VIDEO 3 COMPONENT terminal with a component video cable Set the DVD player s AV COMPULINK MODE to DVD1 For instructions on how to change the device s setting refer to the device s instruction manua...

Page 84: ...picture No sound Have you chosen a TV channel whose reception is extremely bad In this case the BLUE BACK function will be activated the entire screen becomes blue and the sound is muted In spite of this if you want to view the TV channel follow the description BLUE BACK on page 27 to try to change the BLUE BACK function setting to OFF Are your SOUND SYSTEM settings for the TV channels correct Fol...

Page 85: ...he batteries of the remote control become exhausted Follow the description Putting the batteries into the remote control on page 4 and replace them with new batteries to try solve the problem Have you attempted to use the remote control at the sides or rear of the TV or at a location more than seven meters apart from the TV location Operate the remote control in the front of your TV or a location ...

Page 86: ...lete the tilt It takes a short period of time from the time an operation such as changing channels is performed until an image is displayed This is not a malfunction This is the time required for the image to stabilize before it can be displayed The TV may emit a crackling sound due to a sudden change in temperature It does not matter if a picture or sound does not show any abnormality If you hear...

Page 87: ... table in the description TELETEXT LANGUAGE on page 34 Power requirements AC 110 to 240V 50 60Hz Audio output Rated Power output 15W 15W HV Z34L1 10W 10W 18W HV Z29V1 VIDEO 1 terminal RCA connector 3 S VIDEO connector 1 Video input S VIDEO Y C input and Audio L R inputs are available VIDEO 2 COMPONENT RCA connector 6 Video input Componet video Y Cb Pb Cr Pr input and Audio L R inputs are available...

Page 88: ...VICTOR COMPANY OF JAPAN LIMITED VICTOR COMPANY OF JAPAN LIMITED 44 ...

Reviews: