background image

15

Remote control buttons and functions

Choose a TV channel for
the SUB-picture

Press the SUB-P -/+ button.

Listen to the sound of SUB-
picture

You can listen to the sound of SUB-picture on
your headphones while listening to the sound
of MAIN-picture on the TV speakers.
For details, see "HEADPHONE" on page 25.

Change the colour system
of the SUB-picture

1 While the SUB-picture is dis-

played, press the MENU/OK
button to display the MENU
(main manu).

2 Press the 

/

 buttons to

choose COLOUR SYSTEM, and
then press the MENU/OK button.

3 Press the 

/

 buttons to

choose SUB, and then press the

/

 buttons to choose the

appropriate colour system. Then
press the MENU/OK button.

• You cannot change the COLOUR

SYSTEM of the SUB-picture using the
COLOUR SYSTEM button on the remote
control.

COLOUR SYSTEM

NTSC 3.58

:EXIT

:OK

OK

TV

:BACK

DISP

SUB

AUTO

MAIN

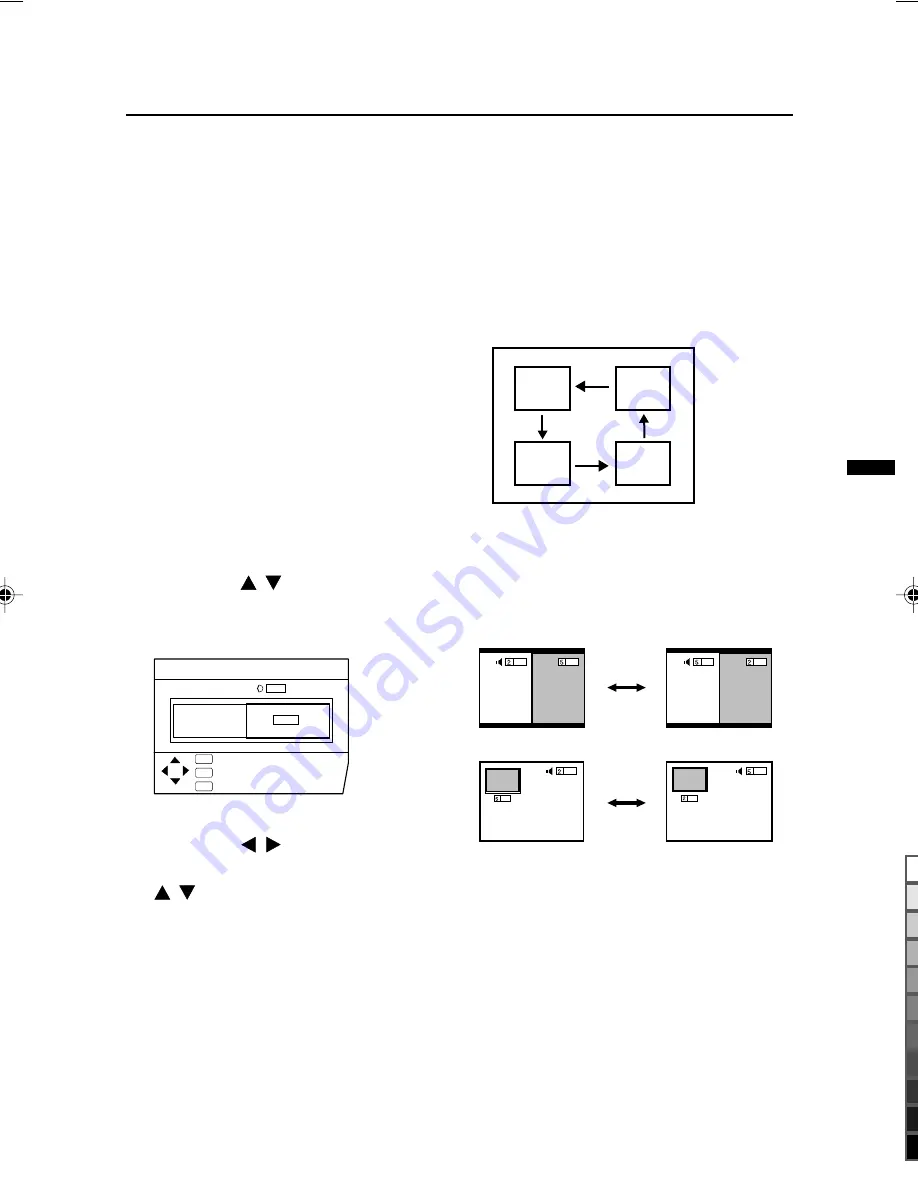
POSITION button

You can adjust the position of the SUB-
Picture when using the Picture in picture
mode.

Press the POSITION button
repeatedly.

Each time you press the button, the SUB-
Picture moves counterclockwise.

SWAP button

You can replace the MAIN-picture and the
SUB-picture with each other.

Press the SWAP button.

• Do not press the SWAP button while you

are recording the TV output on the VCR.
If you do, the output signal will change.

 LCT0959-001B-H_p01-21

7/3/1, 8:16 PM

15

Black

Summary of Contents for HV-L29PRO

Page 1: ...l buttons and functions Using the TV s menu Basic operation PICTURE SETTING menu PICTURE FEATURES menu SOUND SETTING menu FEATURES menu INSTALL menu DEMO menu Additional preparation Troubleshooting Specification 3 6 8 18 18 20 21 24 26 29 35 36 40 43 LCT0959 001B H 0601 T AB NV JMT 2001 VICTOR COMPANY OF JAPAN LIMITED ...

Page 2: ...tilation openings Never install the TV where good ventilation is unattainnable When installing this TV leave spaces for ventilation around the TV of more than the minimum distances as shown 4 Do not allow objects or liquid into the cabinet openings 5 In the event of a fault unplug the unit and call a service technician Do not attempt to repair it yourself or remove the rear cover 6 The surface of ...

Page 3: ...S VIDEO OUT S VIDEO output connector and TV s S connector with an S VIDEO cable instead of connecting with a video cable A 3 Connect the VCR s VIDEO OUT audio L R output jacks and the TV s AUDIO jacks L MONO and R with an audio cable If the VCR s audio output is in mono connect the VCR s AUDIO OUT audio output jack and the TV s AUDIO L MONO jack with an audio cable You can use the AV COMPU LINK fu...

Page 4: ...it enters the initial setting mode and the JVC logo is displayed 1 Press the main power button on the TV The TV is turned on and the JVC logo appears If the power lamp on the TV lights red and does not change to green your TV is in the standby mode Press the POWER button on the remote control to turn the TV on If the JVC logo does not appear your TV has already been turned before In this case use ...

Page 5: ...register it using the MANUAL function For details see EDIT MANUAL on page 30 The AUTO PROGRAM function does not store a TV channel to the programme number 0 AV If you do not need to use the EDIT MANUAL function press the MENU OK button to close the EDIT menu Now setting up is complete Please enjoy your new JVC TV CH CC PR ID AV 01 02 03 04 05 06 07 08 09 CH CH CH CH CH CH CC CC CC 21 22 23 24 25 2...

Page 6: ...he CHANNEL buttons 5 Choose a VIDEO terminal Press the TV VIDEO button 3 or CHANNEL buttons 5 Adjust the volume Press the VOLUME buttons 4 The volume level indicater appears MENU button 6 Press to open the menu For details see Operation with the buttons on the TV on page 19 Remote control sensor and ECO sensor 9 ECO lamp 7 If you set the DIGITAL ECO SENSOR function to ON or DISPLAY the ECO lamp li...

Page 7: ...al See page 28 and 36 VIDEO 4 terminal See page 36 OUTPUT terminal See page 36 Aerial socket Connect the aerial cable See page 3 AV COMPU LINK terminal See page 36 and 38 TV buttons and functions S VIDEO VIDEO 1 VIDEO 2 VIDEO 3 COMPONENT OUTPUT Y VIDEO CB CR VIDEO AV COMPU LINK L MONO AUDIO OVER R L MONO AUDIO R L AUDIO R S VIDEO VIDEO 1 VIDEO 2 VIDEO 3 COMPONENT OUTPUT Y VIDEO CB CR VIDEO AV COMP...

Page 8: ...e DISPLAY button on page 11 If you do not have a clear picture or no colour appears follow the operation procedure COLOUR SYSTEM button on page 11 Adjust the volume Press the VOLUME buttons You cannot adjust the volume of your headphones Follow the operation procedure HEADPHONE on page 25 Watch images from external devices Choose a VIDEO terminal to which the external device has been connected Pre...

Page 9: ...6 9 This mode converts a normal picture 4 3 aspect ratio into a Wide picture 16 9 as pect ratio Use for picture with a 16 9 aspect ratio that have been squeezed into a normal picture 4 3 aspect ratio you can restore their original demensions SPATIALIZER button You can enjoy Surround sound with a live effect by using the SPATIALIZER function Press the SPATIALIZER button to choose a mode LIVE Live a...

Page 10: ...n and hold for more than 3 seconds continuously RETURN PLUS PROGRAMMED is displayed and the registration is com pleted To cancel register a TV channel as the Return Channel while viewing any TV channel press the RETURN button and hold for more than 3 seconds continuously RETURN PLUS CANCELED is displayed and the regist ration is cancelled When you turn off the TV the registration for the Return Ch...

Page 11: ...LIST 2 Press the and buttons to choose a programme number or VIDEO terminal Then press the MENU OK button For programme numbers with the CHANNEL GUARD function set the CHANNEL GUARD mark is displayed next to the programme number in the PR LIST The VIDEO terminals are registered after the programme number PR99 COLOUR SYSTEM button The colour system is chosen automatically However if the picture is ...

Page 12: ...untry or Region System Asia Middle East Bahrain Kuwait Oman Qatar United Arab Emirates Yemen etc Indonesia Malaysia Singapore Thailand India etc B G SECAM SECAM SECAM NTSC PAL PAL PAL PAL PAL PAL PAL PAL PAL China Vietnam etc Hong Kong etc Islamic Republic of Iran Lebanon Saudi Arabia etc B G I B G B G I I M B G B G D K D K D K Philippines Taiwan Myanmar etc Europe Russia etc Czech Republic Poland...

Page 13: ...the still images become abnormal You cannot use the STROBE button when the SUB picture or the MAIN picture are displayed on the screen Moving picture If you press the STROBE button when receiving the Progressive Video Signal 525P signal 525P appears on the screen and the STROBE function does not operate You cannot change the TINT setting for the still images on the screen even if you are viewing a...

Page 14: ...se no sound comes from the television Using the PIP function You can view two pictures MAIN and SUB at the same time Press the PIP button Press the PIP button changes the display as follows You cannot view a picture from the same programme number or the same VIDEO terminal as both the MAIN picture and the SUB picture at the same time If the MAIN picture signal is poor then the quality of the SUB p...

Page 15: ...s the buttons to choose SUB and then press the buttons to choose the appropriate colour system Then press the MENU OK button You cannot change the COLOUR SYSTEM of the SUB picture using the COLOUR SYSTEM button on the remote control COLOUR SYSTEM NTSC 3 58 EXIT OK OK TV BACK DISP SUB AUTO MAIN POSITION button You can adjust the position of the SUB Picture when using the Picture in picture mode Pre...

Page 16: ...details see TELETEXT LANGUAGE on page 34 HOLD button You can hold a teletext page on the screen for as long as you want even while several other teletext pages are being received Press the HOLD button The hold are displayed at the top left of the screen To cancel the Hold function Press the HOLD button again REVEAL button Some teletext pages include hidden text such as answers to a quiz You can di...

Page 17: ...cel the Sub page function Press the SUBPAGE button again Using the List mode You can store the numbers of your favourite teletext pages in memory and call them up quickly using the coloured buttons To store the page numbers 1 Press the MODE button to engage the List mode The stored page numbers are displayed at the buttom of the screen 2 Press a coloured button to choose a position Then press the ...

Page 18: ...ENU OK button The menu appears To return to the previous menu Press the DISPLAY button To exit a menu instantly Press the TV VIDEO button 3 Press the buttons to choose a function For details of the functions in the menus see the following pages DISPLAY button OK TV DISP TV VIDEO button MENU OK button C H A N N E L V O L U M E 1 2 ZOOM MULTI MUTING NEXT PIP POSITION FREEZE MENU OK SWAP SUB P PIP TE...

Page 19: ...chosen function 5 Press the MENU OK button to comple the setting The menu disappears When watching the television with the NTSC system the menus ae displayed at about half of their normal verical size Operation with the buttons on the TV You can also operate the menus using the buttons on the front panel of the TV There is no button on the front panel of the TV that has the function of the DISPLAY...

Page 20: ...he picture colour lighter deeper TINT You can adjust the picture tint reddish greenish You can change the TINT setting picture tint only when the colour system is NTSC 3 58 or NTSC 4 43 You cannot select the TINT function when receiving the Progressive Video Signal 525P signal To return to the default settings in each PICTURE MODE Press the blue button Returns the picture settings in the currently...

Page 21: ...nt of noise in the original picture You cannot select the DIGITAL VNR function when receiving the Progressive Video Signal 525P signal AUTO The TV will be automatically adjust the level of the DIGITAL VNR effect to match the amount of noise in the picture giving you the best possible picture If you set the DIGITAL VNR effect too high it can make the picture less sharp It is recommended to use the ...

Page 22: ...ality picture that contains a lot of noise this may actually make the noise worse It is recommended to use the AUTO setting if you can MAX The level of the DigiPure effect is set to the maximum If you set the DigiPure function to AUTO but feel that the original picture quality has not been reproduced fully change the setting from AUTO to MAX The MAX setting is not suitable for low quality pictures...

Page 23: ...e tilt If this happens you can correct the picture tilt 1 Choose PICTURE TILT then press the MENU OK button 2 Press the buttons until the picture becomes level Then press the MENU OK button COLOUR SYSTEM PAL EXIT OK OK TV BACK DISP ZOOM REGULAR ZOOM 16 9 EXIT OK OK TV BACK DISP COLOUR SYSTEM The colour system is chosen automatically However if the picture is not clear or no colour appears choose t...

Page 24: ...sound weaker stronger BALANCE You can adjust the volume balance between the left and right speakers turn the left speaker s volume level up turn the right speaker s volume level up AI VOLUME You can prevent the sudden increase or decrease of sound that occurs when changing the channel to another channel or switching the VIDEO mode to another VIDEO mode ON This function is turned on OFF This functi...

Page 25: ...n enables you to output the TV s sound from your headphones 1 Choose HEADPHONE then press MENU OK button 2 Use the button to select and the button to set the HEADPHONE function Then press the MENU OK button VOLUME You can adjust the volume of the sound output from your headphones TV SPEAKER When this function is on the TV s speaker does not shut off the sound even if head phones are connected If y...

Page 26: ...the signal is weak or absent or when there is no input from an external device ON This function is turned on OFF This function is turned off CHILD LOCK You can disable the front control buttons of the TV When this function is set to ON the TV can be operated only by using the remoto control Use this function to prevent children from operating the TV at their own discretion without parent consent O...

Page 27: ...nnel 1 Choose a programme number in which a TV channel locked with the number buttons or PR LIST The screen changes to blue and the CHANNEL GUARD appears You cannot choose a locked TV channel with the buttons 2 Press the DISPLAY button to display ID NO ID unmber input screen 3 Press the number buttons to enter the ID number The lock is temporarily released so you can view the TV channel If you hav...

Page 28: ...ode VIDEO 3 SETTING Set the VIDEO 3 SETTING correctly accord ing to the video signal input from the external device connected to the VIDEO 3 terminal If this setting is incorrect images will not be displayed VIDEO If a normal video signal composite video signal is input COMPONENT If a Component video signal Y CB CR signals is input For detailed connecting methods see Additional preparation on page...

Page 29: ...s the DISPLAY button 2 After the TV channels have been stored in the programme number list the EDIT menu appears You can proceed to edit the programme numbers list using the EDIT MANUAL function For details see EDIT MANUAL on page 30 If a TV cannel you want to view is not stored in the programme numbers list you can register it using the MANUAL function For details see EDIT MANUAL on page 30 The A...

Page 30: ...programme number of a TV channel ID This function registers a Channel name ID to a TV channel INSERT This function adds a new TV channel in the current programme numbers list by using the CH CC number DELETE This function deletes a unnecessary TV Channel MANUAL This function manually registers a new TV channel in a programme number 3 Press the MENU OK button to complete the setting For programme n...

Page 31: ...stem sound system for a TV channel you want to register For the sound systems in each country or region see the table BROADCASTING SYSTEMS on page 12 4 Press the green or red button to search for a TV channel Scanning stops when the TV finds a TV channel Then the TV channel is displayed 5 Press the green or red button repeatedly until the to TV channel you want appears If the TV channel reception ...

Page 32: ...the INSERT function Press the DISPLAY button 4 Press the Number buttons to enter the remaining CH CC number The TV shifts to registration mode When the registration is completed the picture of the TV channel appears on the screen The CH CC number is a number indicating the broadcast frequency to the TV If the TV cannot detect the TV channel corresponding to the broadcast frequency indicated by the...

Page 33: ...umbers are the channel numbers used in the Middle East Southeast Asia etc OIRT The OIRT channel numbers are the channel numbers used in Eastern Europe Russia Vietnam etc AUSTRALIA The AUSTRALIA channel numbers are the channel numbers used in Australia etc Channel CH US CCIR OIRT AUSTRALIA CH 02 US 2 E2 R1 AU 0 CH 03 US 3 E3 AU 1 CH 04 US 4 E4 R2 AU 2 CH 05 US 5 E5 R6 AU 6 CH 06 US 6 E6 R7 AU 7 CH ...

Page 34: ...roatian Slovenian Czech Slovak Rumanian Hungarian German French Italian Swedish Finnish Russian Bulgarian Lettish Lithuanian Estonian Ukrainan Serbian Croatian Slovenian Czech Slovak English German Arabic Czech Slovak Hungarian English German French Italian Spanish Portuguese Swedish Finnish Languages that are not included in the teletext language group that you select the sub titles of the telete...

Page 35: ...on the demon stration starts automatically If you do not want that to happen set the DEMO function to OFF 1 Press the buttons to choose ON To cancel the DEMO function choose off 2 Press the MENU OK button to complete the settings The DEMO function is set to ON and the demostration will start To stop the demonstration Press one of the button on the remote control Using the TV s menu ...

Page 36: ... best VIDEO terminal Note that connecting cables are not supplied When connecting devices that are supported by AV COMPU LINK see Connecting AV COMPU LINK Supported Devices on page 38 1 VCR composite signal 2 VCR S VIDEO signal Y C 3 VCR for recording composite signal 4 DVD player composite signal 5 DVD player S VIDEO signal Y C 6 DVD player component video signals Y CB CR 7 TV game composite sign...

Page 37: ...ck at the TV front panel Connecting methods 1 Connect the TV s VIDEO jack and the device s VIDEO OUT video output jack with a video cable If connecting a device to the TV with an S VIDEO cabel Connect the VCR s S VIDEO OUT S VIDEO output connector and the TV s S connector with an S VIDEO cable instead of connect ing with a video cable Note that the connection with a video cable will be ignored in ...

Page 38: ...he MUTING button on the TV s remote control to cancel the MUT ING function You can regain the sound from the TV s speakers Conditions to use the AV COMPU LINK remote control system A device equipped with an AV COMPU LINK terminal is required You must connect the TV and the device with an AV COMPU LINK cable AV COMPU LINK cable is not supplied with this TV If an AV COMPU LINK cable is unavailable c...

Page 39: ...VD2 If a VCR is connected to the VIDEO 2 terminal Set the VCR s remote control code to B code If a DVD player is connected to the VIDEO 2 terminal Set the DVD player s AV COMPULINK MODE to DVD3 If a DVD player is connected to the VIDEO 3 terminal with a component video cable Set the DVD player s AV COMPULINK MODE to DVD1 For instructions on how to change the device s setting refer to the device s ...

Page 40: ...ntact your local dealer If the TV receives interferences from signal reflecting from mountains or building double pictures ghosting will occur Try to change the aerial s direction or replase the antenna with the one with better directionality Are you COLOUR SYSTEM settings for the TV channels correct Follow the description COLOUR SYSTEM button on pege 11 to try to solve the trouble Has COLOUR or B...

Page 41: ...magnetism In this case use the PICTURE TILT on page 23 to complete the tilt When a white and bright still image su ch as a white dress is displayed on the screen the white part may look as if it were coloured It is a phenomenon unavoidable due to the nature of the picture tube itself and not due to a TV failure When the picture disappears from the screen the unnatural colours will also disappear W...

Page 42: ...icture or sound does not show any abnormality If you hear crackling sounds frequently while you are viewing the TV other causes may be assumed For precautionary purposes request your service technician to inspect it Touching the screen may cause you feel a slight electric shock due to its static electricity It is an unavoidable phenomenon due to the construction of the picture tube It is not a pro...

Page 43: ...vailable Progressive video signal 525P signal input is available VIDEO 4 terminal RCA connector X 3 S VIDEO connector X 1 Video input S VIDEO Y C input and Audio L R inputs are available OUTPUT terminal RCA connector X 3 Video output and Audio L R outputs are available Headphone jack Stereo mini jack 3 5 mm in diameter Accessories Remote control unit X 1 RM C214 AA R6 dry cell battery X 2 Speakers...

Page 44: ...VICTOR COMPANY OF JAPAN LIMITED ...

Page 45: ...LCT0959 001B H 0601 T AB NV JMT 2001 VICTOR COMPANY OF JAPAN LIMITED ...

Page 46: ...нтиляционные отверстия Ни в коем случае не устанавливайте телевизор в местах с плохой вентиляцией При установке телевизора оставьте вентиляционные зазоры по периметру величина зазоров должна быть не меньше показанных на рис значений 4 Не допускайте попадания предметов или жидкости в отверстия корпуса 5 В случае неисправности выньте вилку питания из розетки и вызовите мастера Не пытайтесь отремонти...

Page 47: ...DEO OUT выход видео видеомагнитофона и гнездо VIDEO видео телевизора Для соединения ВМ с телевизором с помощью кабеля S VIDEO выполните следующее ëÓ ËÌËÚ Á ÂÏ S VIDEO OUT Ë ÂÓÏ ÌËÚÓÙÓÌ Ë Á ÂÏ S ÚÂΠËÁÓ Ò ÔÓÏÓ Í ÂÎfl S VIDEO ÌÂ Ë ÂÓÍ ÂÎfl A 3 Соедините гнездаVIDEO OUT L R аудиовыходы видеомагнитофона и гнездаAUDIO L МОNО и R телевизора с помощью аудиокабеля ÖÒÎË Û ËÓ ıÓ Ë ÂÓÏ ÌËÚÓÙÓÌ fl ÎflÂÚÒfl ÏÓÌÓ...

Page 48: ... ËÁÓ ıÓ ËÚ ÂÊËÏ Ô ÓÌ Î Ì ı Ì ÒÚ ÓÂÍ Ì Í Ì ÔÓfl ÎflÂÚÒfl ÎÓ ÓÚËÔ JVC 1 Нажмите кнопку включения питания телевизора íÂΠËÁÓ ÍÎ ËÚÒfl Ë ÔÓfl ËÚÒfl ÎÓ ÓÚËÔ JVC ÖÒÎË ËÌ ËÍ ÚÓ ÔËÚ ÌËfl ÚÂΠËÁÓ ÓÒÚ ÂÚÒfl Í ÒÌ Ï Ë Ì ÒÚ ÌÓ ËÚÒfl ÁÂÎÂÌ Ï ÚÓ ÓÁÌ ÂÚ ÚÓ ÚÂΠËÁÓ Ì ıÓ ËÚÒfl ÂÊËÏ ÓÊË ÌËfl ÑÎfl ÍÎ ÂÌËfl ÚÂΠËÁÓ Ì ÊÏËÚ ÍÌÓÔÍÛ POWER Ì ÔÛÎ Ú ËÒÚ ÌˆËÓÌÌÓ Ó ÛÔ ÎÂÌËfl ÖÒÎË ÎÓ ÓÚËÔ JVC Ì ÔÓfl ÎflÂÚÒfl ÚÓ ÓÁÌ ÂÚ ÚÓ ÚÂΠËÁÓ ÛÊ...

Page 49: ...éâäÄ Çêìóçìû Ì ÒÚ 30 ÖÒÎË ÌÛÊÌ È ÚÂÎÂÍ Ì Î Ì ÒÓı ÌÂÌ ÒÔËÒÍ ÌÓÏÂ Ó Ô Ó ÏÏ Â Ó ÏÓÊÌÓ Á  ËÒÚ Ë Ó Ú Ò ÔÓÏÓ ÙÛÌ͈ËË êìóçÄü ÅÓΠÔÓ Ó ÌÛ ËÌÙÓ Ï ˆË ÒÏ Á ÂΠçÄëíêéâäÄ Çêìóçìû Ì ÒÚ 30 îÛÌ͈Ëfl ÄÇíé èêéÉ Ì ÒÓı ÌflÂÚ ÚÂÎÂÍ Ì Î Ì Ô Ó ÏÏÂ Ò ÌÓÏ ÓÏ 0 AV ÖÒÎË ÙÛÌ͈Ëfl çÄëíêéâäÄ Çêìóçìû ÌÌ È ÏÓÏÂÌÚ Ì ÌÛÊÌ Ì ÊÏËÚ ÍÌÓÔÍÛ MENU OK Îfl Á Í ÌËfl ÏÂÌ çÄëíêéâäÄ На этом настройка заканчивается Новый телевизор JVC к Ва...

Page 50: ...ÌÓÔÍË TV VIDEO 3 Выбор телеканала Нажимайте кнопки CHANNEL m 5 Выбор панели ВИДЕО Нажимайте кнопки TV VIDEO 3 или CHANNEL m 5 Регулировка громкости Нажимайте кнопки VOLUME m 4 èÓfl ËÚÒfl ËÌ ËÍ ÚÓ Û Ó Ìfl ÓÏÍÓÒÚË Кнопка MENU 6 ç ÊËÏÓÏ ÚÓÈ ÍÌÓÔÍË ÓÚÍ ÂÚÒfl ÏÂÌ ÅÓΠÔÓ Ó ÌÛ ËÌÙÓ Ï ˆË ÒÏ Á ÂΠàÒÔÓÎ ÁÓ ÌË ÍÌÓÔÓÍ ÚÂΠËÁÓ Ì ÒÚ 1 9 Датчик пульта дистанционного управления и ЭКО сенсор 9 Индикатор ECО 7 ÖÒÎ...

Page 51: ...ль VIDEO 1 ëÏ ÒÚ 3 Ë 36 Панель VIDEO 2 ëÏ ÒÚ 36 Панель VIDEO 3 COMPONENT ëÏ ÒÚ 28 Ë 36 Панель VIDEO 4 ëÏ ÒÚ 36 Панель OUTPUT ëÏ ÒÚ 36 Гнездо антенны èÓ ÒÓ ËÌËÚ ÌÚÂÌÌ È Í ÂÎ ëÏ ÒÚ 3 Панель AV COMPU LINK ëÏ ÒÚ 36 Ë 38 äÌÓÔÍË Ë ÙÛÌ͈ËË ÚÂΠËÁÓ S VIDEO VIDEO 1 VIDEO 2 VIDEO 3 COMPONENT OUTPUT Y VIDEO CB CR VIDEO AV COMPU LINK L MONO AUDIO OVER R L MONO AUDIO R L AUDIO R S VIDEO VIDEO 1 VIDEO 2 VIDE...

Page 52: ...ÌÙÓ Ï ˆË ÒÏ Á ÂΠäÌÓÔÍ DISPLAY Ì ÒÚ 1 1 ÖÒÎË ËÁÓ ÊÂÌË Ì ÂÚÍÓ ËÎË ÌÂÚ Á ÛÍ ÔÓÎÌËÚ ËÌÒÚ Û͈ËË Á ÂΠäÌÓÔÍ COLOUR SYSTEM Ì ÒÚ 1 1 Регулирование громкости Нажимайте кнопки VOLUME m É ÓÏÍÓÒÚ ÓÎÓ Ì ı ÚÂÎÂÙÓÌÓ ÚËÏË ÍÌÓÔÍ ÏË Ì  ÛÎË ÛÂÚÒfl ëΠÛÈÚ ËÌÒÚ Û͈ËflÏ Á ÂΠçÄ ìôç àäà Ì ÒÚ 25 Просмотр изображения с внешнего устройства Ç Â ËÚÂ Ô ÌÂÎ VIDEO  ÂÁ ÍÓÚÓ Û ÔÓ ÒÓ ËÌflÂÚÒfl Ì Ì ÛÒÚ ÓÈÒÚ Ó Нажмите к...

Page 53: ...6 9 ùÚÓÚ ÂÊËÏ Ó ÂÒÔÂ Ë ÂÚ Ô ÂÓ ÁÓ ÌË ÌÓ Ï Î ÌÓ Ó ËÁÓ ÊÂÌËfl ÙÓ Ï Ú 4 3 Ë ÓÍÓÙÓ Ï ÚÌÓ ËÁÓ ÊÂÌË ÙÓ Ï Ú 1 6 9 ùÚÓÚ ÂÊËÏ ËÒÔÓÎ ÁÛÂÚÒfl Îfl ËÁÓ ÊÂÌËÈ Ò ÙÓ Ï ÚÓÏ 1 6 9 ÒÊ Ú ı Ó Ó ÌÓ Ó ÙÓ Ï Ú ÙÓ Ï Ú 4 3 ÓÌ ÔÓÁ ÓÎflÂÚ ÓÒÒÚ ÌÓ ËÚ Ô ÓÌ Î Ì È ÙÓ Ï Ú Кнопка SPATIALIZER ë ÔÓÏÓ ÙÛÌ͈ËË SPATIALIZER ÏÓÊÌÓ ÔÓÎÛ Ú ÊË ÓÈ Live ÙÙÂÍÚ Ô Ë ËÒÔÓÎ ÁÓ ÌËË ÒËÒÚÂÏ Surround sound ÓÍ ÛÊ ËÈ Á ÛÍ Нажмите кнопку SPATIALIZER для в...

Page 54: ... 3 ÒÂÍÛÌ èÓfl ÎÂÌËÂ Ì Í ÌÂ Ì ÔËÒË ÇéáÇêÄí äÄçÄãÄ áÄèêéÉêÄååàêéÇÄç ÔÓ Ú Â Ê ÂÚ Á  ÂÌË  ËÒÚ ˆËË Для отмены регистрации телеканала как возвращаемого Ô Ë Ô ÓÒÏÓÚ Â Î Ó Ó ÚÂÎÂÍ Ì Î Ì ÊÏËÚ ÍÌÓÔÍÛ RETURN Ë Â ÊËÚ ÂÂ Ì Ê ÚÓÈ Ú ÂÌË Ì ÏÂÌ 3 ÒÂÍÛÌ ç Í Ì ÔÓfl ËÚÒfl Ì ÔËÒ ÇéáÇêÄí äÄçÄãÄ éíåÖçÖç ÚÓ ÓÁÌ ÂÚ ÓÚÏÂÌÛ Â ËÒÚ ˆËË è Ë ÍÎ ÂÌËË ÚÂΠËÁÓ Â ËÒÚ ˆËfl ÓÁ ÂÏÓ Ó ÚÂÎÂÍ Ì Î ÓÚÏÂÌflÂÚÒfl ÖÒÎË Ç ıÓÚËÚ ÔÓÔ Â...

Page 55: ...1 Нажмите кнопку DISPLAY для отображения ПРОГ ЛИСТ 2 Кнопками и выберите номер программы или панели ВИДЕО Затем нажмите кнопку MENU OK êfl ÓÏ Ò ÌÓÏ ÓÏ Ô Ó ÏÏ èêéÉ ãàëí Îfl ÍÓÚÓ ı Á Ì ÙÛÌ͈Ëfl àÑ çéåÖê ÔÓfl ÎflÂÚÒfl ÁÌ Í ÚÓÈ ÙÛÌ͈ËË çÓÏÂ Ô ÌÂÎÂÈ ÇàÑÖé  ËÒÚ Ë Û ÚÒfl ÔÓÒÎÂ Ô Ó ÏÏ Ò ÌÓÏ ÓÏ èP 99 Кнопка COLOUR SYSTEM ëËÒÚÂÏ ˆ ÂÚÌÓÒÚË Ë ÂÚÒfl ÚÓÏ ÚË ÂÒÍË o Ì ÍÓ ÂÒÎË ËÁÓ ÊÂÌË Ì ÂÚÍÓ ËÎË Ìˆ ÂÚÌÓ  ËÚ ÒËÒ...

Page 56: ...é Ì ÍÓ ÂÒÎË Á ÛÍÓ Ó ÒÓÔ Ó ÓÊ ÂÌË ÒÎ ÌÓ Ò ÔÓÏÂı ÏË Ô Ë ÌÓ Ï Î ÌÓÏ ËÁÓ ÊÂÌËË Â ËÚ ÒËÒÚÂÏÛ Á ÛÍÓ Ó Ó ÒÓÔ Ó ÓÊ ÂÌËfl Û ÌÛ Для выбора нужной системы звукового сопровождения нажимайте кнопку SOUND SYSTEM B G ÒËÒÚÂÏ B G I ÒËÒÚÂÏ I D K ÒËÒÚÂÏ D K M ÒËÒÚÂÏ M ùÚ ÙÛÌ͈Ëfl Ì ÓÚ ÂÚ ÂÊËÏ ÇàÑÖé ëËÒÚÂÏ Á ÛÍÓ Ó Ó ÒÓÔ Ó ÓÊ ÂÌËfl ËÒÔÓÎ ÁÛÂÏ Â ÁÎË Ì ı ÒÚ Ì ı Ë Â ËÓÌ ı Ô Ë Â ÂÌ Ú Îˈ íÖãÖÇÖôÄíÖãúçõÖ ëàëíÖåõ Ì ÒÚ 1 ...

Page 57: ...ROBE Для отмены функции STROBE Ì ÊÏËÚ ÍÌÓÔÍÛ STROBE Îfl ÓÁ Ú Í ÉãÄÇçéåì ËÁÓ ÊÂÌË è Ë ÒÎ ÓÏ ÒË Ì Î ÉãÄÇçéÉé ËÁÓ ÊÂÌËfl ÒÚÓÔ Í ÓÒÔ ÓËÁ Ó flÚÒfl Ò ËÒÍ ÊÂÌËflÏË äÓ Ì Í Ì ËÏÂÂÚÒfl ÇíéêéëíÖèÖççéÖ ËÁÓ ÊÂÌËÂ Ë ÉãÄÇçéÖ ËÁÓ ÊÂÌË ÍÌÓÔÍÓÈ STROBE ÔÓÎ ÁÓ Ú Òfl ÌÂÎ Áfl ÖÒÎË Ô Ë Ô ËÂÏ Progressive Ë ÂÓÒË Ì Î ÒË Ì ÎÓ 525P Ì Ê Ú ÍÌÓÔÍÛ STROBE Ì Í Ì ÔÓfl ËÚÒfl Ì ÔËÒ ÒË Ì Î 525P Ë ÙÛÌ͈Ëfl STROBE ÓÚ Ú ÌÂ Û ÂÚ ìÒÚ ÌÓ ÍË ÚÓÌ...

Page 58: ... ÌÂÓ ıÓ ËÏÓ Ó Îfl Á Í ÌËfl ËÒÔÎÂfl ÏÌÓ Ó ËÒÎÂÌÌ ı ËÁÓ ÊÂÌËÈ Á ÛÍÓ Ó ÒÓÔ Ó ÓÊ ÂÌËÂ Û ÂÚ ÓÚÒÛÚÒÚ Ó Ú àÒÔÓÎ ÁÓ ÌË ÙÛÌ͈ËË PIP àÏÂÂÚÒfl ÓÁÏÓÊÌÓÒÚ Ó ÌÓ ÂÏÂÌÌÓ Ó Ô ÓÒÏÓÚ Ûı ËÁÓ ÊÂÌËÈ ÉãÄÇç Ë ÇíéêéëíÖè Нажмите кнопку PIP ç ÊËÏ ÍÌÓÔÍË PIP ËÁÏÂÌflÂÚ ËÁÓ ÊÂÌËÂ Ì Í Ì ÒÎÂ Û ËÏ Ó ÁÓÏ ëÏÓÚ ÂÚ ËÁÓ ÊÂÌËÂ Ó ÌÓÈ Ë ÚÓÈ ÊÂ Ô Ó ÏÏ ËÎË Â ÂÁ Ó ÌÛ Ë ÚÛ ÊÂ Ô ÌÂÎ ÇàÑÖé Ó ÌÓ ÂÏÂÌÌÓ Í Í ÉãÄÇçéÖ Ë ÇíéêéëíÖèÖççéÖ ÌÂÎ Áfl è Ë ÔÎÓı...

Page 59: ...МЕНЮ основное меню 2 Нажмите кнопку для выборы СИСТЕМА ЦВЕТНОСТИ а затем кнопку MENU OK 3 Нажмите кнопку для выбора ВТОРОСТЕП а затем кнопку для выбора нужной системы цветности После этого нажмите кнопку MENU OK àÁÏÂÌflÚ ëàëíÖåì ñÇÖíçéëíà ÇíéêéëíÖèÖççéÉé ËÁÓ ÊÂÌËfl Ò ÔÓÏÓ ÍÌÓÔÍË COLOUR SYSTEM ÔÛÎ Ú ËÒÚ ÌˆËÓÌÌÓ Ó ÛÔ ÎÂÌËfl ÌÂÎ Áfl Кнопка POSITION àÏÂÂÚÒfl ÓÁÏÓÊÌÓÒÚ Â ÛÎË Ó ÌËfl ÇíéêéëíÖèÖççéÉé ËÁÓ ÊÂÌËfl ...

Page 60: ...34 Кнопка HOLD àÏÂÂÚÒfl ÓÁÏÓÊÌÓÒÚ ÒÓı ÌÂÌËfl HOLD ÒÚ Ìˈ ÚÂÎÂÚÂÍÒÚ Ì Í Ì ÒÍÓÎ Û Ó ÌÓ ÓÎ Ó Ê ÍÓ Ô ËÌËÏ ÂÚÒfl ÌÂÒÍÓÎ ÍÓ Û Ëı ÒÚ Ìˈ ÚÂÎÂÚÂÍÒÚ Нажмите кнопку HOLD Ç Î ÓÏ Â ıÌÂÏ Û ÎÛ Í Ì ÔÓfl ËÚÒfl Для отмены функции Hold ÒÌÓ Ì ÊÏËÚ ÍÌÓÔÍÛ HOLD Кнопка REVEAL ç ÌÂÍÓÚÓ ı ÒÚ Ìˈ ı ÚÂÎÂÚÂÍÒÚ ËÏÂÂÚÒfl ÒÍ Ú È ÚÂÍÒÚ Ì Ô ËÏ ÓÚ ÂÚ Ì ÓÔ ÓÒ ËÍÚÓ ËÌ àÏÂÂÚÒfl ÓÁÏÓÊÌÓÒÚ ÁÓ Ì Í Ì ÒÍ ÚÓ Ó ÚÂÍÒÚ При каждом нажиме на кно...

Page 61: ...ы Для отмены функции Подстраница ÒÌÓ Ì ÊÏËÚ ÍÌÓÔÍÛ SUBPAGE Использование режима Список Ç ÏÓÊÂÚ ÒÓı ÌflÚ ÌÓÏ ΠËÏ ı ÒÚ Ìˈ ÚÂÎÂÚÂÍÒÚ Ô ÏflÚË Ë ÒÚ Ó Á Ú Ëı ËÁ Ô ÏflÚË Ò ÔÓÏÓ ˆ ÂÚÌ ı ÍÌÓÔÓÍ Для сохранения номеров страниц 1 Нажмите кнопку MODE для входа в режим Список Ç ÌËÊÌÂÈ ÒÚË Í Ì ÓÚÓ ÁflÚÒfl ËÏ ËÂÒfl Ô ÏflÚË ÌÓÏ ÒÚ Ìˈ 2 С помощью цветной кнопки выберите номер позицию Затем с помощью кнопок с цифра...

Page 62: ... 2 Нажимая кнопки и выберите название меню а затем нажмите кнопку MENU OK èÓfl ËÚÒfl ÏÂÌ Для возврата к предыдущему меню Ì ÊÏËÚ ÍÌÓÔÍÛ DISPLAY Для мгновенного выхода из меню Ì ÊÏËÚ ÍÌÓÔÍÛ TV VIDEO 3 С помощью кнопок выберите функцию ÅÓΠÔÓ Ó ÌÛ ËÌÙÓ Ï ˆË Ó ÙÛÌ͈Ëflı ÏÂÌ ÏÓÊÌÓ Ì ÈÚË Ì ÔÓÒÎÂ Û Ëı ÒÚ Ìˈ ı C H A N N E L V O L U M E 1 2 ZOOM MULTI MUTING NEXT PIP POSITION FREEZE MENU OK SWAP SUB P PI...

Page 63: ...ÌÓÈ ÙÛÌ͈ËÂÈ 5 Нажмите кнопку MENU OK для завершения настройки åÂÌ ËÒ ÂÁÌÂÚ è Ë Ô ÓÒÏÓÚ Â Ô  ÒËÒÚÂÏ NTSC ÏÂÌ ËÏÂ Ú ÁÏ ÔÓ Â ÚËÍ ÎË Ó ÏÂÌ ËÈ ÌÓ Ï Î ÌÓ Ó ÁÏ ÏÂÌ Использование кнопок телевизора ÑÎfl ÛÔ ÎÂÌËfl ÏÂÌ ÏÓÊÌÓ ËÒÔÓÎ ÁÓ Ú ÍÌÓÔÍË Ô Â ÛÒÏÓÚ ÂÌÌ Â Ì Ô  ÌÂÈ Ô ÌÂÎË ÚÂΠËÁÓ ç Ô  ÌÂÈ Ô ÌÂÎË ÚÂΠËÁÓ ÌÂÚ ÍÌÓÔÍË ËÏ ÂÈ ÙÛÌÍˆË ÍÌÓÔÍË DISPLAY ËÎË ˆ ÂÚÌÓÈ ÍÌÓÔÍË ä Í ÔÓÎ ÁÓ Ú Òfl ÏÂÌ ÚÂΠËÁÓ MENU ...

Page 64: ... ÚÂÏÌÂÂ Ò ÂÚΠЧЕТКО óÂÚÍÓÒÚ ËÁÓ ÊÂÌËfl ÏÓÊÌÓ Â ÛÎË Ó Ú ÏÂÌ Â ÓÎ Â îÛÌ͈Ëfl óÖíäé Ì ÓÚ ÂÚ Ô Ë Ô ËÂÏ Progressive Ë ÂÓÒË Ì ÎÓ ÒË Ì ÎÓ 525P ЦВЕТ ñ ÂÚ ËÁÓ ÊÂÌËfl ÏÓÊÌÓ Â ÛÎË Ó Ú Î Ì ÒÓ Ì ЦВ ТОН ñ ÂÚÓ ÓÈ ÚÓÌ ËÁÓ ÊÂÌËfl ÏÓÊÌÓ Â ÛÎË Ó Ú Í ÒÌÓ Ú È ÁÂÎÂÌÓ Ú È àÁÏÂÌÂÌËÂ Ô ÏÂÚ ñÇ íéç ÓÁÏÓÊÌÓ ÚÓÎ ÍÓ Ô Ë ËÒÔÓÎ ÁÓ ÌËË ÒËÒÚÂÏ ˆ ÂÚÌÓÒÚË NTSC 3 58 ËÎË NTSC 4 43 îÛÌ͈Ëfl ñÇ íéç Ì ÓÚ ÂÚ Ô Ë Ô ËÂÏ Progressive Ë ...

Page 65: ... ÒÂÍÛÌ ÔÓfl Îfl ÚÒfl ÁÌ ÍË Ó ÓÁÌ Ë fl ÍÓÒÚ óÂÏ ÚÂÏÌ ÍÓÏÌ Ú ÚÂÏ ÓÎ Â ËÒÎÓ ÁÌ ÍÓ ä Í ÔÓÎ ÁÓ Ú Òfl ÏÂÌ ÚÂΠËÁÓ åÂÌ ëÇéâëíÇÄ àáéÅêÄÜÖçàü ñàîêéÇÄü ëèÇò îÛÌ͈Ëfl ñàîêéÇÄü ëèÇò ÒÌËÊ ÂÚ ÔÓÏÂıË ËÒÍ Ê Ë ËÁÓ ÊÂÌË îÛÌ͈Ëfl ñàîêéÇÄü ëèÇò Ì ÓÚ ÂÚ Ô Ë Ô ËÂÏ Progressive Ë ÂÓÒË Ì ÎÓ ÒË Ì ÎÓ 525P АВТО íÂΠËÁÓ ÚÓÏ ÚË ÂÒÍË Â ÛÎË ÛÂÚ Û Ó ÂÌ ñàîêéÇAü ëèÇò ÒÓÓÚ ÂÚÒÚ ËË ÒÓ ÒÚÂÔÂÌ ÔÓÏÂı Ë Ó ÂÒÔ ËÚ Ì ËÎÛ Â ËÁÓ ÊÂÌË Ö...

Page 66: ...ÓÍÓÏ Û Ó Ì DigiPure Ë ÌËÁÍÓÍ ÂÒÚ ÂÌÌÓÏ ËÁÓ ÊÂÌËË Ò ÒËÎ Ì ÏË ÔÓÏÂı ÏË ËÒÍ ÊÂÌËfl ÏÓ ÛÚ Â Â ÓÎ Â ÛÒËÎËÚ Òfl êÂÍÓÏÂÌ ÛÂÚÒfl ËÒÔÓÎ ÁÓ Ú ÂÊËÏ ÄÇíé МАКС ì Ó ÂÌ DigiPure ÛÒÚ Ì ÎË ÂÚÒfl Ì Ï ÍÒËÏÛÏ ÖÒÎË ÔÓÒΠÛÒÚ ÌÓ ÍË DigiPure Ì ÄÇíé ËÁÓ ÊÂÌË Ô  ÂÚÒfl Ì ÒÓ ÒÂÏ ÔÓÎÌÓ Ô ÂÍÎ ËÚÂÒ Ò ÄÇíé Ì åÄäë êÂÊËÏ åÄäë ÌÂ Ô Ë Ó ÂÌ ÒÎÛ Â ÌËÁÍÓÍ ÂÒÚ ÂÌÌÓ Ó ËÁÓ ÊÂÌËfl Ò ÒËÎ Ì ÏË ÔÓÏÂı ÏË МИН ì Ó ÂÌ DigiPure ÛÒÚ Ì ÎË ÂÚÒfl Ì ÏË...

Page 67: ... ZOOM àÏÂÂÚÒfl ÓÁÏÓÊÌÓÒÚ ËÁÏÂÌÂÌËfl ÙÓ Ï Ú ËÁÓ ÊÂÌËfl Ì Í Ì ÔÛÚÂÏ ËÁÏÂÌÂÌËfl ÍÓ ÙÙˈËÂÌÚ Ô ÓÔÓ ˆËÓÌ Î ÌÓÒÚË Ç Â ËÚ ÓÔÚËÏ Î Ì È ÙÓ Ï Ú Ò ÔÓÏÓ Ó ÌÓ Ó ËÁ Ú Âı ÂÊËÏÓ ZOOM 1 Выберите ZOOM и нажмите кнопку MENU OK 2 Нажимайте кнопки для выбора режима ZOOM Затем нажмите кнопку MENU OK àÁÓ ÊÂÌËÂ Ò Ë ËÚÒfl Ì Á ÌË ÌÌÓ Ó ÂÊËÏ ZOOM ÓÒÚ ÂÚÒfl Ì Í Ì Ú ÂÌË ÓÍÓÎÓ 5 ÒÂÍÛÌ àÏ ÚÒfl ÒÎÂ Û Ë ÂÊËÏ çéêåÄãúçéÖ ZOOM Ë 16...

Page 68: ...Ë Ô Ï ÓÏÍÓ Ó Ó ËÚÂÎflÏË Û ÂÎË ÂÌË ÓÏÍÓÒÚË ÎÂ Ó Ó ÓÏÍÓ Ó Ó ËÚÂÎfl Û ÂÎË ÂÌË ÓÏÍÓÒÚË Ô Ó Ó ÓÏÍÓ Ó Ó ËÚÂÎfl AI ìêéÇÖçú ùÚ ÙÛÌ͈Ëfl ÂÚ ÓÁÏÓÊÌÓÒÚ Ô Â ÓÚ ÂÌËfl ÂÁÍÓ Ó Û ÂÎË ÂÌËfl ËÎË ÛÏÂÌ ÂÌËfl Û Ó Ìfl ÓÏÍÓÒÚË Ô Ë Ô ÂÍÎ ÂÌËË ÚÂÎÂÍ Ì ÎÓ Ë Ô ÂÍÎ ÂÌËË Ò Ó ÌÓ Ó ÂÊËÏ ÇàÑÖé Ì Û ÓÈ ВКЛ îÛÌ͈Ëfl ÍÎ ÂÌ ВЫКЛ îÛÌ͈Ëfl ÍÎ ÂÌ îÛÌ͈Ëfl AI ìêéÇÖçú ÏÓÊÂÚ Á Ú Òfl ÓÚ ÂÎ ÌÓ Îfl ÂÊËÏ íÇ Ë ÂÊËÏ ÇàÑÖé ç Ô ËÏ ÏÓÊÌÓ Á Ú Â Çõäã ÂÊËÏ ...

Page 69: ... НА УЩН ИКИ и нажмите кнопку MENU OK 2 С помощью кнопки сделайте выбор а с помощью кнопки установите функцию НА УЩН ИКИ Нажмите кнопку OK а затем нажмите кнопку MENU OK ГРОМКОСТЬ àÏÂÂÚÒfl ÓÁÏÓÊÌÓÒÚ Â ÛÎË Ó ÌËfl ÓÏÍÓÒÚË ÓÎÓ Ì ı ÚÂÎÂÙÓÌÓ TV ГРОМКОГОВОР äÓ Ú ÙÛÌ͈Ëfl ÍÎ ÂÌ ÓÏÍÓ Ó Ó ËÚÂÎË ÚÂΠËÁÓ Ì ÍÎ ÚÒfl ÊÂ Ô Ë ÔÓ ÒÓ ËÌÂÌËË ÓÎÓ Ì ı ÚÂÎÂÙÓÌÓ ÖÒÎË Ú ÙÛÌ͈Ëfl ÍÎ ÂÌ ÓÏÍÓ Ó Ó ËÚÂÎË ÚÂΠËÁÓ Ô Ë ÔÓ ÒÓ ËÌÂÌ...

Page 70: ...Ó Á Ú ÏÂÌ íÄâåÖê ÇõäãûóÖçàü Îfl ÔÓ Ú Â Ê ÂÌËfl ËÎË ËÁÏÂÌÂÌËfl ÓÒÚ Â ÓÒfl Ô ËÓ ÂÏÂÌË ëàçàâ îéç àÏÂÂÚÒfl ÓÁÏÓÊÌÓÒÚ ÚÓÏ ÚË ÂÒÍÓ Ó ËÁÏÂÌÂÌËfl Í Ì ÚÂΠËÁÓ Ì ÒËÌËÈ Ë ÍÎ ÂÌËfl Á ÛÍ ÒÎÛ Â ÒÎ Ó Ó ËÎË ÔÓÎÌÓÒÚ ÓÚÒÛÚÒÚ Û Â Ó ÒË Ì Î ËÎË Ê ÒÎÛ Â ÂÒÎË Ì ÔÓÒÚÛÔ ÂÚ ÒË Ì Î Ò Ì ÌÂ Ó ÛÒÚ ÓÈÒÚ ВКЛ îÛÌ͈Ëfl ÍÎ ÂÚÒfl ВЫКЛ îÛÌ͈Ëfl ÍÎ ÂÚÒfl áÄåéä éí ÑÖíÖâ àÏÂÂÚÒfl ÓÁÏÓÊÌÓÒÚ ÎÓÍË Ó ÌËfl Ô  ÌËı ÍÌÓÔÓÍ ÚÂΠËÁÓ äÓ Ú ÙÛÌ͈Ëfl ÛÒÚ Ì...

Page 71: ...àÑ çéåÖê ËÒ ÂÁÌÂÚ Ë ÚÂÎÂÍ Ì Î Û ÂÚ Á ÎÓÍË Ó Ì 6 Нажмите кнопку MENU OK для завершения установки åÂÌ ËÒ ÂÁÌÂÚ Для просмотра заблокированного телеканала 1 Выберите номер программы с заблокированным телеканалом с помощью кнопок с цифрами или списка ПРОГ ЛИСТ ùÍ Ì ÒÚ ÌÂÚ ÒËÌËÏ Ë ÔÓfl ËÚÒfl àÑ çéåÖê á ÎÓÍË Ó ÌÌ È ÚÂÎÂÍ Ì Î ÌÂÎ Áfl Ú Ò ÔÓÏÓ ÍÌÓÔÓÍ 2 Нажмите кнопку DISPLAY для вызова на экран ИД НОМЕР 3 Вве...

Page 72: ... ÂÚ ÂÊËÏ ÇàÑÖé VIDEO 3 ùÚ ÙÛÌ͈Ëfl Ó ÂÒÔÂ Ë ÂÚ Ô ËÎ ÌÛ Ì ÒÚ ÓÈÍÛ VIDEO 3 ÒÓÓÚ ÂÚÒÚ Û Û ÔÓÒÚÛÔ ÂÏÛ ÓÚ Ì ÌÂ Ó ÛÒÚ ÓÈÒÚ Â ÂÁ Ô ÌÂÎ VIDEO 3 Ë ÂÓÒË Ì ÎÛ è Ë ÌÂÔ ËÎ ÌÓÈ Ì ÒÚ ÓÈÍ ËÁÓ ÊÂÌËfl ÌÂ Û ÂÚ ВИДЕО Ç ÒÎÛ Â ÂÒÎË ÔÓÒÚÛÔ ÂÚ ÌÓ Ï Î Ì È ÔÓÎÌ È Ë ÂÓÒË Ì Î КОМПОНЕНТHЫЙ Ç ÒÎÛ Â ÂÒÎË ÔÓÒÚÛÔ ÂÚ ÍÓÏÔÓÌÂÌÚÌ È Ë ÂÓÒË Ì Î Y CB CR èÓ Ó ÌÛ ËÌÙÓ Ï ˆË ÔÓ ÔÓ ÒÓ ËÌÂÌËflÏ ÒÏ Á ÂΠÑéèéãçàíÖãúçÄü èéÑÉéíéÇäÄ Ì ÒÚ 36 Ñ Ì...

Page 73: ...ÂÍ Ì Î Û ÛÚ ÚÓÏ ÚË ÂÒÍË ÒÓı ÌflÚ Òfl ÒÔËÒÍ ÌÓÏÂ Ó Ô Ó ÏÏ ÑÎfl ÓÚÏÂÌ ÙÛÌ͈ËË ÄÇíé èêéÉ Ì ÊÏËÚ ÍÌÓÔÍÛ DISPLAY 2 После сохранения телеканалов в списке номеров программ появится меню НАСТРОЙКА èÓÒΠÚÓ Ó ÏÓÊÌÓ Â ÍÚË Ó Ú ÌÓÏÂ Ô Ó ÏÏ Ò ÔÓÏÓ ÙÛÌ͈ËË çÄëíêéâäÄ Çêìóçìû ÅÓΠÔÓ Ó ÌÛ ËÌÙÓ Ï ˆË ÒÏ Á ÂΠçÄëíêéâäÄ Çêìóçìû Ì ÒÚ 30 ÖÒÎË ÌÛÊÌ È ÚÂÎÂÍ Ì Î Ì ΠÒÓı ÌÂÌ ÒÔËÒÍ ÌÓÏÂ Ó Ô Ó ÏÏ Â Ó ÏÓÊÌÓ Á  ËÒÚ Ë Ó Ú Ò...

Page 74: ...Ë ÇëíÄÇäÄ Ô Ë Â ÂÚ Í ÒÚË ÌË ÚÓ Ó ÚÂÎÂÍ Ì Î 1 Выберите НАСТРОЙКА ВРУЧНУЮ и нажмите кнопку MENU OK 2 Используйте функцию согласно ее описанию УПРАВЛ ùÚ ÙÛÌ͈Ëfl ËÁÏÂÌflÂÚ ÌÓÏÂ Ô Ó ÏÏ ÚÂÎÂÍ Ì Î ИД ùÚ ÙÛÌ͈Ëfl  ËÒÚ Ë ÛÂÚ Ì Á ÌË ÚÂÎÂÍ Ì Î àÑ ВСТАВКА ùÚ ÙÛÌ͈Ëfl Ó ÎflÂÚ ÌÓ È ÚÂÎÂÍ Ì Î Í ÚÂÍÛ ÂÏÛ ÒÔËÒÍÛ ÌÓÏÂ Ó Ô Ó ÏÏ ÔÛÚÂÏ ËÒÔÓÎ ÁÓ ÌË ÌÓÏ CH CC УДАЛИТЬ ùÚ ÙÛÌ͈Ëfl Û ÎflÂÚ ÌÂÌÛÊÌ È ÚÂÎÂÍ Ì Î РУЧНАЯ ùÚ ÙÛÌ͈...

Page 75: ...ла ä Ì Î Û ÂÚ Û ÎÂÌ ËÁ ÒÔËÒÍ ÌÓÏÂ Ó Ô Ó ÏÏ РУЧНАЯ 1 Нажимайте кнопки для выбора номера программы под которым Вы хотите зарегистрировать новый телеканал 2 Нажмите синюю кнопку для включения функции РУЧНАЯ ë Ô ÓÈ ÒÚÓ ÓÌ ÓÚ ÌÓÏ CH CC ÔÓfl ËÚÒfl ëàëíÖåÄ ÒËÒÚÂÏ Á ÛÍÓ Ó Ó ÒÓÔ Ó ÓÊ ÂÌËfl ÌÌÓ Ó ÚÂÎÂÍ Ì Î Для отмены функции РУЧНАЯ Ì ÊÏËÚ ÍÌÓÔÍÛ DISPLAY 3 Нажимайте кнопку для выбора телевещательной системы с...

Page 76: ...Ì çÄëíêéâäÄ ВСТАВКА ПОДГОТОВКА ç È ËÚ ÌÓÏ CH CC ÒÓÓÚ ÂÚÒÚ Û ËÈ ÌÓÏÂ Û ÚÂÎÂÍ Ì Î Ú Î Ì ÒÚ 33 1 Нажимайте кнопки для выбора номера программы под которым регистрируется новый телеканал 2 Нажмите зеленую кнопку для включения функции ВСТАВКА 3 С помощью кнопок выберите CC или CH согласно номеру CH CC телеканала Для отмены функции ВСТАВКА ç ÊÏËÚ ÍÌÓÔÍÛ DISPLAY 4 С помощью кнопок с цифрами введите ост...

Page 77: ...ÛÂÏ ı Ì ÅÎËÊÌÂÏ ÇÓÒÚÓÍÂ û Ó ÇÓÒÚÓ ÌÓÈ ÄÁËË Ë Ú OIRT çÓÏÂ ÚÂÎÂÍ Ì ÎÓ ËÒÔÓÎ ÁÛÂÏ ı ÇÓÒÚÓ ÌÓÈ Ö ÓÔÂ êÓÒÒËË Ç ÂÚÌ ÏÂ Ë Ú AUSTRALIA çÓÏÂ ÚÂÎÂÍ Ì ÎÓ ËÒÔÓÎ ÁÛÂÏ ı Ä ÒÚ ÎËË Ë Ú ä Ì Î CH US CCIR OIRT AUSTRALIA CH 02 US 2 E2 R1 AU 0 CH 03 US 3 E3 AU 1 CH 04 US 4 E4 R2 AU 2 CH 05 US 5 E5 R6 AU 6 CH 06 US 6 E6 R7 AU 7 CH 07 US 7 E7 R8 AU 8 CH 08 US 8 E8 R9 AU 9 CH 09 US 9 E9 CH 10 US 10 E10 R10 AU 10 CH 1 1 U...

Page 78: ...ÍÒÚ ÌÂ Û ÂÚ ÌÓ Ï Î ÌÓ ÓÚÓ Ê Ú Òfl Турецкий венгерский английский немецкий французский итальянский испанский португальский греческий шведский финский Польский сербский хорватский словенский чешский словацкий румынский венгерский немецкий французский итальянский шведский финский Русский болгарский латышский литовский эстонский украинский сербский хорватский словенский чешский словацкий английский нем...

Page 79: ...Ì ÂÚÒfl ÚÓÏ ÚË ÂÒÍ fl ÂÏÓÌÒÚ ˆËfl ÖÒÎË ÂÏÓÌÒÚ ˆËfl ÌÂ Ú Â ÛÂÚÒfl ÛÒÚ ÌÓ ËÚ ÙÛÌÍˆË ÑÖåé Ì Çõäã 1 Нажмите кнопку для выбора ВКЛ ÑÎfl ÓÚÏÂÌ ÙÛÌ͈ËË ÑÖåé  ËÚ Çõäã 2 Нажмите кнопку MENU OK для завершения настройки îÛÌ͈Ëfl ÑÖåé ÍÎ ÂÚÒfl ÂÁÛÎ Ú ÚÂ Ì ÌÂÚÒfl ÂÏÓÌÒÚ ˆËfl Для отмены демонстрации Ì ÊÏËÚÂ Î Û ÍÌÓÔÍÛ ÔÛÎ Ú ËÒÚ ÌˆËÓÌÌÓ Ó ÛÔ ÎÂÌËfl ä Í ÔÓÎ ÁÓ Ú Òfl ÏÂÌ ÚÂΠËÁÓ ...

Page 80: ...ÂıÌË ÂÒÍË ÌÌ Â Ì ÒÚ 43 ÒÓ Â ÊËÚÒfl ËÌÙÓ Ï ˆËfl Ó Ô ÌÂÎflı ÇàÑÖé Ç ÒÎÛ Â ÔÓ ÒÓ ËÌÂÌËfl ÛÒÚ ÓÈÒÚ Ì ÍÎ ÂÌÌÓ Ó Ô Ë Â ÂÌÌ È ÌËÊ ÒÔËÒÓÍ Ó ÚËÚÂÒ Í Á ÂÎÛ íÂıÌË ÂÒÍË ÌÌ Â Îfl Ó Ì Ë ÓΠÔÓ ıÓ fl ÂÈ Ô ÌÂÎË ÇàÑÖé àÏÂÈÚÂ Ë Û ÚÓ ÒÓ ËÌËÚÂÎ Ì Â Í ÂÎË Ì ıÓ flÚ ÍÓÏÔÎÂÍÚ ÔÓÒÚ ÍË è Ë ÔÓ ÒÓ ËÌÂÌËË ÛÒÚ ÓÈÒÚ ÔÓ Â ÊË Ëı AV COMPU LINK Ó ÚËÚÂÒ Í Á ÂÎÛ èÓ ÒÓ ËÌÂÌË ÛÒÚ ÓÈÒÚ ÔÓ Â ÊË Ëı AV COMPU LINK Ì ÒÚ 38 1 Çå ÔÓÎÌ È ÒË...

Page 81: ...те гнездо VIDEO панели OUTPUT с гнездом VIDEO IN видеовход видеомагнитофона при помощи видеокабеля Способы подсоединения 1 Соедините гнездо VIDEO телевизора с гнездом VIDEO OUT видеовыход устройства с помощью видеокабеля Подсоединение устройства к телевизору с помощью кабеля S VIDEO ëÓ ËÌËÚ Á ÂÏ S VIDEO OUT ıÓ S VIDEO Ë ÂÓÏ ÌËÚÓÙÓÌ Ò Á ÂÏÓÏ S ÚÂΠËÁÓ Ò ÔÓÏÓ Í ÂÎfl S VIDEO ÌÂ Ë ÂÓÍ ÂÎfl àÏÂÈÚÂ Ë Û...

Page 82: ...ÓÎ ÁÓ ÌË ÔÛÎ Ú ËÒÚ ÌˆËÓÌÌÓ Ó ÛÔ ÎÂÌËfl Примеры работы системы дистанционного управления AV COMPU LINK ç ÊËÏ fl ÍÌÓÔÍÛ PLAY Ë ÂÓÏ ÌËÚÓÙÓÌ ËÎË DVD ÔΠÏÓÊÌÓ Ô ÓÒÏ Ú Ë Ú ËÁÓ ÊÂÌËfl Ì Ì ÌÂÏ ÛÒÚ ÓÈÒÚ Â ÖÒÎË Á ÛÁËÚ Á ÔËÒ ÌÌÛ ÔÎÂÌÍÛ Ì Í ÒÒÂÚÂ Ò Û ÎÂÌÌ Ï Á ËÚÌ Ï flÁ ÍÓÏ Çå ÏÓÊÌÓ ÒÏÓÚ ÂÚ Á ÔËÒ ÇÍÎ Ú Ë ÍÎ Ú ÚÂΠËÁÓ Ì ıÓ fl ËÈÒfl ÂÊËÏ ÓÊË ÌËfl Ë Ô ÂÍÎ Ú ÂÊËÏ ÇàÑÖé ÏÓÊÌÓ Ò ÔÓÏÓ Ô ËÂÏÌËÍ ÛÔ ÎÂÌËfl Äë ê ÓÚ ÒËÒÚÂÏ...

Page 83: ...к панели VIDEO 1 или VIDEO 2 телевизора При подсоединении DVD плеера к телевизору с помощью компонентного видеокабеля èÓ ÒÓ ËÌËÚ DVD ÔÎÂÂ Í Ô ÌÂÎË VIDEO 3 ÚÂΠËÁÓ ÑéèéãçàíÖãúçÄü èéÑÉéíéÇäÄ èÓ Ó Ì Â ËÌÒÚ Û͈ËË ÔÓ ÔÓ ÒÓ ËÌÂÌË ÒÏ Á ÂΠèÓ ÒÓ ËÌÂÌË Ì ÌËı ÛÒÚ ÓÈÒÚ Ì ÒÚ 36 2 Соедините гнездо AV COMPU LINK телевизора с гнездом AV COMPU LINK устройства с помощью кабеля AV COMPU LINK 3 Измените наст...

Page 84: ...ÒÚ Í Í ÛÒËÎËÚÂÎË ÍÓÏÔ Ú ÙÂÌ ÓÚ ÚÂΠËÁÓ ËÎË ÔÓÔ Ó ÛÈÚ ÛÒÚ ÌÓ ËÚ ÚÂΠËÁÓ Û ÓÏ ÏÂÒÚ ÖÒÎË ÌÚÂÌÌÂ Ì Ó flÚÒfl ÔÓÏÂıË ÓÚ ËÓÏ Ú ËÎË ÒÓÍÓ ÓÎ ÚÌ ı ÎËÌËÈ Ó ÚËÚÂÒ Í ÏÂÒÚÌÓÏÛ ËÎÂ Û ÖÒÎË ÚÂΠËÁÓ Ô ËÌËÏ ÂÚ ÒË Ì Î ÓÚ ÊÂÌÌ È ÓÚ Ó ËÎË Á ÌËÈ ËÁÓ ÊÂÌËÂ Ì Í ÌÂ Û ÂÚ ÓËÚ Òfl èÓÔ Ó ÛÈÚ ËÁÏÂÌËÚ Ó ËÂÌÚ ˆË ÌÚÂÌÌ ËÎË Á ÏÂÌËÚ Â ÌÓ ÓÈ Ó Î ÂÈ ÎÛ ÂÈ Ì Ô ÎÂÌÌÓÒÚ Устранение неисправностей ÖÒÎË Ô Ë ÔÓÎ ÁÓ ÌËË ÚÂΠËÁÓ ÓÏ ÓÁÌËÍ...

Page 85: ...OM PIP MULTI FREEZE Ë ÍÌÓÔÍ STROÇE îÛÌ͈ËË åÖçû óÖíäé ñÇ íéç ñàîêéÇÄü ëèÇò Digipure Ë ZOOM ÑÂÎ ÈÚ ÎË ÔÓÒÚ ÌÓ ÍÛ ëàëíÖåÄ ñÇÖíçéëíà Îfl ÚÂÎÂÍ Ì Î Ô ËÎ ÌÓ ÑÎfl ÛÒÚ ÌÂÌËfl ÚÓÈ Ô Ó ÎÂÏ ËÒÔÓÎ ÁÛÈÚ ËÌÙÓ Ï ˆË Á ÂΠäÌÓÔÍ COLOUR SYSTEM Ì ÒÚ 1 1 è ËÎ ÌÓ ÎË ÓÚ Â ÛÎË Ó Ì ñÇÖí Ë üêäé ÑÎfl  ÛÎË Ó ÌËfl ËÒÔÓÎ ÁÛÈÚ ËÌÙÓ Ï ˆË Á ÂΠê ÛÎË Ó ÌË ËÁÓ ÊÂÌËfl Ì ÒÚ 20 á ÔËÒ ÚÂÎÂÚÂÍÒÚ Ì Çå Ì ÂÍÓÏÂÌ ÛÂÚÒfl Ú Í ÓÌ ÏÓÊÂÚ Á ÔË...

Page 86: ... ÌËÂ Í ÌË Ó ÌÌ ı ÓÏÍÓ Ó Ó ËÚÂÎÂÈ àÁ Á ÎËflÌËfl Ï ÌËÚÌÓ Ó ÔÓÎfl áÂÏÎË ÏÓÊÂÚ Ô ÓËÁÓÈÚË Ô ÂÍÓÒ ËÁÓ ÊÂÌËfl ÑÎfl ÛÒÚ ÌÂÌËfl Ô ÂÍÓÒ ËÒÔÓÎ ÁÛÈÚ ËÌÙÓ Ï ˆË Á ÂΠPICTURE TILT Ì ÒÚ 23 è Ë ÔÓÎÌÂÌËË Ú ÍËı ÓÔ ˆËÈ Í Í Ô ÂÍÎ ÂÌËÂ Ò ÚÂÎÂÍ Ì Î Ì ÚÂÎÂÍ Ì Î ÓÁÌËÍ ÂÚ Í ÚÍÓ ÂÏÂÌÌ È Ô  Ô   ËÁÓ ÊÂÌËfl ùÚÓ Ì fl ÎflÂÚÒfl ÌÂËÒÔ ÌÓÒÚ ùÚÓÚ Ô  ÌÂÓ ıÓ ËÏ Îfl ÒÚ ËÎËÁ ˆËË ËÁÓ ÊÂÌËfl è Ë ÂÁÍÓÏ ËÁÏÂÌÂÌËË ÚÂÏÔ ÚÛ ÚÂΠËÁÓ ÏÓÊÂÚ Ë...

Page 87: ...P è ÌÂÎ VIDEO 4 ê Á ÂÏ RCA X 3 Á ÂÏ S VIDEO X 1 ÇË ÂÓ ıÓ ıÓ S VIDEO Y C Ë L R Û ËÓ ıÓ è ÌÂÎ OUTPUT ê Á ÂÏ RCA X 3 ÇË ÂÓ ıÓ Ë Û ËÓ ıÓ L R ÉÌÂÁ Ó ÓÎÓ Ì ı ÚÂÎÂÙÓÌÓ ëÚ ÂÓÙÓÌË ÂÒÍÓ ÏËÌË ÌÂÁ Ó Ë ÏÂÚ 3 5 ÏÏ ÑÓÔÓÎÌËÚÂÎ Ì Â ÛÒÚ ÓÈÒÚ èÛÎ Ú ËÒÚ ÌˆËÓÌÌÓ Ó ÛÔ ÎÂÌËfl X 1 RM C2 1 4 Å Ú ÂÈÍË AA R6 X 2 É ÓÏÍÓ Ó Ó ËÚÂÎË HV L34PRO 1 2 x 3 5 ÒÏ Ó Î Ì È x2 HV L29PRO 10 x 3 5 ÒÏ Ó Î Ì È x2 èÓÚ Â ÎflÂÏ fl ÏÓ ÌÓÒÚ HV L34P...

Page 88: ...VICTOR COMPANY OF JAPAN LIMITED ...

Reviews: