background image

4

 EN

SERVICING

1. Servicing

If your product is not operating correctly or exhibits a marked
change in performance and you are unable to restore normal
operation by following the detailed procedure in its operating
instructions, do not attempt to service it yourself as opening or
removing covers may expose you to dangerous voltage or other
hazards. Refer all servicing to qualified service personnel.

2. Damage Requiring Service

Unplug this product from the wall outlet and refer servicing to
qualified service personnel under the following conditions:
a. When the power supply cord or plug is damaged.
b.If liquid has been spilled, or objects have fallen into the

product.

c. If the product has been exposed to rain or water.
d.If the product does not operate normally by following the

operating instructions. Adjust only those controls that are
covered by the operating instructions as an improper
adjustment of other controls may result in damage and will
often require extensive work by a qualified technician to
restore the product to its normal operation.

e. If the product has been dropped or damaged in any way.
f. When the product exhibits a distinct change in

performance—this indicates a need for service.

3. Replacement Parts

When replacement parts are required, be sure the service
technician has used replacement parts specified by the
manufacturer or have the same characteristics as the original
part. Unauthorized substitutions may result in fire, electric
shock or other hazards.

4. Safety Check

Upon completion of any service or repairs to this product, ask
the service technician to perform safety checks to determine
that the product is in safe operating condition.

HOW TO USE THIS INSTRUCTION

MANUAL

The Index on pages 54 – 57 lists frequently-used terms, and
the number of the page on which they are used or explained
in the manual. This section also illustrates the controls and
connections on the front and rear panel, the front display
panel and the Remote.

The 

 mark signals a reference to another page for

instructions or related information.

Operation buttons necessary for the various procedures are
clearly indicated through the use of illustrations at the
beginning of each major section.

BEFORE YOU INSTALL YOUR NEW

VCR . . .

. . . please read the sections/literature listed below.

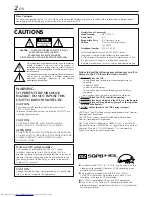
”CAUTIONS” on page 2

”IMPORTANT PRODUCT SAFETY INSTRUCTIONS” on the
previous pages

USE

1. Accessories

To avoid personal injury:
• Do not place this product on an unstable cart, stand, tripod,

bracket, or table. It may fall, causing serious injury to a child
or adult, and serious damage to the product.

• Use only with a cart, stand, tripod, bracket, or table

recommended by the manufacturer or sold with the product.

• Use a mounting accessory recommended by the

manufacturer and follow the manufacturer’s instructions for
any mounting of the product.

• Do not try to roll a cart with small casters across thresholds or

deep-pile carpets.

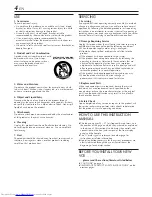
2. Product and Cart Combination

A product and cart combination should
be moved with care. Quick stops,
excessive force, and uneven surfaces
may cause the product and cart
combination to overturn.

3. Water and Moisture

Do not use this product near water—for example, near a bath
tub, wash bowl, kitchen sink or laundry tub, in a wet basement,
or near a swimming pool and the like.

4. Object and Liquid Entry

Never push objects of any kind into this product through
openings as they may touch dangerous voltage points or short-
out parts that could result in a fire or electric shock. Never spill
liquid of any kind on the product.

5. Attachments

Do not use attachments not recommended by the manufacturer
of this product as they may cause hazards.

6. Cleaning

Unplug this product from the wall outlet before cleaning. Do
not use liquid cleaners or aerosol cleaners. Use a damp cloth
for cleaning.

7. Heat

The product should be situated away from heat sources such as
radiators, heat registers, stoves, or other products (including
amplifiers) that produce heat.

PORTABLE CART WARNING
(Symbol provided by RETAC)

Summary of Contents for HR-VP783U

Page 1: ...o Serial No TV CH T V V O L TV CH TV V O L TV CANCEL TIMER START STOP DATE PLAY REW REC STOP SHUTTLE PLUS PAUSE FF MENU OK CH POWER TV VCR C RESET DBS DAILY M F AUX WEEKLY PROG CHECK PROG SP EP SKIP SEARCH DISPLAY A MONITOR CABLE DBS 1 2 3 4 5 6 7 8 9 0 2 4 1 3 EXPRESS PROGRAMMING MULTI BRAND REMOTE CONTROL UNIT MBRSET A B VIDEO MONO L AUDIO R PLAY SP EP MENU CH OK FF REW POWER SP EP VCR REC PAUSE...

Page 2: ...ations not approved by JVC could void user s authority to operate the equipment 䡲 Cassettes marked VHS or S VHS can be used with this video cassette recorder However S VHS recording is not possible with this model 䡲 This model is equipped with SQPB S VHS QUASI PLAYBACK that makes it possible to play back S VHS recordings with regular VHS resolution 䡲 HQ VHS is compatible with existing VHS equipmen...

Page 3: ... paying particular attention to cords at plugs convenience receptacles and the point where they exit from the product 5 Ventilation Slots and openings in the cabinet are provided for ventilation To ensure reliable operation of the product and to protect it from overheating these openings must not be blocked or covered Do not block the openings by placing the product on a bed sofa rug or other simi...

Page 4: ...ctions on the front and rear panel the front display panel and the Remote The 墌 mark signals a reference to another page for instructions or related information Operation buttons necessary for the various procedures are clearly indicated through the use of illustrations at the beginning of each major section BEFORE YOU INSTALL YOUR NEW VCR please read the sections literature listed below CAUTIONS ...

Page 5: ...k Set 12 Tuner Setting 13 Setting channels automatically Auto Channel Set 13 Setting channels manually Manual Channel Set 14 Cable Box Control Setting 15 Installing Controller 15 Setting cable box output channel brand 16 DBS Receiver Control Setting 18 Installing Controller 18 Setting DBS receiver output channel brand 19 BASIC PLAYBACK AND RECORDING 21 Basic Playback 21 Basic Playback Features 22 ...

Page 6: ...W VCR RF OUT RF cable supplied Matching transformer not supplied AC Power Cord Audio video cable not supplied TV ANTENNA IN Antenna or cable input Back of VCR To 75 ohm terminal AC Outlet Antenna or cable Flat feeder Coaxial cable Basic Connections AUDIO OUT VIDEO OUT To Audio video input connectors ...

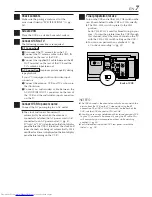
Page 7: ...If Auto or CH is displayed on the front display panel before the VCR is turned on the clock and tuner channels are being set automatically Wait until the clock time is displayed on the front display panel before turning on the VCR 5 Final preparation for use Turn on the VCR and set the CH3 CH4 switch on the rear shown below to either CH3 or CH4 correctly The CH3 CH4 switch is preset to the CH3 pos...

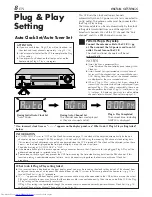
Page 8: ...L SETTINGS Plug Play Setting This VCR sets the clock and tuner channels automatically when AC power cord is first connected to an AC outlet The antenna cable must be connected for the Plug Play setting The time and date can be set automatically by the clock setting data transmitted from one of the regular TV broadcast channels We call this TV channel the host channel and it is a PBS channel in you...

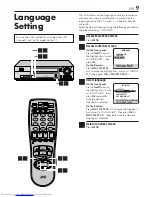
Page 9: ...age On the front panel Press CH5 to move the highlight bar arrow to LANGUAGE then press OK repeatedly until the desired language is selected On the Remote Press SHUTTLE PLUS fi to move the highlight bar arrow to LANGUAGE then press OK or SHUTTLE PLUS repeatedly until the desired language is selected 4 Return to normal screen Press MENU Turn on the VCR and the TV and select the VCR channel 3 or 4 o...

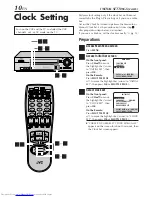
Page 10: ... to INITIAL SET then press OK or SHUTTLE PLUS 3 Select clock set On the front panel Press CH5 to move the highlight bar arrow to CLOCK SET then press OK On the Remote Press SHUTTLE PLUS fi to move the highlight bar arrow to CLOCK SET then press OK or SHUTTLE PLUS CABLE BOX USERS SET CLOCK MANUALLY appears on the screen for about 5 seconds then the Clock Set screen appears Turn on the VCR and the T...

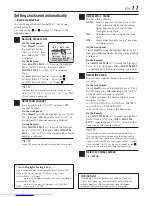
Page 11: ...T AUTO TIME ZONE AUTO PRESS 5 THEN OK PRESS MENU TO END 6 Select D S T mode You have three choices AUTO Select if you want to adjust your VCR s clock automatically by the incoming signal from the host channel Auto Daylight Saving Time ON Adjustment will be made by the clock itself OFF Select when Daylight Saving Time does not apply to you On the front panel Press CH5 to move the highlight bar to D...

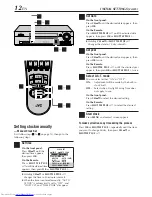
Page 12: ...ect the desired setting 8 Start clock Press MENU and normal screen appears To make corrections any time during the process Press OK or SHUTTLE PLUS repeatedly until the item you want to change blinks then press CH 5 or SHUTTLE PLUS fi CLOCK SET TIME DATE YEAR AM 1 1 00 AUTO CLOCK ON HOST CH AUTO CATV D S T AUTO TIME ZONE AUTO PRESS 5 THEN OK PRESS MENU TO END 1 3 8 2 7 2 7 8 VIDEO MONO L AUDIO R P...

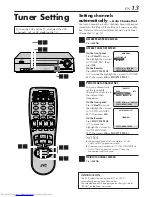
Page 13: ...Remote Press SHUTTLE PLUS fi to move the highlight bar arrow to AUTO CHANNEL SET then press OK or SHUTTLE PLUS NOTES When Auto Channel Set is complete SCAN COMPLETED appears on screen If the scan was unsuccessful SCAN COMPLETED NO SIGNAL appears on screen Check the connections and start again 4 Return to normal screen Press MENU INFORMATION The VCR selects the correct band TV or CATV automatically...

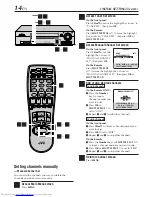
Page 14: ...and 2 to add other channels To skip channels On the front panel 1 Press CH5 to select a channel number you want to skip 2 Press OK to set to SKIP 3 Repeat 1 and 2 to skip other channels On the Remote 1 Press the Number keys or SHUTTLE PLUS fi to input a channel number you want to skip 2 Press OK or SHUTTLE PLUS to set to SKIP 3 Repeat 1 and 2 to skip other channels 5 Return to normal screen Press ...

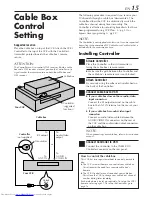
Page 15: ...IDEO IN connectors on the rear of the VCR and the audio video output connectors on the cable box NOTE When connecting your cable box refer to its instruction manual 4 Connect Controller to VCR Connect the Controller to the CABLE BOX Controller connector on the rear panel Cable Box Control Setting Suggested location Place the cable box on top of the VCR Attach the VCR s Controller to the top of the...

Page 16: ... box s output CH2 CH9 appears on the screen If your cable box is connected to your VCR s AUDIO VIDEO IN connectors on the front panel Press CH 5 on the front panel or SHUTTLE PLUS fi on the Remote until ON F 1 FRONT appears on the screen If your cable box is connected to your VCR s AUDIO VIDEO IN connectors on the rear panel Press CH 5 on the front panel or SHUTTLE PLUS fi on the Remote until ON L...

Page 17: ...AY 3 9 22 ZENITH 3 9 22 If the VCR s clock has not been set with AUTO CLOCK set to ON CABLE BOX USERS SET CLOCK MANUALLY appears for about 5 seconds when you press OK in step 6 then the Clock Set screen appears Perform Manual Clock Set on page 12 If you press MENU after the clock has been set the Cable Box Brand Set screen appears CABLE BOX BRAND SET 1 PRESS NUMBER KEY 0 9 THEN OK TO TEST PRESS ME...

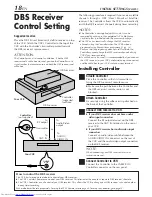
Page 18: ...ceiver to the ANT IN terminal on the rear of your VCR If your DBS receiver has audio video input connectors Connect an audio video cable between the AUDIO VIDEO IN connectors on the rear of the VCR and the audio video output connectors on the DBS receiver NOTE When connecting your DBS receiver refer to its instruction manual 4 Connect Controller to VCR Connect the Controller to the CABLE BOX Contr...

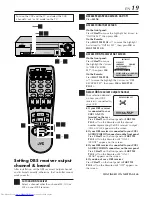
Page 19: ... your VCR s ANT IN terminal on the rear Press CH 5 on the front panel or SHUTTLE PLUS fi on the Remote until the channel number representing the DBS receiver s output CH3 or CH4 appears on the screen If your DBS receiver is connected to your VCR s AUDIO VIDEO IN connectors on the front panel Press CH 5 on the front panel or SHUTTLE PLUS fi on the Remote until ON F 1 FRONT appears on the screen If ...

Page 20: ...ontroller to change satellite channels In this case make sure to leave the DBS receiver turned on and tuned to the proper channel before the scheduled start time of timer recording The VCR can only change the satellite channel through the Controller during timer recording If your DBS receiver cannot be operated with a remote control because it has no remote sensor you cannot use the Controller to ...

Page 21: ...W 1 or turn the SHUTTLE ring on the front panel to the left To fast forward the tape Press FF or turn the SHUTTLE ring on the front panel to the right To eject the tape Press STOP EJECT 7 0 on the front panel when the tape is not running You can also eject the cassette with the VCR turned off To turn off the VCR Press POWER Turn on the VCR and the TV and select the VCR channel 3 or 4 or AV mode on...

Page 22: ...r Instant Review 墌 pg 24 The position of in relation to B Beginning or E End shows you where you are on the tape NOTES SUPERIMPOSE must be set to ON or the indicator will not appear 墌 pg 39 It may take a few seconds for the tape position indicator to be displayed Playing back tape repeatedly Repeat Play You can play back a tape repeatedly 100 times While playing back a tape press and hold PLAY 3 f...

Page 23: ...press A MONITOR on the Remote Each time you press the button sound changes as follows HI FI Normally select this Hi Fi sound is played back HI FI L Sound on the left Hi Fi channel is played back HI FI R Sound on the right Hi Fi channel is played back NORM Sound on the normal track is played back NORM HI FI Both sounds on the Hi Fi track and normal track are mixed and played back Note The above ind...

Page 24: ...ically You can access a program of 2 to 9 index codes away from the current position on the tape If for example you have 5 programs recorded and you want to watch the third one press REVIEW three times Ifyouwanttofindtheverybeginningofthedesiredprogram press REW 1 or FF after playback starts If the tape is already rewound when REVIEW is pressed it will play the tape from the beginning It will not ...

Page 25: ...3 to start recording after Video Calibration is complete To pause recording Press PAUSE 8 To resume recording press PLAY 3 To stop recording Press STOP 7 on the Remote or STOP EJECT 7 0 on the front panel To rewind the tape Press REW 1 or turn the SHUTTLE ring on the front panel to the left To fast forward the tape Press FF or turn the SHUTTLE ring on the front panel to the right To eject the tape...

Page 26: ...ngth you want appears on the front display panel The record indicator starts flashing Each time you press the button recording length increases in 30 minute intervals up to 6 hours To cancel an ITR press STOP 7 on the Remote or STOP EJECT 7 0 on the front panel Watching one program while recording another 1 Engage TV mode During recording If you connect the TV and the VCR only using the RF connect...

Page 27: ...ecording or Instant Timer Recording or timer recording the recording will resume automatically when the power is restored to the VCR No setting is required for this function Video Calibration 墌 pg 39 When this function is set to ON this VCR checks the condition of the tape in use during playback and recording and compensates to provide the highest possible pictures Second Audio Recording 墌 pg 41 T...

Page 28: ...d the button for more than 2 seconds simply releasing it cancels the picture search and normal playback resumes To resume normal playback press PLAY 3 7 Variable Speed Picture Search You can change the speed of picture search How to use the SHUTTLE ring on the front panel Turn the SHUTTLE ring to the right forward search or to the left reverse search As you turn the SHUTTLE ring picture search spe...

Page 29: ... resume normal playback press PLAY 3 NOTE Manual tracking is possible during slow motion playback During slow motion playback simply press CH 5 and on the front panel or CH or on the Remote to adjust tracking E D How to use the SHUTTLE PLUS buttons on the Remote To do forward picture search press SHUTTLE PLUS repeatedly Each time you press the button the search speed increases To decrease the spee...

Page 30: ...f not cover the hole with adhesive tape then load it into the VCR The VCR turns on and the counter is reset automatically 2 Access VCR Plus screen Press PROG on the Remote The clock must be set to access the VCR Plus screen If you have not set the clock the Main Menu screen appears after an error message is displayed Refer to page 8 for the Plug Play setting or page 10 for the clock setting proced...

Page 31: ... screen in step 5 When this happens set the correct guide channel number for that station 墌 pg 32 VCR Plus Setup NOTES Even if a power failure occurs the VCR keeps your timer programs However the clock time channel settings and other menu settings are lost if it lasts for more than 3 minutes As a result when the power is supplied again to this VCR after the power failure the following will take pl...

Page 32: ...R Plus guide channel to the TV channels and the cable channels These guide channel numbers are also called the VCR Plus channel codes Most TV listings have a section usually a chart indicating the guide channel numbers assigned to each station For accurate VCR Plus programing the VCR Plus guide channel number for each station should match the channel number on which it is received in your area NOT...

Page 33: ...with a cable box and if you have properly set your Controller CABLE CH appears in place of VCR CH If not refer to pages 15 17 and re perform the procedure Ex When inputting the guide channel number 6 for WNJU Ind Ex If WNJU Ind is received on channel 47 GUIDE CHANNEL SET GUIDE CH 6 VCR CH PRESS NUMBER KEY 0 9 OR 5 THEN OK PRESS MENU TO END INITIAL SET CLOCK SET LANGUAGE ENGLISH GUIDE CHANNEL SET C...

Page 34: ...e the time in 30 minute intervals 5 Set program stop time Press STOP repeatedly to enter the time you want recording to stop Press and hold STOP to increase the time in 30 minute intervals 6 Set program date Press DATE The current date is displayed on the screen The date you enter appears in its place 7 Set channel number Press CH If you are using a DBS receiver see ATTENTION FOR DBS RECEIVER USER...

Page 35: ...hannel number indication TV To timer record a regular TV broadcast received on the VCR CATV To timer record a cable TV broadcast received on the VCR or through a cable box unless CABLE BOX SET is set to OFF 墌 pg 16 DBS To timer record a satellite broadcast received through a DBS receiver NOTE If BAND is set to TV on the Tuner Set screen 墌 pg 13 and CABLE BOX SET is set to OFF on the Cable Box Set ...

Page 36: ...mer recording standby mode Press TIMER When AUTO TIMER 墌 pg 39 is set to ON the timer recording standby mode automatically resumes when you turn off the VCR PR START STOP CH DATE 1 8 00P 10 00 12 12 24 2 10 00A 10 45 40 12 25 3 11 30P 1 00 125 12 25 4 5 6 7 8 PRESS CHECK TO NEXT A B Turn on the VCR and the TV and select the VCR channel 3 or 4 or AV mode on the TV 1 2 3 4 5 6 7 8 9 0 2 4 1 3 B 2 B ...

Page 37: ...n then press OK PROGRAM COMPLETED appears on the screen for about 5 seconds then normal screen appears NOTE If the overlap is not yet solved or another overlap occurs with the timer program setting made last after making correction on a program the conflicting programs will be shown on the Program Check screen again Repeat the above steps again until the overlap is solved C PROGRAM NOT COMPLETED P...

Page 38: ... highlight bar arrow to the function you want to set then press OK or SHUTTLE PLUS 4 Change setting On the front panel Press OK On the Remote Press OK or SHUTTLE PLUS 5 Return to normal screen Press MENU Turn on the VCR and the TV and select the VCR channel 3 or 4 or AV mode on the TV OTHER USEFUL FUNCTIONS Useful Function Settings MAIN MENU FUNCTION SET TUNER SET INITIAL SET PRESS 5 THEN OK PRESS...

Page 39: ...CALIBRATION is OFF When this function is set to ON The timer recording standby mode is automatically engaged when the VCR is turned off It is temporarily canceled when the VCR is turned on You do not have to press TIMER to engage or disengage the timer recording standby mode When this function is set to OFF For safety all buttons except TIMER are disabled while the VCR is in the timer recording st...

Page 40: ...es from SP to EP mode on the tape This function is not available during ITR Instant Timer Recording and will not work properly on the following tapes T ST 30 T ST 60 T ST 90 and T ST 120 When this function is set to ON you can automatically correct vertical vibrations in the picture when playing back unstable recordings made on another VCR NOTES When you finish viewing a tape be sure to set this f...

Page 41: ... terminal When this function is set to ON you can use the this terminal as the AV COMPULINK terminal By connecting other JVC s AV COMPULINK components see the diagram below including amplifiers or receivers and televisions one touch control of the audio and video components linked via their AV COMPULINK connectors becomes possible For example simply load a cassette in the VCR and press PLAY 3 and ...

Page 42: ...function is now activated and you cannot turn on the VCR by pressing POWER on the front panel To release the child lock press and hold POWER on the Remote until the VCR turns on During timer recording pressing TIMER also releases the child lock NOTES When the child lock function is in use keep the Remote out of the children s reach Timer recording programs will be performed even if the child lock ...

Page 43: ...put on the other VCR On this VCR when using this VCR as the recording VCR Select L 1 when connecting the camcorder to the audio video input connectors on the rear panel Select F 1 when connecting the camcorder to the audio video input connectors on the front panel On the front panel Press CH5 On the Remote Press the Number key 0 AUX or CH 4 Select EDIT function Set the EDIT function to ON ON this ...

Page 44: ...ied Camcorder for playback To Audio video output To EDIT This VCR for recording To AUDIO VIDEO Input Connection VIDEO MONO L AUDIO R PLAY SP EP MENU CH OK FF REW POWER SP EP VCR REC PAUSE STOP EJECT 1 2 3 4 5 6 7 8 9 0 2 4 1 3 48 57 57 3 3 0 VIDEO MONO L AUDIO R PLAY SP EP MENU CH OK FF REW POWER SP EP VCR REC PAUSE STOP EJECT 48 57 357 0 EDITING cont ...

Page 45: ...NEXT PAGE SELECT WITH 5 AND OK PRESS MENU TO END You can use a camcorder as the playback VCR and your VCR as the recording VCR 1 Make connections Connect an audio video cable between the camcorder s audio video output connectors and your VCR s video audio video input connectors When the JVC camcorder is equipped with the Master Edit Control you can control the VCR from the camcorder Connect the mi...

Page 46: ... has two codes If the TV does not function with one code try entering the other 3 Operate TV While holding down TV press one of the following buttons POWER TV VCR TV CH TV VCR TV Muting TV VOL and Number keys For some brands you must press ENTER after having pressed the Number keys to enter a channel number NOTES Depending on the type of TV some or all functions cannot be operated using this Remot...

Page 47: ...tton can be used to change the VCR s channels only NOTES Depending on the type of cable box some or all functions cannot be operated using this Remote It s not possible to operate a cable box not equipped with a remote sensor It s not possible to set the Remote for both your cable box and a DBS receiver at the same time You can only set the Remote control to operate one of these units at a time CA...

Page 48: ...one of the following buttons POWER TV CH and Number keys For some brands you must press ENTER after having pressed the Number keys to enter a channel number To change the DBS receiver s channels press TV CH or the Number keys The CH button can be used to change the VCR s channels only DBS BRAND NAME BRAND CODE JVC DISH Network 51 ECHOSTAR DISH Network 51 PRIMESTAR 50 SONY DSS 41 RCA DSS 40 NOTES D...

Page 49: ...ansmit B code control signals 3 Plug in VCR Plug the AC power cord back into an AC outlet 4 Turn on VCR Press POWER on the Remote The VCR now responds to B code control signals To set the Remote and the VCR back to A code control signals repeat the same procedure as shown above except pressing the Number key 1 in step 2 To control two VCRs with the same Remote You can control two JVC VCRs by switc...

Page 50: ...eard POSSIBLE CAUSE If the RF connection 墌 pg 6 is used to view the picture the channel on the TV is set incorrectly If the AV connection 墌 pg 6 is used to view the picture the TV receiver is set to the wrong mode Automatic tracking is engaged The video heads may be dirty Audio Monitor setting is incorrect CORRECTIVE ACTION Select channel 3 or 4 on the TV Select the AV mode on the TV Disengage aut...

Page 51: ...programing will not work 3 and on the front display panel will not stop blinking 4 The cassette is automatically ejected and and on the front display panel will not stop blinking 5 blinks for 10 seconds and the timer mode is disengaged 6 The cassette is automatically ejected the power shuts off and and will not stop blinking 7 Cable channels are not automatically switched during timer recording 8 ...

Page 52: ...ontains microcomputers External electronic noise or interference can cause microcomputer to malfunction If the VCR does not operate correctly switch its power off and unplug the AC power cord from the AC supply Wait for a while and then plug the power back in Eject and check the condition of the cassette If everything appears normal you can operate the VCR as usual MOISTURE CONDENSATION Moisture i...

Page 53: ...cally rewinds it to the beginning Q Can the VCR indefinitely remain in still mode A No It stops automatically after 5 minutes to protect the heads Q During picture search still picture playback and frame by frame playback the picture is intermittent What s the cause A Picture loss occurs when these types of playback are attempted with a tape recorded in LP mode Pressing PLAY 3 to return to normal ...

Page 54: ...al tracking 23 Multi Brand Remote Controlling two JVC VCRs 49 Setting Cable Box brand 47 Setting DBS receiver brand 48 Setting TV brand 46 N Next Function Memory 23 O On screen display 27 56 P PBS channel 8 Picture Control 39 Picture Search 28 Playback 21 Plug Play 8 R Recording 25 Recording Resume function 27 Remote Pause function 45 Repeat play 22 RF connection 6 S Second Audio Record 41 Slow Mo...

Page 55: ...ECT 7 0 button 墌 pg 21 25 PAUSE 8 button 墌 pg 25 29 Front display panel 2 Tape speed indicators 3 Timer mode indicator 墌 pg 31 35 4 Child lock indicator 墌 pg 42 5 VCR mode indicator 墌 pg 25 26 6 Cassette mark 7 Channel and auxiliary input L 1 and F 1 Counter reading 墌 pg 22 26 Clock time 墌 pg 22 26 1 Symbolic Mode Indicators STILL SLOW RECORD RECORD PAUSE PLAY FF REW VARIABLE SHUTTLE SEARCH SP VCR...

Page 56: ...isplay 1 Channel and auxiliary input L 1 and F 1 2 Date and clock time 墌 pg 22 26 3 STEREO program indication 墌 pg 27 4 SAP Second Audio Program indication 墌 pg 27 5 Audio monitor indications 墌 pg 23 41 6 VCR operation mode indication 7 Tape speed indication 8 Cassette indication 9 Tape position indicator 墌 pg 22 0 Index no indication 墌 pg 24 Time counter 墌 pg 22 26 CH 125 RECORD THU 12 00 AM PAUS...

Page 57: ...g 29 TV VOL button 墌 pg 46 TV CH T V V O L TV CH TV V O L TV CANCEL TIMER START STOP DATE PLAY REW REC STOP SHUTTLE PLUS PAUSE FF MENU OK CH POWER TV VCR C RESET DBS DAILY M F AUX WEEKLY PROG CHECK PROG SP EP SKIP SEARCH DISPLAY A MONITOR CABLE DBS 1 2 3 4 5 6 7 8 9 0 2 4 1 3 EXPRESS PROGRAMMING MULTI BRAND REMOTE CONTROL UNIT MBRSET A B i o u W 1 3 8 7 6 2 9 4 0 5 r e w q t y Q p E ENTER OSD Butt...

Page 58: ...uning system Frequency synthesized tuner Channel coverage VHF Channels 2 13 UHF Channels 14 69 CATV 113 Channels RF output Channel 3 or 4 switchable preset to Channel 3 when shipped 75 ohms unbalanced Specifications TIMER Clock reference Quartz Program capacity 1 year programmable timer 8 programs Memory backup time Approx 3 min ACCESSORIES Provided accessories RF cable F type Infrared remote cont...

Page 59: ...RTERS JVC SERVICE ENGINEERING COMPANY OF AMERICA DIVISION OF JVC AMERICAS CORP 10 New Maple Avenue Pine Brook NJ 07058 9641 Pack your JVC unit in the original carton or one of equivalent size and strength Enclose with the unit a letter stating the problem or symptom that exists and also a copy of the receipt or bill of sale you received when you purchased your JVC unit Print your home return addre...

Page 60: ...ny attachment not provided with the products or if the model or serial number has been altered tampered with defaced or removed 2 Initial installation and installation and removal for repair 3 Operational adjustments covered in the Owner s Manual normal maintenance video and audio head cleaning 4 Damage that occurs in shipment due to act of God and cosmetic damage 5 Signal reception problems and f...

Page 61: ...EN 61 MEMO ...

Page 62: ...62 EN MEMO cont ...

Page 63: ...EN 63 ...

Page 64: ...HR VP783U COPYRIGHT 1999 VICTOR COMPANY OF JAPAN LTD Printed in Malaysia 1199 IYV MW PJ VICTOR COMPANY OF JAPAN LIMITED U U C ...

Reviews: