background image

Page 9

June 11, 2004 1:52 pm

— 9 —

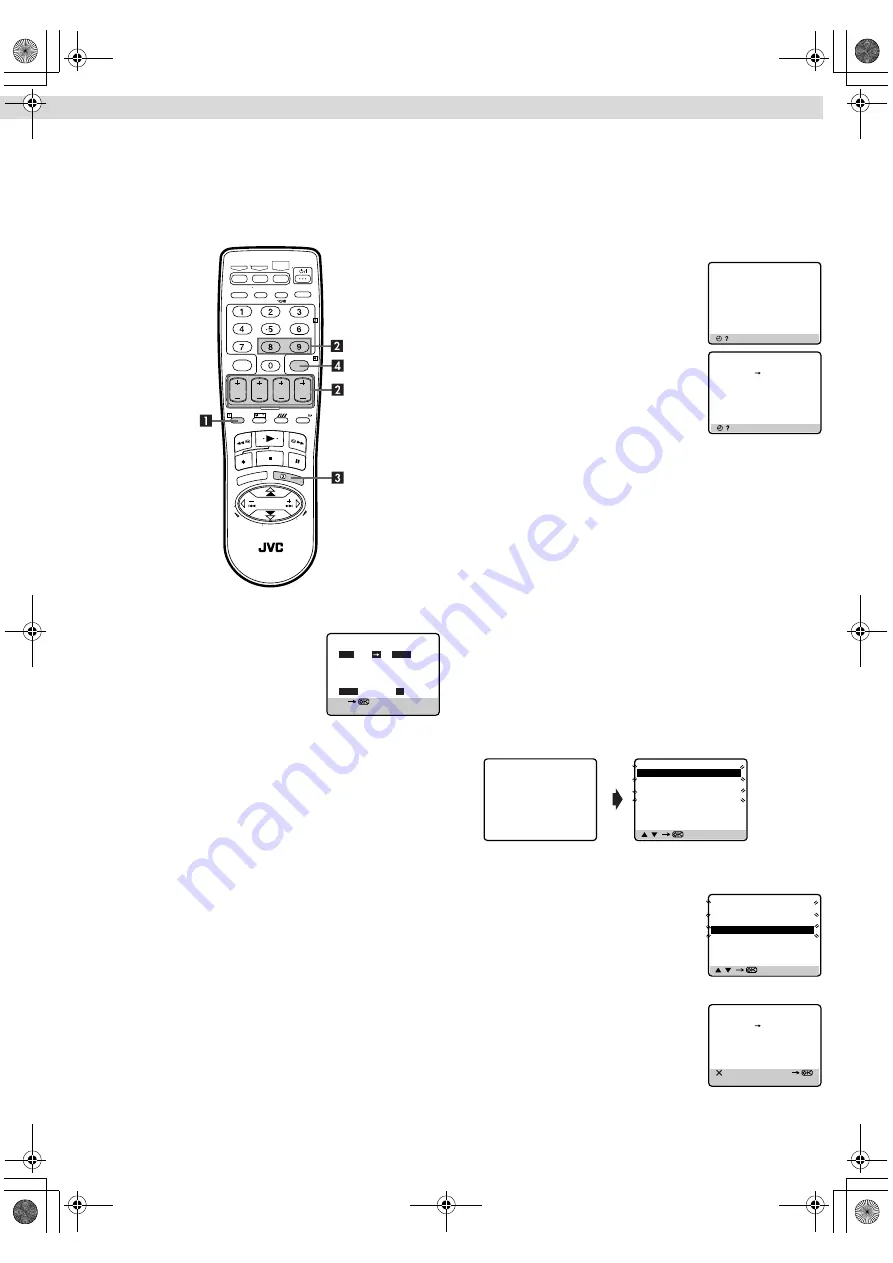
Express Timer Programing

Remember, the clock must be set before you can program the 
timer.

Load a cassette with the record safety tab intact. The recorder 
turns on, and the counter is reset, automatically.

Select the appropriate colour system with “PAL/MESECAM” and 
“NTSC” in Function settings.

A

Press 

PROG

 on the remote control to access the G-

CODE


screen, then press 

START+/–

.

B

Press 

START+/–

STOP+/–

DATE+/–


or 

PR+/–

 repeatedly to enter the start 

time, stop time, date or channel.

Press and hold 

START+/–

 or 

STOP+/–

 to increase the time in 

30-minute intervals.

To set the tape speed, press 

SP/LP/

EP

 (

p

).

To timer-record daily (Monday–Friday) or weekly serials, 
press 

DAILY

 (key number 8) or 

WEEKLY 

(key number 9). 

Pressing the button again makes the “DAILY” or “WEEKLY” 
display disappear.

C

Press 

OK

 or 

PROG

.

If “PROGRAM OVERLAPPED” appears, see “Program 
overlap warning display”.

D

Press 

#

. The recorder turns off automatically and “

#

” is 

displayed on the display panel.

To use the recorder while it is in 
timer recording standby mode

Press 

#

, then press 

1

. After you use the recorder, press 

#

 again 

to put the recorder into timer recording standby mode.

Checking, cancelling or changing 
program settings

A

Disengage timer

Press 

#

, then press 

1

.

When “AUTO TIMER” is set to “ON” (

10), you do not have to 

press 

#

.

B

Access Program Check screen

Press 

"

.

C

Access Program screen

Press 

"

 again. Each time you press 

"

the next program’s Program screen 
appears.

D

Cancel or change program setting

To cancel a program,

 press 

&

 when the Program screen you do 

not want is shown.

To change a program,

 press the appropriate button: 

START+/–

STOP+/–

DATE+/–

PR+/–

DAILY

WEEKLY 

and/or 

SP/LP/EP


(

p

) when the Program screen on which you want to make 

changes is shown.

E

Return to normal screen

Press 

"

 repeatedly until no Program screen is shown.

F

Reengage timer recording standby mode

Press 

#

. The recorder turns off automatically and “

#

” is displayed 

on the display panel.

When “AUTO TIMER” is set to “ON” (

10), the timer 

recording standby mode automatically resumes when you turn 
off the recorder.

Program overlap warning display

If “PROGRAM OVERLAPPED” appears, you have another 

program overlapping the program you have just made. The 

Program Check screen appears and conflicting programs will start 

blinking.

Example:
Program 1 (you have just made) and Program 4 overlap each 
other.

A

Select program to modify

Press 

rt

, then press 

e

.

You can only select one of the 

overlapping programs.

If you do not mind this overlap, press 

PROG

 to finish the timer program 

setting. The program starting earlier or 

program with the lower program number will be recorded.

B

Cancel or change program setting

To cancel a program,

 press 

&

 when the 

Program screen you do not want is shown.

To change a program,

 press the 

appropriate button: 

START+/–

STOP+/–

DATE+/–

PR+/–

DAILY

WEEKLY 

and/or 

SP/LP/EP

 (

p

) when the Program screen 

on which you want to make changes is shown, then press 

OK

.

If the overlap is not yet solved, the conflicting programs will be 
shown on the Program check screen. Repeat the above steps 
again.

[+/–]
[PROG] : EXIT     

– P1 –

START

STOP

8:00

10:00

   SP

DATE

TV PROG

24.04


3

[        ] : NEXT

PR

START

STOP

CH

DATE

1

  8:00

10:00

3

24.04

2

10:00

10:45


2

25.04

3

11:30

13:00

1

25.04

4
5
6
7
8

[        ] : NEXT

– P1 –

START

STOP

8:00

10:00

   SP

DATE

TV PROG

24.04

   3

[    /    ]   

[PROG] : EXIT

PR

START

STOP

CH

DATE

1

  8:00

10:00

3

24.04

2

10:00

10:45


2

25.04

3

11:30

13:00

1

25.04

4

9:00

10:00

92

DAILY

5
6
7
8

PROGRAM OVERLAPPED

[    /    ]   

[PROG] : EXIT

PR

START

STOP

CH

DATE

1

  8:00

10:00

3

24.04

2

10:00

10:45


2

25.04

3

11:30

13:00

1

25.04

4

9:00

10:00

92

DAILY

5
6
7
8

[    ] : DELETE

[+/–]

[PROG] : EXIT


– 

P1 –

START

STOP

  9:00

10:00

   SP

DATE

TV PROG

25.04

   92

– Timer Recording –

HR-V610AH_EN.fm  Page 9  Friday, June 11, 2004  1:53 PM

Summary of Contents for HR-V610AH

Page 1: ...d strictly CAUTION 䡲 When you are not using the recorder for a long period of time it is recommended that you disconnect the power cord from the mains outlet 䡲 Dangerous voltage inside Refer internal servicing to qualified service personnel To prevent electric shock or fire hazard remove the power cord from the mains outlet prior to connecting or disconnecting any signal lead or aerial ATTENTION 1...

Page 2: ...How to use the remote control The remote control can operate most of your recorder s functions as well as basic functions of TV cable box satellite receiver and DVD sets of JVC and other brands Point the remote control toward the sensor window on the target component The maximum operating distance of the remote control is about 8 m NOTES When inserting the batteries be sure to insert in the correc...

Page 3: ...TV s aerial input terminal AV Connection improves picture quality during tape playback If your TV is equipped with AV input connectors A Connect the aerial recorder and TV as shown in the illustration B Connect an AV cable between the AUDIO VIDEO OUT connectors on the rear of the recorder and the AV input connectors on the TV Even if you are using AV cables to connect your recorder to your TV you ...

Page 4: ...t to off C Press OK to finish video channel set If Auto Set Up or Tuner Set has not previously been performed the Language Select screen appears and Auto Set Up function takes place automatically Auto Set Up The Auto Set Up function simplifies installation by guiding you through the procedures of setting the language clock and tuner channels simply follow the on screen menus that appear A Select l...

Page 5: ...creen display is reset automatically Select the appropriate colour system with PAL MESECAM and NTSC in Function settings If the cassette s record safety tab has been removed playback begins automatically B Start playback Press 4 MENU EXIT MAIN MENU FUNCTION SET TUNER SET INITIAL SET MENU EXIT INITIAL SET CLOCK SET LANGUAGE G CODE SHOWVIEW SETUP MENU EXIT INITIAL SET CLOCK SET LANGUAGE G CODE SHOWV...

Page 6: ...r on the display panel starts blinking slowly To stop playback press 8 on the remote control or 0on the recorder NOTE Pressing 4 3 5or 9 also cancels repeat playback Locating beginning of recordings Index Search Index codes are placed on the tape at the beginning of each recording when recording on this recorder A While the tape is not running press 2or 6on the remote control to start search B To ...

Page 7: ...reo sound decoder NICAM as well making reception of stereo and bilingual broadcasts possible When the channel is changed the type of broadcast being received will be displayed on the TV screen for a few seconds To listen to a stereo programme press AUDIO until HIFI L R appears on the screen To listen to a bilingual programme press AUDIO until HIFI L or HIFI R appears on the screen To listen to the...

Page 8: ...el number Press rt or the Number keys to select the number of the channel on which the Guide Program number s broadcasts are received then press OK or e If the satellite broadcast is received on your recorder s auxiliary channel L 1 or F 1 select L 1 or F 1 for the channel position to which the satellite receiver is connected Repeat steps 3 and 4 as necessary E Return to normal screen Press MENU o...

Page 9: ...al screen Press repeatedly until no Program screen is shown F Reengage timer recording standby mode Press The recorder turns off automatically and is displayed on the display panel When AUTO TIMER is set to ON 墌 10 the timer recording standby mode automatically resumes when you turn off the recorder Program overlap warning display If PROGRAM OVERLAPPED appears you have another program overlapping ...

Page 10: ...oise NOTE Select EDIT when you are editing tapes After you finish editing the tapes select AUTO PAL MESECAM AUTO PAL MESECAM Select the appropriate colour system for recording or playback AUTO Usually set to this mode The appropriate colour system PAL or MESECAM will be selected depending on the playback or recording signals If the AUTO mode does not work properly select either of the following ma...

Page 11: ... sets listed below Without setting you can control a JVC TV NOTES Some unit s brands have more than one code If the unit does not function with a specified code try other codes Depending on the type of unit some or all functions cannot be operated using this remote control It s not possible to operate a unit not equipped with a remote sensor It s not possible to set the remote control for two unit...

Page 12: ...d your recorder as the recording deck Refer also to the other components instruction manuals for connection and its operations A Make connections Example When using this recorder as the source player When using this recorder as the recording deck connect this recorder s AV input connectors to the AV output connectors on the other recorder If the source player is monaural connect the audio output c...

Page 13: ... TV does not have aV HOLD control During search still or frame by frame playback the picture will be distorted and there may be a loss of colour ATTENTION When this recorder is connected to a multi system TV the audio signal may not be heard or may be noisy if the colour system select switch of the TV is adjusted to the AUTO position In such a case set the TV s colour system select switch to the a...

Page 14: ...nnels may be incorrect Select the appropriate TV system for those channels Refer to TV System Selection When you see the picture but the audio can t be heard or sounds unnatural 15 Since your recorder memorises all detected stations even if the reception condition is poor some of those stored stations may produce a noisy picture To delete those stations refer to Delete A Channel 15 Manual Channel ...

Page 15: ...the pointer next to CH EDIT then press OK or e C Select channel to fine tune Press rt until the channel you want to tune begins blinking then press OK twice The FRQ number for that channel starts blinking D Perform tuning Press rt until the picture becomes clearer then press OK or e Repeat steps C and D as necessary E Return to normal screen Press MENU TV System Selection When you see the picture ...

Page 16: ...our signal and CCIR monochrome signal 625 lines 50 fields NTSC colour and EIA monochrome signals 525 lines 60 fields Recording system DA 4 Double Azimuth head helical scan system Signal to noise ratio 45 dB Horizontal resolution 250 lines PAL MESECAM 220 lines NTSC Frequency range Normal audio 70 Hz to 10 000 Hz Hi Fi audio 20 Hz to 20 000 Hz Input Output RCA connectors IN x 2 OUT x 1 TUNER TIMER ...

Reviews: