


February 8, 2003 4:54 pm
Page 4
— 4 —
Master Page: Right
A
Check contents
Make sure the package contains all of the accessories listed in
“Specifications” (
墌
16).
B
Situate recorder
Place the recorder on a stable, horizontal surface.
C
Connect recorder to TV
RF Connection
A
Disconnect the TV aerial cable from the TV.
B
Connect the TV aerial cable to the ANT. IN connector on the
rear of the recorder.
C
Connect the provided RF cable between the RF OUT
connector on the rear of the recorder and the TV’s aerial
connector.
AV Connection
If your TV is equipped with a 21-pin SCART connector, perform
AV connection to improve picture quality during tape playback.
A
Connect the aerial, recorder and TV as shown in the
illustration.
B
Connect an optional 21-pin SCART cable between the L-1 IN/
OUT connector on the rear of the recorder and the TV’s 21-pin
SCART connector.
D
Connect recorder to mains
Plug the mains power cord into a mains outlet.
After the
1
is pressed for the first time to power on the recorder,
the recorder starts Auto Set Up.
Before starting:
●
Perform “Basic Connections”.
●
Set the TV to its AV mode (with AV connection) or UHF
channel 36 (with RF connection).
Auto Set Up
— Auto Channel Set/Auto Clock Set*/Auto Guide Program
Number Set
* If you select a country in Central or Eastern Europe, set the clock
manually
(
墌
13).
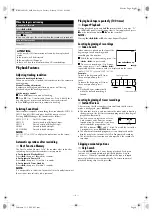
A
Turn on recorder
Press
1
. The Country Set screen appears
on the screen.
●
If you have connected your TV to the
recorder with RF connection and the on-
screen display appearing on UHF
channel 36 looks distorted, perform
“Video Channel Set” (
墌
15).
B
Select your country
Press
rt
to place the pointer next to your country, then press
OK
. The language is automatically selected for the on-screen
display depending on the country you have selected.
●
If you have selected BELGIUM or SUISSE, the Language Set
screen appears. Press
rt
to place the pointer next to the
desired language, then press
OK
.
●
If you have selected MAGYARORSZÁG,
C
ESKÁ REPUBLIKA, POLSKA or OTHER
EASTERN EUROPE, the Clock Set screen
appears. Press
rt
until the desired time
appears, then press
OK
or
e
. Set the date
and year in the same way. (Holding
rt
changes the time in 30-minute intervals,
or changes the date in 15-day intervals.)
Then press
MENU
.
C
Perform Auto Set Up
“Auto” blinks on the front display
panel;
do NOT
press any button on
the recorder or remote control until
the front display panel shows clock
time, “1” or “– –:– –”.
●
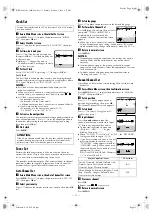
If you are using the on-screen
display, the AUTO SET screen will
appear. As Auto Set Up progresses,
the “
q
” mark on the TV screen moves from left to right.
D
Confirm/Set video channel
With RF connection
The video channel that is shown on the
display panel is your video channel. Press
OK
.
●
If you have selected MAGYARORSZÁG,
C
ESKÁ REPUBLIKA, POLSKA or OTHER
EASTERN EUROPE in step
2
2
2
2
, “2”
appears instead of “1”.
●
To view picture signals from the recorder, set your TV to the
video channel.
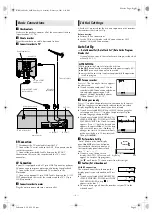
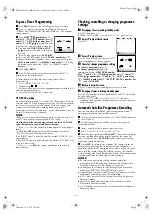
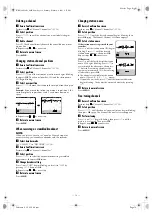
Basic Connections
Aerial connector
Back of TV
21-pin SCART
connector
TV aerial cable
RF cable
(provided)
21-pin SCART cable
(not provided)
Mains power cord
Mains outlet
Back of recorder
L-1 IN/OUT
RF OUT
ANT. IN
Initial Settings
ATTENTION:
While performing Auto Set Up for the first time,
●
do NOT
disconnect the recorder from the power supply (AC)
●
do NOT
press any button unless instructed
●
ensure that Auto Set Up is not interrupted while the operation
is still in progress
AUTO SET
PLEASE WAIT
Beginning
End
HR-S5960.5961_001EN.fm Page 4 Saturday, February 8, 2003 4:58 PM


