background image

April 9, 2002 2:16 pm

Page 6

— 6 —

Master Page: Right

A

Check contents

Make sure the package contains all of the accessories listed in 
“Specifications” (

12).

B

Situate player

Place the player on a stable, horizontal surface.

C

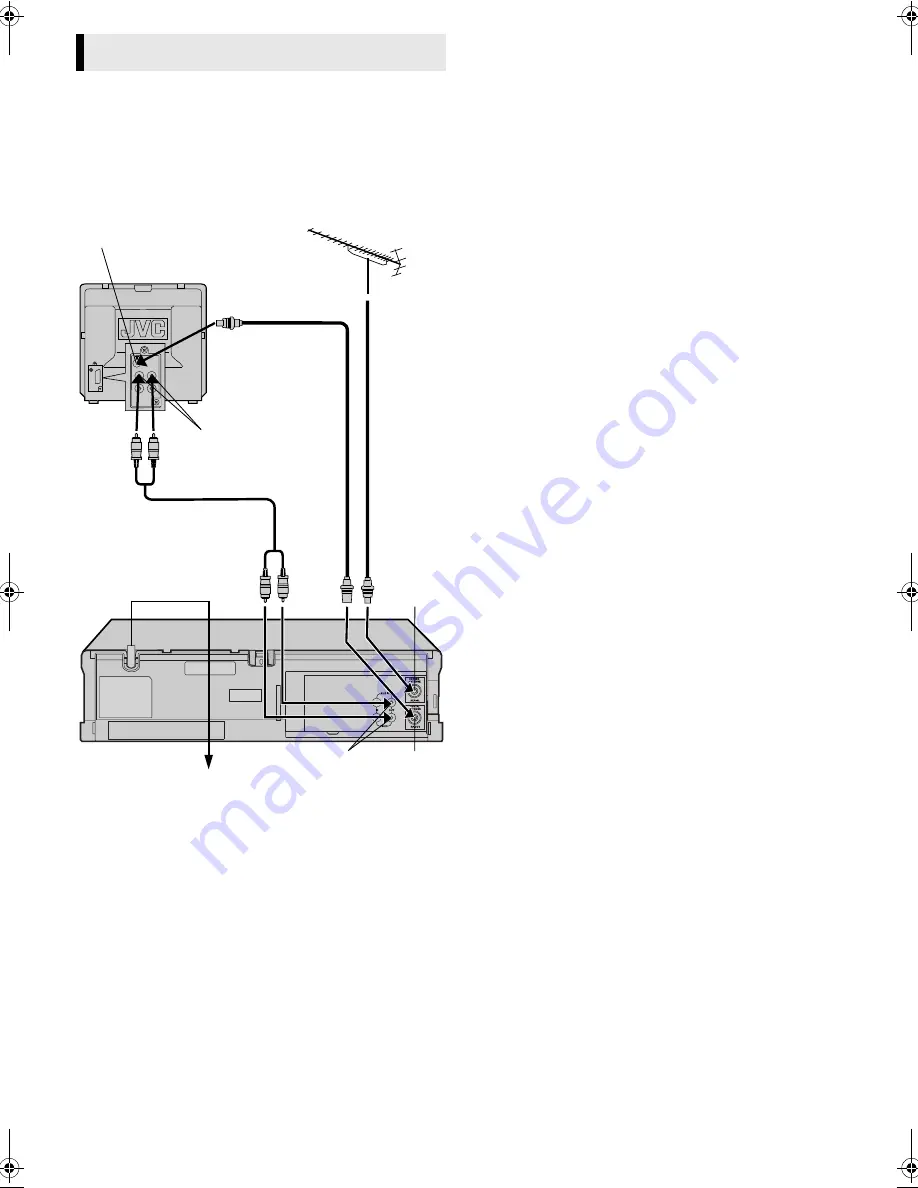
Connect player to TV

RF Connection

A

Disconnect the TV aerial cable from the TV.

B

Connect the TV aerial cable to the AERIAL connector on the 

rear of the player.

C

Connect the provided RF cable between the RF. OUT 

connector on the rear of the player and the TV’s aerial connector.

Before using the player, refer to “Video Channel Set” (

7).

AV Connection

If your TV is equipped with audio/video input connectors, perform 
AV connection to improve picture quality during tape playback.

A

Connect an optional audio/video cable between AUDIO/

VIDEO OUT connectors on the rear of the player and the TV’s 
audio/video input connectors.

Basic Connections

Aerial connector

Back of TV

TV aerial 
cable

RF cable

(provided)

Audio/video cable

(not provided)

Mains power cord

Mains outlet

Back of player

AUDIO/VIDEO 
OUT

RF. OUT

AERIAL

Audio/video input 
connectors

HR-p55_56A-001EN.fm  Page 6  Tuesday, April 9, 2002  2:16 PM

Summary of Contents for HR-P55A

Page 1: ... Failure to heed the following precautions may result in damage to the player remote control or video cassette 1 DO NOT place the player in an environment prone to extreme temperatures or humidity in direct sunlight in a dusty environment in an environment where strong magnetic fields are generated on a surface that is unstable or subject to vibration 2 DO NOT block the player s ventilation openin...

Page 2: ...econds replace the batteries and then try again Video heads cleaning Accumulation of dirt and other particles on the video heads may cause the playback picture to become blurred or interrupted Clean the video heads using a dry cleaning cassette or be sure to contact your nearest JVC dealer if such troubles occur You can check the video head status by using the player s information function 墌 5 11 ...

Page 3: ...by Record Indicator lights when the player is in standby mode or during recording Rear Panel Buttons Connectors and Indicators Cassette loading slot Display panel Infrared beam receiving window Pause9 Play4 Stop Eject0 Record7 Rewind 3 Fast Forward5 Mains power cord ...

Page 4: ...er C EPC mode D Player operation mode Tape speed ATTENTION The remote control is used exclusively for this player You cannot operate another JVC player or recorder Rewind3 Record7 Play4 Fast Forward 5 Pause9 Eject Stop8 On screen display Description PLAY appears during playback REW appears during rewinding FF appears during fast forwarding EJECT appears when you eject the cassette STOP appears whe...

Page 5: ...justed SOFT Reduces image coarseness when viewing overplayed tapes containing much noise SHARP Clearer sharper edged picture when viewing images with much flat same coloured surfaces such as cartoons NOTES You can perform EPC setting only during playback You can also perform EPC setting by pressing EASY PICTURE CONTROL on the player or on the remote control C REPEAT ON OFF If you want to play back...

Page 6: ...ear of the player and the TV s aerial connector Before using the player refer to Video Channel Set 墌 7 AV Connection If your TV is equipped with audio video input connectors perform AV connection to improve picture quality during tape playback A Connect an optional audio video cable between AUDIO VIDEO OUT connectors on the rear of the player and the TV s audio video input connectors Basic Connect...

Page 7: ...manual of your TV Language Set You can change the language setting manually as required A Access Main Menu screen Press MENU Press w e to select the icon ABC OSD then press OK B Select language Press w e to select the desired language then press OK C Return to normal screen Press MENU Initial Settings Turn on the player and the TV With AV connection To view picture signals from the player set your...

Page 8: ...s w e to set to ON then press OK D Press MENU to return to normal screen When the end of the tape is reached the player automatically rewinds tape to the beginning and repeats playback continuously NOTE Set REPEAT to OFF when you want to stop repeat playback Ejecting a tape also stops repeat playback Playback Turn on the TV and select the AV mode or video channel Set SYSTEM to the appropriate mode...

Page 9: ...nnel selector D Set tape speed Press SP LP EP The current setting for the tape speed appears on the screen for about 3 seconds Press SP LP EP again to change the setting while tape speed is displayed You can select SP or EP when you record NTSC signals SP or LP when you record PAL signals E Start recording Press 7 Do not change the channel during recording If the tape reaches its end during record...

Page 10: ...es Insert the playback cassette into the source player and the cassette to be recorded on into your player C Start playback Engage the Play mode of the source player D Start recording Engage the Record mode of the recording deck Editing AV mode Audio video cable not provided Player Your player Another player Recorder TV receiver RF cable provided ...

Page 11: ... record NTSC3 58 signals or play back a NTSC3 58 tape NTSC4 43To record NTSC4 43 signals or play back a NTSC4 43 tape You can change the system setting as follows NOTES You can also perform SYSTEM setting by pressing COLOUR SYSTEM on the player About NTSC Playback Some TVs shrink the picture vertically and place black bars at the top and bottom of the screen or cut off the top and bottom portions ...

Page 12: ... mm x 94 5 mm x 230 mm Weight 3 2 kg Operating temperature 5 C to 35 C Operating humidity Less than 80 VIDEO Signal system PAL SECAM type colour signal and CCIR monochrome signal 625 lines 50 fields Recording Format PAL MESECAM NTSC3 58 NTSC4 43 RF OUT PAL SECAM G or K Input level 1 0 Vp p 75 Ω unbalanced Output level 1 0 Vp p 75 Ω unbalanced RF modulator UHF channels 32 40 Adjustable AUDIO Input ...

Reviews: