background image

EN 

13

PLAYBACK

Basic

Playback

The easiest, most basic operation possible with your video
recorder is tape playback. Already-recorded signals on a video
tape are read by your video recorder and displayed on your TV
just like a TV programme.

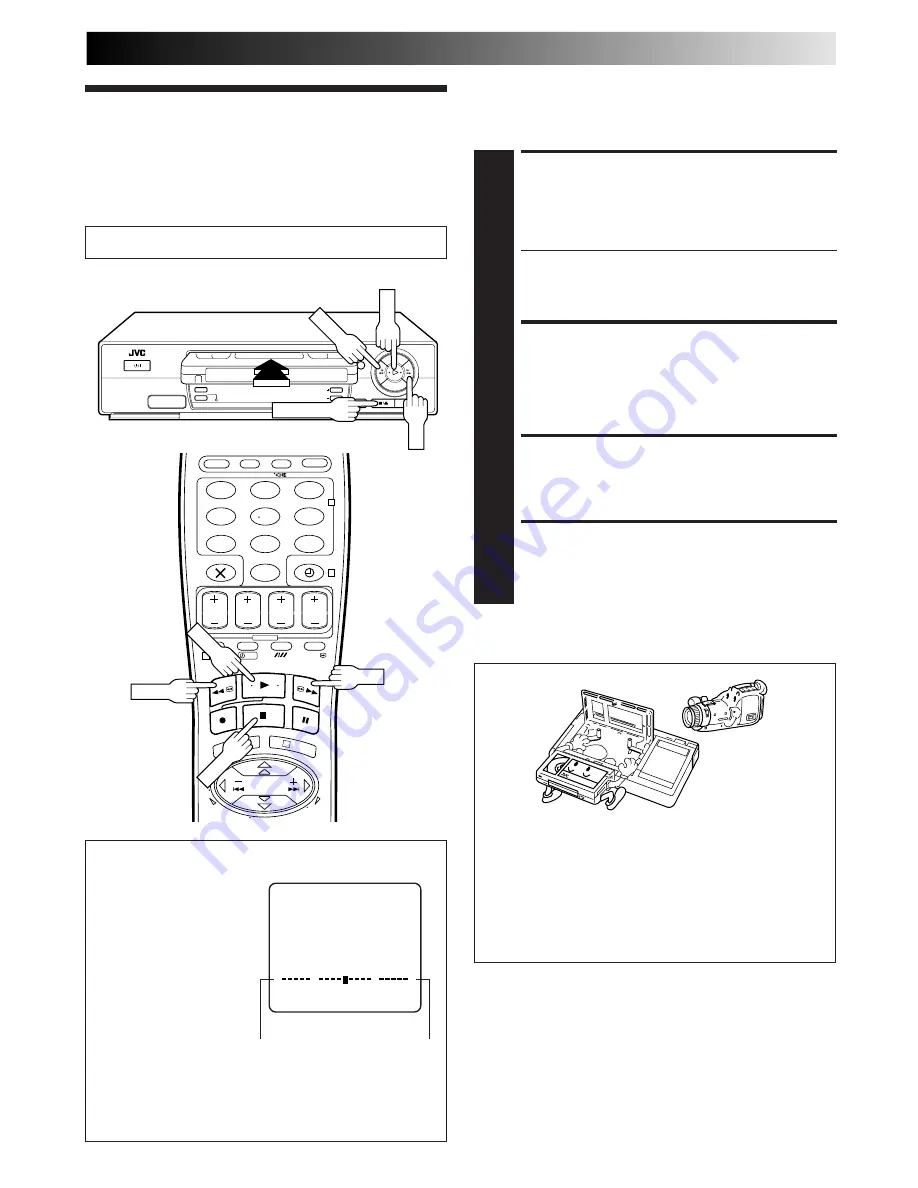
Usable cassettes

LOAD A CASSETTE

1

Make sure the window side is up, the rear label side is

facing you and the arrow on the front of the cassette is
pointed toward the recorder. Don’t apply too much
pressure when inserting.

The recorder power comes on automatically and the
counter is reset to 0:00:00.

If the record safety tab has been removed, playback
begins automatically.

FIND PROGRAMME START

POINT

2

If the tape is advanced past the start point, press REW.

To go forward, press FF.

START PLAYBACK

3

Press PLAY. “BEST” appears blinking in the recorder's

display panel during automatic tracking. (

Z

 pg. 20)

STOP PLAYBACK

4

Press STOP on the remote or STOP/EJECT on the

recorder’s front panel. Then press STOP/EJECT to
remove the cassette.

Compact VHS camcorder recordings can be played on
this video recorder. Simply place the recorded cassette
into a VHS Cassette Adapter and it can be used just like
any full-sized VHS cassette.

This video recorder can record on regular VHS and
Super VHS cassettes. However, it will record and play
back regular VHS signals only. It is not possible to play
back a recorded Super VHS tape.

Turn on the TV and select the VIDEO channel (or AV mode).

Tape Position Indicator

The tape position indicator
appears on screen when,
from the Stop mode, you
press FFREW or perform an
Index Search. The position
of “

5

” in relation to “0”

(beginning) or “+” (end)
shows you where you are
on the tape.
”O.S.D.” (

Z

 pg. 9) must

be set to “ON”, or the
indicator will not appear.

NOTE:

Depending on the type of tape used, there may be times
when the indication is not correct.

3

1:23:45

REMAIN 2:35

0

+

+

+

Beginning

End

STANDBY/ON

TIMER

REC LINK

TV PROG

DISPLAY

1

2

3

4

5

6

7

8

9

0

2

4

1

3

?

STOP/EJECT

PLAY

FF 

PLAY

REW

STOP

REW

FF

Summary of Contents for HR-J313EU

Page 1: ...Power Save Mode 10 T V LINK 11 T V Link Functions 11 INFORMATION ON COLOUR SYSTEM 12 Colour System Set 12 PLAYBACK 13 Basic Playback 13 Playback Features 14 RECORDING 17 Basic Recording 17 Recording Features 18 B E S T Picture System 20 TIMER RECORDING 22 SHOWVIEW Timer Programming 22 Express Timer Programming 24 Automatic Satellite Programme Recording 28 EDITING 29 Edit From A Camcorder 29 Edit T...

Page 2: ... ON n Cassettes marked VHS or S VHS can be used with this video cassette recorder however only VHS signals can be played back and recorded n HQ VHS is compatible with existing VHS equipment n SHOWVIEW is a registered trademark of Gemstar Development Corporation The SHOWVIEW system is manufactured under licence from Gemstar Development Corporation CAUTION n When you are not using the recorder for a...

Page 3: ...nel of the recorder and the TV s 21 pin SCART connector CONNECT RECORDER TO MAINS 4 Plug the end of the mains power cord into a mains outlet It s essential that your video recorder be properly connected Follow these steps carefully THESE STEPS MUST BE COMPLETED BEFORE ANY VIDEO OPERATION CAN BE PERFORMED INSTALLING YOUR NEW RECORDER ENTREE ANT IN ENTREE DECODEUR IN DECODER AV2 ENTREE SORTIE IN OUT...

Page 4: ...ring to the on screen display Press fi to move the highlight bar pointer to your country s name NOTE If you have selected BELGIUM 32 or SUISSE 41 go to step 3 If you have selected MAGYARORSZAG 36 CESKA REPUBLIKA 42 POLSKA 48 or OTHER EASTERN EUROPE EE press OK The Clock Set screen will appear Set the clock manually Z pg 42 43 then go to step 4 If you have selected any other country name code go to...

Page 5: ...recorder or remote control until the display panel shows either the display as illustrated in step 5 or If you are using the on screen display the AUTO SET screen will appear As Auto Set Up progresses the mark on the screen moves from left to right NOTES Auto channel set function takes place first it assigns automati cally all receivable stations in your area Auto clock set function sets the clock...

Page 6: ...ou press any button on the recorder or remote control while downloading is in progress it will be interrupted SET VIDEO CHANNEL 2 Set the Video Channel to off manually Z pg 44 T V LINK PLEASE WAIT MENU EXIT AUTO SET T V LINK 5 MENU EXIT NOTES In the area where no TV station transmits a PDC signal the recorder can perform neither auto clock set nor auto Guide Program number set If there is a power ...

Page 7: ...cord is selected Z pg 22 SHOWVIEW Timer Programming n Your video recorder memorizes all detected stations even if reception of some of them is poor In these cases picture quality may be poor To delete those stations with an unacceptable picture Z Delete A Channel on page 39 n For RF connection users In certain reception conditions the Video Channel may not be set correctly and interference may app...

Page 8: ...o move the highlight bar pointer to AUTO CH SET then press OK or SELECT COUNTRY 4 Press fi to move the highlight bar pointer to your country s name then press OK or SELECT LANGUAGE 5 Press fi to move the highlight bar pointer to the language of your choice You do not have to press OK pressing OK enters Auto Set T V LINK screen RETURN TO NORMAL SCREEN 6 Press MENU Turn on the TV and select the VIDE...

Page 9: ...O NORMAL SCREEN 5 Press MENU 1 Operation mode indicators 2 Tape direction 3 Counter display 4 Tape remaining time indicator Z pg 18 5 Tape position indicator Z pg 13 6 Current day month year 7 Clock display 8 Channel position number and station name Aux indicator L 1 or L 2 9 Timer warning display Z pg 23 25 10 Cassette loaded mark The superimposed indication on the TV screen tells you what the re...

Page 10: ...T 5 MENU EXIT NOTES During Power Save the display panel will be turned off The Just Clock function Z pg 42 does not work while the Power Save mode is engaged While the recorder is in the Power Save mode the picture may be distorted momentarily when you turn on off the recorder Power Save does not work when the recorder is in the Timer mode the recorder s power is turned off after timer recording o...

Page 11: ...timer programming on the recorder For details refer to the instruction manual for your TV TV Auto Power On You can turn on the TV and set it to video mode automatically whenever you play a tape For details refer to the instruction manual for your TV VCR Auto Standby You can use your TV s remote control to turn off the recorder For details refer to the instruction manual for your TV When you connec...

Page 12: ...p and down This can be corrected using the V HOLD control found on some TVs This cannot be corrected if the TV does not have a V HOLD control The counter and tape remaining time readings will be incorrect During search still or frame by frame playback the picture will be distorted and there may be a loss of colour Depending on the type of TV the top and bottom portions of superimposed displays may...

Page 13: ...mote or STOP EJECT on the recorder s front panel Then press STOP EJECT to remove the cassette Compact VHS camcorder recordings can be played on this video recorder Simply place the recorded cassette into a VHS Cassette Adapter and it can be used just like any full sized VHS cassette This video recorder can record on regular VHS and Super VHS cassettes However it will record and play back regular V...

Page 14: ... is vertical jitter use the TV PROG buttons to correct the picture ACTIVATE FRAME BY FRAME PLAYBACK 2 Press PAUSE OR Press or or To resume normal playback press PLAY 1 2 3 4 5 6 7 8 9 0 2 4 1 3 High Speed Search ACTIVATE HIGH SPEED SEARCH 1 During playback or still picture press FF for forward high speed search or REW for reverse high speed search To resume normal playback press PLAY NOTE For shor...

Page 15: ...n screen and search begins in the corre sponding direction To access index codes 2 through 9 press or repeatedly until the correct index number is displayed Ex To locate the beginning of B from the current position press twice To locate the beginning of D from the current position press once When the specified index code is located playback begins automatically Current position Index number A B C ...

Page 16: ... the highlighted bar pointer to PICTURE CONTROL by pressing fi then press OK or to select the desired mode AUTO Provides optimised picture benefits of B E S T Picture System Normally select AUTO EDIT Minimizes picture degradation during editing recording and playback SOFT Reduces image coarseness when viewing overplayed tapes containing a lot of noise SHARP Clearer sharper edged picture when viewi...

Page 17: ...resume recording STOP RECORDING 5 Press STOP on the remote control or STOP EJECT on the recorder Then press STOP EJECT to remove the cassette To prevent accidental recording on a recorded cassette remove its safety tab To record on it later cover the hole with adhesive tape Record safety tab Accidental erasure prevention RECORD B E S T takes place at the beginning of the first recording after inse...

Page 18: ... time of a recording SET COUNTER DISPLAY 1 Press DISPLAY or until a counter reading appears on the display panel RESET COUNTER 2 Press 0000 before starting recording or playback The counter is reset to 0 00 00 and shows the exact elapsed time as the tape runs 1 2 3 4 5 6 7 8 9 0 2 4 1 3 STANDBY ON TIMER REC LINK TV PROG DISPLAY Tape Remaining Time DISPLAY REMAINING TIME 1 Press DISPLAY or until th...

Page 19: ...1 Press RECORD on the recorder ENGAGE ITR MODE 2 Press RECORD again blinks and 0 30 appears on the front display panel SET RECORDING DURATION 3 If you want to record for more than 30 minutes press RECORD to extend the time Each press extends recording time by 30 minutes NOTE You can only perform ITR using the RECORD button on the recorder s front panel STANDBY ON TIMER REC LINK TV PROG DISPLAY REC...

Page 20: ...mode STANDBY ON TIMER REC LINK TV PROG DISPLAY PLAY RECORD TURN ON THE RECORDER 1 Press ACCESS MAIN MENU SCREEN 2 Press MENU ACCESS MODE SET SCREEN 3 Press fi to move the highlight bar pointer to MODE SET then press OK or SELECT B E S T MODE 4 Press fi to move the highlight bar pointer to B E S T then press OK or to set to ON or OFF RETURN TO NORMAL SCREEN 5 Press MENU PLAY RECORD OK MENU PAUSE MA...

Page 21: ... in use B E S T is active during Auto Tracking BEST appears blinking on the recorder s display panel NOTES When watching a tape recorded with B E S T set to ON it is recommended that you leave B E S T on during playback as well When watching a rental tape or one recorded on another video recorder or when using this recorder as the player for editing set B E S T to your preference by performing ste...

Page 22: ... Guide Program number for that SHOWVIEW number correctly If the number you entered is invalid ERROR appears on the screen and Err appears on the display panel Press and input a valid SHOWVIEW number If the GUIDE PROG SET screen appears see ATTENTION Regarding Guide Program Number Set on page 23 SHOWVIEW Timer Programming Before performing SHOWVIEW Timer Programming Make sure that the recorder s bu...

Page 23: ...cancel any unnecessary programmes Z pg 26 It is not possible to timer record a TV programme with a SHOWVIEW number which starts with 0 ATTENTION Regarding Guide Program Number Set GUIDE PROG SET appears after performing step 3 if the Guide Program number for the SHOWVIEW number you entered has not been set Press the NUMBER keys or fi to input the channel position number on which your recorder rece...

Page 24: ...splay panel looks like this ENTER PROGRAMME STOP TIME 4 Press STOP to enter the time you want recording to stop Press and hold STOP to move in 30 minute increments or press and release repeatedly to move 1 minute at a time ENTER PROGRAMME DATE 5 Press DATE The current date appears on screen The date you enter appears in its place Before performing Express Timer Programming Make sure that the recor...

Page 25: ...nd VPS Video Programme System are service designed to assure safe accurate timer recording With this system special code signals are transmitted together with the audio video signals These code signals control your video recorder and have precedence over the advertised times you may have preset into the timer This means that your recorder will start and stop recording when the preset TV programmes...

Page 26: ...ess the appropriate button START STOP DATE TV PROG VPS PDC RETURN TO NORMAL SCREEN DISPLAY 5 Press as many times as necessary If there are still some programmes remaining go on to step 6 RETURN TO TIMER MODE 6 Press TIMER NOTE You can also check the programmes on the display panel even if the recorder s power is off unless the recorder is in the Power Save mode Z pg 10 or the recorder is in the Ti...

Page 27: ...ODE 3 Press fi to move the highlight bar pointer to AUTO TIMER then press OK or to select either ON or OFF RETURN TO NORMAL SCREEN 4 Press MENU NOTE For safety when Auto timer is set to OFF all other recorder functions are disabled while the Timer mode is engaged To disengage the timer press TIMER MAIN MENU MODE SET AUTO CH SET MANUAL CH SET INITIAL SET 5 MENU EXIT MODE SET B E S T ON PICTURE CONT...

Page 28: ... is not possible if your satellite tuner does not have a timer The REC LINK indicator blinks while Auto Satellite Prog recording is in progress Pressing the recorder s button while Auto Satellite Prog recording is in progress turns off the recorder s power and disengage the Auto Satellite Prog Rec mode The B E S T system Z pg 20 does not work while Auto Satellite Prog recording is in progress Just...

Page 29: ... 0 and or TV PROG to select depending on the connector being used L 1 for the AV1 IN OUT connector or L 2 for the AV2 IN DECODER connector When using the AV2 IN DECODER connector make sure AV2 SELECT is set to AV2 Z pg 31 SET EDIT MODE 3 See Picture Control on page 16 START CAMCORDER 4 Engage its Play mode START RECORDER 5 Engage its Record mode NOTES All necessary cables can be obtained from your...

Page 30: ... recorder press NUMBER key 0 and or TV PROG to select depending on the connector being used L 1 for the AV1 IN OUT connector or L 2 for the AV2 IN DECODER connector When using the AV2 IN DECODER connector make sure AV2 SELECT is set to AV2 Z pg 31 SET EDIT MODE 3 See Picture Control on page 16 START SOURCE PLAYER 4 Engage its Play mode START RECORDING DECK 5 Engage its Record mode NOTES All necess...

Page 31: ...to the AV2 IN DECODER connector or to use the satellite tuner connected to the AV2 IN DECODER connector b DECODER To use a decoder connected to the AV2 IN DECODER connector c SAT To view a satellite programme with the TV set while the recorder is in Timer mode in Stop mode recording or turned off Z pg 32 5 Press MENU to return to normal screen If you have a decoder connected to the AV2 IN DECODER ...

Page 32: ...tuner select L 2 mode by pressing NUMBER keys and or TV PROG so that L 2 appears on the display panel For details refer to the instruction manual for the satellite tuner Mains outlet TV Aerial cable Aerial connector Satellite Tuner Unit Satellite Cable Outdoor Unit Aerial Back of TV 21 pin AV input connector SCART RF OUT ANT IN Back of Recorder SYSTEM CONNECTIONS IMPORTANT When you set AV2 SELECT ...

Page 33: ... tuner and TV Mains outlet TV Aerial cable Aerial connector Satellite Tuner Unit Satellite Cable Outdoor Unit Aerial Back of TV 21 pin AV input connector SCART RF OUT ANT IN Back of Recorder Decoder NOTES Set AV2 SELECT to AV2 Z pg 31 To view a programme via the satellite tuner select L 2 mode by pressing NUMBER keys and or TV PROG so that L 2 appears on the display panel To receive a scrambled br...

Page 34: ...AV2 IN DECODER connector to the decoder s Euroconnector using a 21 pin SCART cable SET TUNER 3 Perform the procedure as described in When Receiving A Scrambled Broadcast on page 39 Connecting Using A Decoder ENTREE ANT IN ENTREE DECODEUR IN DECODER AV2 ENTREE SORTIE IN OUT SORTIE RF OUT ANTENNE AV1 SORTIE OUT R L AUDIO ENTREE ANT IN ENTREE DECODEUR IN DECODER AV2 ENTREE SORTIE IN OUT SORTIE RF OUT...

Page 35: ...ESS INITIAL SET SCREEN 2 Press fi to move the highlight bar pointer to INITIAL SET then press OK or ACCESS GUIDE PROG SET SCREEN 3 Press fi to move the highlight bar pointer to GUIDE PROG SET then press OK or ENTER GUIDE PROG NUMBER 4 Press fi or NUMBER keys to enter the Guide Program number for the desired station as shown in the TV listings Then press OK or Ex When inputting the Guide Program nu...

Page 36: ... record TV programmes Auto Channel Set automatically assigns all receivable stations in your area to call them up by using the TV PROG buttons without going through any vacant channel TURN ON THE RECORDER 1 Press ACCESS MAIN MENU SCREEN 2 Press MENU ACCESS AUTO CH SET SCREEN 3 Press fi to move the highlight bar pointer to AUTO CH SET then press OK or SELECT COUNTRY 4 Press fi to move the highlight...

Page 37: ... names may not be stored correctly For information on scrambled broadcasts refer to page 39 IMPORTANT In certain reception conditions station names may not be stored correctly and auto Guide Program Number Set may not work properly If the Guide Program numbers are not set properly when you timer record a TV programme using SHOWVIEW the recorder will record a TV programme of a different station Whe...

Page 38: ...he default setting When AV2 SELECT is set to AV2 the DECODER setting cannot be changed Z pg 31 ENTER NEW CHANNEL INFORMATION 6 Press OK and the Confirmation screen appears Repeat steps 3 through 6 as necessary CLOSE CONFIRMATION SCREEN 7 Press MENU To change positions see Change Station Channel Position Z pg 39 If you wish to set station names other than the ones registered in your recorder Z Set ...

Page 39: ... setting begins blinking and set it to ON by pressing fi RETURN TO CONFIRMATION SCREEN 5 Press OK Repeat steps 3 through 5 as necessary CLOSE CONFIRMATION SCREEN 6 Press MENU When Receiving A Scrambled Broadcast PR CH ID PR CH ID 01 25 ARD 08 C26 E SP 02 C08 SKY1 09 55 WEST 03 10 ZDF 10 C24 SAT1 04 C65 RAI1 11 C23 OSF 05 C31 BBC1 12 C25 ESPN 06 C32 BBC2 13 07 C33 3SAT 14 5 MOVE MANUAL CH SET MENU ...

Page 40: ...reen and then perform step 1 and 2 of Set Stations A on the left before continuing Set station names other than the ones registered in your recorder PR CH ID FINE DECODER 06 CH45 ARD OFF 5 A Z 0 9 CURSOR OK MENU EXIT Perform steps 1 and 2 of Storing Channels Manually on page 38 to access the Confirmation screen before continuing SELECT CHANNEL TO FINE TUNE 1 Press fi until the channel you want to ...

Page 41: ...N ORF1 ORF1 ID STATION NAME ORF2 ORF2 ORF3 ORF3 OWL3 OWL3 PREM PREMIERE PRO7 PRO7 RAI1 RAI1 RAI2 RAI2 RAI3 RAI3 RET4 RETE4 21 TELE21 RTBF RTBF1 or 2 RTL RTL RTL2 RTL2 RTL4 RTL4 RTL5 RTL5 RTP RTP S4 SCHWEIZ4 SAT1 SAT1 SBS SBS SHOW SHOW SIC SOCIEDADE SKY SKY CHANNEL SKYN SKY NEWS SPRT SPORT SRTL SUPER RTL STAR STAR TV SVT1 SVT1 SVT2 SVT2 SWR SUEDWEST3 TCC TCC TELE TELE TEL5 TELE5 TF1 TF1 TM3 TM3 TMC...

Page 42: ...appears NOTE When you have selected MAGYARORSZAG 36 CESKA REPUBLIKA 42 POLSKA 48 or OTHER EASTERN EUROPE EE for the country setting Z pg 4 8 you cannot use Just Clock function Skip steps 6 and 7 on page 43 SET DATE AND TIME 5 Press fi to set the time then press OK or The date display begins blinking Repeat the same procedure to set the date and year When you set the time press and hold fi to chang...

Page 43: ...usted at the start end of Summer Time Just Clock may not function properly depending on the reception condition SET JUST CLOCK 6 The default setting is OFF Set as desired by pressing fi then press OK or For the Just clock function Z Just Clock on page 42 If you set to OFF you can disregard the next step as you won t be able to receive regular clock adjustments SET CLOCK DATA SOURCE CHANNEL POSITIO...

Page 44: ...ea With AV Connection To view picture signals from the video recorder set your TV to its AV mode With RF Connection The channel on which the screen in step 3 appears clearly is your video channel To view picture signals from the video recorder set your TV to the Video Channel Then set your TV to UHF channel 50 If the two vertical white bars appear clearly on the screen as shown to the right go to ...

Page 45: ...tly set If you re using the AV connection the TV receiver is not set to the AV mode This is normal The automatic tracking mode is engaged The video heads may be dirty CORRECTIVE ACTION If you are using the RF OUT connec tion set the TV receiver to the VIDEO channel Z pg 5 perform Video Channel Set Z pg 44 If you are using the AV connection set the TV to its AV mode Try manual tracking Z pg 15 Cons...

Page 46: ...ed but there s no cassette loaded The loaded cassette has had its Record Safety tab removed has been pressed when there are no programs in memory or the timer record information has been programmed incorrectly The end of the tape was reached during timer recording The recorder s channel positions have been set incorrectly CORRECTIVE ACTION Position the camcorder so its microphone is away from the ...

Page 47: ... pause is overlapped by the beginning of the continuation of recording Why does this happen A This is normal It reduces distortion at the pause and resume points Q Can the video recorder indefinitely remain in the Record Pause mode A No The video recorder goes to its Stop mode auto matically after 5 minutes to protect the heads Q What happens if the tape runs out during recording A The video recor...

Page 48: ...DISPLAY Button Z pg 18 4 Rewind REW Button Z pg 13 14 5 PLAY Button Z pg 13 6 Fast Forward FF Button Z pg 13 14 7 TIMER Button Z pg 23 25 8 REC LINK Button Z pg 28 9 REC LINK Indicator Z pg 28 0 Display Panel Z pg 49 Infrared Beam Receiving Window TV PROG Buttons Z pg 17 RECORD Button Z pg 17 STOP EJECT Button Z pg 13 PAUSE Button Z pg 14 ...

Page 49: ...EW DISPLAY PANEL 1 B E S T Picture System Display Z pg 20 2 Symbolic Mode Indicators 3 Programme Time Indicators Z pg 24 5 Tape Remaining Time Indicator Z pg 18 6 Channel Clock Display Z pg 7 7 Instant REVIEW Indicator Z pg 15 8 VPS PDC Indicator Z pg 23 25 9 VCR Indicator Z pg 18 0 Cassette Loaded Mark Counter Remain Display Mode Display L 1 or L 2 REVIEW VCR VPS PDC 9 8 0 2 6 7 1 4 5 3 VPS PDC S...

Page 50: ...on Z pg 14 p OK Button Z pg 5 Q Button Z pg 14 15 TV Button Z Operating JVC TVs below TV PROG TV PROG T V TV TV 0000 START DEBUT STOP FIN DATE MENU OK TV PROG TV VCR DAILY QTDN VPS PDC AUX WEEKLY HEBDO PROG 30 SEC AUDIO 1 2 3 4 5 6 7 8 9 0 2 4 1 3 EXPRESS y u t p 2 7 6 5 1 8 3 9 4 0 w q e r o i Q This remote control transmits A code signals only it is not applicable to B code signals Operating JVC...

Page 51: ... 625 lines 50 fields Recording system Rotary two head herical scan system Signal to noise ratio 45 dB Horizontal resolution 250 lines Frequency range 70 Hz to 10 000 Hz Input Output 21 pin scart connectors IN OUT x 1 IN DECODER x 1 TUNER TIMER TV channel storage capacity 99 positions AUX position Tuning system Frequency synthesized tuner Channel coverage VHF 47 89 104 300 302 470MHz UHF 470 862MHz...

Page 52: ...ne Country Code 3 Press OK twice remote Do NOT press any button on the video recorder or remote control until the display panel shows as follows If you have connected the video recorder to your TV via RF connection press OK to finish the Auto Set Up To view picture signals from the video recorder set your TV to the Video Channel If you have connected the video recorder to your TV via AV connection...

Reviews: