


Display and Description of the Menu
Screen
Selecting Menu Items
.
H
I
F
E
B
D
G
A
C
A
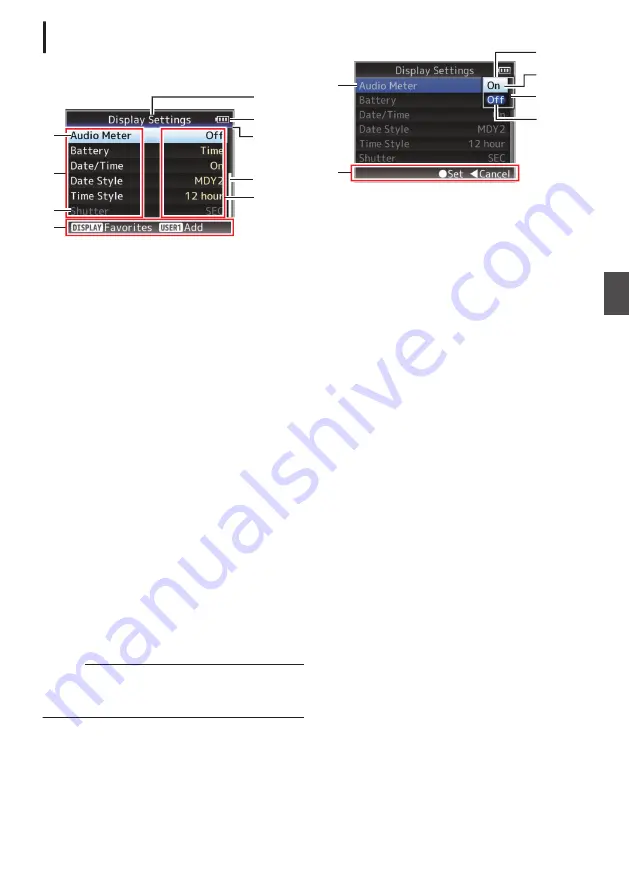
Cursor
Indicates the selected item. Use the cross-
shaped button (
JK
) to move the cursor
B
Menu Item
0
Displays the names of the menu item and
sub-menu.
0
Menu items with [...] after them indicates that
there is a sub-menu to access.
C
Fixed Item
Items that cannot be changed are displayed in
gray and cannot be selected.
D
Operation Guide
Guide for the current operation buttons.
E
Setting Value
Setting values for the menu items.
For menus with sub-menus, values are not
displayed.
F
Scroll Bar
Indicates the scroll position.
G
Header
Indicates the current menu type with the line
color.
Blue
: [Main Menu] Screen
Green
: [Favorites Menu] (Operation
screen)
Magenta : [Favorites Menu] (Editing screen)
H
Remaining Battery Power
Memo :
0
If the supplied battery (or equivalent battery sold
separately) is not used, the battery mark which
indicates the battery level may not appear.
I
Menu Title
Title of the currently displayed menu.
Changing Setting Values
.
D
F
A
C
B
E
A
Menu Item to Change
Menu item to be changed.
A list of setting values
F
appears in a pop-up.
B
Operation Guide
Guide for the current operation buttons.
C
Setting Values Before Change
Setting values before changing. The
background of the item is displayed in blue.
D
Scroll Bar
Indicates the scroll position.
E
Cursor
Indicates the selected item. Use the cross-
shaped button (
JK
) to move the cursor
F
List of Setting Values
0
A pop-up displaying a list of setting values for
selection.
0
The height of the pop-up depends on the
number of settings available. Use the scroll
bar
D
to confirm the current display status.
95
Menu
Display and
D
etailed
S
etti
ngs
Summary of Contents for GY-HM620E
Page 2: ...2 ...
Page 191: ...191 ...


