background image

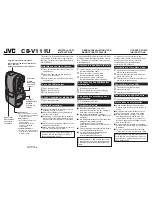
JVC   GY-­‐HM100u   

Why   use   this   camera?   

For   documenCng   performances   and   events   –   

there   is   no   single   shot   length   limit   (as   with   

DSLR   cameras   that   shoot   video)   

High   quality   sound   recording-­‐   XLR   inputs   

Very   good   moCon   reproducCon   –   CCD   

sensors=   no   rolling   shuLer   problems   

Manual   controls   

But   the   image   starts   to   get   noisy   in   low   light   –   

avoid   image   GAIN   if   you   can!   

Summary of Contents for GY-HM100U - Camcorder - 1080p

Page 1: ...JVC GYHM100u video camera Quick Start Guide It should take you half an hour to an hour to read this guide before shooCng ...

Page 2: ...is guide This guide explains some of the essenCal but less obvious features of the camera I m assuming that you know where to find the record buLon the zoom buLon and the focus ring Everything else is explained ...

Page 3: ... there is no single shot length limit as with DSLR cameras that shoot video High quality sound recording XLR inputs Very good moCon reproducCon CCD sensors no rolling shuLer problems Manual controls But the image starts to get noisy in low light avoid image GAIN if you can ...

Page 4: ...shoot Progressive frame rates 24p or 30p this is explained later camera shake is more more apparent on HD video so use a tripod with the camera Image Stabilizer OFF Menu Camera Se ngs OIS always delete clips with the internal camera menu keep the SD card structure intact ...

Page 5: ...F 5 1 U H 3 3 0 L1 ...

Page 6: ... 0 21 951 F J 00 1 9 0 0 1 9 0 V U 82500 23 B0 41 0 91 91AA 0 F 51 A 40 0e A ...

Page 7: ... U H 3 1543C1 ...

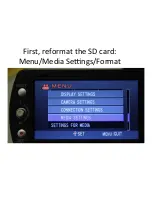
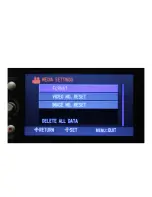
Page 8: ...First reformat the SD card Menu Media Seengs Format ...

Page 9: ......

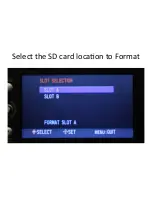
Page 10: ...Select the SD card locaCon to Format ...

Page 11: ...JVC GY HM100u recording Cmes Camera comes with one 32 GB card 1080 24p HQ recording is recommended ...

Page 12: ...Video Recording Before recording video you need to specify the following A the file format Quick Time or MP4 B the video recording format image size and frame rate of the video ...

Page 13: ...A Seeng the File Format ...

Page 14: ...Choosing the Quick Time Format ...

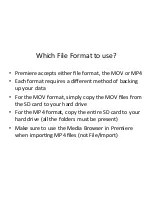
Page 15: ... different method of backing up your data For the MOV format simply copy the MOV files from the SD card to your hard drive For the MP4 format copy the enCre SD card to your hard drive all the folders must be present Make sure to use the Media Browser in Premiere when imporCng MP4 files not File Import ...

Page 16: ...mats are recorded using the XDCAM codec This is a very stable MPEG 2 format but you cannot view the XDCAM files on a computer without ediCng sokware or the Sony XDCAM viewer installed iMovie is not sufficient You will need Premiere Final Cut AVID Sony Vegas or something similar installed The Sony XDCAM viewer is available from the Sony Professional website It is a free download ...

Page 17: ...80 x 720 pixels Full HD resoluCons use square pixels Anamorphic HD frame size avoid these if possible 1440 x 1080 displays as 1920 x 1080 Anamorphic HD resoluCons do not use square pixels this can cause moCon problems Both are 72 pixels inch HD Video always has a 16 9 aspect raCo ...

Page 18: ...gressive NTSC North America and Japan 24p 23 976 fps 30p 29 97 fps or 60p 59 94 fps Interlaced NTSC 60i 60 fields or 29 97 fps interlaced Progressive PAL the rest of the World 25p 50p Interlaced PAL 50i 50 fields or 25 fps interlaced ...

Page 19: ...ame Rate verCcal resoluCon frame rate scan type 1080 24p or 1080p24 this is 1920 x 1080 23 976 fps NTSC PROGRESSIVE 1080 60i or 1080i60 or 1080i30 this is NTSC 29 97 fps NTSC INTERLACED 720 25p or 720p25 This is 1280 x 720 25 fps PAL PROGRESSIVE ...

Page 20: ...me rate 1080 60i 1080 24p is the most common NTSC HD video frame rate it is the most compaCble for North American display devices and also compaCble with North American Blu Ray discs 1080 30p is a good opCon for shooCng fast moCon Shoot 720 60p for a slow moCon effect the video can be later interpreted as 30p or 24p in Premiere to slow it down ...

Page 21: ...Seengs Video ResoluCon and Frame Rate Menu System Select ...

Page 22: ...1080 24p is one selecCon ...

Page 23: ...1080 30p or 720 60p requires two steps First in System Select choose 1080 60 30 or 720 60 30 ...

Page 24: ...Then specify the frame rate in REC MODE ...

Page 25: ...Choose 1920 30p HQ for 1080 30p or 1280 60p HQ for 720 60p ...

Page 26: ...Other EssenCal or Important Seengs White Balance Zebra Stripes Manual or Auto Focus Manual Exposure Adjustments Color Seengs ...

Page 27: ...sensor to the surrounding lighCng White balance must be reset for each change of locaCon or each change of lighCng Oken our lighCng sources are mixed so it is always preferable to do a manual white balance instead of using the presets Always carry a white piece of paper or ideally a thick white card to use for white balancing ...

Page 28: ...F 050 350 9 500 Q 90 3 3 20 0e A D E 3 350 43 3 0e A D W8F 3 9 5 2 1 20M 09 0 f 34053 5120 f 50 09 F04HD ...

Page 29: ...F1 1 3 43 3 J 90 B3 3 20_ J 9 9 0 0e A 1 0 9 05 E 15 M H1 9 9 0 234053 39 3 J 90 235 1 5 A C A 9 3C1 J 0 H50 A 9 0 EQ B L1 D ...

Page 30: ... this camera lack detail zebra stripes are necessary to gauge exposure Overexposure in video can result in white burned out areas without informaCon Adjust exposure or lighCng to avoid these areas The luminance threshold upper limit and lower limit is by default 70 to 80 you can adjust this if needed ...

Page 31: ...To see overexposed image areas turn on the Zebra Stripes Camera Process Zebra ...

Page 32: ...Zebra Stripes appear as below ...

Page 33: ...to exposure is convenient for rapid shooCng situaCons but it does not replace the accuracy of manual exposure Auto focus can be very distracCng the focus will change if there is movement in front of the lens use manual focus in most situaCons ...

Page 34: ...ESf S 91AA 0 43 3 3 3 91 12 StVV EtFd 91AA 0 43 3 3 3 91 0GH1 50 ...

Page 35: ... 3 3 OGH1 50 21 951 1 9 0 B327 1 9 0 234053 ...

Page 36: ...g overexposure turn on the ND filter on the lens next to the focus zoom ring In MANUAL exposure First adjust the IRIS then the AE exposure compensaCon then the ND filter if necessary Try to avoid adjusCng the shuLer speed as this changes moCon unless you want that effect ...

Page 37: ...huLer speed is lek at 2x the frame rate ex 24 fps has a shuLer speed of 48 or 50 A shuLer speed lower than 2x the frame rate will cause moCon blur Faster than 2x the frame rate will start to decrease exposure and cause less moCon blur ...

Page 38: ...ed aker IRIS and AE exposure compensaCon then you must use GAIN The camera has three GAIN seengs the first GAIN seeng must be 0 dB or you will always be shooCng with GAIN Any amount of GAIN introduces image noise Over 6 dB the noise is considerable ...

Page 39: ...F 500 E 0e A D 2 34 5 6 78 89 09 9 0 3 0 1 9 0 0 J 92 0 D 5021440 V_ M _ c M _ o D ...

Page 40: ... for overexposed areas Use Manual Exposure if you can Change Iris lower number means more light Normal shuLer speed is twice the frame rate Use the ND filter if the image is sCll too bright Use GAIN if the image is sCll too dark ...

Page 41: ...unit on the camera handle The built in microphone has a wider pick up paLern It picks up room noise and camera operator noise The aLachable direcConal microphone picks up only what is immediately in front of it and cancels out room noise It is preferable to use this microphone There is an addiConal XLR audio input for other microphones ...

Page 42: ...Put the microphone in Input 1 ...

Page 43: ... 8J 92 Pa H 9 91 H 9 H 9 50Y 50 3 914 1J05 T ubg X 8J 92 E 1 80 029 91 EtFd 0 0 0 0 ...

Page 44: ...E 1 V0 0 9 0 V U 9 0 3 1 915C A T50 X 0 3 3 E 1 V0 0 E r 940 9 Q 00 ...

Page 45: ...Use Headphones to monitor Audio ...

Page 46: ...ng Clips Switching the CAM Media buLon will display the shots for preview or deleCon Select the clip to preview Go into Menu to delete the clip Always delete clips from the camera menu not through a computer ...

Page 47: ... 34053f 0 3 ...

Page 48: ...Media Window ...

Page 49: ...Other Menu Seengs In the Camera Process Menu keep the GAMMA and the COLOR MATRIX seengs to standard STD That s it Happy ShooCng ...

Reviews: