background image

22

Preparation

s

Viewing the Viewfinder/LCD Screen

You can monitor video images on this camcorder using the 
viewfinder, LCD screen, or 

b

oth.

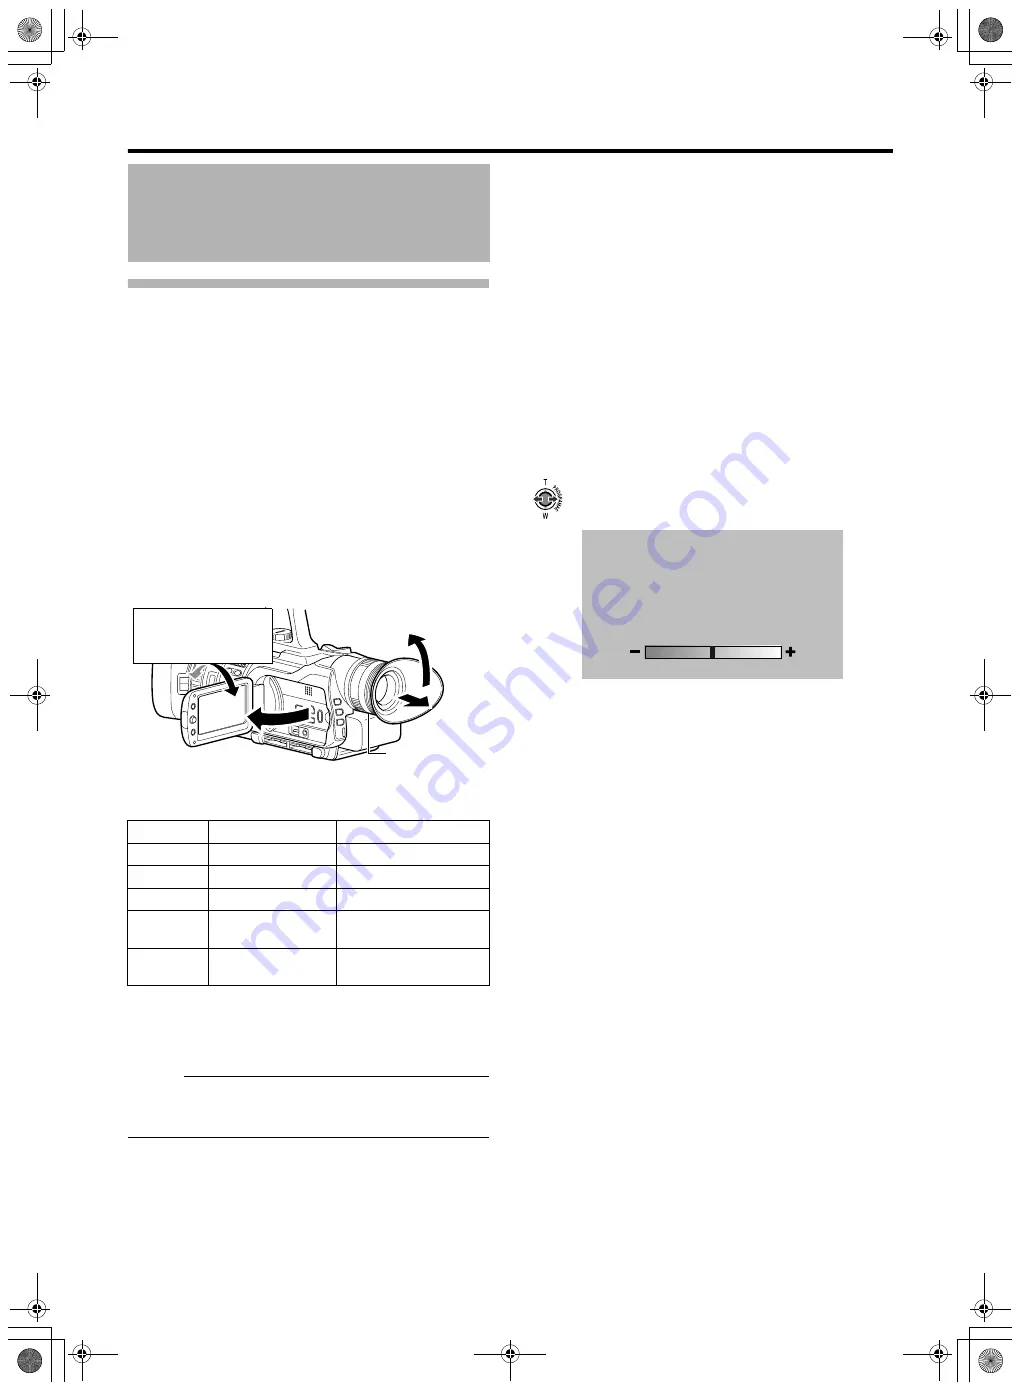
Viewing with the viewfinder

1 . 

Pull out the viewfinder.

2 . 

Incline the viewfinder vertically to a po

s

ition that 

enable

s

 ea

s

y viewing.

3 . 

Turn the eyepiece focu

s

 lever to adju

s

t the focu

s

.

Viewing with the LCD 

s

creen

1 . 

Open the LCD cover.

2 . 

Incline the LCD cover to a po

s

ition that enable

s


ea

s

y viewing.

Relationship 

b

etween the viewfinder and LCD screen 

displays

T

1 In accordance with [PRIORITY 

S

ETTING] in the [CAMERA 

S

ETTING

S

] menu. (

A

Page 66)

T

2 When [PRIORITY 

S

ETTING] is set to [ALWAY

S

-ON 

VIEWFINDER]

Memo :                                                                                 

When the HDMI, COMPONENT OUT or A/V OUT terminal 
is connected, video images will not appear on the 


viewfinder.

Adju

s

ting the brightne

ss

 of the viewfinder/LCD 

s

creen

When a screen is displayed on the viewfinder, performing 
the following steps adjusts the 

b

rightness of the viewfinder.

When a screen is displayed on the LCD, the 

b

rightness of 

the LCD is adjusted.
When a screen is displayed on 

b

oth the viewfinder and 

LCD, only the 

b

rightness of the viewfinder is adjusted.

Select [MONITOR BRIGHT] in the [DISPLAY SETTINGS] 
menu. (

A

Page 65)

A slide 

b

ar for adjusting the screen 

b

rightness appears.

1 . 

Pu

s

h the Set Lever to the left or right.

Doing so moves the slide 

b

ar and changes the 

b

rightness of the screen.

2 . 

Pre

ss

 the center of the Set Lever.

S

etting the 

b

rightness of the LCD screen 

b

acklight

Select [MONITOR BACKLIGHT] in the [DISPLAY 
SETTINGS] menu. (

A

Page 65)

Setting

s

 and Adju

s

tment

s


Before U

s

e (continued)

VF 

S

tatus

LCD 

S

tatus

Video Output

OFF

OFF

VF

ON

OFF

VF

OFF

ON

LCD, VF (

T

2)

ON

ON

In accordance with the 
menu settings (

T

1)

ON

ON (Face-to-face 
shooting direction)

VF and LCD

ON

ON

Eyepiece
Focus Lever

Face-to-face 

S

hooting 

Direction

(direction in which the 

screen faces the su

b

ject)

0

M9H7_EN_001D.book  Page 22  Thursday, August 26, 2010  11:51 AM

Summary of Contents for GY-HM100

Page 1: ...mer Use NTER BELOW THE 3ERIAL O WHICH IS LOCATED ON THE BODY 2ETAIN THIS INFORMATION FOR FUTURE REFERENCE ODEL O 9 5 3ERIAL O HD MEMORY CARD CAMERA RECORDER GY HM100U INSTRUCTIONS イラストは GY HM100 に付属のマイクを取り付けた例です The illustration shows the GY HM100U with the provided microphone attached LYT2089 001D M9H7_EN_001D book Page 1 Thursday August 26 2010 11 51 AM ...

Page 2: ...are on its upper and lower sides Caution on Replaceable lithium battery The battery used in this device may present a fire or chemical burn hazard if mistreated Do not recharge disassemble heat above 100 C or incinerate Replace battery with Panasonic Sanyo Sony or Maxell CR2025 Danger of explosion or Risk of fire if the battery is incorrectly replaced Dispose of used battery promptly Keep away fro...

Page 3: ... with Part 15 of FCC Rules Operation is subject to the following two conditions 1 This device may not cause harmful interference and 2 this device must accept any interference received including interference that may cause undesired operation Changes or modifications not approved by JVC could void the user s authority to operate the equipment This equipment has been tested and found to comply with...

Page 4: ...ttings and alarm indications in addition to the camera image and playback image 䡵 Built in monitor speaker for audio checking 䡵 Recording check function for convenient recording review 䡵 Camera designed with 3 CCD system for high quality picture 䡵 Zebra pattern video level indication 䡵 Full Auto shooting mode Eliminates the need for troublesome switch operations by automatically providing a wide r...

Page 5: ...re Shooting Mode 29 Setting the Picture Quality Recording Size and Sensitivity 29 Capturing Still Pictures 29 Zoom Operation 30 Adjusting the Focus Manually 31 Using the Focus Assist Function 31 Shooting Different Scenes and Conditions Program AE 32 Enabling Lolux Mode with the USER Button 32 Using the Built in ND Filter 32 Adjusting the Exposure Manually 33 Using the Tele Macro Feature 33 Display...

Page 6: ...ns 74 Dimensional Outline Drawing 75 Contents continued How to use this manual 䡵 Symbols used Caution Describes precautions concerning the operation of this product Memo Describes reference information such as functions and usage restrictions of this product A Indicates the reference page numbers and reference items 䡵 Content of this manual All rights reserved by JVC Unauthorized duplication or re...

Page 7: ...files recorded by devices other than this camcorder or files that are saved from a PC the recordable time may be shorter or data may not be properly recorded In addition the remaining space on the card may not increase even when files are deleted using a PC Make use of the following SD cards Video SDHC card that supports Class 6 or higher 4 GB to 32 GB Still Picture SD card 256 MB to 2 GB SDHC car...

Page 8: ...d object 䡵 Do not insert objects other than the memory card into the card slot 䡵 Do not leave the card slot cover open for a long period of time Dirt entering the interior of the slot may cause it to malfunction 䡵 Do not turn off the POWER switch or remove the power cord during recording or playback 䡵 The camera may not show stable pictures for a few seconds immediately after the power is turned o...

Page 9: ...g it in the pocket before attaching it 䡵 Do not expose the battery to excessive heat such as direct sunlight or fire 䡵 If the battery is not to be used for a long time A use up the charge completely and detach it from the camera to prevent deterioration Wait for the battery to run out by itself such as through continuous shooting or playback B charge the battery once every half a year and store it...

Page 10: ...ibility It is found on the under side H Eyepiece I Viewfinder A Page 22 J SNAPSHOT Snapshot button A Page 29 Button for starting the recording of still images K Zoom lever A Page 30 For zooming to the Tele T or Wide W end L Microphone holder A Page 18 For mounting an external microphone M Knob Knob for locking the microphone in place N External microphone A Page 18 Names of Parts and Functions AWB...

Page 11: ...etting can be assigned to this button according to the user s preference P USER1 User 1 button A Page 21 A specific feature in the menu setting can be assigned to this button according to the user s preference Q CH 1 CH 2 AUDIO LEVEL CH 1 CH 2 recording level adjustment knob A Page 40 For adjusting the audio input level for the CH 1 or CH 2 audio R CH 1 CH 2 AUDIO SELECT CH 1 CH 2 audio selection ...

Page 12: ...the remaining space on the SD card A Page 27 and the remaining battery power A Page 20 When in the playback mode pressing this button switches between the playback index and date search screens A Page 45 M Set Lever When in the shooting mode this lever is used for Program AE selection and as the zooming lever A Page 32 When in the playback mode this lever is used for playback file selection and pl...

Page 13: ...till picture playback mode L Video indicating lamp A Page 25 Lights up during video shooting or video playback mode M ACCESS Charging Access indicating lamp Lights up or blinks during recording or playback Blinks when the battery is charging Light goes out when charging is complete Grip Belt Side N POWER MODE Power Operating mode switch POWER Turns the power On Off A Page 20 MODE Switches between ...

Page 14: ...the playback index screen is displayed K INFO button When in the playback mode pressing this button displays the file information L Left button Moves the cursor to the left on the menu screen or playback index screen It is also used to perform reverse search during playback M Down button Moves the cursor downward on the menu screen or playback index screen N Right button Moves the cursor to the ri...

Page 15: ...n the CONNECTION SETTINGS menu to ON Indications on the LCD Screen and in the Viewfinder DISPLAY 0 0 0 0 0 0 0 0 18dB F5 6 1 4000 0 1h56m 1h56m A B CH1 CH2 4 5 0 P M 0 0 0 0 0 0 0 0 10x 18dB F5 6 1 4000 0 3200K SPORT ND 1h56m 1h56m NOV 1 2009 A B CH1 CH2 Main information for camera shooting Full display Simple display DISPLAY DISPLAY Appears when the remaining time falls below 2 minutes Q REVIEW M...

Page 16: ...et to ON S Tele Macro Displayed when TELE MACRO in the CAMERA PROCESS menu is set to ON Items Displayed During Video Shooting Only A Video Mode B Sensitivity C Wind Noise Displayed when the WIND CUT menu is set to ON D Simultaneous Still Picture Recording E Continuous Clip Recording Displayed when the CLIP CONTINUOUS REC menu is set to ON F Mode Indicator RREC Recording RW Record Standby mode Reco...

Page 17: ...left indicates the speed step H Card Slot I Automatic Slot Switch Displayed when SLOT AUTO SWITCHING in the CAMERA SETTINGS menu is set to ON J Video Picture Quality SP Standard HQ High K Frame Rate L Vertical Resolution M Horizontal Resolution Items Displayed During Still Picture Playback A Still Picture Mode B Date Time C Battery Blinks in red when the battery runs out D Slideshow Blinks during ...

Page 18: ...he microphone holder anticlockwise to loosen it and open the microphone holder 2 Place the microphone in the microphone holder 3 Turn the knob on the microphone holder clockwise to secure the microphone 4 Connect the microphone to the INPUT1 INPUT2 audio input terminal or the MIC terminal according to the type of microphone cable terminal you are using INPUT1 INPUT2 Terminal XLR Terminal MIC Termi...

Page 19: ...r cord When battery charging starts the access indicating lamp blinks When charging is complete the access indicating lamp goes out Charging time and continuous recording time approximate The above are the approximate charging times when used under an ambient temperature range of 10 C to 35 C A longer charging time may be required if the battery has been left unused for a long time Recording time ...

Page 20: ... charged battery or connect the AC adapter 1 Set the POWER MODE switch to ON The camcorder turns on in the video shooting mode 䡵 Turning off the power 1 Set the POWER MODE switch to OFF 䡵 Auto Power Off feature When AUTO POWER OFF in the CAMERA SETTINGS menu is set to ON the power turns off automatically when it is not operated for 5 minutes or longer Lens Cover Before shooting open the lens cover...

Page 21: ... then press the center 5 Set the desired language Push the Set Lever up or down to select Press the center of the Set Lever to confirm your selection 䡵 To return to the previous screen push the Set Lever to the left 䡵 To close the menu screen press MENU Assigning Functions to the USER Buttons This camcorder comes with three USER buttons A specific function can be assigned to each USER button accor...

Page 22: ...e viewfinder performing the following steps adjusts the brightness of the viewfinder When a screen is displayed on the LCD the brightness of the LCD is adjusted When a screen is displayed on both the viewfinder and LCD only the brightness of the viewfinder is adjusted Select MONITOR BRIGHT in the DISPLAY SETTINGS menu A Page 65 A slide bar for adjusting the screen brightness appears 1 Push the Set...

Page 23: ...the playback mode playback from the other SD card starts automatically When the Automatic Slot Switch feature is turned ON an automatic slot switch icon appears on the screen Memo If the SD card to switch to cannot be read slot switching will not be performed When an SD card is inserted into the slot to switch to during recording slot switching will not be performed as the SD card cannot be read S...

Page 24: ...63 A video or still picture reset screen appears Push the Set Lever up or down to select YES then press the center of the Set Lever Video or still picture reset starts Video A parent folder is created for each video file format When recording starts after resetting the number a file is created with the smallest number that is not used in the corresponding parent folder Still picture A new folder i...

Page 25: ...ode is displayed changes the setting Press FULL AUTO to display the Full Auto shooting mode icon A at the top of the screen Exposure aperture shutter speed and white balance are adjusted automatically 䡵 Setting to the Manual shooting mode Press FULL AUTO to display the Manual shooting mode icon M at the top of the screen Even when the Manual shooting mode is set the aperture and shutter speed are ...

Page 26: ... SELECT menu A Page 61 When settings in this menu are altered the camcorder will reboot automatically 䡵 Setting the recording mode Specify the horizontal resolution frame rate scan method and picture quality mode Example 1920 60i HQ Setting Set the REC MODE menu A Page 62 The selected recording mode appears at the top of the screen Memo The color of the recording mode display changes according to ...

Page 27: ...plit into two or more files if the size exceeds 4 GB Recording stops when there is no more space left on the SD card If SLOT AUTO SWITCHING in the CAMERA SETTINGS menu is set to ON recording to the other SD card will start automatically INDEX INDEX SORT 1h30m 1h20m 2h10m 1h40m MAX RECORDING TIME SD A FREE USED SD Card Slot Displays the icon of the recording mode that is determined by the video sys...

Page 28: ...to ON AC CONTB appears on the screen While the CLIP CONTINUOUS REC menu is set to ON the RW icon lights up in yellow during Record Pause mode 䡵 Ending the file To end the file during recording Press REC for 1 second or longer To end the file during Record Pause mode Press the USER button that is set as CLIP CONTINUOUS OFF Assigning functions to the USER buttons A Page 21 65 Alternatively set the C...

Page 29: ...Still Pictures Preparation Set to the still picture shooting mode A Page 25 1 Press SNAPSHOT halfway The camcorder automatically adjusts the focus and exposure Once the adjustment is complete the focus icon turns green and the shutter speed is displayed 2 Press SNAPSHOT all the way down A still picture is recorded APHOTOB appears on the monitor screen during the recording process Using the Camcord...

Page 30: ... A Camcorder s zoom lever on the top surface B Camcorder s manual ring This can be used as a zoom ring when the FOCUS ZOOM ring switch at the side of the camcorder is set to ZOOM C Sub zoom lever on the LCD cover D Zoom lever on the remote control The priority order of these levers rings is in the sequence A B C D 䡵 A zoom bar appears during zoom operation Using the Camcorder in the Still Picture ...

Page 31: ...cus Assist function then press the corresponding USER button A Page 21 65 Turn the manual ring to add color to where you want to focus 䡵 Canceling Focus Assist Set the FOCUS ASSIST menu to OFF Or Press the USER button that is assigned the Focus Assist function Memo To change the contour color use the FOCUS ASSIST COLOR setting in the CAMERA PROCESS menu BLUE GREEN RED When using the Focus Assist f...

Page 32: ... Lolux in the video mode Applicable to Full Auto shooting mode A Manual shooting mode M Adjust the amount of light from the lens by turning the ND FILTER switch ON OFF to enable disable the built in ND filter Set the filter to AONB when shooting at a bright outdoor location 䡵 Set the ND FILTER switch to ON Reduces the amount of incident light to about 1 10 ANDB appears on the screen Memo Enabling ...

Page 33: ...for 1 second or longer The mark disappears 䡵 Disabling the Manual Exposure mode Press AE Memo AE Lock is canceled if the shutter speed or aperture is set to the manual mode When in the still picture mode exposure cannot be adjusted manually if shutter speed and aperture are set to the manual mode The AE display flashes for about 5 seconds on the screen and its setting becomes invalid Applicable to...

Page 34: ...the CONNECTION SETTINGS menu is set to ON the zebra pattern is output on the external monitor Set DISPLAY ON TV to OFF to clear the display on external monitors 䡵 Clearing the zebra pattern display Set the ZEBRA menu to OFF Alternatively press the USER button that is set as ZEBRA Specifying the Luminance Level Range for Displaying Zebra Pattern You can specify the upper limit and lower limit of th...

Page 35: ...he following messages will appear for about 5 seconds NG OBJECT Displayed when there is not enough white color on an object or when the color temperature is not suitable Use another white object and adjust the white balance again ERROR LOW LIGHT Displayed when the light is too dim Increase the intensity of the lighting and adjust the white balance again ERROR OVER LIGHT Displayed when the light is...

Page 36: ... of Auto White Balance When the power of the camcorder is turned on with the FAW mode selected it takes about 10 seconds for the FAW adjustment to complete Do not start recording during this interval Adjusting White Paint Applicable to Manual shooting mode M Adjusts the red R and blue B components when in the Auto White Balance mode 䡵 Set to the Manual shooting mode 1 Select WHITE PAINT R or WHITE...

Page 37: ... exposure and aperture are set to the manual mode The S SP display flashes for about 5 seconds on the screen and its setting becomes invalid When in the Lolux mode shutter speed cannot be adjusted manually The S SP display flashes for about 5 seconds on the screen and its setting becomes invalid 䡵 Setting values Video frame rate 60 1 3 75 1 7 5 1 15 1 30 1 60 1 80 1 100 1 250 1 500 1 1000 1 2000 1...

Page 38: ...electing one of the three photometry areas indicated by the frames on the screen Set using PHOTOMETRY AREA in the CAMERA PROCESS menu When PHOTOMETRY AREA is set to WHOLE SCREEN the brightness of the entire screen is automatically adjusted to an optimal level 䡵 Set to the Manual shooting mode 1 Display the photometry area setting screen Set PHOTOMETRY AREA in the CAMERA PROCESS menu to SPOT The ph...

Page 39: ...N For details of the respective items see the CAMERA PROCESS menu A Page 59 Example DETAIL LEVEL 1 Adjust accordingly Push the Set Lever to the left or right Doing so moves the slide bar in the same direction The detail level of the camera image changes according to the movement along the slide bar 2 Confirm the adjusted value Press the center of the Set Lever The menu screen closes Memo When the ...

Page 40: ... terminal to CH 2 Memo The audio from the INPUT1 terminal is input to CH 1 regardless of the setting 䡵 Selecting the audio input to the INPUT1 or INPUT2 terminal Caution When connecting a device that does not require a 48 V power supply make sure that it is not set to the MIC 48V position 䡵 Adjusting the audio recording level Select a method for adjusting the audio recording level Configure the CH...

Page 41: ...n in the preset mode you can set the time code and user s bit freely A Page 42 䡵 Recording time code and user s bit in the preset mode Menu settings Set TC GENE in the TC UB menu to FREE or REC FREE The time code operates in the run mode at all times REC The time code operates in the run mode only during recording 䡵 Recording time code in continuation of the recorded time code on the SD card Menu ...

Page 42: ... second frame Push the Set Lever up or down to change the setting value Push the Set Lever to the left or right to jump to the next digit 3 Confirm the time code setting Press the center of the Set Lever Returns to the TC UB menu 䡵 Closing the menu screen Press MENU The normal screen is displayed Select UB PRESET in the TC UB menu The method for setting the user s bit is the same as the method for...

Page 43: ...e from the playback index screen Select a playback file from the date search screen A Page 45 Playing Back Videos from the Playback Index Screen The thumbnails of the files that can be played back using the current video format are displayed The thumbnail for the group of files that cannot be played back is displayed on the last page Split files are files that are automatically split when the size...

Page 44: ...During Still Mode W B Push to the right Forwards frame by frame C Push to the left Reverses frame by frame B Push to the right for 1 second or longer Slow forward playback C Push to the left for 1 second or longer Slow reverse playback D Push upward Switches to the still mode at the beginning of the file E Push downward Switches to the still mode at the beginning of the next file Press center Play...

Page 45: ...layed 3 Select a file to play Push the Set Lever up down or to the left right to move the cursor to the thumbnail you want to play 4 Play the file Press the center of the Set Lever or T of the zoom lever The selected video file is played back 䡵 Returning to the playback index screen Press the INDEX button when the date search screen or date index screen is displayed INDEX SELECT SET INDEX SORT 1 1...

Page 46: ... when the SNAPSHOT button is pressed if you set OPERATION SOUND in the CAMERA SETTINGS menu to ON Memo It takes about 3 seconds to capture a still picture The size of the captured image is 1920 x 1080 When the SYSTEM SELECT menu is set to 720 still pictures cannot be captured Playing Videos on the SD Card continued FILE DATE TIME START TC END TC DURATION REC MODE OK MARK DISPLAY CH 2INPUT CH 1 3 4...

Page 47: ...mote control to enlarge the image 4 Move the viewpoint Press the cross shaped buttons on the remote control to move the viewpoint 5 Press zoom W on the remote control to reduce the image Zoom out Zooming out continuously restores the image to its original size The sub screen also disappears Adjusting the Volume of the Built In Speaker or Headphone Audio sound is not output from the built in speake...

Page 48: ...the slideshow Press the center of the Set Lever The next picture slides in from the right Forward direction 䡵 Reversing the display order of the slides Push the Set Lever upward The previous picture slides in from the left 䡵 Restoring the display order of the slides Push the Set Lever downward 2 End the slideshow Press the center of the Set Lever Returns to the full screen display of a still pictu...

Page 49: ...connected video is output from the HDMI terminal and audio sound is output from both terminals Memo Be sure to use the supplied component cable You can specify the following items in the CONNECTION SETTINGS menu VIDEO OUTPUT For adjusting the display size on the monitor 4 3 or 16 9 DISPLAY ON TV For specifying whether to enable on screen display When the HDMI COMPONENT OUT or A V OUT terminal is c...

Page 50: ... to the left or right to move to the next or previous file 3 Select YES to execute Push the Set Lever up or down to select YES Press the center of the Set Lever Execution starts A message appears at the end of the process 4 Press the center of the Set Lever Returns to the OK MARK menu screen Specifying Selected Files 1 Select FILE SELECT in the OK MARK menu and press the center of the Set Lever Th...

Page 51: ...of a single image End slideshow 2 Select CURRENT in the DELETE menu and press the center of the Set Lever Alternatively press the USER button that is set as DELETE A screen to confirm deletion appears T Push the Set Lever to the left or right to move to the next or previous file 3 Select YES to execute Push the Set Lever up or down to select YES Press the center of the Set Lever The file is delete...

Page 52: ...be moved Preparation 䡵 Insert SD cards into Slot A and Slot B Insert an SD card containing the file to copy move and an SD card where the file is to be copied moved to 䡵 Select a playback mode To copy a file set to the video playback or still picture playback mode according to the format of the file to be copied To move a file set to the still picture playback mode 䡵 Copying and moving of files ca...

Page 53: ...Lever Returns to the playback index screen 1 Select a file Push the Set Lever up down or to the left right to select a file Next press the center of the Set Lever The selected file is indicated with a selection icon You can repeat the above steps to select multiple files 2 Press the MENU button Returns to the copy settings screen Copy files by following step 3 onwards in the previous section ACopy...

Page 54: ...e saved on each SD card EXT1 EXT2 EXT3 EXT4 䡵 Settings that are saved Menu settings TSettings of the FOCUS ASSIST menu cannot be saved Settings controlled by the camcorder buttons Shooting mode AUTO MANUAL program AE mode shutter speed AUTO MANUAL aperture AUTO MANUAL AE AUTO MANUAL and focus AUTO MANUAL 䡵 Perform settings in the CAMERA SETTINGS menu ASetting Menu ScreensB A Page 65 Saving Setting...

Page 55: ...Lever The selected character appears in the display area on the screen Repeat the above steps to enter subsequent characters 3 Save the entered characters Push the Set Lever up down or to the left right to select the ENTER key then press the center of the Set Lever Returns to the STORE FILE screen Loading Settings from an SD Card Settings saved on an SD card can be loaded on the camcorder Select a...

Page 56: ... the center of the Set Lever The hour meter appears 3 Press the center of the Set Lever again Returns to the menu screen You can reset the menu settings to their default values However the time code user s bit date time and hour meter cannot be reset 1 Select RESET ALL MENU in the CAMERA SETTINGS menu 2 Press the center of the Set Lever The RESET ALL MENU screen appears 3 Restore the default setti...

Page 57: ...he parameter Push the Set Lever up or down to select Next press the center of the Set Lever The settings are changed 䡵 The menu screens in the second layer can also be altered using the same procedure Select a parameter from the second layer s menu then press the center of the Set Lever to return to the first layer s menu 䡵 To return to the first layer s menu without changing settings in the secon...

Page 58: ... OUTPUT 䡬 䡬 䡬 䡬 HDMI COLOR SETTING 䡬 䡬 䡬 䡬 HDMI ENHANCE SETTING 䡬 䡬 䡬 䡬 MEDIA SETTINGS FORMAT 䡬 䡬 䡬 䡬 VIDEO NO RESET 䡬 䡬 䡬 䡬 IMAGE NO RESET 䡬 䡬 䡬 䡬 WIND CUT INPUT1 䡬 INPUT2 䡬 MIC 䡬 Menu Item Operation Mode Video Shooting Still Picture Shooting Video Playback Still Picture Playback AUDIO REF LEVEL 䡬 MIC LEVEL SETTING 䡬 INTERNAL MIC LEVEL 䡬 AUDIO MONITOR 䡬 TC UB TC PRESET 䡬 DROP FRAME 䡬 TC GENE 䡬 UB...

Page 59: ... 10 9 to RNORMAL 0 to 9 MAX 10 DETAIL V H BALANCE A separate screen is displayed A Page 39 Use this item to sharpen contours details in the horizontal H direction or in the vertical V direction Increase the number Enhances contour in the horizontal direction Decrease the number Enhances contour in the vertical direction MIN 5 4 to RNORMAL 0 to 4 MAX 5 KNEE For setting whether to run the knee funct...

Page 60: ...splayed A Page 36 Use this item to adjust the R red component when in the AWB Auto White Balance mode Increase the number Strengthens the red Decrease the number Weakens the red MIN 15 14 to R0 to 14 MAX 15 Memo This item is available when the WHT BAL switch is set to A or B Settings can be made for A B individually When PRESET is set this cannot be selected When you press the AWB Auto White Balan...

Page 61: ... shots up to about 1 m ON Enables closeup shots up to about 80 cm FILE FORMAT For setting the video file format R QuickTime file format Records in the QuickTime MOV format MP4 file format Records in the MP4 file format Memo The display color of the recording mode icon on the status screen changes according to the settings in the FILE FORMAT menu When set to QuickTime file format Blue When set to M...

Page 62: ...30 1280 60p HQ 1280 60p SP 1280 30p HQ 1280 30p SP Horizontal resolution of 1280 lines 60 frame progressive fine quality Horizontal resolution of 1280 lines 60 frame progressive standard quality Horizontal resolution of 1280 lines 30 frame progressive fine quality Horizontal resolution of 1280 lines 30 frame progressive standard quality 1080 50 25 1920 50i HQ 1440 50i HQ 1440 50i SP 1920 25p HQ Ho...

Page 63: ...Outputs at 480p 480i Outputs at 480i This setting is fixed at 576p or 576i when 1080 50 25 or 720 50 25 is selected for SYSTEM SELECT HDMI COLOR SETTING For selecting the color format of HDMI signals RAUTO Outputs upon detecting YUV RGB automatically according to the connected monitor RGB Outputs RGB signals HDMI ENHANCE SETTING For setting the color range of HDMI signals R OFF When connected to a...

Page 64: ...Internal time code generator works in non drop frame mode Use this setting when you want to place emphasis on the number of frames Memo This item can be specified only when SYSTEM SELECT is set to 1080 60 30 or 720 60 30 It is fixed at NON DROP when set to 720 24 TC GENE For setting the time code generator to the preset mode or regeneration mode The run mode during the preset mode can also be sele...

Page 65: ...ration of this camcorder LOAD FILE A separate screen is displayed A Page 55 Use this item to load setting files saved on an SD card on the camcorder Select one of the four setting files from EXT1 to EXT4 STORE FILE A separate screen is displayed A Page 54 Use this item to save the current menu settings or camcorder settings to an SD card Up to four setting files EXT1 to EXT4 can be saved to the SD...

Page 66: ...Correction by this feature may not be sufficient when camera shake is too strong TALLY For selecting whether to turn on the tally lamp OFF Turns off tally lamp R ON Turns on tally lamp REMOTE For selecting whether to accept remote control operation OFF Does not accept remote control operation R ON Accepts remote control operation OPERATION SOUND For selecting whether to turn on the operation sound...

Page 67: ...basic color temperature to 5600K Use for light sources with a high color temperature such as sunlight Memo This item does not function when FAW is set to PRESET FAW For setting the positions to assign the FAW Full Auto White Balance function to the WHT BAL switch Fixed at FAW when in FULL AUTO mode A R NONE The FAW function is not assigned A Assigns FAW to the A position B Assigns FAW to the B pos...

Page 68: ...NAPSHOT button To turn off the notification sound when shooting starts set OPERATION SOUND of the CAMERA SETTINGS menu to OFF SHUTTER MODE For selecting the shutter operation R RECORD ONE SHOT Disables continuous shooting CONTINUOUS SHOOTING Continuous shooting is performed while the SNAPSHOT button is pressed About 2 shots second BRACKETING Performs three types of continuous shots starting from s...

Page 69: ...ll video or still picture files COPY A separate screen is displayed A Page 52 For copying video or still picture files to another SD card ALL Copies all video or still picture files SCENE Video FILE Still Picture Copies selected video or still picture files MOVE Supports only still pictures A separate screen is displayed A Page 53 For moving still picture files to another SD card ALL Moves all sti...

Page 70: ...ous light sources in the background set to the manual shooting mode and perform auto white balance adjustment Adjust the red or blue using white paint adjustment 35 36 White balance cannot be adjusted Do not use TWILIGHT from Program AE 32 Continuous shooting speed of still pictures is slow The continuous shooting speed drops if the function is used continuously Continuous shooting speed may drop ...

Page 71: ...e PRIORITY SETTING in the CAMERA SETTINGS menu When the HDMI COMPONENT OUT or A V OUT terminal is connected video images will not appear on the viewfinder Remove the cable 66 49 Time code or user s bit is not displayed Set TC DISPLAY in the TC UB menu to TC or UB 64 Playback Unable to switch from the shooting mode to playback mode Check whether the pause mode of continuous clip recording is set If...

Page 72: ...T TAKE MORE STILL IMAGES AT THE MOMENT Stop video shooting and then record a still image When the SYSTEM SELECT menu is set to 720 still pictures cannot be captured 29 RECORDING FAILURE Turn off and on the power of the camcorder 20 VIDEO MANAGEMENT FILE IS DAMAGED RECOVERY IS REQUIRED TO RECORD PLAYBACK RECOVER Select OK to start recovery The request for recovery screen may appear repeatedly even ...

Page 73: ... 4GB 8GB 16GB 32GB HQ 1080i 720p 12 m 25 m 50 m 1 h 40 m SP 1080i 17 m 35 m 1 h 10 m 2 h 20 m SP 720P 22 m 45 m 1 h 30 m 3 h Image Size Image Quality SD Card SDHC Card 512MB 1GB 2GB 4GB 8GB 16GB 32GB 1920 1080 16 9 FINE 510 1040 2100 4200 8420 9999 9999 STANDARD 800 1630 3210 6410 9999 9999 9999 1440 1080 4 3 FINE 680 1370 2770 5540 9999 9999 9999 STANDARD 1060 2160 4360 8700 9999 9999 9999 640 48...

Page 74: ...rding format QuickTime File Format for Final Cut Pro MP4 file format Video format 720 24p 25p 30p 50p 60p 1080 24p 25p 30p 50i 60i Video signals 720p format MPEG 2 8bit 35 18 3 Mbps 1080 format MPEG 2 8bit 35 25 Mbps Audio signals LPCM 2ch 48 kHz 16bit 䡵 Still Picture Still picture recording format JPEG Recording size 4 modes 1920 x 1080 1440 x 1080 1024 x 768 640 x 480 Recording quality 2 modes F...

Page 75: ...ble operating temperature 0 C to 40 C 32 F to 104 F Dimensions 42 mm W 14 5 mm H 91 mm D 1 6 8 9 16 3 5 8 Mass Approx 30 g 0 07 lbs including button battery CH 2INPUT CH 1 3 4 5 2 1 2 3 0 CH 2 AUDIOINPUT AUTOMANUAL AUTOMANUAL USER1 GAIN L M H B A PRST WHT BAL A B A B FOCUS ZOOM ON ND FILTER OFF USER2 AF MF FULLAUTO AUDIO SELECT INPUT1 INPUT2 LINE MIC MIC 48V AWB SNAP SHOT T W INPUT2 INPUT1 135 114...

Page 76: ... 2010 Victor Company of Japan Limited GY HM100U HD MEMORY CARD CAMERA RECORDER LYT2089 001D M9H7_EN_001D book Page 76 Thursday August 26 2010 11 51 AM ...

Reviews: