background image

FEATURES FOR RECORDING

44 

EN

MasterPage: Left

These effects let you make pro-style scene 
transitions. Use them to spice up the transition 
from one scene to the next.

Wipe or fader works when video recording is 
started or stopped.

1

Set the 

VIDEO/MEMORY

 switch to “VIDEO”.

2

Set the power switch to “

M

”.

3

Set “

v

” to the desired mode. (

pg. 33)

4

Press 

FADE/WIPE

.

The selected effect indicator appears.

5

Press the recording start/stop button to 

activate the fade-in/out or wipe-in/out.

To deactivate the selected effect

Press 

FADE/WIPE

 twice in step 

4

. The effect 

indicator disappears.

NOTES:

You can extend the length of a wipe or fader by 
pressing and holding the recording start/stop 
button.

Some wipe/fader effects cannot be used with 
certain modes of program AE and special effects. 
(

pg. 44, 45) In this case, the selected indicator 

blinks or goes out.

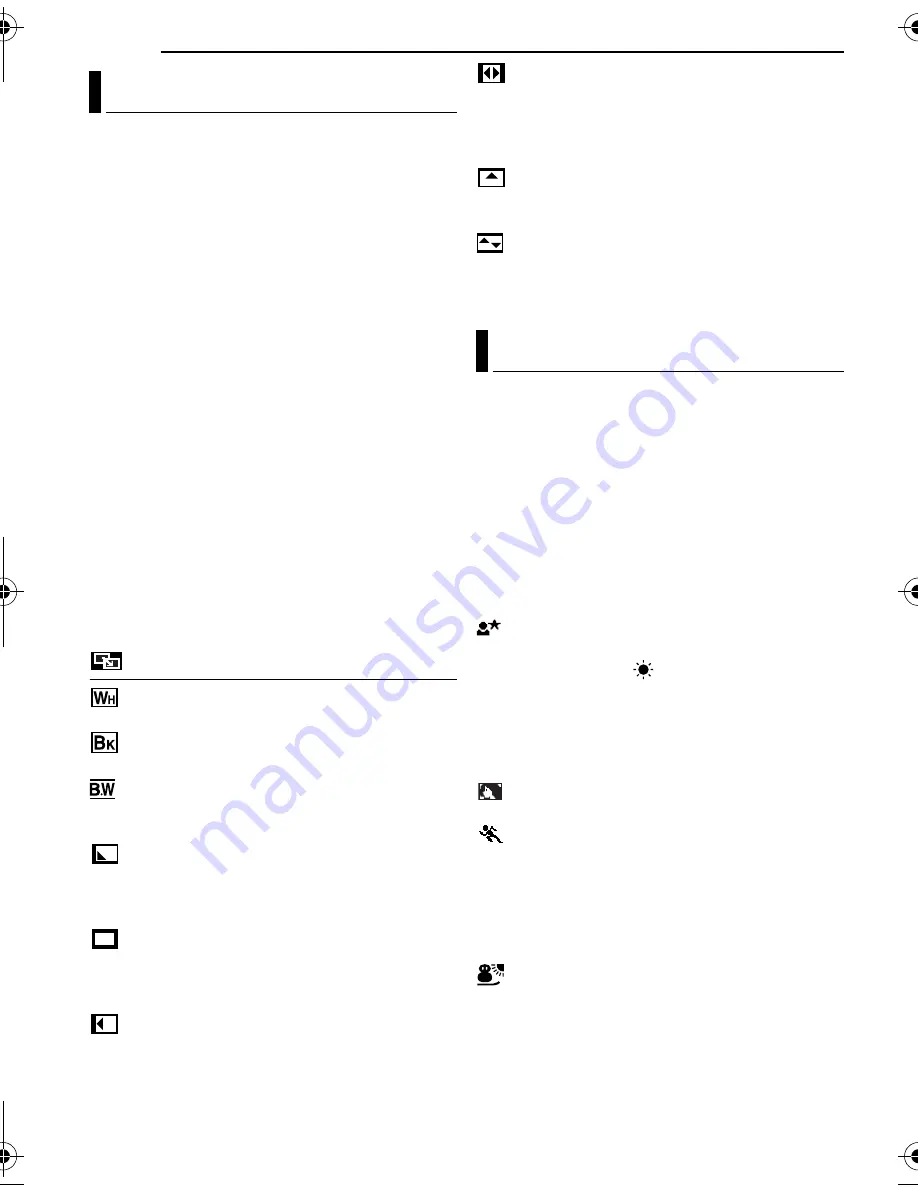
WIPE/FADER


FADER–WHITE

: Fade in or out with a white 

screen.


FADER–BLACK

: Fade in or out with a black 

screen.


FADER–B.W

: Fade in to a colour screen 

from a black and white screen, or fade out from 
colour to black and white.


WIPE–CORNER

: Wipe in on a black screen 

from the upper right to the lower left corner, or 
wipe out from lower left to upper right, leaving a 
black screen.


WIPE–WINDOW

: The scene starts in the 

centre of a black screen and wipes in toward the 
corners, or comes in from the corners, gradually 
wiping out to the centre.


WIPE–SLIDE

: Wipe in from right to left, or 

wipe out from left to right.


WIPE–DOOR

: Wipe in as the two halves of 

a black screen open to the left and right, 
revealing the scene, or wipe out and the black 
screen reappears from left and right to cover the 
scene.


WIPE–SCROLL

: The scene wipes in from 

the bottom to the top of a black screen, or wipes 
out from top to bottom, leaving a black screen.


WIPE–SHUTTER

: Wipe in from the centre 

of a black screen toward the top and bottom, or 
wipe out from the top and bottom toward the 
centre leaving a black screen. 

You can use the program AE settings for specific 
shooting situations.

1

Set the power switch to “

M

”.

2

Press 

PROGRAM AE

.

The program AE menu appears.

3

Rotate the manual focus dial to select the 

desired mode.

4

Press 

SET

 on the manual focus dial. The 

setting is completed.

The selected program AE indicator appears.


TWILIGHT

: Makes evening scenes look 

more natural. White balance (

pg. 43) is 

automatically set to “

”, but can be changed to 

your desired setting. When Twilight is chosen, the 
camcorder automatically adjusts the focus from 
approx. 10 m to infinity. From less than 10 m, 
adjust the focus manually. The flash does not fire 
in this mode.


PORTRAIT

: The subject in the front is 

accentuated by blurring the background.


SPORTS

(Variable Shutter Speed: 1/250 – 1/4000):

This setting allows fast-moving images to be 
captured one frame at a time, for vivid, stable 
slow-motion playback. The faster the shutter 
speed, the darker the picture becomes. Use the 
shutter function under good lighting conditions.


SNOW

: Compensates for subjects that may 

otherwise appear too dark when shooting in 
extremely bright surroundings such as in the 
snow.

Wipe or Fader Effects

Program AE

GR-X5PAL.book  Page 44  Thursday, April 7, 2005  7:23 PM

Summary of Contents for GR-X5AA

Page 1: ...afe use of this product Please visit our Homepage on the World Wide Web for Digital Video Camera For Accessories http www jvc co jp english cyber http www jvc co jp english accessory INSTRUCTIONS DIGITAL VIDEO CAMERA GETTING STARTED 6 VIDEO RECORDING PLAYBACK 18 DIGITAL STILL CAMERA D S C RECORDING PLAYBACK 25 ADVANCED FEATURES 33 REFERENCES 51 To deactivate the demonstration set DEMO MODE to OFF ...

Page 2: ...BACKLIGHT button brightens the image darkened by backlight 墌 pg 42 You can also select a spot metering area so that more precise exposure compensation is available 墌 pg 42 Spot Exposure Control Data Battery You can check the battery status by simply pressing the DATA button 墌 pg 14 Direct Printing If your printer is compatible with PictBridge still images can be printed easily by connecting the ca...

Page 3: ...ime it is recommended that you disconnect the power cord from AC outlet Blue to N Neutral or Black Brown to L Live or Red CAUTION To avoid electric shock or damage to the unit first firmly insert the small end of the power cord into the AC Adapter until it is no longer wobbly and then plug the larger end of the power cord into an AC outlet CAUTIONS This camcorder is designed to be used with PAL ty...

Page 4: ... allow electrical equipment to be exposed to rain or moisture ABOVE ALL NEVER let anyone especially children push anything into holes slots or any other opening in the case this could result in a fatal electrical shock NEVER guess or take chances with electrical equipment of any kind it is better to be safe than sorry When the equipment is installed in a cabinet or on a shelf make sure that it has...

Page 5: ...rmation 27 Histogram for Still Image Files 27 Removing On Screen Display 27 ADDITIONAL FEATURES FOR D S C 28 Dubbing Still Images Recorded on a Tape to a Memory Card 28 Resetting The File Name 28 Protecting Files 28 Deleting Files 29 Setting Print Information DPOF Setting 30 Direct Printing with a PictBridge Printer 31 Initialising a Memory Card 32 ADVANCED FEATURES 33 MENUS FOR DETAILED ADJUSTMEN...

Page 6: ... e f g h i b c W j k lmno p q r s tuv l m j k n o X Y Z a b c p f g h i q r s t d When loading or unloading a cassette disconnect the headphone cable etc and close the cover If the cover is open it may get caught in cassette holder ...

Page 7: ...47 48 i Link refers to the IEEE1394 1995 industry specification and extensions thereof The logo is used for products compliant with the i Link standard YMicrophone connector MIC 墌 pg 12 50 An optional microphone can be used during video recording and audio dubbing To stabilise the microphone use of an optional shoe adapter is recommended ZHeadphone connector 墌 pg 12 50 No sound is output from the ...

Page 8: ...ing Only AGain Mode Indicator 墌 pg 34 BImage Size 2560 2560 x 1920 2048 2048 x 1536 1600 1600 x 1200 1280 1280 x 960 640 640 x 480 墌 pg 37 CInterval Shooting Indicator 墌 pg 26 DShooting Icon 墌 pg 25 Appears and blinks during shooting ECard Icon 墌 pg 25 Appears during shooting Blinks in white when a memory card is not loaded Blinks in yellow while the camcorder is reading the data in the memory car...

Page 9: ...ack 5 Fast Forward Shuttle Search 3 Rewind Shuttle Search 9 Pause 9 U Forward Frame By Frame Playback Slow Motion Y 9 Reverse Frame By Frame Playback Slow Motion D Audio Dubbing 9D Audio Dubbing Pause Appear while a tape is running ESound Input for Audio Dubbing 墌 pg 50 FBattery Remaining Power Indicator 墌 pg 54 GDate Time 墌 pg 38 HVOLUME Volume Level Indicator speaker or headphone 墌 pg 20 BRIGHT ...

Page 10: ...s with a cleaning cassette optional Be sure to store your cassette tapes and camcorder in the proper environment Video heads can become dirty more easily if your cassette tapes and camcorder are stored in a dusty area Cassette tapes should be removed from the camcorder and stored in cassette cases Store the camcorder in a bag or other container Use SP Standard mode for important video recordings L...

Page 11: ...ment refer to Charging the Battery Pack 墌 pg 13 NOTES In order to maintain optimum performance of the camcorder provided cables may be equipped with one or more core filter If a cable has only one core filter the end that is closest to the filter should be connected to the camcorder Make sure to use the provided cables for connections Do not use any other cables Attaching the Lens Hood When shooti...

Page 12: ...nnecting a cable attach the end with the core filter to the camcorder How to Use the Audio Extension Cable When using optional headphones or external microphone connect to the provided audio extension cable with a core filter attached then connect the audio extension cable to the camcorder The core filter reduces interference Attach two core filters to the audio extension cable for headphones LCD ...

Page 13: ...rrow mark The camcorder does not turn on with the battery mount cover without the arrow mark When charging the battery pack for the first time or after a long storage period the POWER CHARGE lamp may not light In this case remove the battery pack from the camcorder then try charging again If the battery operation time remains extremely short even after having been fully charged the battery is worn...

Page 14: ...e batteries apart or expose them to flame or excessive heat as it may cause a fire or explosion WARNING Do not allow the battery or its terminals to come in contact with metals as this can result in a short circuit and possibly start a fire To resume the original function of the accurate battery power indication If the battery power indication differs from the actual operating time fully charge th...

Page 15: ...ay is highlighted 3 Press Up 4 9 or Down 8 to input the day and press SET Repeat to input the month year hour and minute 4 Press Up 4 9 or Down 8 to select BRETURN and press SET twice The menu screen closes 1 Adjust the velcro strip 2 Pass your right hand through the loop and grasp the grip 3 Adjust your thumb and fingers through the grip to easily operate the recording start stop button power swi...

Page 16: ...quipped with studs The camcorder needs to be powered up to load or eject a cassette 1 Slide and hold OPEN EJECT in the direction of the arrow then pull the cassette holder cover open until it locks The cassette holder opens automatically Do not touch internal components 2 Insert or remove a tape and press PUSH HERE to close the cassette holder Be sure to press only the section labeled PUSH HERE to...

Page 17: ...d a memory card firmly insert it with its clipped edge first To unload a memory card push it once After the memory card comes out of the camcorder pull it out Do not touch the terminal on the reverse side of the label 4 Close the card cover To protect valuable files available only for SD Memory Card Slide the write erase protection tab on the side of the memory card in the direction of LOCK This p...

Page 18: ...the camcorder on again close and re open the LCD monitor When a blank portion is left between recorded scenes on the tape the time code is interrupted and errors may occur when editing the tape To avoid this refer to Recording from the Middle of a Tape 墌 pg 20 To turn the tally lamp or beep sounds off 墌 pg 33 35 During recording sound is not heard from the speaker To hear the sound connect optiona...

Page 19: ...ide more dramatic results Hold the camcorder in the desired position and tilt the LCD monitor in the most convenient direction Time Code During recording a time code is recorded on the tape This code is to confirm the location of the recorded scene on the tape during playback Frames are not displayed during recording If recording starts from a blank portion the time code begins counting from 00 00...

Page 20: ...Set the VIDEO MEMORY switch to VIDEO 3 Set the power switch to PLAY while pressing down the lock button located on the switch 4 To start playback press 4 9 5 To stop playback press 8 During stop mode press 3 to rewind or 5 to fast forward the tape To control the speaker volume Slide the power zoom lever VOL towards to turn up the volume or towards to turn down the volume NOTES The playback picture...

Page 21: ...button located on the switch 4 Press MENU The menu screen appears 5 Press SET to select t The VIDEO menu appears 6 Press Up 4 9 or Down 8 to select BLANK SRCH and press SET The sub menu appears 7 Press Up 4 9 or Down 8 to select EXECUTE and press SET The BLANK SEARCH indication appears and the camcorder automatically starts reverse or forward search then stops at the spot which is about 3 seconds ...

Page 22: ...ion manual 4 Turn on the camcorder the VCR and the TV 5 Set the VCR to its AUX auxiliary input mode and set the TV to its VIDEO mode 6 Start playback on the camcorder 墌 pg 20 To choose whether or not the following displays appear on the connected TV Date Time Set DATE TIME to AUTO ON or OFF 墌 pg 33 38 Or press DISPLAY on the remote control to turn on off the date indication Time code Set TIME CODE...

Page 23: ...uttons are available only when the camcorder s power switch is set to PLAY B PAUSE Button Pauses the tape 墌 pg 24 Up Button 墌 pg 24 C SLOW Rewind Button 墌 pg 24 D REW Button Rewind Reverse shuttle search on a tape 墌 pg 21 Displays previous file in a memory card 墌 pg 26 Left Button 墌 pg 24 E INSERT Button 墌 pg 49 F SHIFT Button 墌 pg 24 G DISPLAY Button 墌 pg 22 46 H SLOW Forward Button 墌 pg 24 I PLA...

Page 24: ...t press the zoom button W 3 You can move the image on the screen around to find a particular portion of the picture While holding down SHIFT press Left Right Up and Down To end zoom press and hold W until magnification returns to normal Or press STOP 8 and then press PLAY U during video playback NOTES Zoom can also be used during slow motion and still playback Due to digital image processing the q...

Page 25: ...he camcorder shuts off automatically to save power To perform shooting again close and re open the LCD monitor For approximate number of storable images see page 61 Continuous Shooting Keeping SNAPSHOT pressed in step 5 provides an effect similar to serial photography To use this function set C SHOOTING to ON 墌 pg 33 37 The indicator appears Bracket Shooting In addition to an image with the exposu...

Page 26: ... images Windows only To create movie files with the Macintosh it is recommended that you use the function Creating a Slideshow From Still Images in the commercial software QuickTime Pro D S C PLAYBACK Images shot with the camcorder are automatically numbered then stored in numerical order in the memory card You can view the stored images one at a time much like flipping through a photo album 1 Loa...

Page 27: ...ightness is well balanced The more pixels there are toward the left the darker the image The more pixels there are toward the right the brighter the image By checking the image and its histogram you can see the exposure level pattern and the overall tone reproduction condition To display the histogram Press INFO twice while a still image is displayed To turn off the histogram Press INFO once NOTE ...

Page 28: ... the next shot starts from DVC00001 NOTE If the file name reaches DVC09999 a new folder such as 101JVCGR will be made and the file name will start again from DVC00001 The protect mode helps prevent the accidental erasure of files 1 Perform steps 1 3 in Normal Playback of Images 墌 pg 26 2 Press MENU The menu screen appears 3 Press Up 4 9 or Down 8 to select PROTECT and press SET The sub menu appear...

Page 29: ... The sub menu appears To delete the currently displayed file 4 Press Up 4 9 or Down 8 to select CURRENT and press SET The DELETE screen appears 5 Press 3 or 5 to select the desired file 6 Press Up 4 9 or Down 8 to select EXECUTE and press SET To cancel deletion select RETURN Repeat steps 5 and 6 for all files you want to delete NOTE If the mark appears the selected file is protected and cannot be ...

Page 30: ...nd press SET The normal playback screen appears To cancel the setting select RETURN To Print by Selecting Still Images and Number of Prints 1 Perform steps 1 3 in To Print All Still Images One Print For Each 2 Press Up 4 9 or Down 8 to select CURRENT and press SET The DPOF screen appears 3 Press 3 or 5 to select the desired file 4 Press Up 4 9 or Down 8 to select the number indication 00 and press...

Page 31: ...1 3 in Normal Playback of Images 墌 pg 26 2 Press MENU The menu screen appears 3 Press Up 4 9 or Down 8 to select DIRECT PRINT and press SET A message PLEASE CONNECT PRINTER appears 4 Connect the camcorder to the printer with USB cable After a while the print menu appears 5 Press Up 4 9 or Down 8 to select SELECTED PRINT and press SET 6 Press 3 or 5 to select the desired file and press SET 7 Press ...

Page 32: ...move the USB cable select DIRECT PRINT in the menu again and then reconnect the cable You can initialise a memory card any time After initialising all files and data stored in the memory card including those which have been protected are cleared 1 Set the VIDEO MEMORY switch to MEMORY 2 Set the power switch to PLAY while pressing down the lock button located on the switch 3 Press MENU The menu scr...

Page 33: ...on menus 3 Press SET The menu screen closes Menus with Sub Menus m CAMERA 墌 pg 34 q MANUAL 墌 pg 34 s SYSTEM 墌 pg 35 n CAMERA DISPLAY 墌 pg 36 o DSC 墌 pg 36 t VIDEO 墌 pg 37 n VIDEO DISPLAY 墌 pg 38 1 Press Up 4 9 or Down 8 to select the desired function and press SET The sub menu appears Example CAMERA menu 2 Press Up 4 9 or Down 8 to select the desired parameter 3 Press SET Selection is complete Rep...

Page 34: ...e only when the VIDEO MEMORY switch is set to VIDEO FULL Snapshot mode with no frame NEGA Nega mode FRAME Snapshot mode with frame For details on the procedure refer to Snapshot For Video Recording 墌 pg 39 Available when the VIDEO MEMORY switch is set to VIDEO OFF Allows you to shoot dark scenes with no picture brightness adjustment AGC The overall appearance may be grainy but the image is bright ...

Page 35: ...en using this mode refer to your wide screen TV s instruction manual Available only when the VIDEO MEMORY switch is set to VIDEO NOTE During playback recording on 4 3 TVs LCD monitor black bands are inserted at the top and bottom of the screen and the image appears like a letter boxed 16 9 movie CINEMA and 16 9 WIDE mode OFF Disengages the function ON Helps cut down on noise created by wind The in...

Page 36: ...ry preset 墌 pg 16 Brightness Adjustment of the Display LCD Keeps the camcorder s display except the date time and time code from appearing on the connected TV screen LCD TV Makes the camcorder s display appear on screen when the camcorder is connected to a TV OFF The date time does not appear AUTO Displays the date time for approx 5 seconds when the power switch is set from OFF to A or M ON The da...

Page 37: ...also applicable to memory card recording OFF Disables the function ON Enables interval shooting 墌 pg 26 15SEC 30SEC 1MIN 2MIN 5MIN 10MIN 30MIN 60MIN Allows you to select the shooting interval for interval shooting 墌 pg 26 VIDEO Factory preset SOUND MODE and NARRATION During tape playback the camcorder detects the sound mode in which the recording was made and plays the sound back Select the type o...

Page 38: ...ked with s SYSTEM which appears when the power switch is set to M 墌 pg 33 The parameters are the same as in the description on page 35 VIDEO DISPLAY The n VIDEO DISPLAY settings are effective only for video playback except BRIGHT LANGUAGE and AUX MIC The parameters except OFF in ON SCREEN settings are the same as in the description CAMERA DISPLAY on page 36 Factory preset 墌 pg 16 Brightness Adjust...

Page 39: ...der fires the flash and adjusts the brightness automatically You can also adjust the flash brightness manually When you find that the snapshots you took look too bright or too dark adjust it manually 1 Select FLASH ADJ in MANUAL menu and press SET The parameter appears 2 To intensify the flash press Up 4 9 To weaken the flash press Down 8 Adjustment range 3 to 3 Factory preset 0 3 Press SET three ...

Page 40: ...ideo recording starts The tally lamp stays on To stop self timer recording press the recording start stop button again The camcorder re enters record standby mode OR 3 For snapshot press SNAPSHOT The tally lamp starts blinking After 15 seconds the beep sounds and a snapshot is taken The tally lamp turns off After that the camcorder re enters record standby mode 4 To end self timer recording select...

Page 41: ...ted When the scene is affected by sunbeams or light reflecting off the surface of a body of water When shooting a scene with a high contrast background The following low contrast warnings appear blinking and Manual exposure control is recommended in the following situations When shooting using reverse lighting or when the background is too bright When shooting on a reflective natural background su...

Page 42: ...ht compensation brightens the subject quickly With simple operation backlight compensation feature brightens the dark subject portion by increasing the exposure 1 Set the power switch to M 2 Press BACKLIGHT 8 so that the backlight compensation indicator appears To cancel backlight compensation Press BACKLIGHT 8 twice so that the indicator disappears NOTE Using backlight compensation may cause the ...

Page 43: ...return to automatic white balance Select AUTO in step 2 Or set the power switch to A Adjust the white balance manually when shooting under various types of lighting 1 Set the power switch to M 2 Hold a sheet of plain white paper in front of the subject Adjust zoom or position yourself so that the white paper fills the screen 3 Press W B repeatedly to select 4 Press and hold W B until begins blinki...

Page 44: ...WIPE DOOR Wipe in as the two halves of a black screen open to the left and right revealing the scene or wipe out and the black screen reappears from left and right to cover the scene WIPE SCROLL The scene wipes in from the bottom to the top of a black screen or wipes out from top to bottom leaving a black screen WIPE SHUTTER Wipe in from the centre of a black screen toward the top and bottom or wi...

Page 45: ...ast shutter speed allows fast moving subject to be captured one frame at a time vividly Use these settings when an automatic adjustment does not work well by SPORTS mode Available only when the VIDEO MEMORY switch is set to VIDEO To turn off the program AE Select OFF in step 3 The program AE indicator disappears NOTES Some modes of program AE cannot be used during Night Scope When a subject is too...

Page 46: ...hether or not the following displays appear on the connected TV Date time Set DATE TIME to AUTO ON or OFF 墌 pg 33 38 Or press DISPLAY on the remote control to turn on off the date indication Time code Set TIME CODE to OFF or ON 墌 pg 33 38 Indications other than date time and time code Set ON SCREEN to OFF LCD or LCD TV 墌 pg 33 38 To use this camcorder as a recorder 1 Following the illustrations co...

Page 47: ... Special Effects 墌 pg 24 is attempted or SNAPSHOT is pressed during playback only the original playback image recorded on the tape is output from the DV IN OUT connector When using a DV cable be sure to use the optional JVC VC VDV204U DV cable To use this camcorder as a recorder 1 Make sure all units are turned off 2 Connect this camcorder to a video unit equipped with a DV output connector using ...

Page 48: ... to SOFTWARE INSTALLATION AND PC CONNECTION GUIDE for the bundled software and drivers It is recommended to use the AC adapter as the power supply instead of the battery pack 墌 pg 14 Connection to a Personal Computer A Using USB cable To USB PC PC with DV connector USB cable provided To DV IN OUT B Using DV cable To USB connector To DV connector Core filter Core filter DV cable optional OR When co...

Page 49: ... CODE is set to ON in CAMERA DISPLAY and VIDEO DISPLAY menus 墌 pg 33 36 38 Insert editing is not possible on a tape recorded in the LP mode or on a blank portion of a tape 1 Play back the tape locate the edit out point and press PAUSE 9 Confirm the time code at this point 墌 pg 19 2 Press REW 3 until the edit in point is located then press PAUSE 9 3 Press and hold INSERT I on the remote control the...

Page 50: ... BIT the old and new soundtracks are recorded separately If you dub onto a blank space on the tape the sound may be disrupted Make sure you only edit recorded areas If feedback or howling occurs during TV playback move the camcorder s microphone away from the TV or turn down the TV s volume If you change from 12 BIT to 16 BIT in mid recording and then use the tape for audio dubbing it is not effec...

Page 51: ...0X optical zoom is selected HSet ZOOM to 40X or 300X 墌 pg 34 The VIDEO MEMORY switch is set to MEMORY HSet the VIDEO MEMORY switch to VIDEO Video and D S C Playback Your TV has AV input terminals but is not set to its VIDEO mode HSet the TV to the mode or channel appropriate for video playback 墌 pg 22 The cassette holder cover is open HClose the cassette holder cover 墌 pg 16 HClean the video heads...

Page 52: ...P to AGC or OFF 墌 pg 33 34 The subject is too bright with the flash set to 0A or C 0A HSet the flash mode to 0 墌 pg 39 If blinks the flash is being charged HIt can take up to 10 seconds to charge the flash The camcorder is in the record mode HSet the camcorder in the record standby mode 墌 pg 39 The subject does not look straight toward the flash The subject does not look at the first flash which i...

Page 53: ...ade with high precision technology However black spots or bright spots of light red green or blue may appear constantly on the LCD monitor These spots are not recorded on the tape This is not due to any defect of the unit Effective dots more than 99 99 The battery s charge is low HInstall a fully charged battery 墌 pg 13 HPush in the memory card a few more times 墌 pg 17 The LCD monitor s brightness...

Page 54: ... tape is not loaded when the recording start stop button or SNAPSHOT button is pressed while the power switch is set to A or M and the VIDEO MEMORY switch is set to VIDEO Appears when the tape ends during recording or playback Appears when the date time is not set 墌 pg 15 The built in clock battery has run out and the previously set date time has been erased Consult your nearest JVC dealer for rep...

Page 55: ...loaded when the memory card s memory is full when the memory card is not formatted when a write protected SD Memory Card is loaded 墌 pg 17 Appears if there is no memory card loaded when you attempt to record on a memory card or access data on a memory card Appears when there is a problem with a memory card and its memory is corrupt or it has not been initialised Initialise the memory card 墌 pg 32 ...

Page 56: ...SAFEGUARD MODE REMOVE AND REATTACH BATTERY UNIT IN SAFEGUARD MODE EJECT AND REINSERT TAPE Before cleaning turn off the camcorder and remove the battery pack and AC adapter To clean the exterior Wipe gently with a soft cloth Put the cloth in diluted mild soap and wring it well to wipe off heavy dirt Then wipe again with a dry cloth To clean the LCD monitor Wipe gently with a soft cloth Be careful n...

Page 57: ... for the battery pack to be warm after charging or after use Temperature Range Specifications Charging 10 C to 35 C Operation 0 C to 40 C Storage 20 C to 50 C The lower the temperature the longer recharging takes Charging times are for a fully discharged battery pack Cassettes To properly use and store your cassettes be sure to read the following cautions During use make sure the cassette bears th...

Page 58: ...NOT open the camcorder s chassis disassemble or modify the unit short circuit the terminals of the battery pack Keep it away from metallic objects when not in use allow inflammables water or metallic objects to enter the unit remove the battery pack or disconnect the power supply while the power is on leave the battery pack attached when the camcorder is not in use Avoid using the unit in places s...

Page 59: ...cker on either the front or back surface If the CD ROM gets dirty gently wipe it with a soft cloth outward from the centre hole Do not use conventional disc cleaners or cleaning spray Do not bend the CD ROM or touch its mirror surface Do not store your CD ROM in a dusty hot or humid environment Keep it away from direct sunlight Serious malfunctioning About moisture condensation You have observed t...

Page 60: ...ing Audio PCM digital recording 32 kHz 4 channel 12 BIT 48 kHz 2 channel 16 BIT Cassette Mini DV cassette Tape speed SP 18 8 mm s LP 12 5 mm s Maximum recording time using 80 min cassette SP 80 min LP 120 min Storage media SD Memory Card MultiMediaCard Compression system JPEG compatible Image size 5 modes 2560 x 1920 2048 x 1536 1600 x 1200 1280 x 960 640 x 480 Picture quality 2 modes FINE STANDAR...

Page 61: ...640 x 480 185 385 780 1555 3140 6040 195 640 x 480 265 550 1115 2225 4490 8635 275 1280 x 960 50 100 210 420 845 1630 50 1280 x 960 80 170 350 705 1425 2745 85 1600 x 1200 33 65 140 280 570 1095 35 1600 x 1200 50 110 225 455 920 1775 55 2048 x 1536 20 42 85 170 350 675 21 2048 x 1536 32 65 135 270 550 1055 34 2560 x 1920 13 27 55 110 225 435 14 2560 x 1920 21 42 85 175 355 685 22 Capacity Manufact...

Page 62: ... Stabiliser DIS 34 Direct Printing 31 DPOF Setting 30 31 Dubbing 28 46 47 E Exposure Control 41 F Flash 39 H Histogram 27 I Image Size 37 Initialising a Memory Card 32 Insert Editing 49 Interval Shooting 26 Iris Lock 42 L LCD Monitor 12 Loading a Cassette 16 Loading a Memory Card 17 M Manual Focus 41 Memory Card 17 58 N Night Scope 40 P Picture Quality 36 Playback Special Effects 24 Power Linked O...

Page 63: ...me 20 Special Effects 45 Specifications 60 Spot Exposure Control 42 T Tape Speed REC MODE 34 38 Telephoto Setting TELE MACRO 35 Time Code 19 36 Tripod Mounting 16 Troubleshooting 51 W Warning Indications 54 White Balance 43 Wide Mode 35 Wipe or Fader Effects 44 Z Zooming 19 24 34 5 Second Recording 35 40 ...

Page 64: ...ke one 1 copy of the Program solely for your personal backup or archival purposes 3 RESTRICTION ON THE PROGRAM 1 You may not reverse engineer decompile disassemble revise or modify the Program except to the extent that expressly permitted by applicable law 2 You may not copy or use the Program in whole or in part other than as expressly specified in this Agreement 3 You have no right to grant a li...

Page 65: ...Your machine including the erasing from any memory in Your PC and no longer own such Program 7 EXPORT CONTROL You agree that You will not ship transfer or export the Program or underlying information and technology to any countries to which Japan and other relevant countries have initiated an embargo on such goods 8 U S GOVERNMENT USER If You are an agency of the United States of America the Gover...

Page 66: ...ce refer to the Readme of each software 墌 pg 15 and the following website http www2 cli co jp products dvc CAUTION Operate this equipment according to the operating procedures described in this manual Use only the provided CD ROM Never use any other CD ROM to run this software Do not attempt to modify this software Changes or modifications not approved by JVC could void user s authority to operate...

Page 67: ...upported media DVD Video DVD R RW DVD R RW DVD R DL DVD VR DVD RW DVD RW DVD RAM VideoCD CD R RW For more details refer to CyberLink web site http www gocyberlink com english products powerproducer 2_gold comp_dvd_drives jsp 䡲 Macintosh The following requirements must be satisfied to connect a camcorder to a PC Hardware iMac iBook Power Mac G4 or G5 PowerBook G3 or G4 eMac equipped with a USB conn...

Page 68: ...apturing video from a camcorder and for easily editing MPEG AVI and other video files still images and other contents for creating a movie This software has an interface that allows editing in either timeline or storyboard mode maintains superior image quality uses SVRT for high speed rendering and has a host of other advanced video editing features You can export video files as DV format AVI to r...

Page 69: ... to install then click Next Wait for a moment until the installation is finished When the installation is finished Setup Complete screen appears Click Finish Restarts the PC For Windows 98SE Me 2000 Before Setup Complete screen appears Question screen appears Click Yes Then DMA setting screen appears Click OK Setup Complete screen appears Click Finish to restart the PC Install all of the desired s...

Page 70: ...ge Class driver 1 Use the USB cable to connect the camcorder to the PC 墌 pg 8 2 Click Start go to Settings and then click Control Panel Double click the System icon 3 Select the Device Manager tab 4 Delete GR X5 in Other devices The model name depends on the connected camcorder 5 Disconnect the USB cable from the camcorder Restart the PC 6 Load the provided CD ROM into the PC Install USB Mass Stor...

Page 71: ... the camcorder to the PC through a USB hub compatibility issues between the hub and the PC may result in instability in the operation of the PC If this happens connect the camcorder directly to the PC not through the hub Do not use an extension USB cable When connecting the camcorder to a PC using a DV cable make sure to follow the procedure below Connecting the cable incorrectly may cause malfunc...

Page 72: ...ht When using Windows 98SE Me 2000 1 Double click the My Computer icon on the desktop The Removable Disk icon which represents the memory card in the camcorder appears in the My Computer window 2 Double click the Removable Disk icon Windows 98SE Removable Disk icon does not appear if USB Mass Storage Class driver is not installed properly In this case refer to Updating Device Manager Windows 98SE ...

Page 73: ...tension may not appear depending on the FOLDER option setting of Windows Still image and video clip files that are stored in a memory card can be copied to the PC and played back on the PC 1 Perform the procedure in Viewing the Contents of a Memory Card Windows 墌 pg 9 The folders in the memory card appear 2 Create a new folder enter the folder name and then double click it For example create a new...

Page 74: ...io install the G 726 decoder from the CD ROM Before loading or unloading memory cards or turning off the PC first disconnect the USB cable and turn off the camcorder When using Windows 98SE 1 Confirm that is not currently displayed on the LCD monitor of the camcorder If is currently displayed wait until it disappears before proceeding 2 Double click the My Computer icon on the desktop If the camco...

Page 75: ...ject Hardware dialog box appears Windows XP If not wait a while then go to step 5 3 Select USB Mass Storage Device or USB Disk and then click Stop Windows 2000 XP Windows Me The Stop a Hardware device dialog box appears 4 Click OK Windows 2000 Me If a message indicating that the device can be safely removed appears click OK and then click Close Windows 2000 XP Windows Me The model name depends on ...

Page 76: ...he PC If this happens connect the camcorder directly to the PC not through the hub Do not use an extension USB cable 1 Make sure that there is a memory card in the camcorder 2 Set the camcorder s VIDEO MEMORY Switch to MEMORY 3 Set the camcorder s Power Switch to PLAY while pressing down the Lock Button located on the switch 4 Connect the camcorder to the PC with a USB cable See above On the camco...

Page 77: ... the camcorder s LCD monitor If you are using a brand new memory card you need to initialize the memory card with the camcorder first You may not be able to copy files from the memory card to the PC without doing so Still image and video clip files that are stored in a memory card can be copied to the PC and played back on the PC 1 Double click the memory card icon on the desktop The folders in th...

Page 78: ...tware installation and PC connection For more details of each software refer to its user s guide help Readme 䡲 CyberLink DVD Solution Following steps are the example of CyberLink PowerDirector 3 1 Click Start go to All Programs or Programs CyberLink DVD Solution PowerDirector and then click User s Guide Help Readme depending on your preference 䡲 Digital Photo Navigator The instruction manual is in...

Page 79: ...ette DVD Player PC EDIT moving images with PowerDirector 3 CREATE the DVD or VCD with PowerProducer 2 Gold PLAYBACK the DVD or VCD Memory Card SHOOT the still images CREATE and ENJOY the picture album with Digital Photo Navigator 1 0 TRANSFER the still images via the USB cable PC Use of PowerProducer 2 Gold alone is enough for creating a DVD or VCD with ease http www2 cli co jp products dvc ...

Page 80: ...EN EK EX Printed in Japan 0405MKH AL VP 2005 Victor Company of Japan Limited ...

Reviews: