background image

6

 EN

GETTING STARTED

  (cont.)

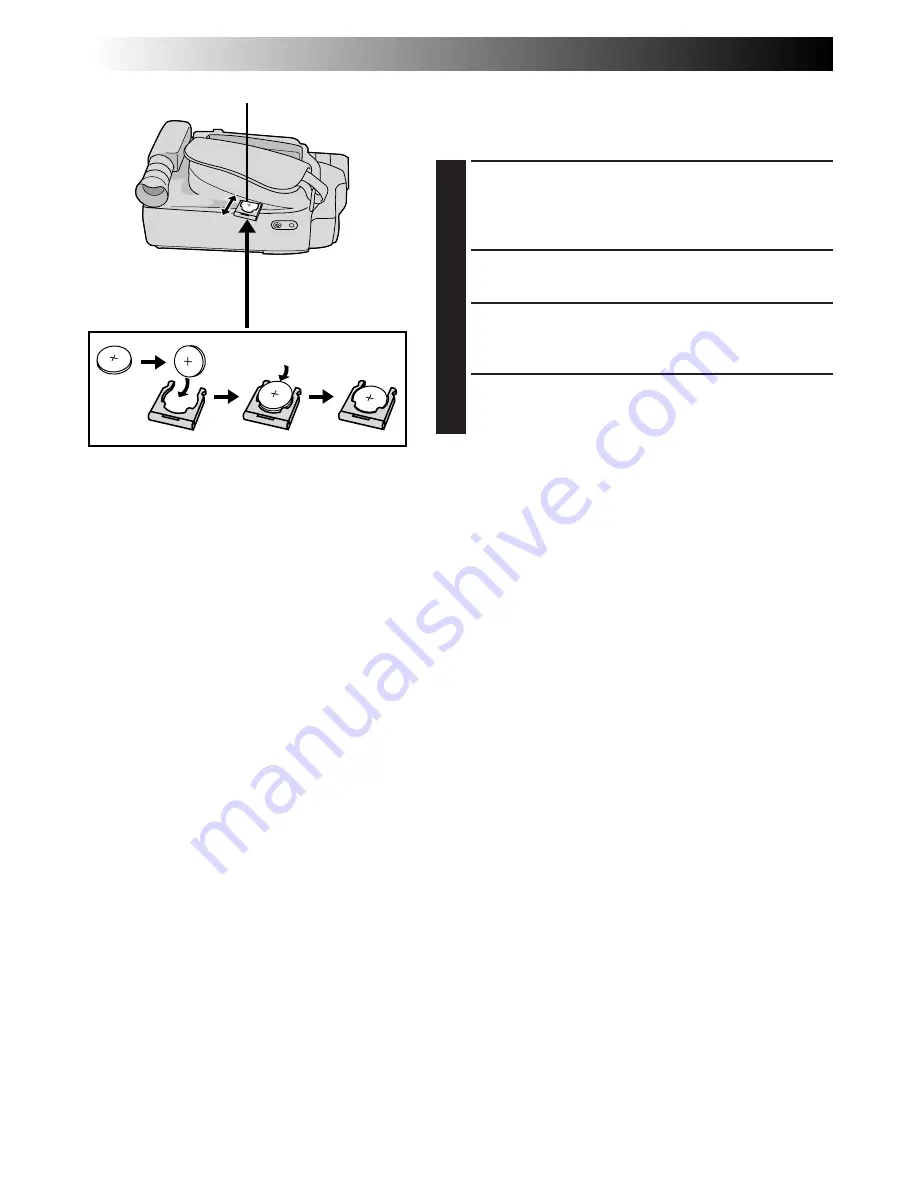
Clock (Lithium) Battery Insertion/Removal

This battery is necessary for clock operation and to
perform date/time settings.

1

SWITCH OFF POWER

Switch off the unit’s power and remove the power
supply unit (battery pack, AC Power Adapter/Battery
Charger, etc.).

2

REMOVE BATTERY HOLDER

Pull out the battery holder.

3

INSERT BATTERY IN HOLDER

Insert the battery in the holder, and be sure to have
the “+” mark visible.

4

RE-INSERT HOLDER

Slide the holder back into the slot until you hear a
click.

NOTES:

See “SAFETY PRECAUTIONS” (

Z

 pg. 2) for information

on safe handling of lithium batteries.

To avoid losing the battery and/or battery holder, place
the camcorder with the grip side up as shown in the
illustration when inserting/removing the battery.

Slot

Battery holder

Summary of Contents for GR-SXM25

Page 1: ...COMPACT VHS CAMCORDER LYT0295 001A INSTRUCTIONS ENGLISH EN GR SXM25 Super VHS VHS PAL 625 ...

Page 2: ...ispose of used battery promptly n Keep away from children n Do not disassemble and do not dispose of in fire CAUTIONS n To prevent shock do not open the cabinet No user serviceable parts inside Refer servicing to qualified personnel n When you are not using the AC Power Adapter Charger for a long period of time it is recommended that you disconnect the power cord from AC outlet NOTES The rating pl...

Page 3: ...ation GETTING STARTED 4 11 Power 4 Clock Lithium Battery Insertion Removal 6 Date Time Settings 7 Tape Length Setting 8 Loading Unloading A Cassette 9 Recording Format Setting 10 Grip Adjustment 11 Viewfinder Adjustment 11 Shoulder Strap Attachment 11 Tripod Mounting 11 RECORDING 12 33 Basic Recording 12 Basic Features 16 Advanced Features 19 PLAYBACK 34 39 Basic Playback 34 Features 35 Using The ...

Page 4: ...nction REFRESH The AC Power Adapter Charger features a REFRESH function that allows you to fully discharge the battery pack before recharg ing Perform the REFRESH function after no less than 5 chargings To discharge the battery attach the battery pack to the adapter as shown in the above illustration Then push REFRESH The REFRESH indicator lights when discharging starts and goes out when dischargi...

Page 5: ... If you stop recharging or discharging part way through make sure to remove the battery pack before unplugging the adapter s AC cord Remove the battery pack from the adapter immediately after discharging To avoid interference with reception do not use the AC Power Adapter Charger near a radio Make sure you unplug the DC cord before charging or discharging the battery pack The CHARGE indicator may ...

Page 6: ... BATTERY HOLDER Pull out the battery holder 3 INSERT BATTERY IN HOLDER Insert the battery in the holder and be sure to have the mark visible 4 RE INSERT HOLDER Slide the holder back into the slot until you hear a click NOTES See SAFETY PRECAUTIONS Z pg 2 for information on safe handling of lithium batteries To avoid losing the battery and or battery holder place the camcorder with the grip side up...

Page 7: ...linking rotate the Select Dial until the correct setting appears and then press it The setting stops blinking Repeat this procedure until you re satisfied with the Date settings YEAR MONTH and DAY 4 SET TIME Rotate the Select Dial to move the highlight bar to TIME and then press it When the hour setting begins blinking rotate the Select Dial until the correct setting appears and then press it When...

Page 8: ...e the highlight bar to TAPE LENGTH then press it The TAPE LENGTH Setting Menu appears 3 SET TAPE LENGTH Rotate the Select Dial to move the highlight bar to the correct setting T30 30 minutes of recording time T45 45 minutes and T60 60 minutes If you decide you want to return the tape length to the previous setting rotate the Select Dial to move the highlight bar to EXIT 4 CLOSE MENU SCREEN Press t...

Page 9: ...he cassette If there is any slack turn the gear on the cassette in the direction of the arrow to take up the slack Make sure the Erase Protection tab is in the position that allows recording If not slide the tab Some cassettes have removable tabs If the tab has been removed cover the hole with adhesive tape The cassette holder cannot be opened while the camcorder is in the record mode Cassette hol...

Page 10: ...u to record in VHS on a VHS cassette or in S VHS on an S VHS cassette OFF Allows you to record in VHS on an S VHS cassette 4 CLOSE MENU SCREEN Press the Select Dial The Menu Screen reappears with the highlight bar on RETURN Press the Select Dial again to close the Menu Screen During S VHS record mode S is displayed Normal Screen Select Dial MENU Button Power Switch Menu Screen S TAPE Setting Menu ...

Page 11: ...viewfinder are clearly focused Shoulder Strap Attachment 1 ATTACH STRAP Following the illustration on left thread the strap through the top of the eyelet 1 then fold it back and thread it through the buckle 2 Repeat the procedure to attach the other end of the strap to the other eyelet 3 making sure the strap is not twisted 2 ADJUST LENGTH Adjust as shown in the illustration on left 4 Tripod Mount...

Page 12: ...AMERA AUTO or PRO The power lamp lights and the camcorder enters the Record Standby mode The scene you are aimed at appears on the viewfinder screen with the word PAUSE superimposed upon it 3 START SHOOTING Press the Recording Start Stop Button appears in the viewfinder while recording is in progress Power lamp Tally lamp lights while recording is in progress Power Switch Position According to the...

Page 13: ...rder s power shuts off automatically Set the Power Switch to POWER OFF and then back to CAMERA to turn the camcorder on again If the Recording Start Stop button is pressed after the Record Standby mode has continued for over 5 minutes recording may not start immediately If you are recording on a cassette from the middle such as when a tape is removed and re inserted during recording use the Retake...

Page 14: ... the LCD monitor upward downward for best viewability Z pg 15 and press the Recording Start Stop Button appears in the LCD monitor while recording is in progress 4 STOP RECORDING Press the Recording Start Stop Button again to stop recording The camcorder re enters the Record Standby mode NOTES When you use the LCD monitor outdoors in direct sunlight the LCD monitor may be difficult to see If this ...

Page 15: ...rds Interface Shooting The person you shoot can view himself herself in the LCD monitor and you can even shoot yourself while viewing your own image in the LCD monitor 1 TILT LCD MONITOR UPWARD Open the LCD monitor and tilt it upward to 180 degrees so that it faces forward When the LCD monitor is tilted upward to an angle of over approx 105 degrees the monitor image is inverted vertically and the ...

Page 16: ...r you push the Power Zoom Lever the quicker the zoom action NOTES Focusing may become unstable during Zooming In this case set the zoom while in Record Standby lock the focus by using the manual focus Z pg 29 then zoom in or out in Record mode The zoom level indicator 5 moves during zoom Once the zoom level indicator reaches the top of the zoom indicator bar all magnification from that point is th...

Page 17: ...r the next shot NOTE Distortion may occur at the start of playback This is normal FEATURE Retake PURPOSE To re record certain segments OPERATION 1 Make sure the camcorder is in the Record Standby mode 2 Press either RETAKE to reach the start point for new recording Pressing F forwards the tape and pressing R reverses it 3 Press the Recording Start Stop Button to start recording NOTE Noise bars app...

Page 18: ...n various directions When shooting scenes with low contrast back grounds Switch off the Picture Stabilizer when recording with the camcorder on a tripod The indicator appears blinking if the Stabilizer cannot be used FEATURE 5Sec Rec 5 sec Recording PURPOSE To record a scene for 5 seconds providing quick scene transitions like those seen in TV programmes OPERATION 1 During Record Standby press 5SE...

Page 19: ...s EFFECT repeatedly until OFF appears OFF is displayed for approx 2 seconds and the fade wipe standby mode is canceled Fade in Recording Start Stop Button After 2 sec EFFECT Button Ex Fader Display Fade out FADER Fades in out to a black screen MOSAIC Fader Gradually turns returns the picture into from a mosaic pattern SHUTTER Wipe A black screen moves in from the top and bottom closing over the im...

Page 20: ...displayed for approx 2 seconds Then the name disappears and only the indication remains The mode is activated NOTES Only one mode can be engaged at a time The screen becomes slightly reddish when the Fade Wipe Z pg 19 is used in the Sepia mode The screen becomes slightly dark in the High Speed Shutter mode Use in well lit situations In the High Speed Shutter or Sports modes picture colour may be a...

Page 21: ...s when an external fog filter is attached to the lens Softens the image and gives it a fantasy look Twilight TWILIGHT Twilight Dusk twilight scenery fireworks etc look more natural and dramatic The following happens when Twilight mode is selected Auto gain control is turned off White Balance is set to FINE day mode but can also be manually changed to another mode Z pg 30 Auto Focus becomes availab...

Page 22: ...tandby Then press it to display the DATE TIME DISP Menu 4 SELECT THE DESIRED MODE Move the highlight bar to the desired mode by rotating the Select Dial then press it The desired mode is activated You should have already performed the Date Time Setting procedure Z pg 7 If you haven t do so first 5 CLOSE MENU SCREEN The Menu Screen reappears with the highlight bar on RETURN Then press the Select Di...

Page 23: ...eft 1 SELECT OPERATION MODE Set the Power Switch to PRO 2 ACCESS MENU SCREEN Press the Select Dial to display the Menu Screen 3 ACCESS TITLE MENU Move the highlight bar to TITLE by rotating the Select Dial while in Record Standby Then press it to display the TITLE Menu 4 SELECT THE DESIRED MODE Move the highlight bar to the desired mode by rotating the Select Dial then press it The desired mode is...

Page 24: ...it If the setting you want cannot be found in the Menu Screen place the highlight bar on RETURN then go to step 6 4 MAKE SETTING Press the Select Dial The setting procedure depends on the function you select If you select FOCUS EXPOSURE TITLE DATE TIME DISP or DATE TIME see respective pages FOCUS Z pg 28 29 EXPOSURE Z pg 27 TITLE Z pg 23 DATE TIME DISP Z pg 22 DATE TIME Z pg 7 If you select WIDE D...

Page 25: ...F during Digital Zoom zoom magnification changes to 16x Usually the distance to a subject where the lens is in focus depends on the zoom magnification Unless there is a distance of more than 1m to the subject the lens is out of focus at the maximum telephoto setting When set to ON you can shoot a subject as large as possible at a distance of approx 60 cm Depending on the zoom position the lens may...

Page 26: ... The numbers range from 01 to 99 Factory setting is 06 Automatic demonstration will not take place Demonstrates certain functions such as Fade Wipe etc When DEMO MODE is set to ON and the Menu Screen is closed the demonstration starts NOTES When a tape whose Erase Protection tab is in the position that allows recording is loaded in the camcorder demonstration is not available By turning off the ca...

Page 27: ...evel counter appears 5 ADJUST EXPOSURE To brighten the image rotate the Select Dial upward The exposure control level counter increases maximum 06 Go to step 6 To darken the image rotate the Select Dial downward The exposure control level counter decreases maximum 06 Go to step 6 6 END ADJUSTMENT OF EXPOSURE Press the Select Dial The Menu Screen reappears with the highlight bar on RETURN 7 CLOSE M...

Page 28: ...ntical patterns that are regularly repeated When the scene is affected by sunbeams or light reflecting off the surface of a body of water When shooting a scene with a high contrast background The low contrast warning appears NOTES If the lens is smeared or blurred accurate focusing is not possible Keep the lens clean wiping with a piece of soft cloth if it gets dirty When condensation occurs wipe ...

Page 29: ...and blinks Go to step 6 To nearer subject rotate the Select Dial downward appears and blinks Go to step 6 6 END ADJUSTMENT OF FOCUS Press the Select Dial The Menu Screen reappears with the highlight bar on RETURN 7 CLOSE MENU SCREEN Press the Select Dial The Menu Screen disppears and reappears to indicate the focus is locked NOTES To return to Auto Focus select AUTO in step 4 To re adjust Manual F...

Page 30: ...Dial then press it The Menu Screen disap pears and the M W B Menu appears 4 SET FUNCTION PARAMETERS Move the highlight bar to the required white balance by rotating the Select Dial AUTO The white balance is adjusted automatically This is the factory preset position FINE When shooting outdoors on a sunny day CLOUD When shooting outdoors on a cloudy day HALOGEN When using a video light or other simi...

Page 31: ...LOSE MENU SCREEN Press the Select Dial again to close the Menu Screen To Change The Tint For Recording in step 2 substitute coloured paper for white The white balance is adjusted based on the colour changing the tint Red paper deeper green blue paper orange yellow paper deeper purple NOTES In step 2 it may be difficult to focus on the white paper in some circumstances In such a case adjust focus m...

Page 32: ...e sure the Power Switch is set to PRO and the camcorder is in the Record Standby mode before performing the following steps 1 ACCESS MENU SCREEN Press MENU 2 ACCESS INT TIME MENU Rotate the Select Dial to move the highlight bar to NEXT in Menu Screen 1 and press it to display Menu Screen 2 Then move the highlight bar to INT TIME and press it 3 SET INTERVAL TIME Rotate the Select Dial to move the h...

Page 33: ...apse recording make sure the Animation or Time Lapse mode is deactivated Self Timer Animation and Time Lapse are canceled when the power is shut off or when the cassette is ejected Time Lapse You can record sequentially at preset time spans Leaving the camcorder aimed at a specific subject you can record subtle changes over an extended period of time NOTE Before performing the following steps make...

Page 34: ...urn on again set the Power Switch to POWER OFF then to PLAY When the Power Switch is set to PLAY and the LCD monitor is opened at an angle of 60 degrees or more the LCD monitor switches on and the viewfinder switches off automatically to save power The playback picture can also be viewed in the viewfinder with the LCD monitor shut or on a connected TV Z pg 38 39 Camcorder operation is the same as ...

Page 35: ...can be used to eliminate noise bars that appear on screen during playback Initial setting is Auto Tracking Manual Tracking is also available 1 ACTIVATE MANUAL TRACKING Press P AE and EFFECT simultaneously Then press P AE or EFFECT as many times as necessary until the noise bars disappear To return to Auto Tracking press P AE and EFFECT simultaneously AT blinks When Auto Tracking finishes the indic...

Page 36: ...n Once you release it normal playback resumes Noise bars appear and pictures may become monochrome or darken during Shuttle Search This is normal FEATURE Counter Memory Function PURPOSE To make it easier to locate a specific tape segment OPERATION 1 Press COUNTER R M and hold for more than 1 second The counter resets to 0 00 00 2 Press COUNTER R M for less than 1 second M appears 3 After recording...

Page 37: ...REMOVE CASSETTE FROM ADAPTER Slide the latch and the compartment door opens automatically This may take around 10 seconds Do not attempt to force the adapter open Then insert your finger in the hole on the underside of the adapter as shown in the illustration on left and push up and remove the cassette NOTES During tape loading and unloading do not touch the reels for safety and tape protection Ta...

Page 38: ...A V cable provided S Video cable provided Yellow to VIDEO in To S VIDEO IN A Connection to a TV or VCR equipped with a SCART connector compatible only with regular video signal Use the provided Audio Video A V cable B Connection to a TV or VCR equipped with a SCART connector compatible with Y C signal Use the provided Audio Video A V cable and S Video cable C Connection to a TV or VCR equipped wit...

Page 39: ...e camcorder is turned on If you have a TV or speakers that are not specially shielded do not place the speakers adjacent to the TV as interference will occur in the camcorder playback picture Set the video out select switch of the cable adapter as required Y C When connecting to a TV or VCR which accepts Y C signals and uses an S Video cable CVBS When connecting to a TV or VCR which does not accep...

Page 40: ...u hear a click Read the caution concerning lithium batteries Z pg 2 Buttons 1 PAUSE IN Connector 2 Infrared beam transmitting window 3 MBR SET Button 4 INT TIME Button 5 REC TIME Button 6 FF Button 7 REW Button 8 PAUSE Button 9 PLAY Button 0 START STOP Button VISS Button ZOOM T W Buttons VCR CTL Button A DUB Button STOP Button INSERT Button R A EDIT Buttons Functions With the camcorder s Power Swi...

Page 41: ...rol until the Rec Time indicator disappears Time Lapse 1 Set Instead of performing steps 1 through 3 on pg 33 Time Lapse press INT TIME and REC TIME on the remote control Each time INT TIME is pressed the Interval Timer indicator appears changing in the following order 15S 30S 1MIN 5MIN and No indication off Each time REC TIME is pressed the Rec Time indicator appears changing in the following ord...

Page 42: ...R and point the remote towards the VCR s infrared sensor Then referring to the VCR CODE LIST on the left press and hold MBR SET and press button A and then B The code is automatically set once you release MBR SET and the VCR s power comes on 2 OPERATE VCR Make sure the VCR s power is on Then while holding VCR CTL press the button on the remote for the desired function The functions the remote can ...

Page 43: ...with Y C signals connect the camcorder and the VCR using the provided S Video cable This can improve the dubbed picture quality If you use the provided cable adapter set the Y C CVBS video out select switch as required Y C When connecting to a VCR which accepts Y C signals and uses an S Video cable CVBS When connecting to a VCR which does not accept Y C signals and uses an audio video cable CONTIN...

Page 44: ... the screen 7 REGISTER ADDITIONAL SCENES Repeat steps 5 and 6 for each additional scene as many as 8 8 MAKE CORRECTIONS IF NECESSARY Press CANCEL during steps 5 and 6 to erase the most recently registered point NOTES There must be at least one second between an in point and its corresponding out point To ensure correct operation there should be at least 15 seconds between an out point and the next...

Page 45: ...P on the remote control does not start editing 12 END AUTOMATIC EDITING When all selected scenes have been copied the camcorder and VCR enter the Still or Pause mode Press STOP on both units To make the R A Edit counter display disappear press ON OFF When finished editing be sure to disconnect the editing cable and the audio video cable NOTES If you performed step 1 on page 43 MAKE CON NECTIONS ke...

Page 46: ...press PAUSE exactly at the point where the new scene should start 5 ENGAGE INSERT EDITING MODE Press and hold INSERT and without releasing INSERT press and release PAUSE The Insert Editing mode is engaged When the scene the camcorder is aimed at appears on the screen go to the next step 6 BEGIN INSERT EDITING Press START STOP When the counter reaches 0 00 00 editing stops automatically and the cam...

Page 47: ...REW during Audio Dub Standby or the edit points will not be accurate If the microphone is too close to the TV or if the TV s volume is too high whistling or howling may occur NOTES for Insert Editing and Audio Dubbing Insert Editing and Audio Dubbing may not work correctly if the tape contains blank segments or if the recording speed was changed during the original recording To edit dub onto a tap...

Page 48: ...g cannot be performed The battery pack has not been attached correctly Z pg 4 The battery pack is not charged Z pg 4 The power supply has not been correctly connected Z pg 5 The battery pack has completely discharged Remove the cassette and disconnect the power source then after a few minutes try turning the power back on If it still does not come on consult your nearest JVC dealer Make sure the E...

Page 49: ...luminate the LCD monitor causes it to be hot Close the LCD monitor to turn it off or set the Power Switch to OFF and let the unit cool down The LCD monitor and the viewfinder are made with high precision technology However black spots or bright spots of light red green or blue may appear constantly on the LCD monitor or in the viewfinder These spots are not recorded on the tape This is not due to ...

Page 50: ...50EN INDEX Controls Connectors And Indicators Y U 1 i o u t w e q 2 p Q 3 4 5 y W E T R r 6 7 9 8 0 ...

Page 51: ...ERY RELEASE Z pg 4 PUSH Button Z pg 9 Connectors DC IN Jack Z pg 5 The connectors q to r are located beneath the cover q Video Output Connector Z pg 38 w Audio Output Connector Z pg 38 e S Video Output Connector Z pg 38 r J Terminal JLIP Joint Level Interface Protocol Connector Connect the editing cable when performing Random Assemble Editing Z pg 42 45 It is used to connect the camcorder to a dev...

Page 52: ...r Z pg 35 Battery Pack Remaining Power Indicator Changes as follows according to the battery pack s remaining power level When the power is almost gone the indicator blinks battery power warning then the unit shuts off Replace the battery pack with a fully charged one Note The symbol containing 3 darkened squares does not necessarily mean that the battery pack is fully charged Focus Indicator Z pg...

Page 53: ...rage 10 C to 30 C Recharging time is based on room temperature of 20 C 68 F The lower the temperature the longer recharging takes Terminals Cassettes To properly use and store your cassettes be sure to read the following cautions 1 During use make sure the cassette bears the S VHS C or VHS C mark be aware that recording onto prerecorded tapes automatically erases the previously recorded video and ...

Page 54: ...LEAN LENS Blow it with a blower brush then wipe it gently with lens cleaning paper 4 REMOVE EYEPIECE Turn the eyepiece counterclockwise and pull it out 5 CLEAN VIEWFINDER Remove dust using a blower brush 6 RE ATTACH EYEPIECE Re attach the eyepiece and turn it clockwise NOTES Avoid using strong cleaning agents such as benzine or alcohol Cleaning should be done only after the battery pack has been r...

Page 55: ...C P7U Dimensions 188 W x 25 H x 104 D mm Weight Approx 240 g Accessory R6 AA size battery x 1 Storage temperature 20 C to 50 C Weight Approx 880 g Dimensions 99 W x 119 H x 198 D mm with the LCD monitor closed and with the viewfinder fully tilted downward Pickup 1 4 format CCD Lens F1 6 f 3 9 to 62 4 mm 16 1 power zoom lens with auto iris and macro control filter diameter 40 5 mm Viewfinder Electr...

Page 56: ...GR SXM25 COPYRIGHT 1999 VICTOR COMPANY OF JAPAN LTD EG Printed in Japan 0299MKV UN SN VICTOR COMPANY OF JAPAN LIMITED EN ...

Reviews: