background image

EN

9

R

I

T
T

D

J

D

T
E

N
E

I

A

L
E

R

O
C

T
L
T

T

I

M

E

.

E
L

E

P

O

T

C

T

E

/

U

S
A

I

T

M

T

I

M

R

Y

M
M

I

A

L

I

D
O

N

S
E
E

M

C
A

M

D

T

R

E
R
N

E

N
E

E
A

O
G

O

M

.

.

M

M

E

E
N

O
O
O

E

0

O

N
U

F
F
F

N

6
F

U

F
F
F

G

F

L I SH

F
E

M

T

O

X

.

O

C
P

W

U
O

.

S

S
S
B

C

Y

U

.

A

S

R

M

T

E

E

E

R

M

A

M

M

E

E

N

A
A
A

N

U

U
U
U

U

T
T
T

O
O
O

R
D

N

E

.

E

C

X

Z

T

M
O

S

O
O

Y

D

M

S

E

TEM ME

S
5

N

P
0

U

x

Y

M

D

T

E

E

O
A

I

X

A

N
Y

M

I

R

T

E

T

H

DATE / T I ME

2

2

0

0

:

0

2
2

1

6
8
0

24-hour
indication

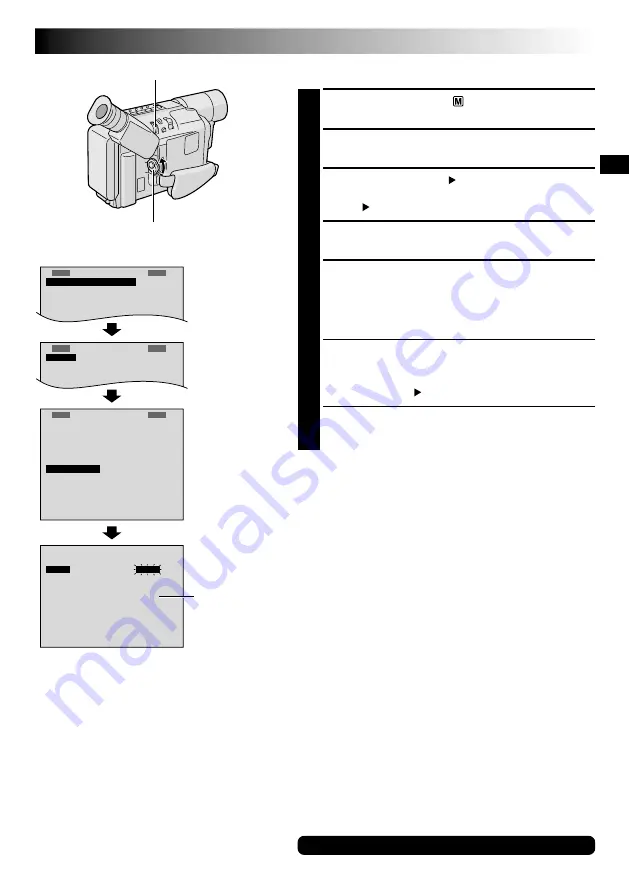
Menu Screen

DATE/TIME Menu

MENU Wheel

Power Switch

Display

Date/Time Settings

1

Set the Power Switch to “

”. The power lamp

comes on.

2

Press 

MENU

. The Menu Screen appears.

3

Rotate 

MENU

 to select “ TO SYSTEM MENU” and

press it to display SYSTEM MENU. Rotate 

MENU

 to

select “ NEXT” and press it to display the next page.

4

Rotate 

MENU

 to select “DATE/TIME” and press it.

The DATE/TIME Menu appears.

5

To set “YEAR”, “MONTH”, “DAY” or “TIME” (hour/
minute), rotate 

MENU 

to select the desired item, and

press it. When the setting begins blinking, rotate

MENU

 until the correct setting appears and then

press it. The setting stops blinking.

6

When none of these settings (“YEAR”, “MONTH”,
“DAY”, “TIME”) blinks, rotate 

MENU

 to select “EXIT”,

and press it. The Menu Screen reappears with the
highlight bar on “ RETURN”.

7

Press 

MENU

 to close the Menu Screen.

NOTE:

To display the date and time in the camcorder’s display and
on a connected TV, see “Date/Time Insert” (

 pg. 25).

For other notes, 

 pg. 44

Summary of Contents for GR-FX120

Page 1: ...ects Program AE With Special Effects Digital Effects Using Menus For Detailed Adjustment Date Time Insert Instant Titles Animation Time Lapse Exposure Control Focusing White Balance Adjustment Manual White Balance Operation PLAYBACK 30 34 Basic Playback 30 Features 31 Connections And Tape Dubbing 32 Using The Cassette Adapter 34 USING THE REMOTE CONTROL UNIT GR SXM470A only 35 43 Playback Zoom 37 ...

Page 2: ...ecautions contained in the following pages to ensure safe use of this product Cassettes marked and can be used with this camcorder However S VHS recordings are possible only with cassettes marked GR SXM470A SXM27EA SX22EA only 625 CAUTIONS If you notice smoke or a peculiar smell coming from the camcorder or AC adapter shut it down and unplug it immediately Continue using the camcorder or AC adapte...

Page 3: ...evision signals It cannot be used for playback with a television of a different standard However live recording and LCD monitor viewfinder playback are possible anywhere Use the JVC BN V11U V12U V20U V400U battery packs and to recharge them or to supply power to the camcorder from an AC outlet use the provided multi voltage AC Adapter and Power Cord An appropriate conversion adapter may be necessa...

Page 4: ... Erase Protection tab is in the position that allows recording is loaded in the camcorder demonstration is not available O O E F N X F I T DEMO MODE Setting Menu AC Adapter AP V10A AP V10AS or AP V10EA Shoulder Strap Battery Pack BN V11U A V Audio Video Cable AAA R03 Battery x 2 for Remote Control Unit GR SXM470A only S Video Cable GR SXM470A SXM27EA SX22EA only Core Filter x 3 for provided A V Ca...

Page 5: ...re Filter Wind the cable around the outside of the Core Filter as shown in the illustration Wind the cable so that it is not slack NOTE Take care not to damage the cable 3 Close the Core Filter until it clicks shut Connect the end of the cable with the Core Filter to the camcorder 5 cm Stopper 1 3 2 How To Attach The Lens Cap To protect the lens attach the provided lens cap to the camcorder as sho...

Page 6: ...s case remove the battery pack from the camcorder then try charging again If the battery operation time remains extremely short even after having been fully charged the battery is worn out and needs to be replaced Please purchase a new one Using the optional AA V15 AC Power Adapter Charger you can charge the BN V11U V12U V20U V400U battery pack without the camcorder However it cannot be used as an...

Page 7: ...rder malfunction USING THE BATTERY PACK Perform step 1 of CHARGING THE BATTERY PACK pg 6 Approximate recording time unit min 1 When using models equipped with LCD monitor 2 When using GR FX220A FX120A FX12A SX22EA when the video light is on GR SXM470A FXM270A FX220A SXM27EA SX22EA only NOTES Recording time is reduced significantly under the following conditions Zoom or Record Standby mode is engag...

Page 8: ...y to Stabilize the camcorder To prevent damage to the unit caused by falling over do not use a small sized tripod Tripod Mounting 1 Align the screw and camera direction stud on the tripod with the camera s mounting socket and stud hole Then tighten the screw Grip Adjustment 1 Separate the Velcro strip 2 Pass your right hand through the loop and grasp the grip 3 Adjust so that your thumb and finger...

Page 9: ... Press MENU The Menu Screen appears 3 Rotate MENU to select TO SYSTEM MENU and press it to display SYSTEM MENU Rotate MENU to select NEXT and press it to display the next page 4 Rotate MENU to select DATE TIME and press it The DATE TIME Menu appears 5 To set YEAR MONTH DAY or TIME hour minute rotate MENU to select the desired item and press it When the setting begins blinking rotate MENU until the...

Page 10: ...pears 3 Rotate MENU to select TO SYSTEM MENU and press it to display SYSTEM MENU If a VHS cassette is loaded rotate MENU to select S VHS ET then press it The S VHS ET Setting Menu appears If an S VHS cassette is loaded rotate MENU to S VHS then press it The S VHS Setting Menu appears 4 Rotate MENU to set to either of the parameters then press it The Menu Screen reappears with the highlight bar on ...

Page 11: ...t is recommended that tapes recorded on this camcorder be played back on this camcorder Tapes recorded in S VHS or S VHS ET mode can be played back not only on this camcorder but also on a Super VHS VCR Tapes recorded in S VHS ET mode cannot be played back on some VCRs including some JVC VCRs Tapes recorded in S VHS or S VHS ET mode cannot be played back correctly on a normal VHS VCR S VHS ET does...

Page 12: ...ct only if the correct tape length has been selected REC MODE Menu Recording mode indicator Recording Mode Setting Set the tape recording mode depending on your preference 1 Set the Power Switch to The power lamp comes on 2 Press MENU The Menu Screen appears 3 Rotate MENU to select TO SYSTEM MENU and press it to display SYSTEM MENU 4 Rotate MENU to select REC MODE and press it The REC MODE Menu ap...

Page 13: ... LCD monitor models equipped with LCD monitor only The cassette holder can t be opened unless a power supply is attached Make sure that the tape is not slack when loading the cassette If there is any slack turn the gear on the cassette in the direction of the arrow to take up the slack Make sure the Erase Protection tab is in the position that allows recording If not slide the tab Some cassettes h...

Page 14: ...ng Blinking To Adjust The Brightness Of The LCD Monitor rotate BRIGHT until the bright level indicator on the display moves and the appropriate brightness is reached RECORDING Basic Recording Power Switch Position Suitable for standard recording using NO special effects or manual adjustments Allows you to set recording functions using the menus for more creative capabilities OFF Switches off the c...

Page 15: ... To remove the indications from the camcorder s display during recording pg 22 24 Self Recording JOURNALISTIC SHOOTING models equipped with LCD monitor only In some situations different shooting angles may provide more dramatic results Hold the camcorder in the desired position and tilt the LCD monitor in the most convenient direction It can rotate 270 90 downward 180 upward SELF RECORDING models ...

Page 16: ...ode pg 21 is activated GR SXM470A FXM270A FX220A SXM27EA SX22EA only Picture Stabiliser To compensate for unstable images caused by camera shake particularly at high magnification 1 Press P STABILIZER appears 2 To switch off the Picture Stabiliser press P STABILIZER The indicator disappears Accurate stabilisation may not be possible if hand shake is excessive or under the following conditions When...

Page 17: ...ration or soon after turning it off otherwise serious injury may result Do not place the camcorder into the carrying case immediately after using the video light since it remains extremely hot for some time When operating keep a distance of about 30 cm between the video light and people or objects Do not use near flammable or explosive materials It is recommended that you consult your nearest JVC ...

Page 18: ...fect press NIGHT SCOPE repeatedly until OFF appears OFF is displayed for approx 2 seconds NOTES During Night Scope the following functions or settings cannot be activated Picture Stabiliser pg 16 Program AE With Special Effects pg 20 and Digital Effects pg 21 GAIN or S LX in CAMERA MENU pg 23 Night Scope does not work when LIGHT OFF AUTO ON is set to AUTO or ON pg 17 During Night Scope it may be d...

Page 19: ...from a mosaic pattern SHUTTER Wipe A black screen moves in from the top and bottom closing over the image like a shutter or a new image pushes open the black screen vertically from the centre SLIDE Wipe A black screen moves in from the left to gradually cover the image or a new image moves in from right to left DOOR Wipe Wipes in as the two halves of a black screen open to the left and right revea...

Page 20: ...The following happens when Twilight mode is selected Auto gain control is turned off White Balance is set to FINE day mode but can also be manually changed to another mode pg 29 Auto Focus becomes available only in the range of 10 m to infinity To focus when the subject to camera distance is less than 10 m use manual focusing pg 28 S1 2000 1 2000 sec High Speed Shutter Captures faster action than ...

Page 21: ... a mosaic pattern STRETCH Doubles the width of the picture horizontally CLASSIC FILM Makes your footage look like a classic movie by shooting in black and white with a strobing effect and black bars added at the top and bottom STROBE Your recording looks like a series of consecutive snapshots VIDEO ECHO Adds a ghost to the subject giving your recording a fantasy feeling Zoom magnification of over ...

Page 22: ...ENU The Menu Screen appears 3 Rotate MENU to select the desired function To go from CAMERA MENU to SYSTEM MENU rotate MENU to select TO SYSTEM MENU and press it SYSTEM MENU is composed of 2 pages To go to the next page rotate MENU to select NEXT and press it To return to CAMERA MENU from page 2 of SYSTEM MENU rotate MENU to select TO CAMERA MENU and press it 4 Press MENU to display the Setting Men...

Page 23: ...g 25 Makes the date time settings appear in the camcorder or on a connected monitor pg 25 Allows you to set the recording mode SP or LP depending on your preference pg 12 50X Allows you to use the Digital Zoom By digitally processing and magnifying images zooming is possible from 16X the optical zoom limit to a maximum of 50X digital magnification 400X 600X Allows you to use the Digital Zoom By di...

Page 24: ...t Titles pg 25 Allows you to set the current date and time pg 9 This number is necessary when connecting the camcorder to a device such as a computer using the J terminal JLIP The numbers range from 01 to 99 Factory setting is 06 ON Demonstrates certain functions automatically When DEMO MODE is set to ON and the Menu Screen is closed the demonstration starts Operating the Power Zoom Lever during t...

Page 25: ...O M P M W C E F A A U O A E E O X F P P R V R R D N I P P I T R D G T Y Y F E Y Y I R A N A T B H M S T C G T I I O I T I H U T R L L A M R D L L T I Y R E I A A E H D S Y T D A T I A Y M O Y S A N S S Instant Titles The camcorder has eight preset titles in memory You can superimpose one of them over the video image Instant Titles can be displayed not only in English but also in Chinese Arabic and...

Page 26: ...owing steps make sure that The Power Switch is set to The camcorder is in the Record Standby mode The recording mode is set to SP NOTES for Animation and Time Lapse For best results make sure the camcorder is secured when shooting in Animation or Time Lapse mode Fade or wipe in out cannot be performed during Animation or Time Lapse shooting Before performing other operations following Animation or...

Page 27: ... 4 Rotate MENU to select MANU then press it The Menu Screen disappears and 00 exposure control level counter appears 5 To brighten the image rotate MENU downward The exposure control level counter increases maximum 06 To darken the image rotate MENU upward The exposure control level counter decreases maximum 06 6 Press MENU The setting is complete The Menu Screen reappears with the highlight bar o...

Page 28: ...ocus on a farther subject rotate MENU upward appears and blinks To focus on a nearer subject rotate MENU downward appears and blinks 6 Press MENU The setting is complete The Menu Screen reappears with the highlight bar on RETURN 7 Press MENU The Menu Screen disappears and reappears to indicate the focus is locked NOTES If the lens is smeared or blurred accurate focusing is not possible Keep the le...

Page 29: ...al White Balance Operation Perform Manual White Balance when shooting under various types of lighting 1 Follow steps 1 through 4 of the white balance adjustment and select MWB 2 Hold a sheet of plain white paper in front of the subject Adjust zoom or position yourself so that the white paper fills the screen 3 Press MENU until MWB begins blinking When the setting is completed MWB stops blinking an...

Page 30: ...itor Brightness Adjustment models equipped with LCD monitor only Rotate BRIGHT towards to brighten or towards to darken The Bright Level Indicator is displayed under the Date Time Display when you play back images recorded in Wide Mode pg 23 Speaker Volume Control models equipped with LCD monitor only Slide the Power Zoom Lever VOL towards to turn up the volume or towards to turn down the volume T...

Page 31: ...is activated TBC is displayed Counter Memory Function Makes it easier to locate a specific tape segment 1 Press COUNTER R M and hold for more than 1 second The counter resets to 0 00 00 2 Press COUNTER R M for less than 1 second M appears 3 After recording or playback press 5 then 2 The tape automatically stops at or close to 0 00 00 4 Press 4 6 to start playback The counter memory functions in th...

Page 32: ...CR equipped with an S VIDEO IN and A V input connectors GR SXM470A SXM27EA SX22EA only Use the provided A V cable and S Video cable Yellow not connected To S Video Input To S Video Output To TV or VCR When connecting the cables open this cover Connector cover White to Audio Input S Video cable provided White to Audio Output A V cable provided TV VCR When connecting the cables open this cover VCR T...

Page 33: ... Switch to or then set your TV to the appropriate input mode Make sure you adjust the TV sound volume to its minimum level to avoid a sudden burst of sound when the camcorder is turned on If you have a TV or speakers that are not specially shielded do not place the speakers adjacent to the TV as interference will occur in the camcorder playback picture Tape Dubbing 1 Following the illustration on ...

Page 34: ... door 3 Load the cassette adapter into the VCR and play the tape back as you would any other 4 Slide the latch and the compartment door opens automatically This may take around 10 seconds Do not attempt to force the adapter open Then insert your finger in the hole on the underside of the adapter as shown in the illustration at left and push up and remove the cassette NOTES During tape loading and ...

Page 35: ...PAUSE IN Connector START STOP Button MBR SET Button SNAPSHOT Button Up Button Down Button A DUB Button PLAY Button FF Button STOP Button PAUSE Button R A EDIT Buttons Functions With the camcorder s Power Switch set to or Transmits the beam signal Zoom in out pg 16 Functions the same as the Recording Start Stop Button on the camcorder Functions the same as SNAPSHOT on the camcorder With the camcord...

Page 36: ... size batteries in the correct direction 3 Replace the battery compartment cover Tab When using the remote control be sure to point it at the remote sensor The illustration shows the approximate transmitted beam effective area for indoor use The transmitted beam may not be effective or may cause incorrect operation outdoors or when the remote sensor is directly exposed to sunlight or powerful ligh...

Page 37: ...around to find a particular portion of the picture while holding down SHIFT press Left Right Up and Down To End Zoom press and hold W until magnification returns to normal Or press STOP and then press PLAY NOTES Zoom can also be used during still playback Due to digital image processing the quality of the image may suffer After zooming in on a still video image when normal playback is started the ...

Page 38: ...ne you want to replace press PLAY 4 to view the recorded tape and press PAUSE 6 exactly at the Edit In point where the new scene should start 5 Press and hold INSERT w and without releasing INSERT w press and release PAUSE 6 The Insert Editing indicator appears and the Insert Editing mode is engaged When the scene the camcorder is aimed at appears on the screen go to the next step 6 To begin Inser...

Page 39: ...the Audio Dub Standby mode 4 To end Audio Dubbing press STOP 5 NOTES Do not press FF 3 or REW 2 during Audio Dub Standby or the edit points will not be accurate If the microphone is too close to the TV or if the TV s volume is too high whistling or howling may occur NOTES for Insert Editing and Audio Dubbing Insert Editing and Audio Dubbing may not work correctly if the tape contains blank segment...

Page 40: ... and point the remote towards the VCR s infrared sensor Then referring to the VCR CODE LIST on the left press and hold MBR SET and press button A and then B The code is automatically set once you release MBR SET and the VCR s power comes on 2 Make sure the VCR s power is on Then while holding SHIFT press the button on the remote for the desired function The functions the remote can control are PLA...

Page 41: ...order and set the Power Switch to 3 Turn the VCR power on insert a recordable tape and engage the AUX mode refer to the VCR s instructions NOTE If your VCR has an S Video input connector connect the camcorder and the VCR using the provided S Video cable This can improve the dubbed picture quality S Video cable provided To J terminal JLIP Open the cover To Video Output and Audio Output connectors T...

Page 42: ...n an in point and its corresponding out point To ensure correct operation there should be at least 15 seconds between an out point and the next in point Blank portions of a tape cannot be registered as in points or out points If it takes more than 5 minutes to search for an in point the VCR s Record Pause mode is cancelled and editing does not take place Pressing R A EDIT ON OFF clears all in and ...

Page 43: ...rol does not start editing 12 When all selected scenes have been copied the camcorder and VCR enter the Still or Pause mode Press STOP 5 on both units To make the R A Edit counter display disappear press R A EDIT ON OFF When finished editing be sure to disconnect the editing cable and the A V cable NOTES If you performed step 1 on page 41 MAKE CONNECTIONS keep the remote control pointed at the VCR...

Page 44: ...e AC Adapter near a radio Since the AC Adapter processes electricity internally it becomes warm during use Be sure to use it only in well ventilated areas The following operation stops charging or discharging Set the Power Switch to or Disconnect the AC Adapter from the camcorder Unplug the AC Adapter s power cord from the AC outlet Detach the battery from the camcorder The date time cannot be sto...

Page 45: ... if left in this condition for 5 minutes TAPE END also appears when a cassette whose tape is already at its end is loaded If the Recording Start Stop button is pressed after the Record Standby mode has continued for over 5 minutes recording may not start immediately While shooting sound is not heard from the speaker models equipped with LCD monitor only The TBC indicator turns green grey with a ca...

Page 46: ...he power supply has not been correctly connected pg 6 7 The battery pack has completely discharged Remove the cassette and disconnect the power source then after a few minutes try turning the power back on If it still does not come on consult your nearest JVC dealer Make sure the Erase Protection tab is in the position that allows recording If not slide the tab Some cassettes have removable tabs I...

Page 47: ...itor causes it to be hot Close the LCD monitor to turn it off or set the Power Switch to OFF and let the unit cool down The LCD monitor and the viewfinder are made with high precision technology However black spots or bright spots of light red green or blue may appear constantly on the LCD monitor or in the viewfinder These spots are not recorded on the tape This is not due to any defect of the un...

Page 48: ...48EN INDEX Controls Connectors And Indicators I 2 1 3 5 6 7 8 9 0 y u Y U T Q W E R p i t r w e q o 4 ...

Page 49: ...Recording Start Stop Button pg 14 Battery Release Switch BATTERY RELEASE pg 6 Dioptre Adjustment Control pg 8 Connectors The connectors q to t are located beneath the cover q S Video Output Connector S GR SXM470A SXM27EA SX22EA only pg 32 w Audio Output Connector A pg 32 e Video Output Connector V pg 32 r J Terminal Edit Connector JLIP Joint Level Interface Protocol EDIT Connect the editing cable ...

Page 50: ...rox 2 seconds when Night Scope is switched from one mode to another by pressing NIGHT SCOPE then only the indicator remains at 9 3 0 Fade Wipe Standby Indicator pg 19 Displayed at 3 for approx 2 seconds when the Fade Wipe is switched from one effect to another by pressing FADE WIPE then only the indicator remains at 0 4 Recording Format Indicator S S ET GR SXM470A SXM27EA SX22EA only pg 10 5 Tape ...

Page 51: ...g consult your nearest JVC dealer The error indications E01 E06 show what type of malfunction has occured If an error indication and warning appear turn the unit off remove the power supply battery etc and wait a few minutes for them to clear When it does you can resume using the camcorder If the indication remains consult your nearest JVC dealer Indications During Playback TAPE END E01 E06 UNIT I...

Page 52: ...sive heat as they can leak or explode 6 Do not dispose of the batteries in a fire 7 Remove the batteries from the unit if it is to be stored for an extended period to avoid battery leakage which can cause malfunctions CAUTIONS Battery Packs The battery packs are nickel cadmium or nickel metal hydride batteries Before using the supplied battery pack or an optional battery pack be sure to read the f...

Page 53: ...mables water or metallic objects to enter the unit remove the battery pack or disconnect the power supply while the power is on leave the battery pack attached when the camcorder is not in use 2 Avoid using the unit in places subject to excessive humidity or dust in places subject to soot or steam such as near a cooking stove in places subject to excessive shock or vibration near a television set ...

Page 54: ...nits have been disconnected Mould may form if the lens is left dirty When using a cleaner or chemically treated cloth refer to the cautions that came with it When removing the eyepiece be sure to hold the viewfinder securely CAUTIONS cont About moisture condensation You may have observed that pouring a cold liquid into a glass will cause drops of water to form on the glass outer surface This same ...

Page 55: ...umption Viewfinder on 4 0 W GR SXM470A FXM270A FXM170A FXM17A SXM27EA only 3 7 W GR FX220A FX120A FX12A SX22EA only LCD monitor on 4 5 W GR SXM470A FXM270A FXM170A FXM17A SXM27EA only Video light 3 0 W Models equipped with LCD monitor only GR SXM470A FXM270A FX220A SXM27EA SX22EA only Signal system PAL type Video recording system Luminance FM recording Colour Converted sub carrier direct recording...

Page 56: ...CTOR COMPANY OF JAPAN LTD COPYRIGHT 2000 VICTOR COMPANY OF JAPAN LTD A EA Printed in Malaysia 1000MKV UN PJ EN GR SXM470A GR FXM270A GR FXM170A GR FXM17A GR FX220A GR FX120A GR FX12A GR SXM27EA GR SX22EA VICTOR COMPANY OF JAPAN LIMITED ...

Reviews: