background image

EN 

31

Animation

Give stationary scenes or objects an illusion of
movement. This function allows you to shoot a
series of pictures, each slightly different, of the same
object for a brief period of time.

NOTE:

Make sure the camcorder is in the Record-Standby
mode and the recording mode is set to “SP” before
performing the following steps.

ACCESS MENU SCREEN

1

Turn the PROGRAM AE select dial to any
position except AUTO LOCK, then press
MENU.

SET RECORDING TIME

2

Press – or + to move the highlight bar down to
REC TIME”,  then press FAR or NEAR to cycle
through the choices. Stop when the desired
time appears. Choose from “1/4S”, “1/2S”,
“1S”, or select to turn the function “OFF”.
Then press MENU to close Menu screen.

START RECORDING

3

Press the Recording Start/Stop button after
focusing on the subject. The recording stops
automatically after the selected period of time.

ASSEMBLE SERIES OF

PICTURES

4

Repeat step 3 for the desired number of
pictures.

RELEASE ANIMATION MODE

5

Set “REC TIME” in the Menu screen to “OFF”.

NOTES:

For best results, make sure the camcorder is
secured when shooting in Animation or
Time-Lapse mode.

Fade-in/out cannot be performed during
Animation or Time-Lapse shooting.

Before performing other operations following
Animation or Time-Lapse recording, make sure
the Animation or Time-Lapse mode is deactivated.

Time-Lapse

You can record sequentially at preset time spans.
Leaving the camcorder aimed at a specific subject,
you can record subtle changes over an extended
period of time.

NOTE:

Make sure the camcorder is in the Record-Standby
mode and the recording mode is set to “SP” before
performing the following steps.

ACCESS MENU SCREEN

1

Turn the PROGRAM AE select dial to any
position except AUTO LOCK, then press
MENU.

SET INTERVAL BETWEEN

RECORDINGS

2

Press – or + to move the highlight bar down to
INTERVAL TIMER”, then press FAR or NEAR
to cycle through the choices. Stop when the
desired time appears. Choose from “15S”,
“30S”, “1MIN”, “5MIN”, or select to turn the
function “OFF”.

SET RECORDING TIME

3

Press – or + to move the highlight bar down to
REC TIME”, then press FAR or NEAR to cycle
through the choices. Stop when the desired
time appears. Choose from “1/4S”, “1/2S”,
“1S”, or select to turn the function “OFF”.
Then press MENU to close Menu screen.

START TIME-LAPSE

RECORDING

4

Press the Recording Start/Stop button.
Recording and intervals alternate
automatically.

RELEASE TIME-LAPSE MODE

5

To release when the tally lamp is not blinking,
set “REC TIME” and “INTERVAL TIMER” in the
Menu screen to “OFF”. To release when the
tally lamp is blinking, press the Recording
Start/Stop button to stop the blinking, then set
INTERVAL TIMER” and “REC TIME” in the
Menu screen to “OFF”.

Summary of Contents for GR-AXM22UM

Page 1: ...ENGLISH PORTUGUÊS ESPAÑOL LYT0002 0K7A GR AXM22UM COMPACT VHS CAMCORDER VIDEOCAMARA VHS COMPACTO CÂMERA VHS COMPACTA Compact VHS INSTRUCTIONS MANUAL DE INSTRUCCIONES INSTRUÇÕES ...

Page 2: ... not recharge disassemble heat above 100 C or incinerate Replace battery with Panasonic Matsushita Electric Sanyo or Maxell CR2025 use of another battery may present a risk of fire or explosion n Dispose of used battery promptly n Keep away from children n Do not disassemble and do not dispose of in fire SAFETY PRECAUTIONS WARNING TO PREVENT FIRE OR SHOCK HAZARD DO NOT EXPOSE THIS UNIT TO RAIN OR ...

Page 3: ... instructions marked on your product and its operating instruc tions For your safety please read all the safety and operating instructions before you operate this product and keep this manual for future reference INSTALLATION 1 Power Sources Operate your product only from the type of power source indicated on the marking label If you are not sure of the type of power supply to your home consult yo...

Page 4: ...s heat registers stoves or other products including amplifiers that produce heat SERVICING 1 Servicing If your product is not operating correctly or exhibits a marked change in performance and you are unable to restore normal operation by following the detailed procedure in its operating instructions do not attempt to service it yourself as opening or removing covers may expose you to dangerous vo...

Page 5: ...ypak Z pg 35 1 Slide the LENS COVER open close knob to open the lens cover 2 Set the power switch to CAMERA The power indicator will light and an image will appear in the LCD monitor or the viewfinder 3 Press the Recording Start Stop button Recording starts To stop recording temporarily momentarily press the Recording Start Stop button once again For more details Z pg 15 16 The viewfinder switches...

Page 6: ...om Assemble Editing Z pg 37 39 PROVIDED ACCESSORIES AC Power Adapter Charger AA V11EG Cassettes marked can be used with this camcorder Variable Speed Hyper Zoom Z pg 18 Zoom in Zoom out LCD Color Monitor Z pg 16 The Logical Choice The only compact video cassettes that can be used with your VHS VCR 8 8 2 2 5 5 4 4 1 1 6 6 3 3 7 7 180 90 Cassette Adapter VHS PlayPak C P7U DC Cord Battery Pack BN V11...

Page 7: ...achment 14 Tripod Mounting 14 RECORDING 15 Basic Recording 15 Basic Features 18 Advanced Features 20 PLAYBACK 32 Basic Playback 32 Features 33 Basic Connections 34 Using The Cassette Adapter 35 EDITING 36 Tape Dubbing 36 Random Assemble Editing R A Edit 37 USER MAINTENANCE 40 TROUBLESHOOTING 41 INDEX 43 LCD monitor Viewfinder 43 Controls 44 Connectors 44 Indicators 44 Other Parts 44 Terms 46 CAUTI...

Page 8: ...ocks in place The CHG indicator lights DETACH BATTERY PACK 3 When charging is completed the END indicator lights Slide the battery pack opposite the direction of the arrow USING THE BATTERY PACK ATTACH BATTERY PACK 1 Hook its top end to the camcorder and push the battery pack in until it locks in place DETACH BATTERY PACK 2 Slide BATT RELEASE and pull out the battery pack BATT PACK CHARGE DISCHARG...

Page 9: ...g To avoid interference with reception do not use the AC Power Adapter Charger near a radio Make sure you unplug the DC cord before charging or discharging the battery pack A blinking CHG indicator means that the battery pack has become hot Wait until it cools down to continue The CHG indicator may not light properly with a brand new battery pack or with one that s been stored for an extended peri...

Page 10: ...d the compartment A and pull the battery out INSERT BATTERY 4 Ensuring the plus side is up insert a CR2025 lithium battery and push it in CLOSE COVER 5 Close the compartment cover until it clicks in place NOTE See SAFETY PRECAUTIONS Z pg 2 for information on safe handling of lithium batteries Viewfinder Adjustment POSITION VIEWFINDER 1 Adjust the viewfinder manually for best viewability see illust...

Page 11: ...rn the date and time to the previous settings press FAR or NEAR to move the highlight bar to CANCEL then press MENU If you re satisfied with the settings go on to step 5 START CLOCK OPERATION 5 Once you ve set the date and time press FAR or NEAR until SET begins to blink then press MENU The Menu screen reappears CLOSE MENU 6 Press MENU NOTES To display the date and time in the LCD monitor or the v...

Page 12: ...nder is correct only if the correct tape length has been selected Recording Mode Setting Set depending on your preference SET RECORDING MODE 1 Press SP EP button SP Standard Play provides higher picture and sound quality and is better for dubbing while EP Extended Play is more economical recording at 1 3 the speed of SP NOTE If the recording mode is switched during recording the playback picture w...

Page 13: ...r NOTES Closing the LCD monitor while the cassette holder is still open may cause damage to the LCD monitor A cassette holder can t be opened unless a power supply is attached Make sure that the tape is not slack when loading the cassette If there is any slack turn the gear on the cassette in the direction of the arrow to take up the slack Make sure the Erase Protection tab is in the position that...

Page 14: ...the keeper 2 and then through the buckle 3 Repeat the procedure to attach the other end of the strap to the other eyelet making sure the strap isn t twisted ADJUST LENGTH 2 Adjust as shown in the illustration at left 1 then slide both keepers snug against the eyelets to prevent slipping 2 Tripod Mounting ALIGN AND TIGHTEN 1 Align the screw and camera direction stud on the tripod with the camera s ...

Page 15: ...hes off automatically to save power A cassette holder can t be opened unless a power supply is attached There may be a delay after you press EJECT until the holder opens Do not use force The tape s remaining time is displayed in the LCD monitor or the viewfinder as shown The indicated remaining time is approximate The time required to calculate the remaining tape length and the accuracy of the cal...

Page 16: ...itor upward downward for best viewability Z pg 17 and press the Recording Start Stop button The tally lamp lights while recording is in progress and REC appears in the LCD monitor STOP RECORDING 4 Press the Recording Start Stop button again to stop recording The camcorder re enters the Record Standby mode NOTES When you use the LCD monitor outdoors in direct sunlight the LCD monitor may be difficu...

Page 17: ... brightness of the LCD monitor by turning the BRIGHT dial ADJUST BRIGHTNESS 1 If you want to brighten the image Turn the dial toward If you want to darken the image Turn the dial toward Self recording You can shoot yourself while viewing your own image in the LCD monitor TILT LCD MONITOR UPWARD 1 Open the LCD monitor and tilt it upward to 180 degrees so that it faces forward START RECORDING 2 Poin...

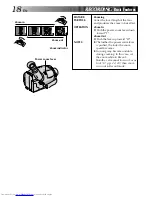
Page 18: ...om lever down toward T Zoom Out 1 Push the lever up toward W NOTES The further the power zoom lever is pushed the faster the zoom speed becomes Focusing may become unstable during zooming In this case set the zoom while in Record Standby set manual focus or Focus Lock Z pgs 22 23 then zoom in or out in Record mode Zoom out Zoom in Zoom indicator Power zoom lever ...

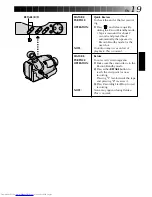
Page 19: ...de for the next shot NOTE Distortion may occur at start of playback This is normal FEATURE Retake PURPOSE To re record certain segments OPERATION 1 Make sure the camcorder is in the Record Standby mode 2 Press either RETAKE button to reach the start point for new recording Pressing F fast forwards the tape and pressing R reverses it 3 Press Recording Start Stop to start recording NOTE Noise may ap...

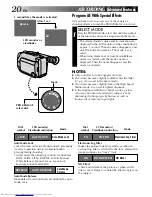
Page 20: ...ts All you have to do to access any of the variety of shooting effects is to turn the PROGRAM AE select dial SELECT MODE 1 Turn the PROGRAM AE select dial until the symbol of the function you want is aligned with the mark The selected mode s name and its indication are displayed in the LCD monitor or the viewfinder for approx 1 second Then the name disappears and only the indication remains The mo...

Page 21: ...tures fast moving action High Speed Shutter 1 1000s 1 2000s Captures faster action than Sports mode Sports SPORTS Sepia SEPIA Twilight TWILIGHT 1 1000 sec High Speed Shutter 1 1000 S 1 1000 1 1 2000 sec High Speed Shutter 1 2000 S 1 2000 2 Exposure Control This feature automatically adjusts the iris for the best available picture quality but you can override and make the adjustment manually SELECT...

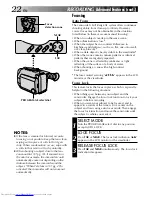
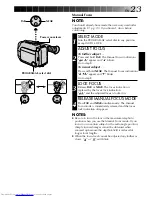
Page 22: ... the camcorder Engage the focus lock function to lock your subject in before recording When you want your subject to be focused and to appear in a corner of the screen First center on the subject and focus using auto focus mode Then engage the focus lock function and move the camcorder until the subject is where you want it SELECT MODE 1 Turn the PROGRAM AE select dial to any position except AUTO ...

Page 23: ...AR The focus indication is replaced by the focus lock indication and the adjusted focus is locked in RELEASE MANUAL FOCUS MODE 4 Press FAR and NEAR simultaneously The Manual Focus mode is immediately released and the focus lock indication disappears NOTES Be sure to focus the lens in the maximum telephoto position when you use the Manual Focus mode If you focus in on a certain subject in the wide ...

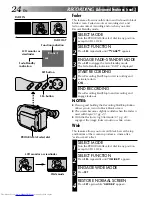
Page 24: ...cording and engage fade out NOTES Pressing and holding the Recording Start Stop button allows you to record a black blank screen The screen becomes slightly reddish when the Fader is used with Sepia Z pg 21 With the Electronic fog filter mode Z pg 20 engaged the image fades in out to a white screen Wide This feature allows you to record black bars at the top and bottom of the screen to produce a c...

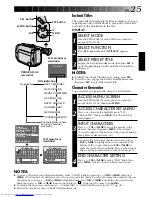
Page 25: ...AR to make the desired location blink Press when you re done and the pointer returns to the character grid END CHARACTER SETTING 4 Press FAR or NEAR to make END blink then press MENU twice to return to the normal screen NOTES To erase a character you entered mistakenly make CLEAR blink by pressing FAR or NEAR then press MENU All characters are deleted at once Or to erase selected characters only f...

Page 26: ...Record Standby mode and then select the desired display mode using SET AUTO DATE RECORD Your camcorder automatically records the date for about 5 seconds after recording is initiated in the following situations After changing the date After loading a cassette After Auto Date Record mode is selected by pressing SET In this mode the date is replaced after 5 seconds with AUTO DATE NOTES Setting PROGR...

Page 27: ...gs even when there are multiple subjects with different color temperatures SELECT MODE 1 Turn the PROGRAM AE select dial to any position except AUTO LOCK ADJUST FOCUS 2 Point the camcorder at a white flat object such as a sheet of white paper and adjust focus manually Z pg 23 ADJUST WHITE BALANCE 3 Press SET until MWB appears then press and hold SET for more than 3 seconds MWB blinks in the LCD mo...

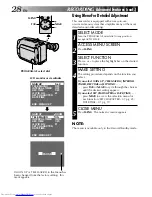
Page 28: ... Press or to place the highlight bar on the desired function MAKE SETTING 4 The setting procedure depends on the function you select If you select GAIN UP TELE MACRO INTERVAL TIMER REC TIME or JLIP ID NO press FAR or NEAR to cycle through the choices until the desired setting appears If you select SET CHARACTER or DATE TIME press NEAR to access the selection menu for each function SET CHARACTER Z ...

Page 29: ... dark scenes with no picture brightness adjustment OFF Usually set to this position ON Usually the distance to a subject where the lens is in focus depends on the zoom magnification Unless there is a distance more than 1m to the subject the lens is out of focus at the maximum telephoto setting When set to ON you can shoot a subject as large as possible at a distance of approx 60 cm Depending on th...

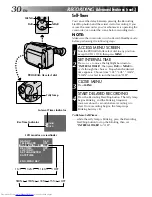
Page 30: ...tion except AUTO LOCK then press MENU SET INTERVAL TIME 2 Press or to move the highlight bar down to INTERVAL TIMER then press FAR or NEAR to cycle through the choices Stop when the desired time appears Choose from 15S 30S 1MIN 5MIN or select to turn the function OFF CLOSE MENU 3 Press MENU START DELAYED RECORDING 4 Press the Recording Start Stop button The tally lamp begins blinking and the blink...

Page 31: ...Animation or Time Lapse recording make sure the Animation or Time Lapse mode is deactivated Time Lapse You can record sequentially at preset time spans Leaving the camcorder aimed at a specific subject you can record subtle changes over an extended period of time NOTE Make sure the camcorder is in the Record Standby mode and the recording mode is set to SP before performing the following steps ACC...

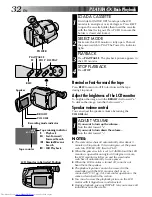
Page 32: ...dial toward If you want to turn down the volume Turn the dial toward NOTES The camcorder shuts off automatically after about 5 minutes in Stop mode To turn on again set the power switch to POWER OFF then to PLAY When the power switch is set to CAMERA and the LCD monitor is opened at an angle of 45 degrees or more the LCD monitor switches on and the viewfinder switches off automatically to save pow...

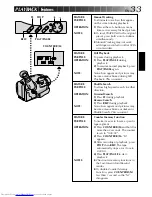
Page 33: ...OSE To allow high speed search in either direction OPERATION Forward Search 1 Press FF during playback Reverse Search 1 Press REW during playback NOTE Noise bars appear and pictures may become monochrome or darken in Shuttle Search This is normal FEATURE Counter Memory Function PURPOSE To make it easier to locate a specific tape segment OPERATION 1 Press COUNTER R M and hold for more than 2 second...

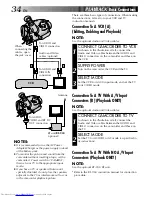
Page 34: ...nectors on the camcorder and those on the TV SELECT MODE 2 Set the TV to its VIDEO or AV mode as specified in its instructions Connection To A TV With NO A V Input Connectors Playback ONLY NOTE Use the optional RF V5U RF unit Refer to the RF V5U instruction manual for connection procedure NOTES It is recommended to use the AC Power Adapter Charger as the power supply instead of the battery pack To...

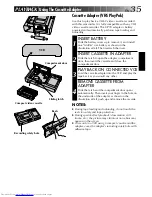
Page 35: ...rtment door PLAY BACK ON CONNECTED VCR 3 Load the cassette adapter into the VCR and play the tape back as you would any other REMOVE CASSETTE FROM ADAPTER 4 Slide the latch and the compartment door opens automatically Then insert your finger in the hole on the underside of the adapter as shown in the illustration at left push up and remove the cassette NOTES During tape loading and unloading do no...

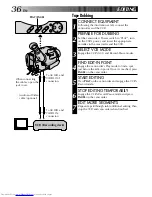
Page 36: ...der s Play mode to find a spot just before the edit in point Once it s reached press PAUSE on the camcorder START EDITING 5 Press PLAY on the camcorder and engage the VCR s Record mode STOP EDITING TEMPORARILY 6 Engage the VCR s Record Pause mode and press PAUSE on the camcorder EDIT MORE SEGMENTS 7 Repeat steps 4 through 6 for additional editing then stop the VCR and camcorder when finished VCR R...

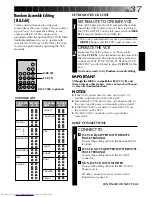
Page 37: ...the VCR The RM V700U cannot be used to operate this camcorder MAKE CONNECTIONS CONNECT TO 1 A JVC VCR EQUIPPED WITH REMOTE PAUSE TERMINAL Connect the editing cable to the Remote PAUSE terminal B JVC VCR NOT EQUIPPED WITH REMOTE PAUSE TERMINAL Connect the editing cable to the R A EDIT connector C NON JVC VCR WITH NEITHER Connect the editing cable to the RM V700U s Pause In jack All other connection...

Page 38: ...that point The data appears under IN on the display REGISTER END OF SCENE 3 Press REW or FF to locate the end of the scene and press IN OUT to register it The data appears under OUT on the display The total time of the registered scene s is displayed at the bottom of the screen REGISTER ADDITIONAL SCENES 4 Repeat steps 2 and 3 for each additional scene as many as 8 MAKE CORRECTIONS 5 Press CANCEL ...

Page 39: ...rder END AUTOMATIC EDITING 3 When all selected scenes have been copied the camcorder and VCR enter the still or pause mode Press STOP on both units To make the R A Edit counter display disappear press R A EDIT When finished editing be sure to disconnect the editing cable and the audio video cable NOTES If you performed step 1 C on page 37 MAKE CONNECTIONS keep the remote control pointed at the VCR...

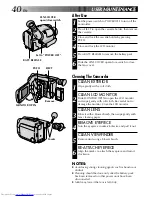
Page 40: ... and wipe gently with soft cloth Be careful not to damage the monitor Close the LCD monitor CLEAN LENS 3 Blow it with a blower brush then wipe gently with lens cleaning paper REMOVE EYEPIECE 4 Turn the eyepiece counterclockwise and pull it out CLEAN VIEWFINDER 5 Remove dust using a blower brush RE ATTACH EYEPIECE 6 Align the marks re attach the eyepiece and turn it clockwise NOTES Avoid using stro...

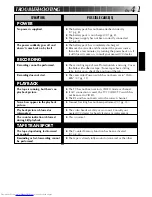
Page 41: ...bs In this case check the position of the tab The camcorder Power switch has not been set to CAM ERA Z pg 15 PLAYBACK The tape is running but there s no playback picture Noise bars appear in the playback picture Playback picture is blurred or interrupted The counter indication is blurred during Still playback The TV has not been set to its VIDEO mode or channel If A V connection is used the TV s V...

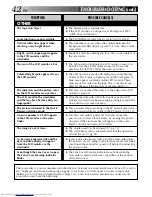
Page 42: ...e object is great It is not a defect of the camcorder Sunlight is directly entering the lens This is not a defect of the camcorder The light used to illuminate the LCD monitor causes it to be hot Close the LCD monitor to turn it off or set the power switch to OFF and let the unit cool down The LCD monitor is made with high precision technology However black spots or bright spots of light red green...

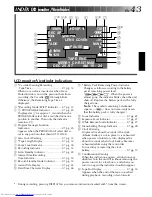
Page 43: ...nit off without removing the power source for a few hours and when you turn it on again the indicator should disappear w Tape End Display Z pg 15 Appears when the end of the tape is reached during playback recording or fast forward INDEX LCD monitor Viewfinder 1 Cassette Warning Remaining Tape Time Z pg 15 When no cassette is inserted or when Erase Protection tab is not in the position that allows...

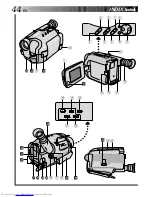
Page 44: ...44EN INDEX Controls y R Q E e 2 4 6 0 3 5 7 9 q w r t s o u i I W P O p Y U T 8 1 a ...

Page 45: ...Button Z pg 39 w R A EDIT Button Z pg 38 e PROGRAM AE Select Dial Z pg 20 r BRIGHT Dial Z pg 32 t VOLUME Dial Z pg 32 Connectors y J terminal JLIP Joint Level Interface Protocol Connector Located beneath the jack cover Connect the Editing Cable when performing Random Assemble Editing Z pg 38 It is used to connect the camcorder to a device such as a personal computer For further detail consult your...

Page 46: ...er Mode pg 21 I Insert Cassette pg 13 Instant Titles pg 25 L LCD monitor Viewfinder indications pg 43 J Journalistic shooting pg 17 M Manual Focus pg 23 MBR Code Setting pg 37 N ND Effect Mode pg 20 P Playback pg 32 Program AE with Special Effects pg 20 Provided Accessories pg 6 Q Quick Review pg 19 R Random Assemble Editing pg 37 39 Recording Advanced Features pg 20 31 Recording pg 15 Recording S...

Page 47: ...r use Temperature Range Specifications Charging 10 C to 35 C Operation 0 C to 40 C Storage 10 C to 30 C NOTES Recharging time is based on room temperature of 20 C The lower the temperature the longer recharging takes When using the AC Power Adapter Charger in areas other than the USA n The provided AC Power Adapter Charger features automatic voltage selection in the AC range from 110 V to 240 V US...

Page 48: ...5 or extremely high above 80 in direct sunlight in a closed car in summer near a heater 4 To protect the unit DO NOT allow it to become wet drop the unit or strike it against hard objects subject it to shock or excessive vibration during transportation keep the lens directed at extremely bright objects for long periods direct the eyepiece of the viewfinder at the sun carry it by holding the viewfi...

Page 49: ...out connector SPECIFICATIONS AUDIO Output 8 dBs 1 k ohm via AUDIO out connector Speaker 20 mm round x 1 monaural AC POWER ADAPTER BATTERY CHARGER AA V11EG Power requirement AC 110 V to 240 V 50 60 Hz Power consumption 23 W Output Charge DC 8 5 V 1 3 A VTR DC 6 3 V 1 8 A Charging system Constant current peak detection timer controlled Dimensions 150 W x 42 H x 68 D mm 5 15 16 x 1 11 16 x 2 11 16 We...

Page 50: ...COPYRIGHT 1997 VICTOR COMPANY OF JAPAN LTD VICTOR COMPANY OF JAPAN LIMITED UM Printed in Japan 0597TOV UN YP GR AXM22UM ...

Reviews: