background image

29

ENGLISH

4

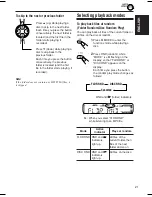
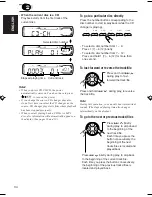
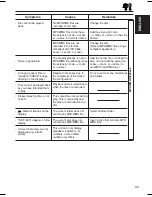
Move the cursor to the next (or
previous) character position.

5

Repeat steps 

3

 and 

4

 until you

finish entering the name.

6

Finish the procedure while the last
selected character is flashing.

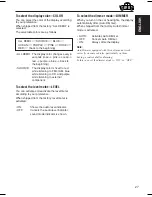
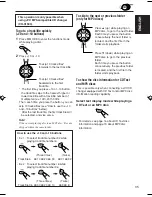
To erase the input characters

To erase all the characters at a time, press and
hold DISP (display) for more than 1 second as
described in the procedure above.

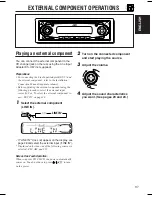
Available characters

Notes:

• When you try to assign a name to the 41st disc,

“NAME FULL” appears on the display. (In this
case, delete unwanted names before assignment.)

• When the CD changer is connected, you can assign

names to CDs in the CD changer. These names can
also be shown on the display if you insert the CDs
in this unit.

Assigning names to the sources

You can assign names to station frequencies and
CDs (both in this unit and in the CD changer).
After assigning a name, it will appear on the
display when you select the source.

Sources

Maximum number

of characters

Station frequencies

Up to 8 characters (up to
30 station frequencies
including both FM and AM)

CDs*

Up to 32 characters (up to
40 discs)

*

You cannot assign a name to CD Text or an MP3/
WMA  disc.

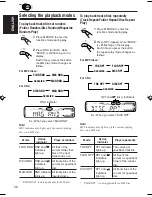
1

Select a source you want to assign a
name to.

When you select a source,
the power automatically
comes on.

2

While pressing DISP (display), press
and hold SEL (select) for more than
2 seconds.

3

Select a character.

• See right column for

available characters.

Ex.: When you select CD as the source

A

B

C

D

E

F

G

H

I

J

K

L

M

N

O

P

Q

R

S

T

U

V

W

X

Y

Z

space

0

1

2

3

4

5

6

7

8

9

/

<

>

EN25_32_KD_SC605[U].P65

9/24/03, 4:49 PM

29

Summary of Contents for GET0188-001A

Page 1: ... connections refer to the separate manual 0 ÿ Ÿ ŸË Õ Ë µË ßÀ π µ µ Èß ËÕ µËÕ SOUND VOL VOL SOURCE R F U D ATT CD RECEIVER CD ËÕß Ëπ CD KD SC605 This unit is equipped with the display demonstration To cancel it see page 8 0 8 ËÕßπ ȵ µ Èß µ ß π πÀπÈ Õ Ÿ µ ËÀπÈ 8 ...

Page 2: ... button on the panel holder using a ball point pen or a similar tool This will reset the built in microcomputer Note Your preset adjustments such as preset channels or sound adjustments will also be erased How to use the M MODE button If you press M MODE the unit goes into functions mode then the number buttons and 5 buttons work as different function buttons Ex When number button 2 works as MO mo...

Page 3: ...FICATIONS 42 Temperature inside the car If you have parked the car for a long time in hot or cold weather wait until the temperature in the car becomes normal before operating the unit How to reset your unit 2 How to use the M MODE button 2 LOCATION OF THE BUTTONS 4 Control panel 4 Remote controller 5 Preparing the remote controller 6 BASIC OPERATIONS 7 Turning on the power 7 Canceling the display...

Page 4: ...eter during play if the level meter is activated see page 27 z Disc information indicators TAG ID3 Tag folder track file x Main display c Source display Volume level indicator v Tr track indicator 1 Remote sensor 2 Control dial 3 SEL select button 4 standby on attenuator button 5 Screw M2 x 5 mm 6 Plate cover and standard plate 7 FM AM button 8 5 up button 10 button 9 0 eject button p 4 buttons q ...

Page 5: ... press the button the source changes 7 Searches for stations while listening to the radio Fast forwards or reverses the track file if pressed and held while listening to a disc Skips to the beginning of the next track file or goes back to the beginning of the current or previous tracks files if pressed briefly while listening to a disc 1 Turns on the unit if pressed when the unit is turned off Tur...

Page 6: ...hing it until you hear a clicking sound Lithium coin battery product number CR2025 Remote sensor WARNING Store the battery in a place where children cannot reach If a child accidentally swallows the battery consult a doctor immediately Do not recharge short disassemble or heat the battery or dispose of it in a fire Doing any of these things may cause the battery to give off heat crack or start a f...

Page 7: ...uce very little noise compared with other sources If the volume level is adjusted for the tuner for example the speakers may be damaged by the sudden increase in the output level Therefore lower the volume before playing a disc and adjust it as required during playback Turning on the power 1 Turn on the power Note on One Touch Operation When you select a source in step 2 below the power automatica...

Page 8: ...splay demonstration before you use the unit for the first time To cancel the display demonstration follow the procedure below 1 Press and hold SEL select for more than 2 seconds so that one of the PSM items appears on the display PSM see pages 25 and 26 2 Select DEMO if not shown on the display 3 Select DEMO OFF 4 Finish the setting To activate the display demonstration repeat the same procedure a...

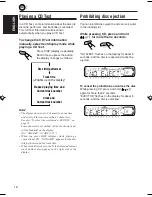
Page 9: ...play mode During tuner operation During disc operation Notes If a name has been assigned to a station it will be shown instead of NO NAME While playing a conventional CD NO NAME appears for the disc title performer and the track title For indication change while playing a CD Text or an MP3 WMA disc see also pages 16 and 19 During external component operation During power off The power turns on and...

Page 10: ...er frequencies When a station is received searching stops To search stations of higher frequencies Selected band appears Lights up when receiving an FM stereo broadcast with sufficient signal strength FM 1 FM 2 FM 3 A M To stop searching before a station is received press the same button you have pressed for searching Searching a station manually Manual search 1 Select the band FM1 3 AM Each time ...

Page 11: ...r becomes monaural but the reception will be improved Storing stations in memory You can use one of the following two methods to store broadcasting stations in memory Automatic preset of FM stations SSM Strong station Sequential Memory Manual preset of both FM and AM stations FM station automatic preset SSM You can preset 6 local FM stations in each FM band FM1 FM2 and FM3 1 Select the FM band FM1...

Page 12: ...ect the number 1 6 for the preset station you want Note You can also use the 5 up or down button on the unit to select the next or previous preset stations Each time you press the 5 up or down button the next or previous preset station is tuned in Manual preset You can preset up to 6 stations in each band FM1 FM2 FM3 and AM manually Ex Storing FM station of 92 5 MHz into the preset number 1 of the...

Page 13: ...stop playback Total playing time of the inserted disc Total track number of the inserted disc Elapsed playing time Current track Notes When a CD is inserted upside down the CD automatically ejects if the control panel is open If the control panel is closed the source changes to the previously selected source PLEASE and EJECT appear alternately on the display If there is no CD in the loading slot y...

Page 14: ...ng of the next tracks is located and played back Press 4 briefly while playing a CD to go back to the beginning of the current track Each time you press the button consecutively the beginning of the previous tracks is located and played back To skip 10 tracks forwards to the last track To skip 10 tracks backwards to the first track To stop play and eject the CD Press 0 CD play stops and the contro...

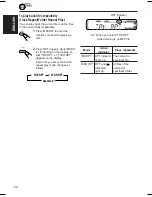
Page 15: ...ff alternately When disc random play is turned on the RND and indicators light up on the display A track randomly selected starts playing RND and disc indicators RPT indicator To play back tracks repeatedly Track Repeat Play You can play back the current track repeatedly 1 Press M MODE to enter the functions mode while playing a CD 2 Press RPT repeat while MODE is still flashing on the display so ...

Page 16: ...ou play a CD Text To change the CD Text information manually select text display mode while playing a CD Text Press DISP display repeatedly Each time you press the button the display changes as follows Notes The display shows up to 8 characters at one time and scrolls if there are more than 8 characters See also To select the scroll mode SCROLL on page 28 Some characters or symbols will not be sho...

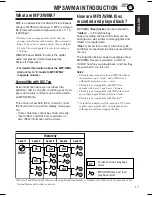
Page 17: ...reviation of Motion Picture Experts Group or MPEG Audio Layer 3 MP3 is simply a file format with a data compression ratio of 1 10 128 Kbps Bit rate is the average number of bits that one second of audio data will consume The unit used is Kbps To get a better audio quality choose a higher bit rate The most popular bit rate for encoding is 128 Kbps WMA Windows Media Audio is the digital audio compre...

Page 18: ...s up depending on the first detected file Notes MP3 WMA discs require a longer readout time It differs due to the complexity of the folder file configuration When playback starts folder and file names or ID3 tags will automatically appears See also page 19 If you change the source or turn the power off disc playback stops without ejecting the disc Next time you select the CD player as the source o...

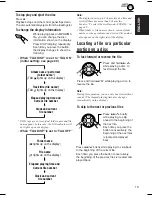
Page 19: ...o To select the scroll mode SCROLL on page 28 When folder or file name is shown current folder number or the indicator and current file number also appear on the right side of the display Locating a file or a particular portion on a disc To fast forward or reverse the file Press and hold 4 while playing a disc to reverse the file Note During this operation you can only hear intermittent sounds The...

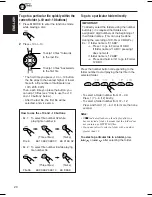
Page 20: ...y after you have selected a folder it means that the folder does not contain any MP3 WMA files You cannot directly select a folder with a number greater than 12 To select a particular file in a folder press or 4 after selecting the folder To go to a particular file quickly within the current folder 10 and 10 buttons 1 Press M MODE to enter the functions mode while playing a disc 2 Press 10 or 10 T...

Page 21: ...ive Plays at random indicator FLDR RND RND and All files of the indicators current folder then light up files of the next folder and so on DISC RND RND and All files on the disc indicators light up To skip to the next or previous folder Note If the folder does not contain any MP3 WMA files it is skipped Press 5 up while playing a disc to skip to the next folder Each time you press the button conse...

Page 22: ...while MODE is still flashing on the display so that TRK RPT or FLDR RPT appears on the display Each time you press the button repeat play mode changes as follows RPT indicator Ex When you select TRK RPT while listening to an MP3 file Mode Active Plays repeatedly indicator TRK RPT RPT indicator The current or lights up specified file FLDR RPT RPT and All files of the indicators current or light up ...

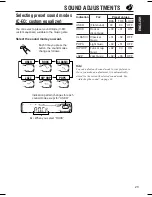
Page 23: ...TRE LOUD USER Flat sound 00 00 OFF ROCK Rock or 03 01 ON disco music CLASSIC Classical 01 02 OFF music POPS Light music 04 01 OFF HIP HOP Funk or rap 02 00 ON music JAZZ Jazz music 02 03 OFF Note You can adjust each sound mode to your preference Once you make an adjustment it is automatically stored for the currently selected sound mode See Adjusting the sound on page 24 Ex When you select ROCK PO...

Page 24: ...the loudness To decrease the level or turn off the loudness Adjusting the sound You can adjust the sound characteristics to your preference 1 Select the item you want to adjust Each time you press the button the adjustable items change as follows Indication To do Range BAS 1 Adjust the bass 06 min 06 max TRE 1 Adjust the treble 06 min 06 max FAD 2 Adjust the front R06 Rear only and rear speaker ba...

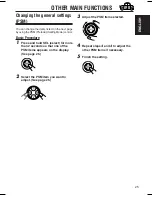
Page 25: ...Preferred Setting Mode control Basic Procedure 1 Press and hold SEL select for more than 2 seconds so that one of the PSM items appears on the display See page 26 2 Select the PSM item you want to adjust See page 26 3 Adjust the PSM item selected 4 Repeat steps 2 and 3 to adjust the other PSM items if necessary 5 Finish the setting ...

Page 26: ...CLOCK M Minute adjustment COLOR Color adjustment LEVEL Level display DIMMER Dimmer mode SCROLL Scroll mode EXT IN External component TAG DISP Tag display AMP GAIN Amplifier gain control Press SEL select to finish the setting Displayed only when one of the following sources is selected FM AM and CD Back Advance TAG OFF TAG ON ONCE TAG ON ON ON OFF 00 1 00 ALL DEMO AUTO 1 3 9 27 27 27 28 28 DEMO ON ...

Page 27: ...l component To select the level meter LEVEL You can activate or deactivate the level meter according to your preference When shipped from the factory level meter is activated ON Shows the audio level indicator OFF Cancels the audio level indicator sound mode indicator is shown To select the dimmer mode DIMMER When you turn on the car head lights the display automatically dims Auto Dimmer When ship...

Page 28: ... PWR while listening at a volume level more than 30 the unit automatically changes the volume level to VOL 30 HIGH PWR You can adjust the volume level from VOL 00 to VOL 50 To select the scroll mode SCROLL You can select the scroll mode for the disc information when the entire text cannot be shown all at once When shipped from the factory scroll mode is set to ONCE ONCE Scrolls only once AUTO Repe...

Page 29: ...display if you insert the CDs in this unit Assigning names to the sources You can assign names to station frequencies and CDs both in this unit and in the CD changer After assigning a name it will appear on the display when you select the source Sources Maximum number of characters Station frequencies Up to 8 characters up to 30 station frequencies including both FM and AM CDs Up to 32 characters ...

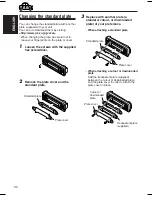
Page 30: ...the supplied hex screwdriver 2 Remove the plate cover and the standard plate Plate cover Standard plate Plate cover Standard plate Plate cover Cutout or downloaded plate Transparent plate supplied 3 Replace with another plate a standard cutout or downloaded plate of your preference When attaching a standard plate When attaching a cutout or downloaded plate Add the transparent plate supplied betwee...

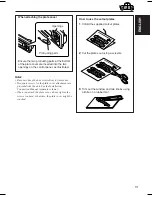
Page 31: ...ng parts at the bottom of the plate cover are inserted into the two openings on the control panel as illustrated Notes Be sure to keep the hex screwdriver for future use Two spare screws for the plate cover attachment are provided with the unit See the Installation Connection Manual separate volume When you attach the plate cover do not tighten the screws too hard otherwise the plate cover might b...

Page 32: ...nnectors with a cotton swab or cloth moistened with alcohol being careful not to damage the connectors Detaching the control panel You can detach the control panel when leaving the car When detaching or attaching the control panel be careful not to damage the connectors on the back of the control panel and on the panel holder Detaching the control panel Before detaching the control panel be sure t...

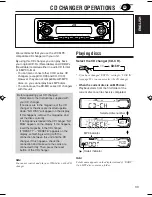
Page 33: ...ries CD changers with this unit Before operating your CD changer Refer also to the Instructions supplied with your CD changer If no discs are in the magazine of the CD changer or the discs are inserted upside down NO DISC will appear on the display If this happens remove the magazine and set the discs correctly If no magazine is loaded in the CD changer NO MAG appears on the display If this happen...

Page 34: ...ecutively the beginning of the next tracks files is located and played back Press 4 briefly during play to skip back to the beginning of the current track file Each time you press the button consecutively the beginning of the previous tracks files is located and played back Press and hold during play to fast forward the track file When the current disc is a CD Playback starts from the first track ...

Page 35: ... information This operation is only possible when using JVC MP3 compatible CD changer CH X1500 To go to a track file quickly 10 and 10 buttons 1 Press M MODE to enter the functions mode while playing a disc 2 Press 10 or 10 The first time you press 10 or 10 button the track file skips to the nearest higher or lower track file with a track file number of multiple ten ex 10th 20th 30th Then each tim...

Page 36: ... play mode changes as follows For MP3 discs For CDs Note MP3 indicator also lights up if the current playing disc is an MP3 disc Canceled DISC RPT TRK RPT RND indicator DISC RPT TRK RPT FLDR RPT Canceled Ex When you select MAG RND Mode Active Plays at random indicator FLDR RND RND and All files of the indicators current folder then light up files of the next folder and so on DISC RND RND and All t...

Page 37: ...rocedure select the external input correctly See To select the external component to use EXT IN on page 28 1 Select the external component LINE IN If LINE IN does not appear on the display see page 28 and select the external input LINE IN Displayed only when one of the following sources is selected FM AM and CD Note on One Touch Operation When you press CD CD CH the power automatically comes on Yo...

Page 38: ... into the loading slot Insert the disc correctly Causes The volume level is set to the minimum level Connections are incorrect The built in microcomputer may have functioned incorrectly due to noise etc Signals are too weak The antenna is not connected firmly Disc is inserted upside down CD R CD RW is not finalized Disc is locked You are driving on rough roads Disc is scratched Connections are inc...

Page 39: ...WMA file although it has the extension code mp3 or wma Readout time varies due to the complexity of the folder file configuration Playback order is determined when the files are recorded This sometimes occurs during play This is caused by how the files are recorded on the disc The current folder does not contain any MP3 WMA file The current disc does not contain any MP3 WMA file This unit can only...

Page 40: ...e magazine Discs are inserted upside down No magazine is loaded in the CD changer This unit is not connected to the CD changer correctly The built in microcomputer may function incorrectly due to noise etc Symptoms NO DISC appears on the display NO MAG appears on the display RESET 8 appears on the display RESET 1 RESET 7 appears on the display The CD changer does not work at all About mistracking ...

Page 41: ...ad their instructions or cautions carefully Use only finalized CD Rs or CD RWs Some CD Rs or CD RWs may not be played back on this unit because of their disc characteristics and for the following reasons Discs are dirty or scratched Moisture condensation on the lens inside the unit The pickup lens inside the unit is dirty CD RWs may require a longer readout time since the reflectance of CD RWs is ...

Page 42: ...ECTION Maximum Power Output Front 50 W per channel Rear 50 W per channel Continuous Power Output RMS Front 19 W per channel into 4 Ω 40 Hz to 20 000 Hz at no more than 0 8 total harmonic distortion Rear 19 W per channel into 4 Ω 40 Hz to 20 000 Hz at no more than 0 8 total harmonic distortion Load Impedance 4 Ω 4 Ω to 8 Ω allowance Tone Control Range Bass 10 dB at 100 Hz Treble 10 dB at 10 kHz Fre...

Page 43: ...F VO WFł d vłd öO u Ë VO d UOKLF 1003KKSFLEJEIN EN CT TH AR 2003 VICTOR COMPANY OF JAPAN LIMITED J VC w d SOUND VOL VOL SOURCE R F U D ATT CD GA l u œ Ò q KD SC605 Ëe UN c Ò Æ W H dE WýUA dF Ý WHOþË UG ô ÆWýUA dF Ý WHOþuÐ œ ...

Page 44: ...ö bFð qLŽ pOKŽ V p l ÆWO U UOJ UJH Ý UM ÊU ÆUNJK 9 w Ë uKF WłUŠ uBjÐ U Ëœ d d VO vł UA Ý eNłô Ÿ u uB UOJK WOð U W JVC dA Ë u W Ëœô cN WŽ Æ O O O O O ÒÒÒÒÒ qOUu ØVO d ULOKFð V qOUu ØVO d ULOKFð V qOUu ØVO d ULOKFð V qOUu ØVO d ULOKFð V qOUu ØVO d ULOKFð V WOzUÐdNJ öOUu WOzUÐdNJ öOUu WOzUÐdNJ öOUu WOzUÐdNJ öOUu WOzUÐdNJ öOUu M l Š b Ë À ð I B O d w b Ë z d J N d Ð U z O W u U w Ð H B q Þ d D U W J U...

Page 45: ...Sleeve ª Õ ÀÿÈ 3 2 Removing the unit Before removing the unit release the rear section 1 Remove the control panel 2 Remove the trim plate 3 Insert the 2 handles into the slots as shown Then while gently pulling the handles away from each other slide out the unit Be sure to keep the handles after installing it 1 Parts list for installation and connection The following parts are provided with this u...

Page 46: ...π ËÕß Ëπ ÕÁ æ æ È π ËÕ µËÕ Õ ª µÕ Ï È KS U57 Ë È ÀÈ È Ÿ ºπ Ÿ Orange with white stripe È To car light control switch µ Ï ÿ ø Õß πµ Ï CAUTION ÈÕ ß To prevent short circuit cover the terminals of the UNUSED leads with insulating tape 0123 ªÈÕß π ß µÈÕßæ π È µ Ë Ë Ë È È È ªæ π ø Twist the core wires when connecting Èπ π æ ËÕ ËÕ µËÕ Solder the core wires to connect them securely ËÕ Èπ π ÈßÀ È È π æ ËÕ ...

Page 47: ...ß Ë ßπ È Õ Ë µËÕ ÿ ª Õ Ë È π ø æß Èß π Èπ π Èπ ÿ ª Õ È À ÀÈ π ø æß À Ë æ ËÕ ÿ µËÕ ÿ ª Õ È æßµ Ÿª æ Ë 3 È À π ø æß π Õß ÿ ªÁπ À Õπ π Ÿª æ Ë 3 ÿ µËÕ ÿ ª Õ Ë È π ø æß Èß π Õß ÿ È À ÿ Ë πË Ë π ø æß π Õß ÿ ªÁπ ÀȪ ºŸÈ πµÏ Õß ÿ Fig 3 Fig 2 Fig 1 L R L R L R WOzUÐdNJ W UD b Ëeð uŠ UNO Mð WOzUÐdNJ W UD b Ëeð uŠ UNO Mð WOzUÐdNJ W UD b Ëeð uŠ UNO Mð WOzUÐdNJ W UD b Ëeð uŠ UNO Mð WOzUÐdNJ W UD b Ëeð uŠ UNO M...

Reviews: