background image

Page 13

March 27, 2001 3:20 pm

BLUE BACK

 — 

ON

/OFF

When this function is set to “ON”, the TV screen becomes all blue 
in the following cases:

When receiving a channel not in use.

When stopping playback.

NOTE:

When you want to receive an unstable channel with poor signals, 
set this function to “OFF”.

2ND AUDIO RECORD

 — ON/

OFF

When this function is set to “ON”;

If a SAP program is received, the SAP audio is recorded on both 
the normal and Hi-Fi tracks. The main audio is not recorded.
If a non-SAP program is received, the main audio is recorded on 
both the Hi-Fi and normal tracks.

When this function is set to “OFF”,

 the SAP audio cannot be 

recorded.

NOTES:

When the channel is changed on the VCR;

The “STEREO” indication appears on the screen for about 
5 seconds if the program is a stereo broadcast.

The “SAP” indication appears on the screen for about 5 seconds 
if the program is a SAP broadcast.

Both indications appear when a stereo program is accompanied 
by SAP sound.

AUDIO MONITOR

 — 

HI-FI

/HI-FI L/HI-FI R/NORM/MIX

This VCR can record two sound tracks simultaneously (normal 
and Hi-Fi) on a Hi-Fi stereo tape. You can select the sound track(s) 
to listen to while playing back a Hi-Fi stereo tape. In addition, 
when playing back a prerecorded tape containing two separate 
audio programs on the Hi-Fi tracks, you can choose either one by 
selecting either “HI-FI L” or “HI-FI R”.

HI-FI

: Normally select this. Hi-Fi sound is played back.

HI-FI L

: Sound on the left Hi-Fi channel is played back.

HI-FI R

: Sound on the right Hi-Fi channel is played back.

NORM

: Sound on the normal track is played back.

MIX

: Both sounds on the Hi-Fi track and normal track are mixed 

and played back.

NOTES:

While playing back a monaural tape, sounds on the normal 
track will be heard regardless of this setting.

If RF connection is used for viewing pictures on the TV, sound 
will be monaural even though you select “HI-FI”.

You can also use the 

AUDIO

 button on the Remote to select the 

desired monitor sound.

Multi-Brand Remote Control

This Remote can control some functions of remote controllable 
TVs, cable boxes or DBS (Direct Broadcast Satellite) receivers 
listed below. Without setting, you can control a JVC TV.

NOTES:

Some unit’s brands have more than one code. If the unit does 
not function with a specified code, try other codes.

Depending on the type of unit, some or all functions cannot be 
operated using this Remote.

It’s not possible to operate a unit not equipped with a remote 
sensor.

It’s not possible to set the Remote for both your cable box and a 
DBS receiver at the same time.

Once you have set the Remote to operate the unit, you do not 
have to set it until you replace the batteries from the Remote.

TV Brand Setting

A

Turn on TV

Turn on the TV using the Power button on the TV or its Remote.

B

Set TV brand code

A

Press and hold 

TV

.

B

Press the 

Number keys

 to enter your TV’s brand code.

C

Press 

OK

, and release 

TV

. The TV should turn off.

C

Operate TV

First, press 

TV

 to set the Remote to TV mode, then press one of the 

following buttons: 

POWER

1

TV/VCR

TV PR+/–

^

 (TV 

Muting), 

TV

%

+/–

 (Volume), and the 

Number keys

.

For some brands, you must press 

ENTER

 after having pressed the 

Number keys

 to enter a channel number.
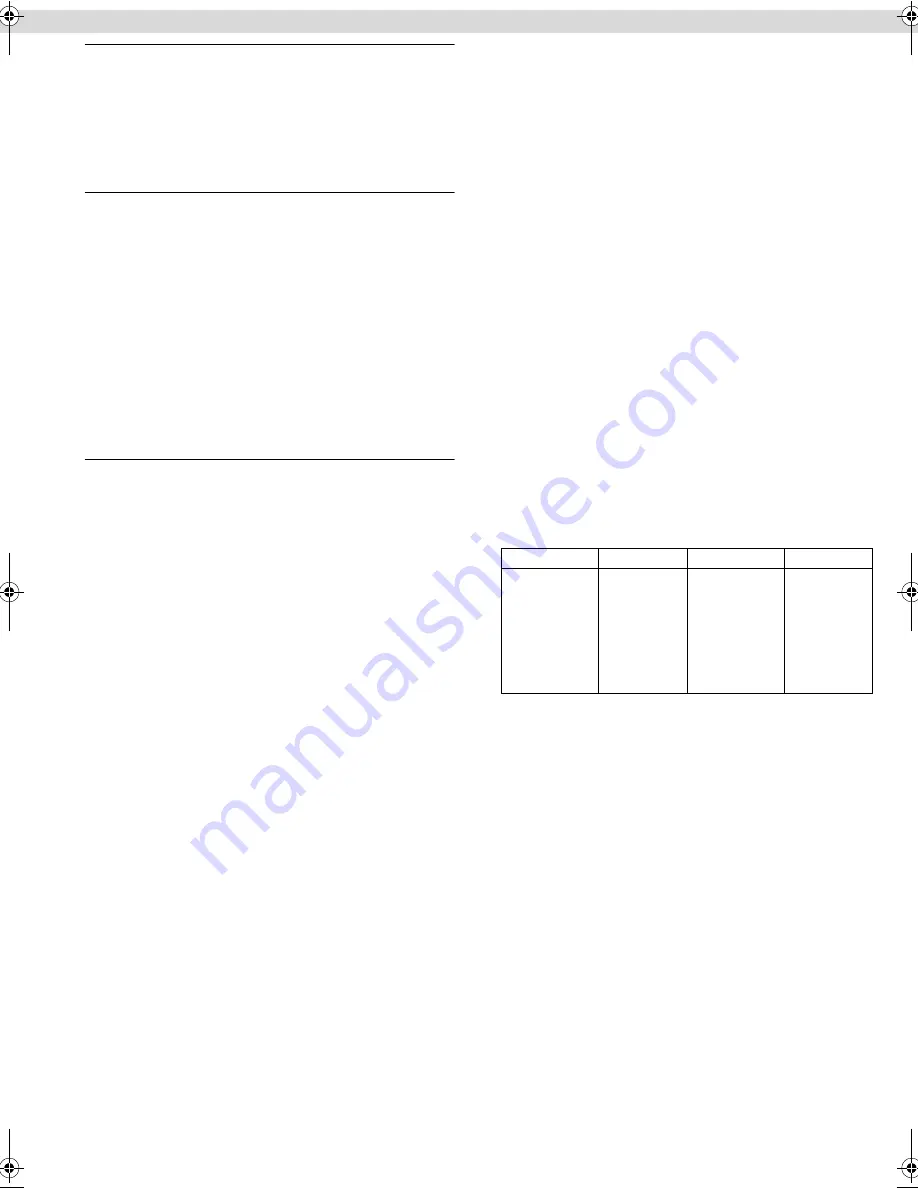
TV BRAND

CODE

TV BRAND

CODE

JVC

CCE

GRADIENTE

GRUNDIG

LG/GOLDSTAR

MITSUBISHI

NEC

NOBLEX

PANASONIC

01

03

02, 11, 12, 16

14

11

08

16

18

13

PHILICO

PHILIPS

RCA

SANYO

SAMSUNG

SHARP

SONY

TOSHIBA

05, 09, 17

03

12

04

10

06

15

07

– Other Functions –

HR-J6008UM-EN.fm  Page 13  Tuesday, March 27, 2001  3:20 PM

Summary of Contents for GEM-RP1CA

Page 1: ...10 220Vd 50 60 Hz with automatic switching Use the conversion plug provided depending on the type of your AC WALL outlet The rating plate and safety caution are on the rear of the unit IMPORTANT It may be unlawful to record or play back copyrighted material without the consent of the copyright owner CAUTION 䡲 When you are not using the VCR for a long period of time it is recommended that you disco...

Page 2: ...r or liquids such as cosmetics or medicines flower vases potted plants cups etc on top of this unit 7 DO NOT place any naked flame sources such as lighted candles on the apparatus 8 AVOID violent shocks to the VCR during transport MOISTURE CONDENSATION Moisture in the air will condense on the VCR when you move it from a cold place to a warm place or under extremely humid conditions just as water d...

Page 3: ...el Rear Panel Cassette loading slot VIDEO AUDIO input connectors Display panel VCR mode indicator Play indicator Record indicator Timer mode indicator Channel and auxiliary input Clock time Remote sensor AC power cord Lithium battery compartment ...

Page 4: ... OK again The indications are not recorded even if the VCR is in the recording mode A Channel and auxiliary input B Day and clock time C STEREO program indication D SAP indication E Audio monitor indications F Time counter G Index number H Tape position I Cassette mark J Tape speed K VCR operation mode L Timer warning display Number keys B E CH125 RECORD THU 12 00 AM PAUSE STEREO WARNING SP SAP TI...

Page 5: ...nection When the VCR is turned off press STOP EJECT 0 on the VCR for more than 5 seconds CH3 appears on the display panel Press PR on the Remote to select CH3 CH4 or CH OFF then press OK If Plug Play or Tuner setting has not previously been performed the Language Select screen appears and Plug Play takes place automatically The VCR channel is preset to CH3 Set to CH4 if CH3 is used for broadcastin...

Page 6: ...B Select language Press rt to move the highlight bar arrow to LANGUAGE then press OK or e repeatedly until the desired language is selected Press MENU to return to normal screen Clock Setting Perform clock setting only if the clock has not been set correctly by the Plug Play setting A Access Main Menu screen then Initial Set screen Press MENU on the Remote Press rt to move the highlight bar arrow ...

Page 7: ...row on the front of the cassette is pointing towards the VCR Do not apply too much pressure when inserting The VCR turns on and the counter on the on screen display is reset automatically If the cassette s record safety tab has been removed playback begins automatically B Start playback Press PLAY 4 MAIN MENU FUNCTION SET TUNER SET INITIAL SET PRESS THEN OK PRESS MENU TO END AUTO CHANNEL SET SCANN...

Page 8: ...ck press and hold PLAY 4 for more than 5 seconds The play indicator on the display panel starts blinking slowly To stop playback press STOP 8 on the Remote or STOP EJECT 0 on the VCR NOTE Pressing PLAY 4 REW 3 FF 5 or PAUSE 9 also stops repeat playback Locating beginning of recordings Index Search Index codes are placed on the tape at the beginning of each recording when recording on this VCR A Wh...

Page 9: ...ing ITR During recording press REC 7 on the VCR repeatedly until the recording length you want appears on the display panel The record indicator 䡬 on the display panel starts blinking Each time you press the button recording length increases in 30 minute intervals up to 6 hours The VCR shuts off after recording is finished To cancel an ITR press STOP 8 on the Remote or STOP EJECT 0 on the VCR Watc...

Page 10: ...LAP appears see Program overlap warning display D Press The VCR turns off automatically and is displayed on the display panel To use the VCR while it is in timer recording standby mode Press then press 1 After you use the VCR press again to put the VCR into timer recording standby mode Checking canceling or changing program settings A Disengage timer Press then press 1 When AUTO TIMER is set to ON...

Page 11: ...nstant Review the tape position indicator appears The position of q in relation to B Beginning or E End shows you where you are on the tape Set SUPERIMPOSE to ON Changing display information Each time you press the display panel shows the channel number and the clock time alternatively You can change display in the stop recording or recording pause mode or during rewind fast forward high speed sea...

Page 12: ...when the VCR is turned off It is temporarily canceled when the VCR is turned on You do not have to press to engage or disengage the timer recording standby mode When this function is set to OFF You have to press to engage or disengage the timer recording standby mode 䡵 SUPERIMPOSE ON OFF When this function is set to ON various VCR status information on screen display appears on the screen NOTE Whe...

Page 13: ...normal track are mixed and played back NOTES While playing back a monaural tape sounds on the normal track will be heard regardless of this setting If RF connection is used for viewing pictures on the TV sound will be monaural even though you select HI FI You can also use the AUDIO button on the Remote to select the desired monitor sound Multi Brand Remote Control This Remote can control some func...

Page 14: ...e the cable box s or DBS receiver s channels press TV PR or the Number keys The PR button can be used to change the VCR s channels only CABLE BOX BRAND CODE ARCHER CABLETENNA CABLEVIEW CITIZEN CURTIS DIAMOND GC BRAND GEMINI GENERAL INSTRUMENTS HAMLIN JASCO JERROLD LG GOLDSTAR NOVAVISION OAK PANASONIC PULSER RCA REGAL REMBRANDT SAMSUNG SCIENTIFIC ATLANTA SIGMA SL MARX SPRUCER STARGATE TAIHAN DEHAN ...

Page 15: ...e remote control code for the Remote DO NOT perform steps B B B B and C C C C Editing You can use your VCR as the playback or recording VCR You can use a camcorder as the playback VCR and your VCR as the recording VCR Refer also to the other components instruction manuals for connection and its operations A Make connections Example When using this VCR as the playback VCR When using this VCR as the...

Page 16: ...es 60 fields Recording Playback system DA 4 Double Azimuth head helical scan system Signal to noise ratio 45 dB Horizontal resolution 230 lines Frequency range Normal audio 70 Hz to 10 000 Hz Hi Fi audio 20 Hz to 20 000 Hz Input Output RCA connectors IN x 1 OUT x 1 TUNER Tuning system Frequency synthesized tuner Channel coverage VHF Channels 2 13 UHF Channels 14 69 CATV 113 Channels RF output Chan...

Reviews: