background image

10

GETTING STARTED

CONNECTING TO PC

You can transfer MP3 and WMA format music files from the PC to your 
Digital Audio Player through USB port. USB2.0 (480Mbps speed is not 
supported.)

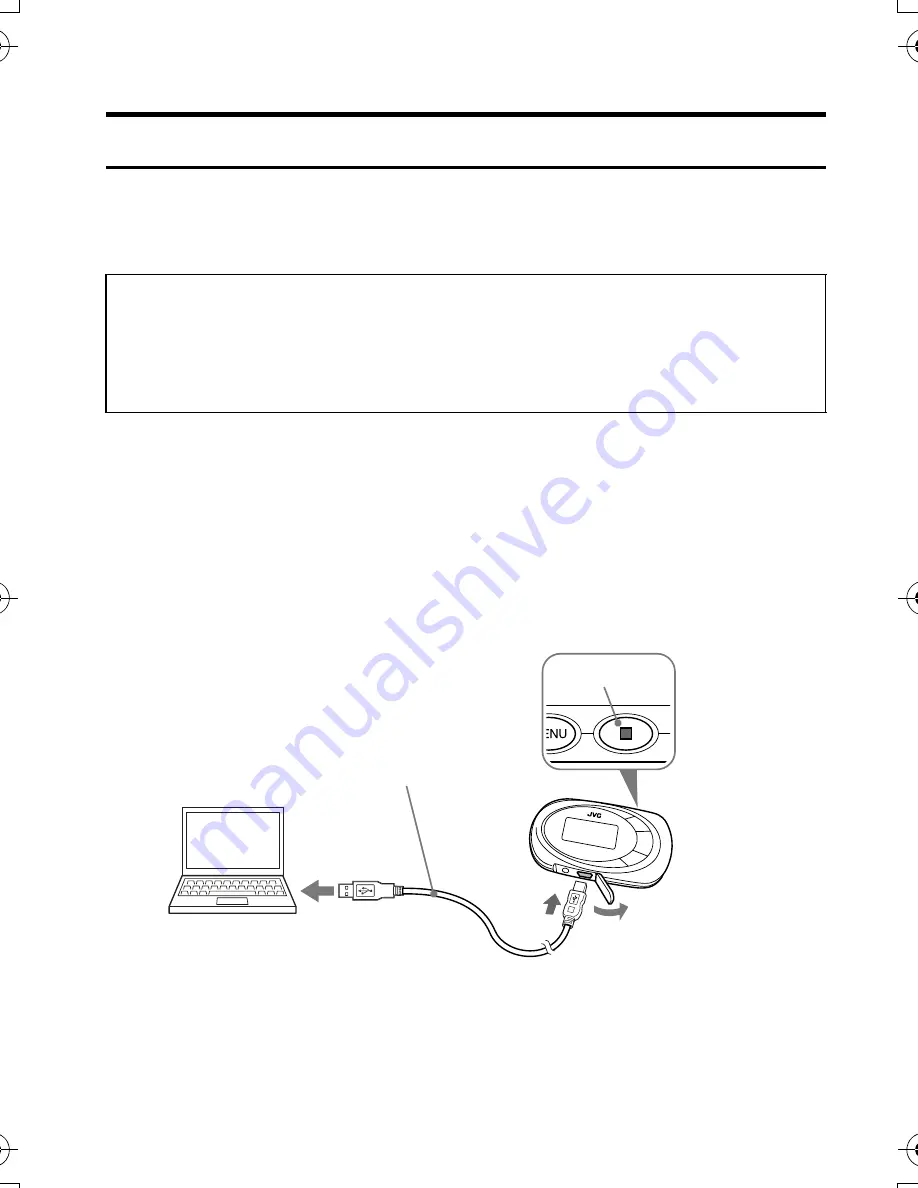
Connecting Digital Audio Player to PC

1.

Make sure that the player is turned off.
(Press and hold 

7

 button.)

2.

Open the cover of the USB connector.

3.

Connect the player to the USB port on your PC using USB cable.
"USB Connected" appears on the display, and the connection is 
completed.

For Windows 98SE user:

Before connecting your player to the computer for the first time, you 
need to install the USB driver from the supplied CD-ROM into your 
computer. For details, see "INSTALLING USB DRIVER (FOR 
WINDOWS 98SE ONLY)" on page 8.

2

1

3

3

USB cable (supplied)

LVT1542-004A[J_E_EV]_Eng.book  Page 10  Monday, February 6, 2006  9:38 AM

Summary of Contents for F107B - 1 GB Digital Player

Page 1: ...A F107A B H P R S Thank you for purchasing this JVC product Please read these instructions carefully before starting operation to be sure to obtain optimum performance and a longer service life from the unit LVT1542 004A J E EV INSTRUCTIONS ...

Page 2: ...has been damaged in any way liquid has been spilled or objects have fallen into the apparatus the apparatus has been exposed to rain or moisture does not operate normally or has been dropped IMPORTANT SAFETY INSTRUCTIONS For qualified service personnel only CAUTION Danger of explosion if battery is incorrectly replaced Replace only with the same or equivalent type These servicing instructions are ...

Page 3: ...ment off and on the user is encouraged to try to correct the interference by one or more of the following measures Reorient or relocate the receving antenna Increase the separation between the equipment and receiver Connect the equipment into an outlet on a circuit different from that to which the receiver is connected Consult the dealer or an experienced radio TV technician for help For U S A For...

Page 4: ... Do not play your Headphones at a high volume Hearing experts advise against continuous extended play If you experience a ringing in your ears reduce volume or discontinue use Do not use while operating a motorized vehicle It may create traffic hazard and is illegal in many areas You should use extreme caution or temporarily discontinue use in potentially hazardous situations Even if your Headphon...

Page 5: ...or discolor the player and may also cause malfunctioning CAUTION Do not place any naked flame sources such as lighted candles on the apparatus We have no responsibility for any improper recording or playback incurred by equipment malfunction It is recommended to store backup copy of your important data in your PC or the like ...

Page 6: ... negative effects on the environment and human health which could otherwise be caused by inappropriate waste handling of this product For more information about collection point and recycling of this product please contact your local municipal office your household waste disposal service or the shop where you purchased the product Penalties may be applicable for incorrect disposal of this waste in...

Page 7: ...OVERVIEW 16 BASIC OPERATIONS 17 USING THE MAIN MENU 17 PLAYING MUSIC 18 NAVIGATE 19 RECORDING MUSIC FROM EXTERNAL AUDIO EQUIPMENT IN LINE IN MODE 21 DELETING FILES 23 ADVANCED FEATURES 24 SET MENU ITEMS 24 EQUALIZER 24 PLAYMODE 26 SLEEP TIMER 28 AUTO POWER OFF 29 BACKLIGHT 30 CONTRAST 31 RECORD SET 32 LANGUAGE 34 ABOUT 35 RESETTING THE UNIT 36 LOCKING BUTTONS HOLD 37 DISPOSING OF THE DIGITAL AUDIO...

Page 8: ...l the driver from the CD ROM On a screen to search for the location of the Digital Audio Player s driver click the Browse button and select CD ROM drive and then proceed to the next screen 4 Be sure that the installation completion screen appears 5 Reboot the PC If you are using Windows XP Me or 2000 you do not need to install the USB driver on the CD ROM GETTING STARTED Make sure that no programs...

Page 9: ...5 hours to fully charge an empty battery When your PC is in standby mode the battery cannot be charged The player cannot be operated while it is being charged Battery indicator The battery indicator shows the remaining battery level When the battery level becomes low Low Battery appears on the display In this case you need to charge the battery NOTES Notes on the built in battery To replace the ba...

Page 10: ...f Press and hold 7 button 2 Open the cover of the USB connector 3 Connect the player to the USB port on your PC using USB cable USB Connected appears on the display and the connection is completed For Windows 98SE user Before connecting your player to the computer for the first time you need to install the USB driver from the supplied CD ROM into your computer For details see INSTALLING USB DRIVER...

Page 11: ...ow the on screen instructions For Windows 98SE users Open My Computer and select Removable Disk then right click to select EJECT The player supports MP3 ID3 V1 0 1 1 tags ID3 V2 3 tags and WMA tags ID3 tags and WMA tags are the data including music names and artist names recorded in MP3 files and WMA files When the player is connected to the PC it is recognized as an external USB memory removable ...

Page 12: ... PLAYER 1 Display 2 4 Reverse button 3 3 8 Play Pause button 4 Forward button 5 LINE IN jack 6 USB connector 7 Headphone jack 8 Hole for strap 9 Hold switch 0 Reset switch 7 Stop button MENU button REC button VOL Volume buttons 8 9 0 1 2 3 4 5 6 7 ...

Page 13: ...njoy listening to music anywhere you go without having to worry about the cables 1 Insert the supplied strap through the hole of the player and loop it through itself If you have difficulty in inserting the strap into the hole use a thin sharp tool to push it through 2 Insert the Neck Strap Headphones plug into the headphone jack of the player 3 Adjust the positions of the silver slider on the Nec...

Page 14: ...k bring each earphone from the behind your neck and place in the each ear respectively You can also adjust the position of the silver slider according to your preference Be sure to read the separate sheet Precautions for Use of the Neck Strap Headphones for its safety information NOTE ...

Page 15: ...TING STARTED TURNING POWER ON OFF To turn power ON Press and hold 3 8 button till Welcome appears After a while the following screen appears To turn power OFF Press and hold 7 Stop button AUDIO PLAYER DIGITAL ...

Page 16: ...nes of the file information are long the top line is scrolled first and then the bottom line is scrolled 1 Play indicator 2 Volume level 3 Play mode indicator 4 EQ sound mode 5 Sleep Timer icon 6 Lock icon 7 Battery indicator 8 Track number Total number of tracks 9 File information 0 Track time Mode indicator MUSIC mode ...

Page 17: ...splay about the player See page 35 NAVIGATE mode Select to easily search for the desired music See page 19 RESET mode Select to reset the settings you have made See page 36 LINE IN mode Select to record music MP3 file from external audio equipment See page 21 SET mode Select to set advanced settings See pages 24 to 34 DELETE mode Select to delete files See page 23 MAIN MENU MUSIC ...

Page 18: ...8 button To select track During playback or in stop mode press 4 button To fast forward reverse track During playback press and hold 4 button If no audio files are stored NO FILES appears When the player is turned off in stop mode or during playback and then turned on again it will resume playback from the beginning of the track lastly played when you start playback The menu mode returns to the pr...

Page 19: ...t mode 2 Press 4 3 8 7 buttons to locate the desired file 4 Moves the cursor highlight vertically The cursor scrolls through the files and folders in the selected folder 3 8 7 1 Move the cursor to the desired folder and press 3 8 button to open it Then the files in the folder can be selected 2 When the cursor is inside the folder press 7 button to close the folder Then the hierarchical structure a...

Page 20: ...one Maximum number of folders that can be recognized by the player is 50 Maximum number of hierarchies that can be recognized by the player is 8 including the highest order folders You can change the playback order of music files by adding numbers at the head of folder names or file names on PC For example add numbers like 01xxxx 02yyyy The maximum number of files WMA MP3 and WAV files that can be...

Page 21: ...on the player press MENU button and 4 button to select LINE IN mode from Main menu and then press 3 8 button to enter that mode 2 Press and hold REC button until Recording appears The player is paused the counter is stopped 3 Play the music source on the external audio equipment The player automatically detects the sound starts recording of the music and numbers each track The default recording se...

Page 22: ...his mode It is recommended to use a fully charged battery if you continue to record the music for many hours in this mode AUTO LEVEL CONTROL ALC The player is equipped with Auto Level Control ALC to control distortion during recording When the output level from external audio equipment is too high the ALC automatically activates to control the recording level which can reduce distortion When you p...

Page 23: ...tion select NO 6 Press 3 8 button to delete the file File Deleted appears If you try to delete a read only file Operation Failed appears Each time you press 7 button the status switches between YES and NO To return to DELETE menu Press MENU button once To exit DELETE mode Press MENU button again or select EXIT and press 3 8 button in DELETE submenu When all files in a folder are deleted the folder...

Page 24: ... relevant later page EQUALIZER You can select from one of 6 different preset sound modes or one customized sound mode Types of sound modes ADVANCED FEATURES NORMAL No sound effect applies CLASSICAL Good for classical music JAZZ Good for jazz music ROCK Boosts low and high frequency POP Good for vocal music BASS Empowers bass sound CUSTOMIZED You can create your own sound mode Low High Level High L...

Page 25: ...on to enter that mode 2 Press 4 button to select EQ SET 3 Press 3 8 button 4 Press 4 button to select CUST 5 Press MENU button briefly to start editing The indicator of the lowest frequency is highlighted 6 Press 4 button to select the frequency you want to edit 7 Press 3 8 button The indicator starts to blink 8 Press 4 button to set the level up or down and then press 3 8 button to store it 9 Rep...

Page 26: ...yed back or repeats all tracks of a folder which has a track selected in NAVIGATE mode RANDOM Plays all tracks in random order RANDOM RPT Repeats all tracks in random order RND FOLDER Repeats all tracks of a folder which has a track being played back or plays all tracks of a folder which has a track selected in NAVIGATE mode in random order INTRO Plays first 10 seconds for each tracks When all tra...

Page 27: ... to select SET mode from Main Menu and then press 3 8 button to enter that mode 2 Press 4 button to select PLAYMODE 3 Press 3 8 button 4 Press 4 button to select the play mode 5 Press 3 8 button to return to SET MENU To exit SET mode Press MENU button or select EXIT and press 3 8 button in the SET MENU ...

Page 28: ...the sleep timer is set the sleep timer icon appears on the upper right of the display To set sleep timer 1 After turning on the player press MENU button and 4 button to select SET mode from Main Menu and then press 3 8 button to enter that mode 2 Press 4 button to select SLEEP TIMER 3 Press 3 8 button 4 Press 4 button to select the time 5 Press 3 8 button to return to SET MENU To exit SET mode Pre...

Page 29: ...OFF default To set auto power off 1 After turning on the player press MENU button and 4 button to select SET mode from Main Menu and then press 3 8 button to enter that mode 2 Press 4 button to select A POWER OFF 3 Press 3 8 button 4 Press 4 button to select the time 5 Press 3 8 button to return to SET MENU To exit SET mode Press MENU button or select EXIT and press 3 8 button in the SET MENU ...

Page 30: ...ng on the player press MENU button and 4 button to select SET mode from Main Menu and then press 3 8 button to enter that mode 2 Press 4 button to select BACKLIGHT 3 Press 3 8 button 4 Press 4 button to select the time 5 Press 3 8 button to return to SET MENU To exit SET mode Press MENU button or select EXIT and press 3 8 button in the SET MENU When Low Battery appears backlighting goes out and af...

Page 31: ... MENU button and 4 button to select SET mode from Main Menu and then press 3 8 button to enter that mode 2 Press 4 button to select CONTRAST 3 Press 3 8 button 4 Press 4 button to select the level 5 Press 3 8 button to return to SET MENU To exit SET mode Press MENU button or select EXIT and press 3 8 button in the SET MENU ...

Page 32: ... from Main menu and then press 3 8 button to enter that mode 2 Press 4 button to select RECORD SET 3 Press 3 8 button 4 Press 4 button to select item Bit Rate or A TRK 5 Press 3 8 button to select the desired content from the selected item 6 Repeat the steps from 4 to 5 as necessary 7 Press MENU button to return to the SET MENU Source LINE Encode MP3 Stereo Bit Rate 96kbps 128kbps 160kbps A TRK ON...

Page 33: ...k When the music starts the A TRK starts recording and when the music stops the A TRK detects silence and the player pauses When OFF is selected no track is detected and recording doesn t stop if the player is in silent state When silent state continues for 3 seconds or more in LINE IN mode the A TRK judges this state as a turn of the track and the track is divided The track therefore is not divid...

Page 34: ...g on the player press MENU button and 4 button to select SET mode from Main Menu and then press 3 8 button to enter that mode 2 Press 4 button to select LANGUAGE 3 Press 3 8 button 4 Press 4 button to select the language 5 Press 3 8 button to return to SET MENU To exit SET mode Press MENU button or select EXIT and press 3 8 button in the SET MENU When Simplified Chinese or Traditional Chinese is s...

Page 35: ...er press MENU button and 4 button to select ABOUT mode from Main Menu and then press 3 8 button to enter that mode To exit ABOUT mode Press MENU button Upgrading firmware version To upgrade the firmware of your player please visit our website Amount of memory installed Available memory space to store further music files ...

Page 36: ...mode from Main Menu and then press 3 8 button to enter that mode 2 Press 3 8 button to reset the unit All the settings are reset and RESET OK appears To cancel and exit RESET mode Press MENU button Default value of each SET MENU item EQ SET Normal PLAYMODE Normal SLEEP TIMER OFF A POWER OFF OFF BACKLIGHT 5 Sec CONTRAST Factory set level RECORD SET Bit Rate 128kbps A TRK ON LANGUAGE ENGLISH ...

Page 37: ...ppears in the upper right of the display To unlock Slide the HOLD switch to the left When the player is turned on with the HOLD switch set to ON position HOLD appears after the initial message DIGITAL AUDIO PLAYER Then the player automatically shuts off To use the player set the HOLD switch to OFF position and turn on the player again NOTE ...

Page 38: ...pacts Shorting the poles may cause heating bursting or start a fire Do not store the built in battery with a metal necklace or hairpin in a pocket Shorting the poles may cause heating bursting or start a fire Do not heat disassemble modify the built in battery or throw it into water or fire Bursting ignition or heat may cause a fire or injury Do not leave the built in battery near fire or in direc...

Page 39: ...n the side of the LINE IN jack with a screwdriver 4 Remove the top half of the casing by lifting it up 5 Remove the three screws shown in the illustration below 6 Hold the part shown in the illustration below and turn the circuit board over ...

Page 40: ...tery and place it in a plastic bag Using insulating tape cover each of the wires and stick them to the built in battery to prevent them from touching each other and place it in a plastic bag To replace the battery consult your dealer or JVC Service Center Do not reuse the battery once it has been removed The battery is designated recyclable Please follow your local recycling regulations NOTES ...

Page 41: ...d the end of its life Consult the JVC Service Center and replace it with a new one if necessary The player suddenly stops working Press the reset switch by inserting a thin object for example a pin or a straightened paperclip into the hole on the back of the player to turn the unit off and then turn the player back on Files and settings stored in the memory will not be deleted The display is too d...

Page 42: ...ng CD ROM supplied SPECIFICATIONS Model Name XA F107 XA F57 Type Digital audio player Built in memory size 1 GB 512 MB Display LCD with backlighting 4 line display Music playback format MP3 WMA WMA DRM 1 Bit rate MP3 8 kbps to 320 kbps WMA 32 kbps to 192 kbps Maximum number of tracks 2 Approx 500 Approx 250 Frequency response 60 Hz to 20 kHz 0 dB to 3 dB Audio Output terminal Headphones stereo min...

Page 43: ...43 SPECIFICATIONS ACCESSORIES Neck Strap Headphones USB cable CD ROM USB Driver for Windows 98SE Audio cable ...

Page 44: ... 2006 Victor Company of Japan Limited EN 0206KMMCREBET ...

Page 45: ...W XA F107A B P S Thank you for purchasing this JVC product Please read these instructions carefully before starting operation to be sure to obtain optimum performance and a longer service life from the unit LVT1542 002A US INSTRUCTIONS ...

Page 46: ...ved by JVC could void the user s authority to operate the equipment Player No altering or remodeling This can cause malfunctioning No dropping or strong impacts This may damage the player Locations to be avoided Avoid using the player in the following locations since they can cause malfunctioning 1 Bathrooms and other moisture prone places 2 Warehouses and other dusty places 3 Very hot places near...

Page 47: ...ones are an open air type designed to let you hear outside sounds do not turn up the volume so high that you cannot hear what is around you Once you have established a comfortable sound level leave the level there Do not leave the player exposed to direct sunlight for long periods of time This may deform or discolor the player and may also cause malfunctioning CAUTION Do not place any naked flame ...

Page 48: ...S 15 USING THE MAIN MENU 15 PLAYING MUSIC 16 RECORDING VOICE MESSAGES 17 PLAYING MESSAGES 18 LISTENING TO FM BROADCASTS 19 RECORDING FM BROADCASTS 21 NAVIGATE 22 RECORDING MUSIC FROM EXTERNAL AUDIO EQUIPMENT IN LINE IN MODE 24 DELETING FILES 26 ADVANCED FEATURES 27 SET MENU ITEMS 27 EQUALIZER 28 PLAYMODE 30 SLEEP TIMER 32 AUTO POWER OFF 33 BACKLIGHT 34 CONTRAST 35 RECORD SET 36 LANGUAGE 38 ABOUT 3...

Page 49: ...5 TABLE OF CONTENTS TROUBLESHOOTING 45 SPECIFICATIONS 46 ACCESSORIES 47 ...

Page 50: ...l the driver from the CD ROM On a screen to search for the location of the Digital Audio Player s driver click the Browse button and select CD ROM drive and then proceed to the next screen 4 Be sure that the installation completion screen appears 5 Reboot the PC If you are using Windows XP Me or 2000 you do not need to install the USB driver on the CD ROM GETTING STARTED Make sure that no programs...

Page 51: ...5 hours to fully charge an empty battery When your PC is in standby mode the battery cannot be charged The player cannot be operated while it is being charged Battery indicator The battery indicator shows the remaining battery level When the battery level becomes low Low Battery appears on the display In this case you need to charge the battery NOTES Notes on the built in battery To replace the ba...

Page 52: ...f Press and hold 7 button 2 Open the cover of the USB connector 3 Connect the player to the USB port on your PC using USB cable USB Connected appears on the display and the connection is completed For Windows 98SE user Before connecting your player to the computer for the first time you need to install the USB driver from the supplied CD ROM into your computer For details see INSTALLING USB DRIVER...

Page 53: ...he on screen instructions For Windows 98SE users Open My Computer and select Removable Disk then right click to select EJECT The player supports MP3 ID3 V1 0 1 1 tags ID3 V2 3 tags and WMA tags ID3 tags and WMA tags are the data including music names and artist names recorded in MP3 files and WMA files When the player is connected to the PC it is recognized as an external USB memory removable disk...

Page 54: ...LAYER 1 Display 2 4 Reverse button 3 3 8 Play Pause button 4 Forward button 5 LINE IN jack 6 USB connector 7 Headphone jack 8 MIC 9 Hole for strap 0 Hold switch Reset switch 7 Stop button MENU button REC button VOL Volume buttons 9 0 1 2 3 4 5 6 7 8 ...

Page 55: ...njoy listening to music anywhere you go without having to worry about the cables 1 Insert the supplied strap through the hole of the player and loop it through itself If you have difficulty in inserting the strap into the hole use a thin sharp tool to push it through 2 Insert the Neck Strap Headphones plug into the headphone jack of the player 3 Adjust the positions of the silver slider on the Nec...

Page 56: ...k bring each earphone from the behind your neck and place in the each ear respectively You can also adjust the position of the silver slider according to your preference Be sure to read the separate sheet Precautions for Use of the Neck Strap Headphones for its safety information NOTE ...

Page 57: ...n power OFF Press and hold 7 Stop button When the player is turned on it resumes the mode it was in when it was last turned off The settings you have made and preset FM stations are stored in the player when you turn off the player It is recommended to turn off the player once when you change the setting or preset FM stations NOTES AUDIO PLAYER DIGITAL ...

Page 58: ...irst and then the bottom line is scrolled 1 Play indicator 2 Volume level 3 Play mode indicator 4 EQ sound mode 5 Sleep Timer icon 6 Lock icon 7 Battery indicator 8 Track number Total number of tracks 9 File information 0 Track time Mode indicator FM mode indicator Antenna icon Mono Stereo indicator Preset number Current status of the FM mode Frequency MUSIC mode VOICE mode FM mode ...

Page 59: ...FM broadcast See pages 17 18 and 21 ABOUT mode Select to display about the player See page 39 FM mode Select to listen to and record FM broadcast See pages 19 to 21 RESET mode Select to reset the settings you have made See page 40 NAVIGATE mode Select to easily search for the desired music See page 22 SET mode Select to set advanced settings See pages 27 to 38 LINE IN mode Select to record music M...

Page 60: ...track During playback or in stop mode press 4 button To fast forward reverse track During playback press and hold 4 button To exit MUSIC mode Press MENU button If no audio files are stored NO FILES appears When the player is turned off in stop mode or during playback and then turned on again it will resume playback from the beginning of the track lastly played when you start playback The menu mode...

Page 61: ...essages Refer to PLAYING MESSAGES on page 18 To exit VOICE mode Press MENU button The recorded voice track is converted into monaural WAV files The VOICE folder is automatically generated and the files are stored in it If Low Battery appears when you press and hold REC button it is recommended to replace the battery with new one During playback the recorded files are sorted and treated as the FM f...

Page 62: ...mode 2 Press 3 8 button To stop Press 7 button To pause Press 3 8 button To select messages Press 4 button To fast forward reverse message Press and hold 4 button To exit VOICE mode Press MENU button When the player is turned off in stop mode or during playback and then turned on again it will resume playback from the beginning of the track lastly played when you start playback If no voice files a...

Page 63: ...o preset Nos P01 to P20 1 After turning on the player press MENU button and 4 button to select FM mode from Main Menu and then press 3 8 button to enter that mode 2 Press 7 button to enter scan mode Scan appears 3 Press and hold 3 8 button and then release it A Scan appears and automatic scanning starts After completion the player enters radio mode To exit scan mode Press MENU button To switch bet...

Page 64: ...rn to scan mode 5 Press 4 button to select the desired preset No you want to store 6 Press 3 8 button to store the station The player enters radio mode Radio appears 7 Repeat Steps 2 to 7 to continue preset operation To tune to preset station Radio mode You can listen to up to 20 preset stations Before use you need to preset stations in scan mode 1 After turning on the player press MENU button and...

Page 65: ...FM mode Press MENU button The recorded music from FM broadcast station is converted into stereo WAV files The FM folder is automatically generated and the files are stored in it If Low Battery appears when you press and hold REC button it is recommended to replace the battery with new one During playback the recorded files are sorted and treated as the FM files and voice files During recording vol...

Page 66: ...t mode 2 Press 4 3 8 7 buttons to locate the desired file 4 Moves the cursor highlight vertically The cursor scrolls through the files and folders in the selected folder 3 8 7 1 Move the cursor to the desired folder and press 3 8 button to open it Then the files in the folder can be selected 2 When the cursor is inside the folder press 7 button to close the folder Then the hierarchical structure a...

Page 67: ...one Maximum number of folders that can be recognized by the player is 50 Maximum number of hierarchies that can be recognized by the player is 8 including the highest order folders You can change the playback order of music files by adding numbers at the head of folder names or file names on PC For example add numbers like 01xxxx 02yyyy The maximum number of files WMA MP3 and WAV files that can be...

Page 68: ...on the player press MENU button and 4 button to select LINE IN mode from Main menu and then press 3 8 button to enter that mode 2 Press and hold REC button until Recording appears The player is paused the counter is stopped 3 Play the music source on the external audio equipment The player automatically detects the sound starts recording of the music and numbers each track The default recording se...

Page 69: ... faster in this mode It is recommended to use a fully charged battery if you continue to record the music for many hours in this mode AUTO LEVEL CONTROL ALC The player is equipped with Auto Level Control ALC to control distortion during recording When the output level from external audio equipment is too high the ALC automatically activates to control the recording level which can reduce distortio...

Page 70: ...ES To cancel the operation select NO 6 Press 3 8 button to delete the file File Deleted appears If you try to delete a read only file Operation Failed appears Each time you press 7 button the status switches between YES and NO To return to DELETE menu Press MENU button once To exit DELETE mode Press MENU button again or select EXIT and press 3 8 button in DELETE submenu When all files in a folder ...

Page 71: ...T mode you can set the following SET MENU items EQ SET Equalization Set PLAYMODE SLEEP TIMER A POWER OFF Auto Power OFF BACKLIGHT CONTRAST RECORD SET and LANGUAGE To set each item see the relevant later page ADVANCED FEATURES ...

Page 72: ...customized sound mode Types of sound modes NORMAL No sound effect applies CLASSICAL Good for classical music JAZZ Good for jazz music ROCK Boosts low and high frequency POP Good for vocal music BASS Empowers bass sound CUSTOMIZED You can create your own sound mode Low High Level High Low Frequency ...

Page 73: ...on to enter that mode 2 Press 4 button to select EQ SET 3 Press 3 8 button 4 Press 4 button to select CUST 5 Press MENU button briefly to start editing The indicator of the lowest frequency is highlighted 6 Press 4 button to select the frequency you want to edit 7 Press 3 8 button The indicator starts to blink 8 Press 4 button to set the level up or down and then press 3 8 button to store it 9 Rep...

Page 74: ...ks of a folder which has a track being played back or repeats all tracks of a folder which has a track selected in NAVIGATE mode RANDOM Plays all tracks in random order RANDOM RPT Repeats all tracks in random order RND FOLDER Repeats all tracks of a folder which has a track being played back or plays all tracks of a folder which has a track selected in NAVIGATE mode in random order INTRO Plays fir...

Page 75: ... to select SET mode from Main Menu and then press 3 8 button to enter that mode 2 Press 4 button to select PLAYMODE 3 Press 3 8 button 4 Press 4 button to select the play mode 5 Press 3 8 button to return to SET MENU To exit SET mode Press MENU button or select EXIT and press 3 8 button in the SET MENU ...

Page 76: ...the sleep timer is set the sleep timer icon appears on the upper right of the display To set sleep timer 1 After turning on the player press MENU button and 4 button to select SET mode from Main Menu and then press 3 8 button to enter that mode 2 Press 4 button to select SLEEP TIMER 3 Press 3 8 button 4 Press 4 button to select the time 5 Press 3 8 button to return to SET MENU To exit SET mode Pre...

Page 77: ...OFF default To set auto power off 1 After turning on the player press MENU button and 4 button to select SET mode from Main Menu and then press 3 8 button to enter that mode 2 Press 4 button to select A POWER OFF 3 Press 3 8 button 4 Press 4 button to select the time 5 Press 3 8 button to return to SET MENU To exit SET mode Press MENU button or select EXIT and press 3 8 button in the SET MENU ...

Page 78: ...ng on the player press MENU button and 4 button to select SET mode from Main Menu and then press 3 8 button to enter that mode 2 Press 4 button to select BACKLIGHT 3 Press 3 8 button 4 Press 4 button to select the time 5 Press 3 8 button to return to SET MENU To exit SET mode Press MENU button or select EXIT and press 3 8 button in the SET MENU When Low Battery appears backlighting goes out and af...

Page 79: ... MENU button and 4 button to select SET mode from Main Menu and then press 3 8 button to enter that mode 2 Press 4 button to select CONTRAST 3 Press 3 8 button 4 Press 4 button to select the level 5 Press 3 8 button to return to SET MENU To exit SET mode Press MENU button or select EXIT and press 3 8 button in the SET MENU ...

Page 80: ... from Main menu and then press 3 8 button to enter that mode 2 Press 4 button to select RECORD SET 3 Press 3 8 button 4 Press 4 button to select item Bit Rate or A TRK 5 Press 3 8 button to select the desired content from the selected item 6 Repeat the steps from 4 to 5 as necessary 7 Press MENU button to return to the SET mode Source LINE Encode MP3 Stereo Bit Rate 96kbps 128kbps 160kbps A TRK ON...

Page 81: ...k When the music starts the A TRK starts recording and when the music stops the A TRK detects silence and the player pauses When OFF is selected no track is detected and recording doesn t stop if the player is in silent state When silent state continues for 3 seconds or more in LINE IN mode the A TRK judges this state as a turn of the track and the track is divided The track therefore is not divid...

Page 82: ...ayer press MENU button and 4 button to select SET mode from Main Menu and then press 3 8 button to enter that mode 2 Press 4 button to select LANGUAGE 3 Press 3 8 button 4 Press 4 button to select the language 5 Press 3 8 button to return to SET MENU To exit SET mode Press MENU button or select EXIT and press 3 8 button in the SET MENU When Simplified Chinese or Traditional Chinese is selected the...

Page 83: ...er press MENU button and 4 button to select ABOUT mode from Main Menu and then press 3 8 button to enter that mode To exit ABOUT mode Press MENU button Upgrading firmware version To upgrade the firmware of your player please visit our website Amount of memory installed Available memory space to store further music files ...

Page 84: ...mode from Main Menu and then press 3 8 button to enter that mode 2 Press 3 8 button to reset the unit All the settings are reset and RESET OK appears To cancel and exit RESET mode Press MENU button Default value of each SET MENU item EQ SET Normal PLAYMODE Normal SLEEP TIMER OFF A POWER OFF OFF BACKLIGHT 5 Sec CONTRAST Factory set level RECORD SET Bit Rate 128kbps A TRK ON LANGUAGE ENGLISH ...

Page 85: ...ppears in the upper right of the display To unlock Slide the HOLD switch to the left When the player is turned on with the HOLD switch set to ON position HOLD appears after the initial message DIGITAL AUDIO PLAYER Then the player automatically shuts off To use the player set the HOLD switch to OFF position and turn on the player again NOTE ...

Page 86: ...pacts Shorting the poles may cause heating bursting or start a fire Do not store the built in battery with a metal necklace or hairpin in a pocket Shorting the poles may cause heating bursting or start a fire Do not heat disassemble modify the built in battery or throw it into water or fire Bursting ignition or heat may cause a fire or injury Do not leave the built in battery near fire or in direc...

Page 87: ...n the side of the LINE IN jack with a screwdriver 4 Remove the top half of the casing by lifting it up 5 Remove the three screws shown in the illustration below 6 Hold the part shown in the illustration below and turn the circuit board over ...

Page 88: ...tery and place it in a plastic bag Using insulating tape cover each of the wires and stick them to the built in battery to prevent them from touching each other and place it in a plastic bag To replace the battery consult your dealer or JVC Service Center Do not reuse the battery once it has been removed The battery is designated recyclable Please follow your local recycling regulations NOTES ...

Page 89: ...d the end of its life Consult the JVC Service Center and replace it with a new one if necessary The player suddenly stops working Press the reset switch by inserting a thin object for example a pin or a straightened paperclip into the hole on the back of the player to turn the unit off and then turn the player back on Files and settings stored in the memory will not be deleted The display is too d...

Page 90: ...uilt in memory size 1 GB 512 MB Display LCD with backlighting 4 line display FM radio FM reception frequency 87 5 MHz to 108 0 MHz Wide band Frequency step 50 kHz FM recording ADPCM system Voice recording ADPCM system with built in monaural microphone Music playback format MP3 WMA WMA DRM 1 Bit rate MP3 8 kbps to 320 kbps WMA 32 kbps to 192 kbps Maximum number of tracks 2 Approx 500 Approx 250 Fre...

Page 91: ...47 SPECIFICATIONS ACCESSORIES Neck Strap Headphones USB cable CD ROM USB Driver for Windows 98SE Audio cable ...

Page 92: ... 2006 Victor Company of Japan Limited EN 0206KMMCREBET ...

Reviews: