background image

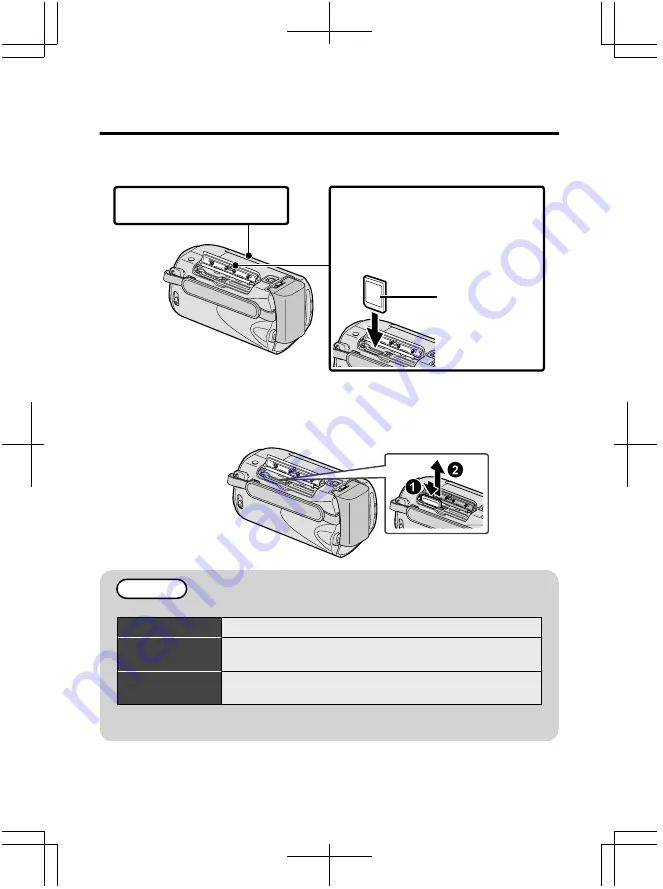
Introducción de una tarjeta SD

Si se introduce una tarjeta SD comercialmente disponible, se pueden realizar
grabaciones en la tarjeta sin que haya que detener el proceso cuando se agota el
tiempo de grabación restante en la memoria integrada.

.

1

Cierre el monitor LCD.

Etiqueta

3

Introduzca una tarjeta SD.

2

Abra la cubierta.

Apague la alimentación de esta

unidad antes de introducir o extraer
una tarjeta.

(base)

Para extraer la tarjeta

Presione la tarjeta hacia adentro y luego retírela hacia arriba.

.

(base)

NOTA

Se ha confirmado el funcionamiento con las siguientes tarjetas SD.

Fabricante

Panasonic, TOSHIBA, SanDisk, ATP

Vídeo

Tarjeta SDHC compatible de clase 4 o superior (de 4
GB a 32 GB)

Imagen fija

Tarjeta SD (de 256 MB a 2 GB), tarjeta SDHC (de 4 GB
a 32 GB)

El uso de otras tarjetas que no sean las indicadas anteriormente puede
provocar una falla en la grabación o la p

é

rdida de datos.

8

Para obtener más información, consulte la Guía detallada del usuario
http://manual.jvc.co.jp/index.html/

Summary of Contents for Everio GZ-MS230

Page 1: ...asic User Guide this manual and a Detailed User Guide Detailed User Guide Explains the ways of shooting in various situations and the useful features Access the following website on your PC http manual jvc co jp index html For Future Reference Enter the Model No located on the bottom of the camera and Serial No located on the battery pack mount of the camera below Model No Serial No Getting Starte...

Page 2: ... allow for ventilation 10 cm 3 15 16 or more on both sides on top and at the rear Do not block the ventilation holes If the ventilation holes are blocked by a newspaper or cloth etc the heat may not be able to get out No naked flame sources such as lighted candles should be placed on the apparatus When discarding batteries environmental problems must be considered and the local rules or laws govern...

Page 3: ...or storage JVC will not be responsible for any lost data Make a backup of important recorded data IMPORTANT SAFETY INSTRUCTIONS 1 Read these instructions 2 Keep these instructions 3 Heed all warnings 4 Follow all instructions 5 Do not use this apparatus near water 6 Clean only with dry cloth 7 Do not block any ventilation openings Install in accordance with the manufacturer s instructions 8 Do not...

Page 4: ... Troubleshooting 23 Cautions 25 Specifications 27 Learning About Advanced Operations Use the Detailed User Guide on your PC to find out more about the advanced operations Access the following address on your PC http manual jvc co jp index html Verifying the Accessories AC Adapter AP V30U Battery Pack BN VG107US USB Cable Type A Mini Type B AV Cable CD ROM Basic User Guide this manual Core Filter S...

Page 5: ...l image modes N UPLOAD EXPORT Upload Export to iTunes Button Recording Takes videos in YouTube or iTunes format Playback Changes the video to YouTube or iTunes format O Power Information Button Recording Displays the remaining time as well as the battery power during continuous recording Playback Displays file information Press and hold to turn the power on off while the LCD monitor is opened P AV...

Page 6: ...to use JVC battery packs If you use any other battery packs besides JVC battery packs safety and performance cannot be guaranteed Charging time Approx 1 h 50 m using supplied battery pack If the battery pack is charged outside the room temperature range of 10 C to 35 C charging may take a longer time or it may not start Attaching the Core Filter to the DC cord The core filter reduces interference ...

Page 7: ...rap and loop it around your wrist While pressing A pull B and remove the strap Press and hold When attaching the hand strap insert C until it clicks into place For more information refer to the Detailed User Guide http manual jvc co jp index html 7 Getting Started Recording Playback Copying Further Information ...

Page 8: ...erting or removing a card Base To remove the card Push the card inward once then pull it out straight Base NOTE Operations are confirmed on the following SD cards Manufacturer Panasonic TOSHIBA SanDisk ATP Video Class 4 or higher compatible SDHC card 4 GB to 32 GB Still Image SD card 256 MB to 2 GB SDHC card 4 GB to 32 GB Using cards other than those specified above may result in recording failure...

Page 9: ...Y SET QUIT 5 4 To use SD cards that have been used on other devices Format initialize the card using FORMAT SD CARD from media settings All data on the card will be deleted when it is formatted Copy all files on the card to a PC before formatting Touch to display the menu Select MEDIA SETTINGS with the slider and touch Select FORMAT SD CARD and touch MEDIA SETTINGS REC MEDIA FOR VIDEO REC MEDIA FO...

Page 10: ... the cursor 4 After setting the date and time touch 5 Select the region where you live and touch The city name and time difference is displayed GMT JAN 1 2009 10 00 AM CLOCK AREA SETTING SAVE QUIT NOTE Touch the slider and buttons around the screen with your fingers The slider and buttons do not function if you touch them with your fingernails or with gloves on The displays on the screen do not wo...

Page 11: ...me as steps 3 5 on the previous page To change the display language The language on the display can be changed Display the menu Touch Select DISPLAY SETTINGS and touch VIDEO DISPLAY SETTINGS CLOCK ADJUST BASIC SETTINGS CONNECTION SETTINGS SET QUIT 761 59 6 4 Select LANGUAGE and touch DISPLAY SETTINGS LANGUAGE DATE DISPLAY STYLE MONITOR BRIGHTNESS LCD BACKLIGHT SET QUIT Select the desired language ...

Page 12: ...tch The mode changes between auto and manual with every touch 4 Start recording Press again to stop Wide angle Telephoto Zooming 1Open the lens cover Indications during video recording Remaining Recording Time Video Quality Record Standby Scene Counter Recording in Progress Recording Media Battery Indicator NOTE The estimated recording time of the supplied battery pack is approximately 50 minutes ...

Page 13: ...le movement with the unit on a tripod Complete stabilization may not be possible if camera shake is excessive Still Image Recording AV Press fully Press halfway Press Lights up during still image recording 1 Select still image mode 3 Take a still image 2 Set the focus on the subject Lights up in green when focused Indications during still image recording 832 Remaining Number of Shots Image Quality...

Page 14: ...Select YES when the confirmation message appears and touch Media being played back To capture a still image during playback Pause the playback and press the SNAPSHOT button Usable operation buttons during playback Display During video playback During still image playback Playback pause Start pause slideshow Stop returns to thumbnail display Stop returns to thumbnail display Advances to the next vid...

Page 15: ... menu to ON Alternatively set ON SCREEN DISPLAY in the playback menu to DISPLAY ALL or DISPLAY DATE ONLY When images look unnatural on the TV Images do not appear on the TV properly Disconnect the cable and connect again Restart this unit by turning off and on Images are projected vertically on the TV Set VIDEO OUTPUT in the connection settings menu to 4 3 Images are projected horizontally on the ...

Page 16: ...writer is not supported Device Referen ce Page Dubbing Files by Connecting to a DVD Recorder or VCR DVD Recorder 3 3 3 P 17 VCR 3 P 17 Copying to PC 3 3 P 18 For details on how to create a disc using a computer refer to the Detailed User Guide Copying 16 For more information refer to the Detailed User Guide http manual jvc co jp index html ...

Page 17: ...the playback mode AV Press 3 Prepare to record Preparation on TV and VCR DVD recorder Switch to a compatible external input Insert compatible blank DVD or VHS to dub Preparation on this unit Set VIDEO OUTPUT in the connection settings menu to the aspect ratio 4 3 or 16 9 of the connecting TV To include the date during dubbing set DISPLAY ON TV in the connection settings menu to ON Alternatively se...

Page 18: ...em type 32 bit 64 bit Memory At least 1 GB 1024 MB Windows XP Windows XP Home Edition or Professional Pre installed versions only Service Pack 3 Processor Intel Core Duo CPU 1 5 GHz or higher Intel Pentium 4 CPU 1 6 GHz or higher Intel Pentium M CPU 1 4 GHz or higher Memory At least 512 MB NOTE If your PC does not meet the above system requirements the provided software cannot be used Still images...

Page 19: ...in Installing the Provided Software You can display the recorded images in calendar format and perform simple editing using the provided software 1 Load the provided CD ROM into your PC Windows Vista only Click Run INSTALL EXE in the auto play dialog box Click Continue on the user account control screen Software Setup appears after a while If it doesn t appear double click the CD ROM icon in My Co...

Page 20: ...PC The subsequent operations are to be performed on the PC 4 Select the volume 2 1 Click Click 5 Start backup Click Saving destination PC 6 After backup is complete click OK If you encounter any problems with the provided software Everio MediaBrowser please consult the Pixela User Support Center To disconnect this unit from the PC Click Safely Remove Hardware Click Safely Remove USB Mass Storage D...

Page 21: ...ady Product Name Model Serial Number Problem Error Message PC Manufacturer Model Desktop Laptop CPU OS Memory MB GB Available Hard Disk Space GB Please note that it may take some time to respond to your questions depending on their subject matter JVC cannot answer questions regarding basic operation of your PC or questions regarding specifications or performance of the OS other applications or driv...

Page 22: ...Video 640 480 4 3 FINE 1450 2930 5930 9999 STANDARD 2080 4180 8480 9999 640 360 16 9 FINE 1820 3660 7420 9999 STANDARD 2430 4880 9890 9999 Up to 9999 still images may be recorded on the SD cards with at least 4 GB capacity regardless of image size and quality Approximate Recording Time Using Battery Battery Pack Actual Recording Time Continuous Recording Time BN VG107US 50 m 1 h 30 m BN VG114US 1 ...

Page 23: ...e the AC adapter and battery pack from this unit reattach them and turn on the power again Trouble Trouble Action Page Power POWER CHARGE lamp starts blinking when the monitor is closed The battery pack is being charged P 6 Recording Recording cannot be performed Check the button P 12 Set to the recording mode with the button P 14 Recording stops by itself Turn off this unit wait for a while and t...

Page 24: ... unit heats up This is not a malfunction This unit may become warm when used for a long time Warning Indications Warning Indications Action Page RECORDING FAILURE Turn off and on this unit again P 10 UNSUPPORTED SCENE Video UNSUPPORTED FILE Still image Make use of a file recorded with this unit Files recorded with other devices may not be playable If the file was recorded with this unit then it is...

Page 25: ...r powered unit when not in use as some machines use current even when switched off ATTENTION The product you have purchased is powered by a rechargeable battery that is recyclable Please call 1 800 8 BATTERY for information on how to recycle this battery USA and Canada only Recording Medium Be sure to follow the guidelines below to prevent corruption or damage to your recorded data Do not bend or ...

Page 26: ... drops you may be injured and the camcorder may be damaged When a child uses the unit there must be parental guidance Declaration of Conformity Model Number GZ MS230BU RU AU GZ MS250BU Trade Name JVC Responsible party JVC AMERICAS CORP Address 1700 Valley Road Wayne N J 07470 Telephone Number 973 317 5000 This device complies with Part 15 of FCC Rules Operation is subject to the following two cond...

Page 27: ...namic zoom Up to 45x Digital zoom Up to 800x Zoom Still image Optical zoom Up to 39x Video recording format SD VIDEO standard Video MPEG 2 Audio Dolby Digital Still image recording format JPEG standard Recording media Built in Memory 8 GB SD SDHC card commercially available Built in Memory 32 GB SD SDHC card commercially available Clock battery Rechargeable battery AC Adapter AP V30U Power supply ...

Page 28: ...Time Setting 10 Deleting Files 14 Dubbing Duplicate 20 L Language Setting 11 LCD Monitor 25 M Mac 19 Menu Settings 21 N Number of Images 22 R Recordable Time 22 Recording Media for Image 9 S SD Card 8 22 Software 18 U USB Cable 20 V Viewing Files on TV 15 W Windows 18 Z Zoom 12 1009MNH SW VM US 2009 Victor Company of Japan Limited ...

Page 29: ... este manual y una Guía detallada del usuario Guía detallada del usuario Explican las formas de filmar en distintas situaciones y las funciones más útiles de la cámara Acceda a la siguiente página web desde su PC http manual jvc co jp index html Para futuras consultas Escriba a continuación el número de modelo situado en la base de la cámara y el número de serie situado en el compartimiento de la ...

Page 30: ...o ninguna fuente de llama sin protección tales como velas encendidas Cuando descarte las pilas deberá considerar los problemas ambientales y respetar estrictamente las normas locales o leyes vigentes para la eliminación de estas pilas La unidad no deberá ser expuesta a goteos ni salpicaduras No use esta unidad en un cuarto de baño o en lugares con agua Tampoco coloque ningún envase lleno de agua o...

Page 31: ...ia o humedad si no funciona normalmente o sufrió caídas Si este símbolo aparece sólo es válido en la Unión Europea Recuerde que esta cámara debe usarse únicamente para fines privados Está prohibido cualquier uso comercial sin la autorización correspondiente Aunque grabe acontecimientos tales como espectáculos o exhibiciones para su disfrute personal se recomienda que obtenga una autorización previa...

Page 32: ...lemas 23 Advertencias 25 Especificaciones 27 Funciones avanzadas Use la Guía detallada del usuario en su PC para obtener más información sobre las funciones avanzadas Acceda a la siguiente dirección web desde su PC http manual jvc co jp index html Comprobación de los accesorios Adaptador de CA AP V30U Batería BN VG107US Cable USB tipo A mini tipo B Cable AV CD ROM Guía básica del usuario este manu...

Page 33: ... Grabación Realiza vídeos en formato compatible con YouTube o iTunes Reproducción Modifica vídeos para que el formato sea compatible con YouTube o iTunes O Botón alimentación información Grabación Muestra el tiempo y carga de batería restantes durante la grabación continua Reproducción Muestra la información del archivo Mantenga presionado este botón para encender o apagar la alimentación siempre ...

Page 34: ...a alguna otra batería que no sea JVC no se pueden garantizar la seguridad ni el rendimiento del producto Tiempo de carga aprox 1 h 50 m utilizando la batería suministrada Si se carga la batería en un rango de temperatura ambiente que no se encuentre entre 10 C y 35 C la carga puede tardar más tiempo en realizarse o puede que no se inicie Montaje del filtro central al cable de CC El filtro central ...

Page 35: ...a y colóquela en su muñeca Mientras presiona A deslice hacia atrás B y retire la correa Mantenga presionado Al ajustar la correa de muñeca introduzca C hasta que se oiga un clic Para obtener más información consulte la Guía detallada del usuario http manual jvc co jp index html 7 Introducción Grabación Reproducción Copia Más información ...

Page 36: ...una tarjeta base Para extraer la tarjeta Presione la tarjeta hacia adentro y luego retírela hacia arriba base NOTA Se ha confirmado el funcionamiento con las siguientes tarjetas SD Fabricante Panasonic TOSHIBA SanDisk ATP Vídeo Tarjeta SDHC compatible de clase 4 o superior de 4 GB a 32 GB Imagen fija Tarjeta SD de 256 MB a 2 GB tarjeta SDHC de 4 GB a 32 GB El uso de otras tarjetas que no sean las ...

Page 37: ... han utilizado en otros dispositivos Formatee inicialice la tarjeta utilizando FORMATEAR TARJETA SD de los ajustes de soportes Si se formatea la tarjeta todos los datos incluidos en ella se eliminarán Realice una copia de todos los archivos a un PC antes de realizar el formateado Presione para ver el menú Seleccione CONFIG MEDIOS con el control deslizante y presione Seleccione FORMATEAR TARJETA SD...

Page 38: ...e funcionamiento para mover el cursor 4 Después de ajustar la fecha y hora presione 5 Seleccione la región en la que vive y presione Se mostrará el nombre de la ciudad y la diferencia horaria GMT JAN 1 2009 10 00AM CONFIGURACIÓN RELOJ ÁREA GUARDA SALIR NOTA Presione el control deslizante y los botones que rodean la pantalla con sus dedos El control deslizante y los botones no funcionan si los toca...

Page 39: ...anterior Para cambiar el idioma de visualización Se puede cambiar el idioma en el que se muestra la información de la pantalla Visualice el menú MENU OK Pulse Seleccione CONFIG PANTALLA y presione VÍDEO CONFIG PANTALLA AJUS RELOJ CONFIG BÁSICA CONFIG CONEXIÓN AJUSTE SALIR 761 1 4 Seleccione LANGUAGE y presione CONFIG PANTALLA LANGUAGE ESTILO INDIC FECHA BRILLO DEL MONITOR LUZ DE FONDO MONITOR AJUS...

Page 40: ...o y manual con cada pulsación 4 Inicie la grabación Presione nuevamente para detener la grabación gran angular telefoto Zoom 1Abra la cubierta de la lente Indicaciones durante la grabación de vídeo Tiempo restante de grabación Calidad de video Espera de grabación Contador de escenas Grabación en curso Indicador de batería Grabación de soportes NOTA El tiempo de grabación estimado de la batería sum...

Page 41: ... sobre un trípode Puede resultar imposible efectuar una estabilización completa si la vibración de la cámara es excesiva Grabación de imágenes fijas Presione completamente Presione hasta la mitad de su recorrido Pulse Se enciende durante la grabación de imágenes fijas 1Seleccione el modo de imágenes fijas 3Tome una imagen fija 2 Ajuste el enfoque del sujeto Se ilumina en verde cuando se ha centrad...

Page 42: ... SÍ cuando aparezca el mensaje de confirmación y presione Soporte en reproducción Para capturar una imagen fija durante una reproducción Ponga la reproducción en pausa y presione el botón SNAPSHOT Botones de funcionamiento habilitados durante la reproducción Visualización Durante la reproducción de vídeo Durante la reproducción de imágenes fijas Reproducción pausa Inicio pausa de presentación de d...

Page 43: ... ON Alternativamente ajuste DATOS EN PANTALLA del menú de reproducción en MOSTRAR TODO o MOSTRAR SÓLO FECHA Si las imágenes no se ven naturales en el televisor Las imágenes no aparecen en el televisor adecuadamente Desconecte el cable y vuelva a conectarlo Reinicie esta unidad apagándola y encendiéndola nuevamente Las imágenes se proyectan verticalmente en el televisor Ajuste SALIDA DE VÍDEO del m...

Page 44: ...e DVD Dispositivo Página de referencia Copia de archivos mediante la conexión a una grabadora de vídeo o DVD Grabadora de DVD 3 3 3 P 17 VCR 3 P 17 Copia a un PC 3 3 P 18 Para obtener información sobre cómo crear un disco utilizando un ordenador consulte la Guía detallada del usuario C o p i a 16 Para obtener más información consulte la Guía detallada del usuario http manual jvc co jp index html ...

Page 45: ...Seleccione el modo reproducción Pulse 3 Prepárese para la grabación Preparación del televisor y de la grabadora de vídeo o DVD Cambie a una entrada externa compatible Para realizar una copia introduzca un DVD o vídeocinta en blanco que sea compatible Preparación en esta unidad Ajuste SALIDA DE VÍDEO del menú de ajustes de conexión en la proporción de aspecto 4 3 o 16 9 del televisor Para incluir l...

Page 46: ...t 64 bit Memoria 1 GB 1024 MB como mínimo Windows XP Windows XP Home Edition o Professional solo versiones preinstaladas Service Pack 3 Procesador Intel Core Duo CPU 1 5 GHz o superior Intel Pentium 4 CPU 1 6 GHz o superior Intel Pentium M CPU 1 4 GHz o superior Memoria 512 MB como mínimo NOTA Si su PC no cumple con los requisitos del sistema mencionados no se puede utilizar el software proporcion...

Page 47: ...pueden visualizar las imágenes grabadas en formato calendario y realizar una edición sencilla utilizando el software proporcionado 1 Coloque el CD ROM proporcionado en su PC Windows Vista solo Haga clic en Ejecntar INSTALL EXE del cuadro de diálogo de reproducción automática Haga clic en Continuar de la pantalla de control de cuenta de usuario Software Setup aparece después de unos momentos Si no ...

Page 48: ... operaciones se deben realizar en el PC 4 Seleccione el volumen 2 1 Clic Clic 5 Inicie la copia de seguridad Clic Destino de almacenamiento PC 6 Después de que se haya completado la copia de seguridad haga clic en OK Si tuviera algún problema con el software proporcionado Everio MediaBrowser consulte con el Pixela centro de soporte al usuario Para desconectar a esta unidad del PC Haga clic en extr...

Page 49: ...ente información Nombre del producto modelo número de serie problema mensaje de error PC fabricante modelo sobremesa portátil CPU sistema operativo memoria MB espacio disponible en el disco duro GB Tenga en cuenta que puede tardar un poco responder a sus preguntas según cuál sea el asunto JVC no puede responder a preguntas relativas al funcionamiento básico del PC o a las especificaciones o el rend...

Page 50: ... 480 4 3 FINA 1450 2930 5930 9999 ESTÁNDAR 2080 4180 8480 9999 640 360 16 9 FINA 1820 3660 7420 9999 ESTÁNDAR 2430 4880 9890 9999 Se pueden grabar hasta 9999 imágenes fijas en las tarjetas SD con al menos 4 GB de capacidad independientemente del tamaño y calidad de la imagen Tiempo aproximado de grabación con batería Batería Tiempo real de grabación Tiempo continuo de grabación BN VG107US 50 m 1 h...

Page 51: ...la Apague la unidad cierre el monitor LCD Retire el adaptador de CA y la batería de esta unidad colóquelos nuevamente y encienda la alimentación Problema Problema Acción Página Alimentación La luz POWER CHARGE empieza a parpadear cuando el monitor está cerrado La batería se está cargando P 6 Grabación La grabación no puede realizarse Compruebe el botón P 12 Ajuste el modo grabación con el botón P ...

Page 52: ...al funcionamiento la temperatura de esta unidad puede subir si se utiliza durante un largo tiempo Indicaciones de advertencia Indicaciones de advertencia Acción Página ERROR DE GRABACIÓN Apague esta unidad y vuelva a encenderla P 10 ESCENA INCOMPATIBLE Vídeo ARCHIVO INCOMPAT Imagen fija Utilice un archivo grabado con esta unidad es posible que los archivos grabados con otros dispositivos no se pue...

Page 53: ...scargar totalmente la batería cada seis meses cuando se guarde durante un periodo de tiempo prolongado cuando no se utilice se debe retirar del cargador o dispositivo eléctrico ya que algunas máquinas utilizan corriente incluso estando apagadas ATENCIÓN La batería que ha adquirido es reciclable Por favor comunicarse al 1 800 8 BATTERY para información sobre como reciclar dicha batería Sólo para EE...

Page 54: ...dad se caiga Ajuste bien la correa de mano Si utiliza la cámara con un trípode fije bien la cámara en el trípode Si se le cae la cámara puede herirse usted y dañarse la cámara Si un niño utiliza la unidad un adulto deberá guiarle Declaración de conformidad Número de modelo GZ MS230BU RU AU GZ MS250BU Nombre comercial JVC Parte responsable JVC AMERICAS CORP Dirección 1700 Valley Road Wayne N J 07470...

Page 55: ...ta 39x Zoom dinámico hasta 45x Zoom digital hasta 800x Zoom imagen fija Zoom óptico hasta 39x Formato de grabación de vídeo SD VIDEO estándar Vídeo MPEG 2 Audio Dolby Digital Formato de grabación de imágenes fijas JPEG estándar Grabación de soportes Memoria integrada 8 GB tarjeta SD SDHC disponible comercialmente Memoria integrada 32 GB tarjeta SD SDHC disponible comercialmente Batería del reloj B...

Page 56: ...figuración del reloj 11 Copia copia de seguridad 16 17 20 D Dubbing Duplicate 20 E Eliminación de archivos 14 M Mac 19 Monitor LCD 25 N Número de imágenes 22 S Software 18 Soporte de grabación para imagen 9 T Tarjeta SD 8 22 Tiempo de grabación 22 V Visualización de archivos en un televisor 15 W Windows 18 Z Zoom 12 1009MNH SW VM US 2009 Victor Company of Japan Limited ...

Reviews: