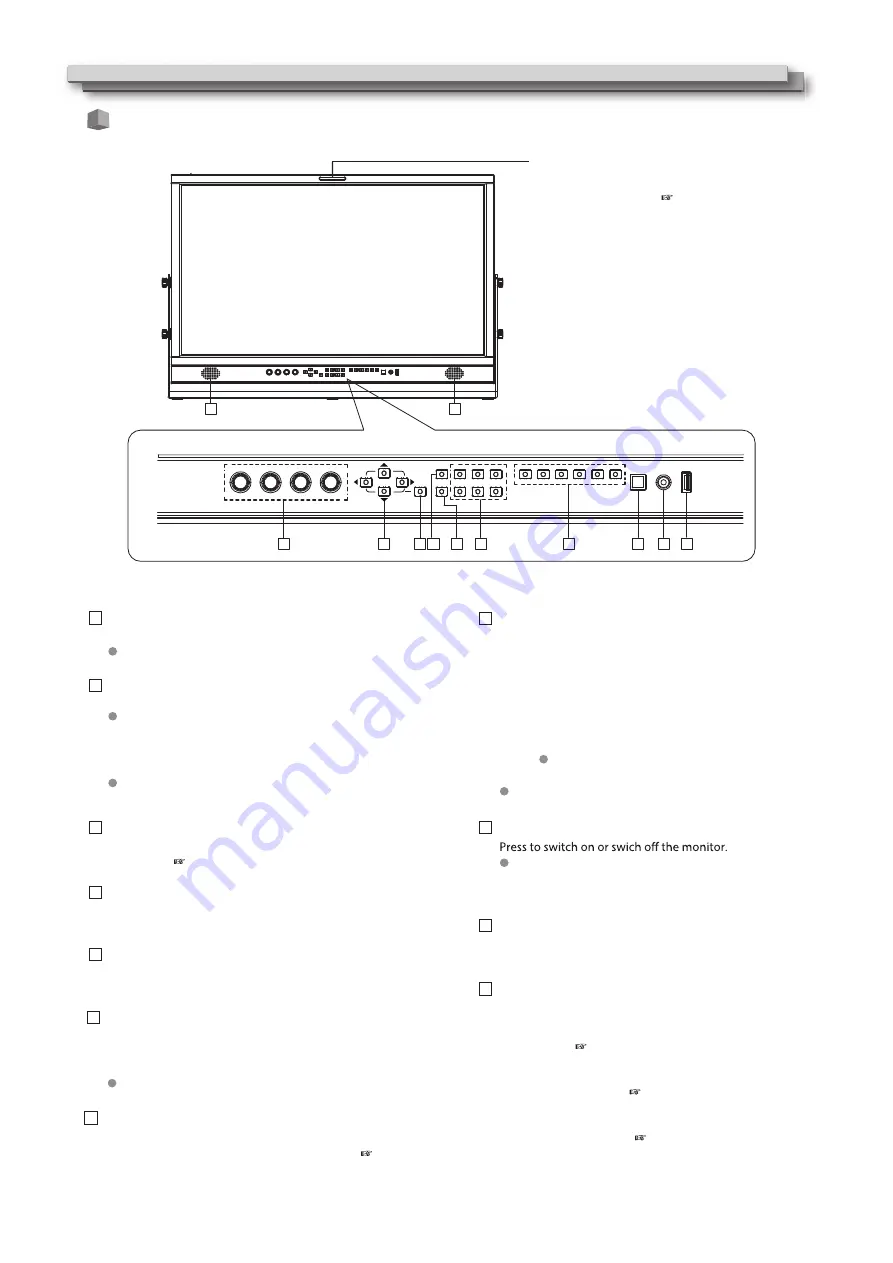
1. Firmware upgrade:
Plug in USB stick with firmware, operate Menu to upgrade
the monitor. ( page 19.)
2. User 3DLUT upload:
Plug in USB stick with user created LUTs, operate Menu to
upload to the monitor. ( page 11.)
3. Auto calibration:
Plug in color sensor probe into the USB port, operate Menu
to start auto calibration. ( page 12.)
8
Index of Parts and Functionos (cont.)
Speaker:
For SDI/HDMI embedded audio monitoring.
The speaker will not work if earphone is plugged in.
Rotary knobs
:
VOLUME: Adjust the sound volume from 0-100.
Press down the VOLUME knob, the volume will be 0 (mute).
CHROMA: Adjusts the picture chroma from -100 to +100.
BRIGHT: Adjusts the picture brightness from -100 to +100.
CONTRAST
:
Adjusts the picture contrast from -100 to +100.
Press down the BRIGHT/CONTRAST/SATURATION knobs,
the parameters will recover to default value 0.
Direction Keys:
Includes Up, Down, Left, Right 4 direction keys for Menu
operation. ( page 10.)
Menu Key:
Press to switch on Menu system and operate by direction
keys.
WFM Key:
Press to swtich on/off the Waveform scope.
FUNCTION Keys
Provide F1 / F2 / F3 / F4 / F5 / F6 function keys to assign
monitor functions and switch on/off quickly. ( page 19.)
INPUT SELECTION keys
Select input sources directly:
- SDI 1 / SFP: Press to switch to the SDI IN-1 terminal input,
Press again to switch to SFP terminal input.
- SDI 2: Press to switch to the SDI IN-2 terminal input.
- SDI 3: Press to switch to the SDI IN-3 terminal input.
- SDI 4: Press to switch to the SDI IN-4 terminal input.
- 4x3G: Press to switch to Quad-link 4x3G SDI 2SI interleave mode,
Press again to switch to 4x3G SDI Quad split mode.
The 4x3G source requires inputs of all SDI IN1,2,3,4.
- HDMI: Press to switch to HDMI terminal input.
The key light will indicate the current input source.
POWER ON/OFF
The standby power consumption is less than 0.5W, comply
with ErP rules. To complete cut off power, please switch off the
AC input switcher or disconnect DC cable.
PHONE jack
3.5mm earphone socket, for SDI/HDMI embedded audio
monitoring.
USB LUT
Front panel
Tally lamp
This lamp is controlled by the tally function of the
Make contact terminal. ( Page 16.)
You can select the color of the tally lamp from
"Green", "Red", or "Yellow".
1
2
3
4
5
INFO Key
Press to switch on/off all the on screen overlay
informations, includes video scopes, audio meters,
UMD, timecode, markers etc.
Press INFO can quit Menu system at any time.
6
7
8
9
10
11
1
1
2
3
4 5
6
7
8
9
10 11


