background image

36

Using the Surround/DSP modes

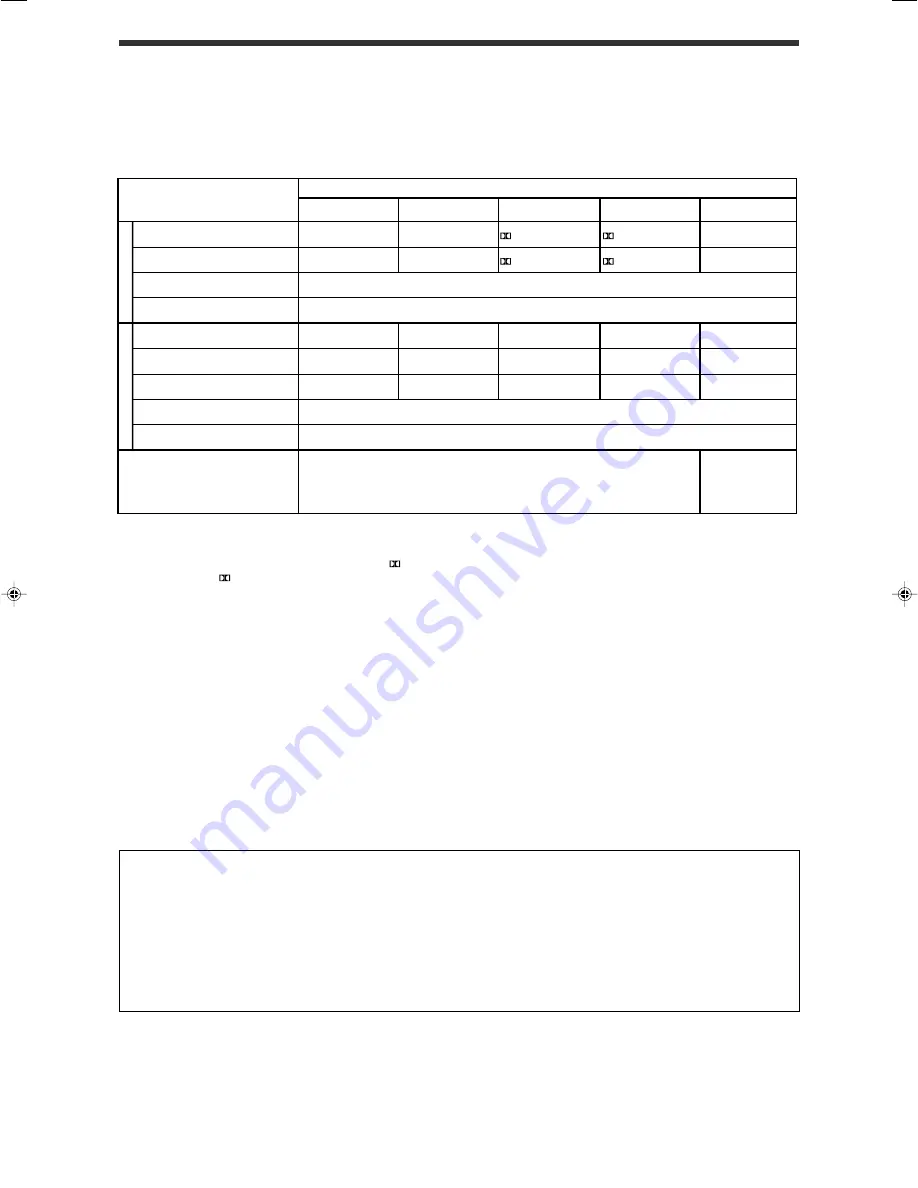
Available Surround/DSP modes vary depending on the speaker settings and the incoming signals. See the table below.
• The numbers inside the parentheses following the incoming signal type indicate the number of the front channels and that of the

surround channels. For example, (3/2) indicates that the signals are encoded with three front signals (left/right/center) and two (stereo)
surround signals.

• For EX/ES/PLIIx setting, see page 24.

EX/ES/PLIIx setting

AUTO

ON

PLIIx MOVIE

PLIIx MUSIC

OFF

Dolby Digital Surround EX

DOLBY D EX

*

3,5

DOLBY D EX

*

3

 D+PLIIx MOVIE

*

2,3

 D+PLIIx MUSIC

*

3

DOLBY DIGITAL

Dolby Digital (3/2, 2/2)

DOLBY DIGITAL

DOLBY D EX

*

3

 D+PLIIx MOVIE

*

2,3

 D+PLIIx MUSIC

*

3

DOLBY DIGITAL

Dolby Digital (3/1, 2/1, 3/0, 1/0)

DOLBY DIGITAL

Dolby Digital (Dual Mono)

DUAL MONO

DTS-ES Discrete

*

1

DTS-ES DSCRT

*

3

DTS-ES DSCRT

*

3

DTS+PLIIx MOVIE

*

2,3

DTS+PLIIx MUSIC

*

3

DTS SURROUND

DTS-ES Matrix

*

1

DTS-ES MATRIX

*

3

DTS-ES MATRIX

*

3

DTS+PLIIx MOVIE

*

2,3

DTS+PLIIx MUSIC

*

3

DTS SURROUND

DTS (3/2, 2/2)

*

1

DTS SURROUND

DTS+NEO:6

*

3

DTS+PLIIx MOVIE

*

2,3

DTS+PLIIx MUSIC

*

3

DTS SURROUND

DTS (3/1, 2/1, 3/0, 1/0)

DTS

DTS (Dual Mono)

DUAL MONO

Incoming Signal  Type

PLIIx MOVIE

*

4

/

PLIIx MUSIC

*

4

/

PLIIx GAME

*

4

/

NEO:6 CINEMA/

NEO:6 MUSIC

Analog/LINEAR PCM

Dolby Digital (2/0)

Dolb

y Digital

DTS

*

1

DTS 96/24 processing is not applied when the EX/ES/PLIIx setting is activated. If you want to apply the processing, set the EX/ES/
PLIIx setting to “OFF” (see page 24).

*

2

When “S BACK OUT” is set to “SB OUT 

<

1SPK

>

,” 

 D+PLIIx MOVIE is changed to DOLBY D EX and DTS+PLIIx MOVIE is

changed to DTS+

 EX.

*

3

When “S BACK SPK” is set to “

<

NO

>

,” Virtual Surround Back is activated for the modes and the VIRTUAL SB indicator lights up on

the display.

*

4

When “S BACK SPK” is set to “

<

NO

>

,” PLllx MOVIE, PLllx MUSIC, and PLllx GAME are changed to PLll MOVIE, PLll MUSIC, and

PLll GAME respectively.

*

5

For some Dolby Digital Surround EX software, Dolby Digital 5.1-channel reproduction (“DOLBY DIGITAL”) may be applied even
though you have selected “

<

AUTO

>

”. In this case, select “

<

ON

>


to apply


“DOLBY D EX.”

Virtual Surround Back

This function creates the great surround effect from the behind as if you have connected the surround back speaker. The VIRTUAL
SB (Surround Back) indicator lights up on the display.
If you have connected (and activated) the surround speakers, you can use Virtual Surround Back without connecting the surround
back speaker.
Virtual Surround Back is activated when EX/ES/PLIIx is set to other than “

<

OFF

>

” and when playing back the software including the

following signals:

– Dolby Digital Surround EX
– DTS-ES
– Dolby Digital or DTS with 4-channels or more

About the DSP modes

• The following DSP modes are available regardless of incoming signal type.

HALL1, HALL2, LIVE CLUB, DANCE CLUB, PAVILION, THEATER1, THEATER2

• If an incoming signal is a multi-channel (more than 2 channel) digital signal, “MONO FILM” is not available.
• If “SURROUND SPK” is set to “

<

NO

>

,” “ALL CH STEREO” is not available.

PLII MOVIE/
PLII MUSIC/

PLII GAME/

NEO:6 CINEMA/

NEO:6 MUSIC

33-37RX-D401S[J]_f.p65

05.7.1, 7:09 PM

36

Summary of Contents for D402B - AV Receiver

Page 1: ...2B AUDIO VIDEO CONTROL RECEIVER INSTRUCTIONS For Customer Use Enter below the Model No and Serial No which are located either on the rear bottom or side of the cabinet Retain this information for future reference Model No Serial No ...

Page 2: ...le ground shall be connected to the grounding system of the building as close to the point of cable entry as practical For U S A Declaration of Conformity Trade Name JVC Model Number RX D401S RX D402B This device complies with Part 15 of the FCC Rules Operation is subject to the following two conditions 1 This device may not cause harmful interference 2 This device must accept any interference rec...

Page 3: ...AP Digital Acoustic Processor Sound field simulation technology allows precise ambience recreation of existing theatres and halls Thanks to the high performance DSP Digital Signal Processor and high capacity memory you can enjoy 7 1 channel surround by playing 2 channel or multi channel software DCDi technology DCDi Directional Correlational Deinterlacing technology developed by Faroudja eliminate...

Page 4: ... MODE 25 Setting the digital input DIGITAL IN terminals DIGITAL IN 1 2 3 25 Setting the Audio delay level AUDIO DELAY 26 Memorizing the volume level for each source ONE TOUCH OP 26 Selecting the source for HDMI terminal and COMPONENT VIDEO jacks HDMI SELECT CMPNT SELECT 26 Selecting the output video signals VIDEO OUTPUT 26 Sound adjustments 27 Basic adjustment items 27 Operating procedure 27 Adjus...

Page 5: ...tton 16 w DECODE MODE button 18 e EX ES PLIIx button 24 r Adjusting buttons for Digital Equalizer 28 D EQ FREQ D EQ LEVEL t Adjusting buttons for Surround DSP modes parameters C center TONE EFFECT LIVENESS 29 30 y Adjusting buttons for speaker and subwoofer output levels 28 FRONT L FRONT R CENTER SUBWFR SURR L SURR R S BACK L S BACK R u SURROUND button 37 i VOLUME button 17 o DVR DVD mode selector...

Page 6: ...tor 26 0 INPUT ATT attenuate indicator 29 SLEEP indicator 19 Digital signal format indicators 18 33 34 DIGITAL AUTO LINEAR PCM 96 24 Signal and speaker indicators 19 NEO 6 indicator 34 VIRTUAL SB indicator 36 3D PHONIC indicator 34 35 DSP indicator 35 and indicator 33 36 Main display B bass BOOST indicator 29 MIDNIGHT indicator 25 Frequency unit indicators MHz for FM stations kHz for AM stations D...

Page 7: ... OUT REC DVR OUT REC q DVD MULTI IN jacks 11 CENTER SUBWOOFER SURR L SURR R w Speakers terminals 8 SURROUND BACK SPEAKERS SURROUND SPEAKERS CENTER SPEAKER FRONT SPEAKERS AV COMPU LINK III Y PB PR COMPONENT VIDEO VIDEO AUDIO MONITOR OUT DVR DVD IN TV IN DBS IN OUT REC IN PLAY VCR DVR OUT REC DVR DVD IN PLAY VCR DBS IN MONITOR OUT DVR OUT REC VCR OUT REC IN PLAY DBS IN DVR DVD IN PLAY VIDEO S VIDEO ...

Page 8: ...at is level and protected from moisture and dust The temperature around the receiver must be between 5 C and 35 C 23 F and 95 F Make sure there is good ventilation around the receiver Poor ventilation could cause overheating and damage the receiver Leave sufficient distance between the receiver and the TV Handling the receiver Do not insert any metal object into the receiver Do not disassemble the...

Page 9: ...n If the reception is poor connect an outdoor single vinyl covered wire not supplied to the AM EXT terminal Keep the AM loop antenna connected FM antenna connection Connect the FM antenna supplied to the FM 75 Ω COAXIAL terminal as a temporary measure Extend the supplied FM antenna horizontally If the reception is poor connect an outdoor FM antenna not supplied Before attaching a 75 Ω coaxial cabl...

Page 10: ...anel to the and terminals marked on the speakers 3 Close the terminal When using a single speaker for the surround back speaker You can enjoy the surround sound by one surround back speaker When using one surround back speaker set S BACK OUT to SB OUT 1SPK see page 23 and connect the surround back speaker to the left surround back speaker terminal No sound comes from the speaker if you connect it ...

Page 11: ...h input video signals converted into HDMI signals the playback picture may be distorted when you change the playback mode fast forward rewind or pause for example When connecting a VCR or DBS to HDMI VCR DBS IN terminal select HDMI SELECT see page 26 correctly according to the component you connect If you do not you cannot view the playback picture on the TV By using a HDMI DVI conversion cable yo...

Page 12: ...igital sound if using a digital coaxial or optical cable When shipped from the factory the digital coaxial terminal DIGITAL IN 1 DVR DVD on the rear of the receiver is set for a DVD recorder and DVD player For details of digital audio connection see page 14 DO NOT use a TV through a VCR or a TV with a built in VCR otherwise the picture may be distorted CAUTION If you connect a sound enhancing devi...

Page 13: ...deo input Ô Only for DVD recorder To composite video input When you enjoy sound recorded in DVD Audio You can enjoy sound recorded in DVD Audio both with analog or digital methods With analog method connect your DVD recorder or DVD player to this receiver according to the diagram above select A MULTI setting for AUDIO INPUT See pages 16 and 17 With digital method connect your DVD recorder or DVD p...

Page 14: ...plied S video cable not supplied Red Green Blue Red VCR NOTES Select the audio and video input setting according to the connection method See pages 16 and 17 for details When connecting a VCR to the component video input jacks select CMPNT SELECT see page 26 to VCR If you do not you cannot view the playback picture on the TV or the AV COMPU LINK remote control system see page 38 cannot operate pro...

Page 15: ...nnect the AC power plug to the wall outlet until all connections are completed Red Green Blue Component video cable not supplied Å To left right audio channel output ı To component video output Connect Y PB and PR correctly Ç To composite video output Î To S video output NOTES Select the audio input setting according to the connection method See pages 16 and 17 for details You can enjoy digital so...

Page 16: ...not supplied Before connecting a digital optical cable unplug the protective plug NOTES The digital signal format transmitted through the DIGITAL OUT terminal is the same as that of the input signal For example when the DTS signals are input the DTS signals are transmitted The digital signal coming through the USB terminal and HDMI input terminal cannot be output from the DIGITAL OUT terminal 7 Di...

Page 17: ... game controllers Universal Serial Bus controllers The following window appears and you can check if the drivers are installed Now PC is ready for playback through the USB connection After installation is completed you can use your PC as the playback source The PC automatically recognizes the receiver whenever a USB cable is connected between the PC and the receiver while the receiver is turned on...

Page 18: ... turn off the power into standby Press STANDBY ON or AUDIO on the remote control again The standby lamp lights in red NOTE A small amount of power is consumed in standby mode To turn the power off completely unplug the AC power cord L S WFR R AUTO SURR TUNED STEREO AUTOMUTING MHz ANALOG L S WFR R AUTO SURR TUNED STEREO AUTOMUTING MHz ANALOG DVR DVD VCR DBS TV FM AM Back to the beginning USB 1 2 3 ...

Page 19: ... audio connection using the terminals on the rear of the receiver you also need to select the correct digital input terminal See Setting the digital input DIGITAL IN terminals DIGITAL IN 1 2 3 on page 25 From the remote control ONLY Press AUDIO INPUT to select the audio input setting Each time you press the button the audio input setting changes as follows This setting is memorized for each source...

Page 20: ...en Linear PCM signal comes in When the multi channel PCM signal comes in MULTI CH PCM appears on the display for a while Lights up when Dolby Digital signal comes in Flashes when DOLBY DIGITAL is selected for any software other than Dolby Digital Lights up when conventional DTS signal comes in Flashes when DTS is selected for any software other than DTS 96 24 Lights up when DTS 96 24 signal comes ...

Page 21: ...ES When A MULTI is selected in AUDIO INPUT setting see pages 16 and 17 all the signal indicators except SB S and LFE light up When playing back multi channel digital sound recorded in DVD Audio with HDMI connection see pages 9 16 and 17 the signal indicators may not light up correctly The speaker indicators light up as follows The subwoofer indicator S WFR lights up when SUBWOOFER is set to SUBWFR...

Page 22: ...nected speakers speaker channel number As you press 2 3 button the speaker channel number changes as follows On the front panel turn MULTI JOG For the details of speaker channel number see Speakers channels number and the size on page 21 7 0ch is the initial setting 4 Press SET 5 Press 2 3 button repeatedly to select an appropriate room size to match to your listening room As you press 2 3 button ...

Page 23: ... 22 SURROUND SPK Register your surround speaker size 22 S BACK SPK Register your surround back speaker size 22 S BACK OUT Register the number of your surround back speaker s 23 DIST UNIT Select the measuring unit for the speaker distance 23 FRONT L DIST Register the distance from the left front speaker to your listening point 23 FRONT R DIST Register the distance from the right front speaker to yo...

Page 24: ...cted a subwoofer Selecting this changes the front speaker size to LRG see below Initial setting SUBWFR NO Setting the speaker size FRONT SPK front speakers CENTER SPK center speaker SURROUND SPK surround speakers S BACK SPK surround back speakers Register the sizes of all the connected speakers LRG large Select when the cone speaker size is larger than 12 cm 4 3 4 inches SML small Select when the ...

Page 25: ...n S BACK SPK is set to NO you cannot select S BACK OUT When S BACK OUT is set to SB OUT 1SPK connect the surround back speaker to the left surround back speaker terminal see page 8 No sound comes from the surround back speaker if you connect it to the right surround back speaker terminal Setting the speaker distance The distance from your listening point to the speakers is one of the important ele...

Page 26: ...o mode see page 34 which includes two monaural channels separately When the receiver detects Dual mono signals the DUAL MONO indicator lights up on the display D MONO MAIN Select to play back the main channel Ch 1 Signal indicator L lights up while playing back this channel D MONO SUB Select to play back the sub channel Ch 2 Signal indicator R lights up while playing back this channel D MONO ALL S...

Page 27: ...NOTE Crossover frequency is not valid for the HEADPHONE and 3D HEADPHONE modes Setting the low frequency effect attenuator LFE ATT If the bass sound is distorted while playing back software encoded with Dolby Digital or DTS set the LFE level to eliminate distortion This function takes effect only when the LFE signals come in LFE 0dB Normally select this LFE 10dB Select when the bass sound is disto...

Page 28: ...om the display Selecting the source for HDMI terminal and COMPONENT VIDEO jacks HDMI SELECT CMPNT SELECT When you connect a VCR or DBS to the VCR DBS IN terminal in HDMI terminal or COMPONENT VIDEO jacks on the rear of the receiver you need to select either VCR or DBS according to the component you connect If you have not selected appropriate source you cannot view the playback picture on the TV F...

Page 29: ...ENSION Adjust sound localization pattern 30 CENTER GAIN Adjust the sound localization of the center channel 30 CENTER TONE 1 Make the center tone soft or sharp 30 CENTER ALIGN Align the vertical localization of the center channel signals 30 1 You can adjust these items directly from the remote control 2 If you have used Quick Speaker Setup on page 20 these settings are not required NOTE Some items...

Page 30: ...heck the speakers output balance TEST L starts flashing on the display and a test tone comes out of the speakers clockwise You can adjust the speaker output levels without the test tone 2 Adjust the speaker output levels Press the or button corresponding to the speaker you want to adjust 3 Press TEST again to stop the test tone NOTES No test tone comes out of the speakers for which the speaker set...

Page 31: ...ve made an adjustment it is memorized for each DSP mode Adjustable range 1 to 5 in 1 step intervals Initial setting EFFECT 3 As the number increases the effect becomes stronger Normally select 3 From the remote control Press EFFECT repeatedly to select the level you want to adjust Adjusting the virtual room size for DSP modes ROOM SIZE This setting is available only when one of the DSP modes excep...

Page 32: ...n 1 step intervals Initial setting DIMENSION 4 As the number increases the sound localization moves towards forward from backward Normally select 4 Adjusting the sound localization of the center channel CENTER GAIN This setting is available only when Neo 6 Music is in use If CENTER SPK is set to NO see page 22 this item is not adjustable Once you have made an adjustment it is memorized until you c...

Page 33: ...et stations Before you start remember There is a time limit in doing the following steps If the setting is canceled before you finish start from step 2 again From the remote control ONLY 1 Tune in to the station you want to preset see Tuning in to stations manually above If you want to store the FM reception mode for this station select the FM reception mode you want See Selecting the FM reception...

Page 34: ...d station of the selected band is tuned in 2 Press TUNER PRESET P appears on the display and MULTI JOG now works for selecting preset channels 3 Turn MULTI JOG to select a preset channel number To increase the preset channel numbers turn MULTI JOG clockwise To decrease the preset channel numbers turn MULTI JOG counterclockwise Selecting the FM reception mode When an FM stereo broadcast is hard to ...

Page 35: ...by Digital EX Dolby Digital EX DOLBY D EX is a digital surround encoding format that adds the third surround channels called surround back Compared to the conventional Dolby Digital 5 1CH these newly added surround back channels can reproduce more detailed movements behind you while viewing the video software In addition surround sound localization will become more stable Dolby Surround Dolby Pro ...

Page 36: ...o 7 1 channel or 6 1 channel that developed from Dolby Pro Logic II The matrix based conversion method used for Dolby Pro Logic IIx makes no limitation for the cutoff frequency of the surround treble This receiver provides three types of Dolby Pro Logic IIx modes Pro Logic IIx Movie PLIIx MOVIE Pro Logic IIx Music PLIIx MUSIC and Pro Logic IIx Game PLIIx GAME When Dolby Pro Logic IIx is activated ...

Page 37: ...ed while playing back 2 channel analog or digital source the built in Dolby Pro Logic II decoder is activated and the indicator lights up Early reflections Direct sounds Reflections from behind When using the DAP mode the sounds come out of all the connected and activated speakers If SURROUND SPK is set to NO in the speaker setting see page 22 JVC s original 3D PHONIC processing which has been dev...

Page 38: ...e processing set the EX ES PLIIx setting to OFF see page 24 2 When S BACK OUT is set to SB OUT 1SPK D PLIIx MOVIE is changed to DOLBY D EX and DTS PLIIx MOVIE is changed to DTS EX 3 When S BACK SPK is set to NO Virtual Surround Back is activated for the modes and the VIRTUAL SB indicator lights up on the display 4 When S BACK SPK is set to NO PLllx MOVIE PLllx MUSIC and PLllx GAME are changed to P...

Page 39: ...e speaker settings and the incoming signals For details see page 36 Activating one of the Surround DSP modes automatically recalls the memorized settings and adjustments To adjust the speaker output level see page 28 When activating one of the Surround DSP modes you can adjust CENTER TONE see page 30 When activating one of the Surround DSP modes except PLIIx MUSIC PLII MUSIC NEO 6 MUSIC and ALL CH...

Page 40: ...you need to connect the video components to this receiver using one of the following three ways When using the AV COMPU LINK remote control system set the video output and video input setting for the DVD player and the VCR correctly see Selecting the video input setting on page 16 and Selecting the output video signals VIDEO OUTPUT on page 26 otherwise the correct input for this receiver will not ...

Page 41: ... have already plugged your VCR DVD player TV and this receiver into the AC outlets unplug their AC power cords first 2 Connect your VCR DVD player TV and this receiver as follows using the cables with the monaural mini plugs not supplied See Connections 1 on the previous page 3 Connect the audio input output jacks on the VCR DVD player TV and this receiver using the audio cables See pages 10 to 13...

Page 42: ...s You can always perform the following operations TV Turn on or off the TV TV VOL Adjust the volume on the TV TV VIDEO Change the input mode either video input or TV tuner on the TV After pressing TV you can perform the following operations on the TV CHANNEL Change the channel numbers 1 9 0 100 10 Select the channel numbers RETURN 10 Switch between the previous channel and the current channel 7 VC...

Page 43: ...item etc If these buttons do not function normally use the remote control supplied with your DVD recorder or DVD player Refer also to the manuals supplied with the DVD recorder or DVD player for details After setting the mode selector correctly you can perform the following operations on the DVD recorder or DVD player See the instructions supplied with the DVD recorder or DVD player for details 7 ...

Page 44: ...either TV or VIDEO After pressing TV you can perform the following operations on the TV CHANNEL Change the channel numbers 1 9 0 100 10 Select the channel numbers See the instructions supplied with the TV for details 5 Try to operate your TV by pressing TV When your TV turns on or off you have entered the correct code If more than one code is listed for your brand of TV try each one until the corr...

Page 45: ...ctions supplied with the VCR for details 5 Try to operate your VCR by pressing VCR When your VCR turns on or off you have entered the correct code If more than one code is listed for your brand of VCR try each one until the correct one is entered Manufacturers codes for VCR Manufacturers codes are subject to change without notice If they are changed this remote control cannot operate the equipment...

Page 46: ...ner by pressing DBS CATV When your CATV converter or DBS tuner turns on or off you have entered the correct code If more than one code is listed for your brand of CATV converter or DBS tuner try each one until the correct one is entered Changing the transmittable signals for operating a DVD player 1 Set the mode selector to DVD 2 Press and hold DVR DVD 3 Press DVR DVD 4 Enter the manufacturer s co...

Page 47: ...correct A video or audio format not compatible with this receiver and or TV is played A HDCP compatible TV is not connected The receiver failed to recognize HDMI connected components A HDMI cable longer than 5 m 15 ft is used SOLUTION Plug the power cord into an AC outlet 1 Stop the playback source 2 Turn on the receiver again then turn the volume down Check the speaker wiring If speaker wiring is...

Page 48: ...oming signal is too weak The station is too far away The wrong antenna is being used Antennas are not connected properly Ignition noise from automobiles Set the mode selector correctly then press the corresponding source selecting button before operation Remove the obstruction Replace batteries Set the mode selector to the proper position Connect an outdoor FM antenna or contact your dealer Select...

Page 49: ...HF 78 IHF 80 dB 62 dB Frequency Response 6 Ω 20 Hz to 20 kHz 1 dB Bass Boost 4 dB 1 dB at 100 Hz Equalization at DSP operation Center frequency 63 Hz 250 Hz 1 kHz 4 kHz 16 kHz Control range 8 dB Specifications Video Video Input Sensitivity Impedance Composite video DVR DVD VCR DBS 1 V p p 75 Ω S video DVR DVD VCR DBS Y luminance 1 V p p 75 Ω C chrominance burst 0 286 V p p 75 Ω Component DVR DVD V...

Page 50: ......

Page 51: ......

Page 52: ...0705RYMMDWJEIN EN 2005 Victor Company of Japan Limited AUDIO VIDEO CONTROL RECEIVER RX D401S RX D402B ...

Reviews: