background image

16

Using the Cassette Deck (Listening to a Tape)

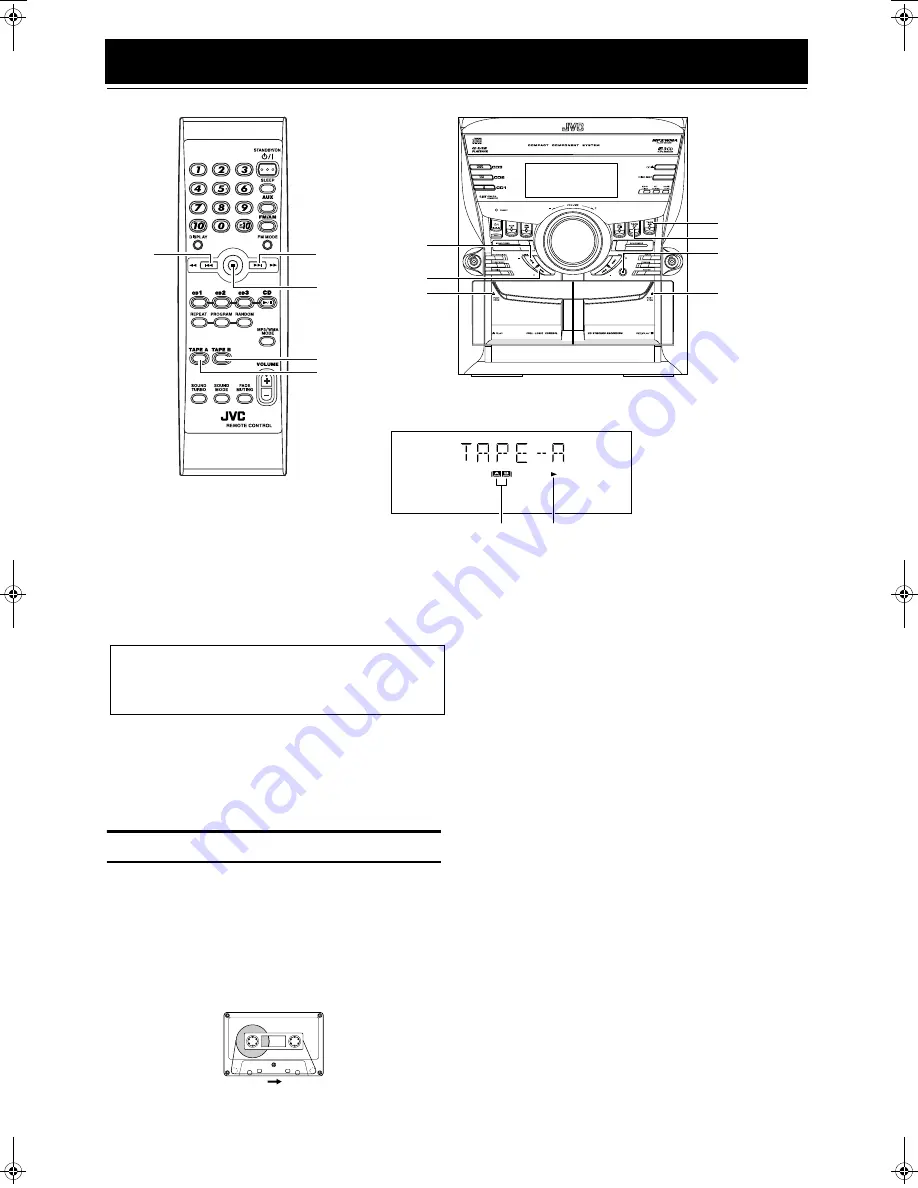
The Cassette Deck allows you to play, record, and dub audio tapes.

Listening to type I tape is suitable for this Cassette Deck.

The use of tapes longer than 120minutes (including
120 minute tapes) is not recommended, since char-
acteristic deterioration may occur and these tapes
easily jam in the pinch-rollers and the capstans.

One Touch Play

By pressing the TAPE A 

3

 or TAPE B 

3

 button, the System will

come on, and if a tape is in the deck, it will start to play. If no tape
is loaded in either Deck A or Deck B, “NO TAPE” appears on the
display, the System will come on and wait for you to insert a tape,
or select another function.

Playing a Tape

You can use either Deck A or Deck B at a time for playback.

1

Press the 

0

 PUSH OPEN part for the deck

you want to use.

2

When the cassette holder opens, put a cas-
sette in, with the exposed part of the tape
down, toward the base of the Unit.

The tape will travel from the left to right.

3

Press 

0

 PUSH OPEN gently to close the cas-

sette holder.

The Deck indicator “A” or “B” lights up on the display.

4

Press the TAPE A 

3

 or TAPE B 

3

 button.

The Tape indicator (

3

) blinks on the display and the tape is

played back.
The Cassette Deck automatically stops when one side of the
tape has finished playing.

To stop playing

, press the 

7

 button.

To remove the tape

, stop the tape, and press the 

0

 PUSH

OPEN part to open the Cassette Holder.

To Fast-Wind a Tape

During playback or in Stop mode, press the 

Á

 (FF) button on the

Unit to fast-wind the tape onto the right side of the cassette without
playing. (You can also use the 

¢

 button on the Remote Control.)

During playback or in Stop mode, press the 

22

 (REW) button on

the Unit to fast-wind the tape onto the left side of the cassette with-
out playing. (You can also use the 

4

 button on the Remote Con-

trol.)
During fast-winding the tape, the Tape indicator (

3

) goes out.

During fast-winding, the status bar illumination at the bottom of
the display moves counterclockwise. 
During rewinding, it moves clockwise.
• The Cassette Deck automatically stops when one side of the

tape has finished playing.

During fast-winding the tape, you can change the tape travelling
direction by pressing the 

Á

 (FF) or 

22

 (REW) button. 

TAPE A

Á

* When the System is in use, the display shows other items as well.

For simplicity, we show here only the items described in this section.

22

4

TAPE B

¢

7

7

TAPE B 

3

TAPE A 

3

Deck indicators

3

: Tape indicator

0

 PUSH OPEN

(Deck A)

0

 PUSH OPEN 

(Deck B)

Tape travelling direction

MX-KC45(J)_EN.book  Page 16  Wednesday, January 11, 2006  3:21 PM

Summary of Contents for CA-MXKC45

Page 1: ...which are located either on the rear bot tom or side of the cabinet Retain this information for future reference Model No Serial No LVT1521 001A J COMPACT COMPONENT SYSTEM MX KC45 Consists of CA MXKC45 and SP MXKC45 CA MXKC45 SP MXKC45 SP MXKC45 INSTRUCTIONS ...

Page 2: ...of important operating and mainte nance servicing instructions in the literature accompanying the appliance INFORMATION This equipment has been tested and found to com ply with the limits for a Class B digital device pursu ant to Part 15 of the FCC Rules These limits are designed to provide reasonable protection against harmful interference in a residential installation This equipment generates us...

Page 3: ...entilation sont bloqués par un journal un tissu etc la chaleur pent ne pas être évacuée correctement de l appareil 2 Ne placez aucune source de flamme nue telle qu une bougie sur l appareil 3 Lors de la mise au rebut des piles veuillez prendre en con sidération les problèmes de l environnement et suivre stricte ment les règles et les lois locales sur la mise au rebut des piles 4 N exposez pas cet ...

Page 4: ... recorder The CD Player can play back a CD R and CD RW How This Manual Is Organized Basic information that is the same for many different functions e g setting the volume is given in the section Basic Operations and not repeated under each function The names of buttons controls and display messages are written in all capital letters e g FM AM NO DISC If the button names on the Unit and the Remote ...

Page 5: ...ing the Tuner 9 Tuning In a Station 9 Presetting Stations 10 To Change the FM Reception Mode 10 Using the CD Player 11 To Load CDs 12 To Unload CDs 12 Changing the MP3 WMA Playback Mode 12 Basics of Using the CD Player Normal Play 13 Resume Play for Audio CD and MP3 WMA Disc 14 Programming the Playing Order of the Tracks 14 Random Play 15 Repeating Tracks 15 Tray Lock Function 15 Using the Cassett...

Page 6: ...TION Handle batteries properly To avoid battery leakage or explosion Remove batteries when the Remote Control will not be used for a long time When you need to replace the batteries replace both batteries at the same time with new ones Do not use an old battery with a new one Do not use different types of batteries together Using the Remote Control The Remote Control makes it easy to use many of t...

Page 7: ...e Connector Not supplied A 75Ω antenna with coaxial type connector IEC or DIN45 325 should be connected to the FM 75Ω COAXIAL terminal If reception is poor connect the outdoor antenna Before attaching a 75 ohm coaxial lead the kind with a round wire going to an outdoor antenna disconnect the supplied FM Wire Antenna FM wire antenna Coaxial cable FM outdoor antenna Not supplied ...

Page 8: ...ystem Connect the gray and gray with black stripe cords of the left side speaker to the red and black terminals marked LEFT on the System 3 Close each of the terminals CAUTIONS A TV may display irregular colors if located near the speakers If this happens set the speakers away from the TV Use speakers with the correct impedance only The correct impedance is indicated on the rear panel AM loop ante...

Page 9: ...e for 2 minutes To cancel this auto DEMO display function press the CANCEL button on the Unit during DEMO display COMPU Play JVC s COMPU PLAY feature lets you control the most frequently used System functions with a single touch With One Touch Operation you can play a CD a tape turn on the radio or listen to an external equipment with a single press of the play button for that function One Touch O...

Page 10: ...ediately ECO Mode ECO The System has three energy modes power on power off Stand by and ECO In ECO mode the display goes off and the least power is consumed To enter ECO mode press the ECO button on the Unit in Stand by mode while the STANDBY indicator lights up ECO MODE appears on the display then the display goes off The STANDBY indicator remains lit To cancel ECO mode and turn on the power pres...

Page 11: ...w frequencies are highly boosted To get the effect press the SOUND TURBO button The SOUND TURBO indicator lights up and S TURBO appears on the display To cancel the effect press the button again The SOUND TURBO indicator goes out and OFF appears on the display Selecting the Sound Mode SOUND MODE You can select one of 3 SEA Sound Effect Amplifier modes You can use this effect only for playback To g...

Page 12: ...n to move from frequency to frequency until you find the station you want OR Auto Tuning If you hold down the 22 or Á button for 1 second or more and then release it the frequency changes down or up automatically until a station is found OR Preset Tuning Possible only after presetting sta tions Preset tuning using the Unit Select the preset number you want using the 4 or button Example Press the b...

Page 13: ...ds the display returns to the band frequency display 6 Repeat above steps 2 to 5 for each station you want to store in memory with a preset number To change the preset stations repeat the same steps as above In step 4 you can select the preset number using the nu meric keys on the Remote Control See Entering the Number with the Remote Control on page 8 CAUTION Even if the System is unplugged or if...

Page 14: ...WMA discs either CD R or CD RW require a longer readout time It varies due to the complexity of the re cording configuration When making an MP3 WMA disc select ISO 9660 Level 1 or Level 2 as the disc format This unit does not support multisession recording This unit can play MP3 WMA files only with the following file extensions mp3 and wma Non MP3 WMA files are ignored If non MP3 WMA files are rec...

Page 15: ... the CD Open Close 0 button on the Unit to open the tray 2 Remove the CD then press the DISC SKIP button on the Unit The tray turns for the next CD 3 Repeat step 2 to remove all the CDs 4 Press the CD Open Close 0 button on the Unit to close the tray You can remove CDs while listening to the other source Tips Removing changing the CDs during playback While playing back a CD e g CD1 you can remove ...

Page 16: ...ct the track you want to play except for MP3 WMA GROUP mode By pressing the button you can skip to the next track or skip back to the previous track The selected track starts playing Press the button once to skip to the beginning of the next track Press the 4 button to skip to the beginning of the current track Press twice quickly to skip to the beginning of the previ ous track In Stop mode By bri...

Page 17: ...f the Disc button CD1 CD3 to select the CD you want to program The display will change to the Program Entry display 4 Select the track you want to program On the Unit While the display is blinking press the 4 or button on the Unit to select the track then press the SET button within 5 seconds The program order number will be assigned from P 1 On the Remote Control Press the numeric keys to directl...

Page 18: ...epeat all tracks or individual track as many times as you like Press the REPEAT button The Repeat indicator changes with each press of the button as fol lows REPEAT 1 REPEAT 1DISC REPEAT ALL Normal dis play Normal Play back to the beginning In Program Play mode the Repeat indicator changes with each press of the REPEAT button as follows REPEATï Blank display It repeats all the tracks in the progra...

Page 19: ...blinks on the display and the tape is played back The Cassette Deck automatically stops when one side of the tape has finished playing To stop playing press the 7 button To remove the tape stop the tape and press the 0 PUSH OPEN part to open the Cassette Holder To Fast Wind a Tape During playback or in Stop mode press the Á FF button on the Unit to fast wind the tape onto the right side of the cas...

Page 20: ...ing you can adjust the sound you are actually listening to without affecting the recording level Two small tabs on the back of the cassette tape one for side A and one for side B can be removed to prevent accidental erasure or recording To record on a cassette with the tabs removed you must cover the holes with adhesive tape first Type I tape can be used for recording At the start and end of casse...

Page 21: ...ape into the Deck B and wind past the tape leader 3 Press the CD REC START button on the Unit CD REC appears on the display and the REC indicator lights up Then the System begins CD Synchro Recording and the tracks on the CD are recorded on the tape When recording of the tracks of all CDs is finished the CD Player and Cassette Deck stop If the tab of the cassette tape on the Deck B is removed to p...

Page 22: ...rly connect ed to the System See page 6 1 Set the volume level to the minimum posi tion 2 Press the AUX button AUX IN appears on the display 3 Start playing the external equipment 4 Adjust the volume level to the level you want listen to 5 Apply the following sound effects if you wish SOUND TURBO See page 8 SOUND MODE See page 8 For operation of the external equipment refer to its In structions AU...

Page 23: ...the SET button CLOCK OK appears on the display Then the selected time is set and the seconds start counting from 0 Fixing the Clock On the Unit 1 Press the STANDBY ON button to turn on the System 2 Press the CLOCK TIMER button repeatedly until clock setting display time indication appears on the display Each time you press the button display changes as follows DAILY ON TIME REC ON TIME Clock Setti...

Page 24: ... then press the SET button The minute digits of the ON time blink on the display Pressing the button moves the time forwards and press ing the 4 button moves it backwards Holding down the button moves the time rapidly 2 Press the or 4 button to set the minute then press the SET button OFF TIME appears and then the System enters OFF time setting mode The current OFF time appears on the display and ...

Page 25: ...1 Press the CLOCK TIMER button on the Unit repeatedly until the DAILY appears on the display 2 Press the CANCEL button on the Unit OFF appears and both the Timer indicator and the DAILY indicator go out To activate the cancelled Daily Timer 1 Press the CLOCK TIMER button on the Unit repeatedly until the DAILY appears on the display The DAILY indicator blinks and the Timer indicator lights up on th...

Page 26: ...o select the volume level MIN 1 30 or MAX When the timer is turned on the Volume will be automatically set to the selected level 7 Press the SET button The timer setting is completed and the display returns to the display before you set the Timer 8 Press the STANDBY ON button to turn off the System if necessary The Timer indicator and REC indicator are lit on the display showing that the Rec Timer...

Page 27: ...minutes you have set To Confirm the Sleep Time When the SLEEP button on the Remote Control is pressed the re maining sleep time is displayed Wait until the display returns to the original display To Cancel the SLEEP Timer Setting Press the SLEEP button until OFF appears on the display Turning off the System also cancels the SLEEP Timer When the REC Timer or the DAILY Timer is operating SLEEP Timer...

Page 28: ...ontinuous sound Fading Incomplete erasure Difficulty recording Clean the heads capstans and pinch rollers using a cotton swab moistened with alcohol If the heads become magnetized the Unit will produce noise or lose high frequencies To demagnetize the heads turn off the Unit and use a head demagnetizer available at electronics and record shops Remove the CD from its case by holding it at the edges...

Page 29: ... MP3 WMA disc does not play No MP3 WMA files are recorded on the disc MP3 WMA files do not have the file extension wma or mp3 in thier file names MP3 WMA files are not recorded in the format compliant with ISO 9660 Level 1 or Level 2 Replace the disc The readout time of the MP3 WMA disc is too long The readout time varies with the com plexity of the recording configuration Do not use too many hier...

Page 30: ......

Page 31: ......

Page 32: ...ge 530 kHz 1 710 kHz Unit Dimensions 270 mm 307 mm 492mm W H D 10 11 16 12 1 8 19 3 8 Mass Approx 9 3 kg 20 5 lbs Speaker Specifications each unit SP MXKC45 Type 3 way bass reflex type Speaker Unit Woofer 16 cm 6 5 16 cone 1 Mid 5cm 2 cone 1 Tweeter 2 cm 13 16 dome 1 Power Handling Capacity 200 W Impedance 6 Ω Frequency Range 45 Hz 22 000 Hz Sound pressure level 87 dB W m Dimensions 220 mm 324 mm ...

Page 33: ...LVT1521 002A C COMPACT COMPONENT SYSTEM SYSTEME DE COMPOSANTS COMPACT SP MXKC45 CA MXKC45 CA MXKC45 INSTRUCTIONS MANUEL D INSTRUCTIONS MX KC45 Consists of CA MXKC45 and SP MXKC45 Se compose de CA MXKC45 et de SP MXKC45 ...

Page 34: ...of important operating and mainte nance servicing instructions in the literature accompanying the appliance INFORMATION This equipment has been tested and found to com ply with the limits for a Class B digital device pursu ant to Part 15 of the FCC Rules These limits are designed to provide reasonable protection against harmful interference in a residential installation This equipment generates us...

Page 35: ...fices ou les trous de ventilation sont bloqués par un journal un tissu etc la chaleur pent ne pas être évacuée correctement de l appareil 2 Ne placez aucune source de flamme nue telle qu une bougie sur l appareil 3 Lors de la mise au rebut des piles veuillez prendre en con sidération les problèmes de l environnement et suivre stricte ment les règles et les lois locales sur la mise au rebut des pil...

Page 36: ...uch as an MD recorder The CD Player can play back a CD R and CD RW How This Manual Is Organized Basic information that is the same for many different functions e g setting the volume is given in the section Basic Operations and not repeated under each function The names of buttons controls and display messages are written in all capital letters e g FM AM NO DISC If the button names on the Unit and...

Page 37: ...lay 8 Using the Tuner 9 Tuning In a Station 9 Presetting Stations 10 To Change the FM Reception Mode 10 Using the CD Player 11 To Load CDs 12 To Unload CDs 12 Changing the MP3 WMA Playback Mode 12 Basics of Using the CD Player Normal Play 13 Resume Play for Audio CD and MP3 WMA Disc 14 Programming the Playing Order of the Tracks 14 Random Play 15 Repeating Tracks 15 Tray Lock Function 15 Using the...

Page 38: ...ment CAUTION Handle batteries properly To avoid battery leakage or explosion Remove batteries when the Remote Control will not be used for a long time When you need to replace the batteries replace both batteries at the same time with new ones Do not use an old battery with a new one Do not use different types of batteries together Using the Remote Control The Remote Control makes it easy to use m...

Page 39: ... Type Connector Not supplied A 75Ω antenna with coaxial type connector IEC or DIN45 325 should be connected to the FM 75Ω COAXIAL terminal If reception is poor connect the outdoor antenna Before attaching a 75 ohm coaxial lead the kind with a round wire going to an outdoor antenna disconnect the supplied FM Wire Antenna FM wire antenna Coaxial cable FM outdoor antenna Not supplied ...

Page 40: ...he System Connect the gray and gray with black stripe cords of the left side speaker to the red and black terminals marked LEFT on the System 3 Close each of the terminals CAUTIONS A TV may display irregular colors if located near the speakers If this happens set the speakers away from the TV Use speakers with the correct impedance only The correct impedance is indicated on the rear panel AM loop ...

Page 41: ... made for 2 minutes To cancel this auto DEMO display function press the CANCEL button on the Unit during DEMO display COMPU Play JVC s COMPU PLAY feature lets you control the most frequently used System functions with a single touch With One Touch Operation you can play a CD a tape turn on the radio or listen to an external equipment with a single press of the play button for that function One Tou...

Page 42: ... immediately ECO Mode ECO The System has three energy modes power on power off Stand by and ECO In ECO mode the display goes off and the least power is consumed To enter ECO mode press the ECO button on the Unit in Stand by mode while the STANDBY indicator lights up ECO MODE appears on the display then the display goes off The STANDBY indicator remains lit To cancel ECO mode and turn on the power ...

Page 43: ...d low frequencies are highly boosted To get the effect press the SOUND TURBO button The SOUND TURBO indicator lights up and S TURBO appears on the display To cancel the effect press the button again The SOUND TURBO indicator goes out and OFF appears on the display Selecting the Sound Mode SOUND MODE You can select one of 3 SEA Sound Effect Amplifier modes You can use this effect only for playback ...

Page 44: ...utton to move from frequency to frequency until you find the station you want OR Auto Tuning If you hold down the 22 or Á button for 1 second or more and then release it the frequency changes down or up automatically until a station is found OR Preset Tuning Possible only after presetting sta tions Preset tuning using the Unit Select the preset number you want using the 4 or button Example Press t...

Page 45: ...econds the display returns to the band frequency display 6 Repeat above steps 2 to 5 for each station you want to store in memory with a preset number To change the preset stations repeat the same steps as above In step 4 you can select the preset number using the nu meric keys on the Remote Control See Entering the Number with the Remote Control on page 8 CAUTION Even if the System is unplugged o...

Page 46: ...MP3 WMA discs either CD R or CD RW require a longer readout time It varies due to the complexity of the re cording configuration When making an MP3 WMA disc select ISO 9660 Level 1 or Level 2 as the disc format This unit does not support multisession recording This unit can play MP3 WMA files only with the following file extensions mp3 and wma Non MP3 WMA files are ignored If non MP3 WMA files are...

Page 47: ...ess the CD Open Close 0 button on the Unit to open the tray 2 Remove the CD then press the DISC SKIP button on the Unit The tray turns for the next CD 3 Repeat step 2 to remove all the CDs 4 Press the CD Open Close 0 button on the Unit to close the tray You can remove CDs while listening to the other source Tips Removing changing the CDs during playback While playing back a CD e g CD1 you can remo...

Page 48: ...select the track you want to play except for MP3 WMA GROUP mode By pressing the button you can skip to the next track or skip back to the previous track The selected track starts playing Press the button once to skip to the beginning of the next track Press the 4 button to skip to the beginning of the current track Press twice quickly to skip to the beginning of the previ ous track In Stop mode By...

Page 49: ...ne of the Disc button CD1 CD3 to select the CD you want to program The display will change to the Program Entry display 4 Select the track you want to program On the Unit While the display is blinking press the 4 or button on the Unit to select the track then press the SET button within 5 seconds The program order number will be assigned from P 1 On the Remote Control Press the numeric keys to dir...

Page 50: ...an repeat all tracks or individual track as many times as you like Press the REPEAT button The Repeat indicator changes with each press of the button as fol lows REPEAT 1 REPEAT 1DISC REPEAT ALL Normal dis play Normal Play back to the beginning In Program Play mode the Repeat indicator changes with each press of the REPEAT button as follows REPEATï Blank display It repeats all the tracks in the pr...

Page 51: ...r 3 blinks on the display and the tape is played back The Cassette Deck automatically stops when one side of the tape has finished playing To stop playing press the 7 button To remove the tape stop the tape and press the 0 PUSH OPEN part to open the Cassette Holder To Fast Wind a Tape During playback or in Stop mode press the Á FF button on the Unit to fast wind the tape onto the right side of the...

Page 52: ...e recording level Two small tabs on the back of the cassette tape one for side A and one for side B can be removed to prevent accidental erasure or recording To record on a cassette with the tabs removed you must cover the holes with adhesive tape first Type I tape can be used for recording At the start and end of cassette tapes there is leader tape which cannot be recorded onto Thus when recordin...

Page 53: ...le tape into the Deck B and wind past the tape leader 3 Press the CD REC START button on the Unit CD REC appears on the display and the REC indicator lights up Then the System begins CD Synchro Recording and the tracks on the CD are recorded on the tape When recording of the tracks of all CDs is finished the CD Player and Cassette Deck stop If the tab of the cassette tape on the Deck B is removed ...

Page 54: ...roperly connect ed to the System See page 6 1 Set the volume level to the minimum posi tion 2 Press the AUX button AUX IN appears on the display 3 Start playing the external equipment 4 Adjust the volume level to the level you want listen to 5 Apply the following sound effects if you wish SOUND TURBO See page 8 SOUND MODE See page 8 For operation of the external equipment refer to its In struction...

Page 55: ...ess the SET button CLOCK OK appears on the display Then the selected time is set and the seconds start counting from 0 Fixing the Clock On the Unit 1 Press the STANDBY ON button to turn on the System 2 Press the CLOCK TIMER button repeatedly until clock setting display time indication appears on the display Each time you press the button display changes as follows DAILY ON TIME REC ON TIME Clock S...

Page 56: ...e on then press the SET button The minute digits of the ON time blink on the display Pressing the button moves the time forwards and press ing the 4 button moves it backwards Holding down the button moves the time rapidly 2 Press the or 4 button to set the minute then press the SET button OFF TIME appears and then the System enters OFF time setting mode The current OFF time appears on the display ...

Page 57: ...ily 1 Press the CLOCK TIMER button on the Unit repeatedly until the DAILY appears on the display 2 Press the CANCEL button on the Unit OFF appears and both the Timer indicator and the DAILY indicator go out To activate the cancelled Daily Timer 1 Press the CLOCK TIMER button on the Unit repeatedly until the DAILY appears on the display The DAILY indicator blinks and the Timer indicator lights up o...

Page 58: ...on to select the volume level MIN 1 30 or MAX When the timer is turned on the Volume will be automatically set to the selected level 7 Press the SET button The timer setting is completed and the display returns to the display before you set the Timer 8 Press the STANDBY ON button to turn off the System if necessary The Timer indicator and REC indicator are lit on the display showing that the Rec T...

Page 59: ... of minutes you have set To Confirm the Sleep Time When the SLEEP button on the Remote Control is pressed the re maining sleep time is displayed Wait until the display returns to the original display To Cancel the SLEEP Timer Setting Press the SLEEP button until OFF appears on the display Turning off the System also cancels the SLEEP Timer When the REC Timer or the DAILY Timer is operating SLEEP T...

Page 60: ...Discontinuous sound Fading Incomplete erasure Difficulty recording Clean the heads capstans and pinch rollers using a cotton swab moistened with alcohol If the heads become magnetized the Unit will produce noise or lose high frequencies To demagnetize the heads turn off the Unit and use a head demagnetizer available at electronics and record shops Remove the CD from its case by holding it at the e...

Page 61: ... cord was un plugged Plug in the power cord and turn on the System Unable to record Cassette record protect tabs are removed Cover holes on back edge of cassette with tape Unable to operate the Remote Control The path between the Remote Control and the sensor on the Unit is blocked The batteries have lost their charge Remove the obstruction Replace the batteries Operations are disabled The built i...

Page 62: ...0206NYMCREBET EN FR 2006 Victor Company of Japan Limited MX KC45 COMPACT COMPONENT SYSTEM ...

Reviews: